TadreebLMS User Guide
1. Admin Dashboard
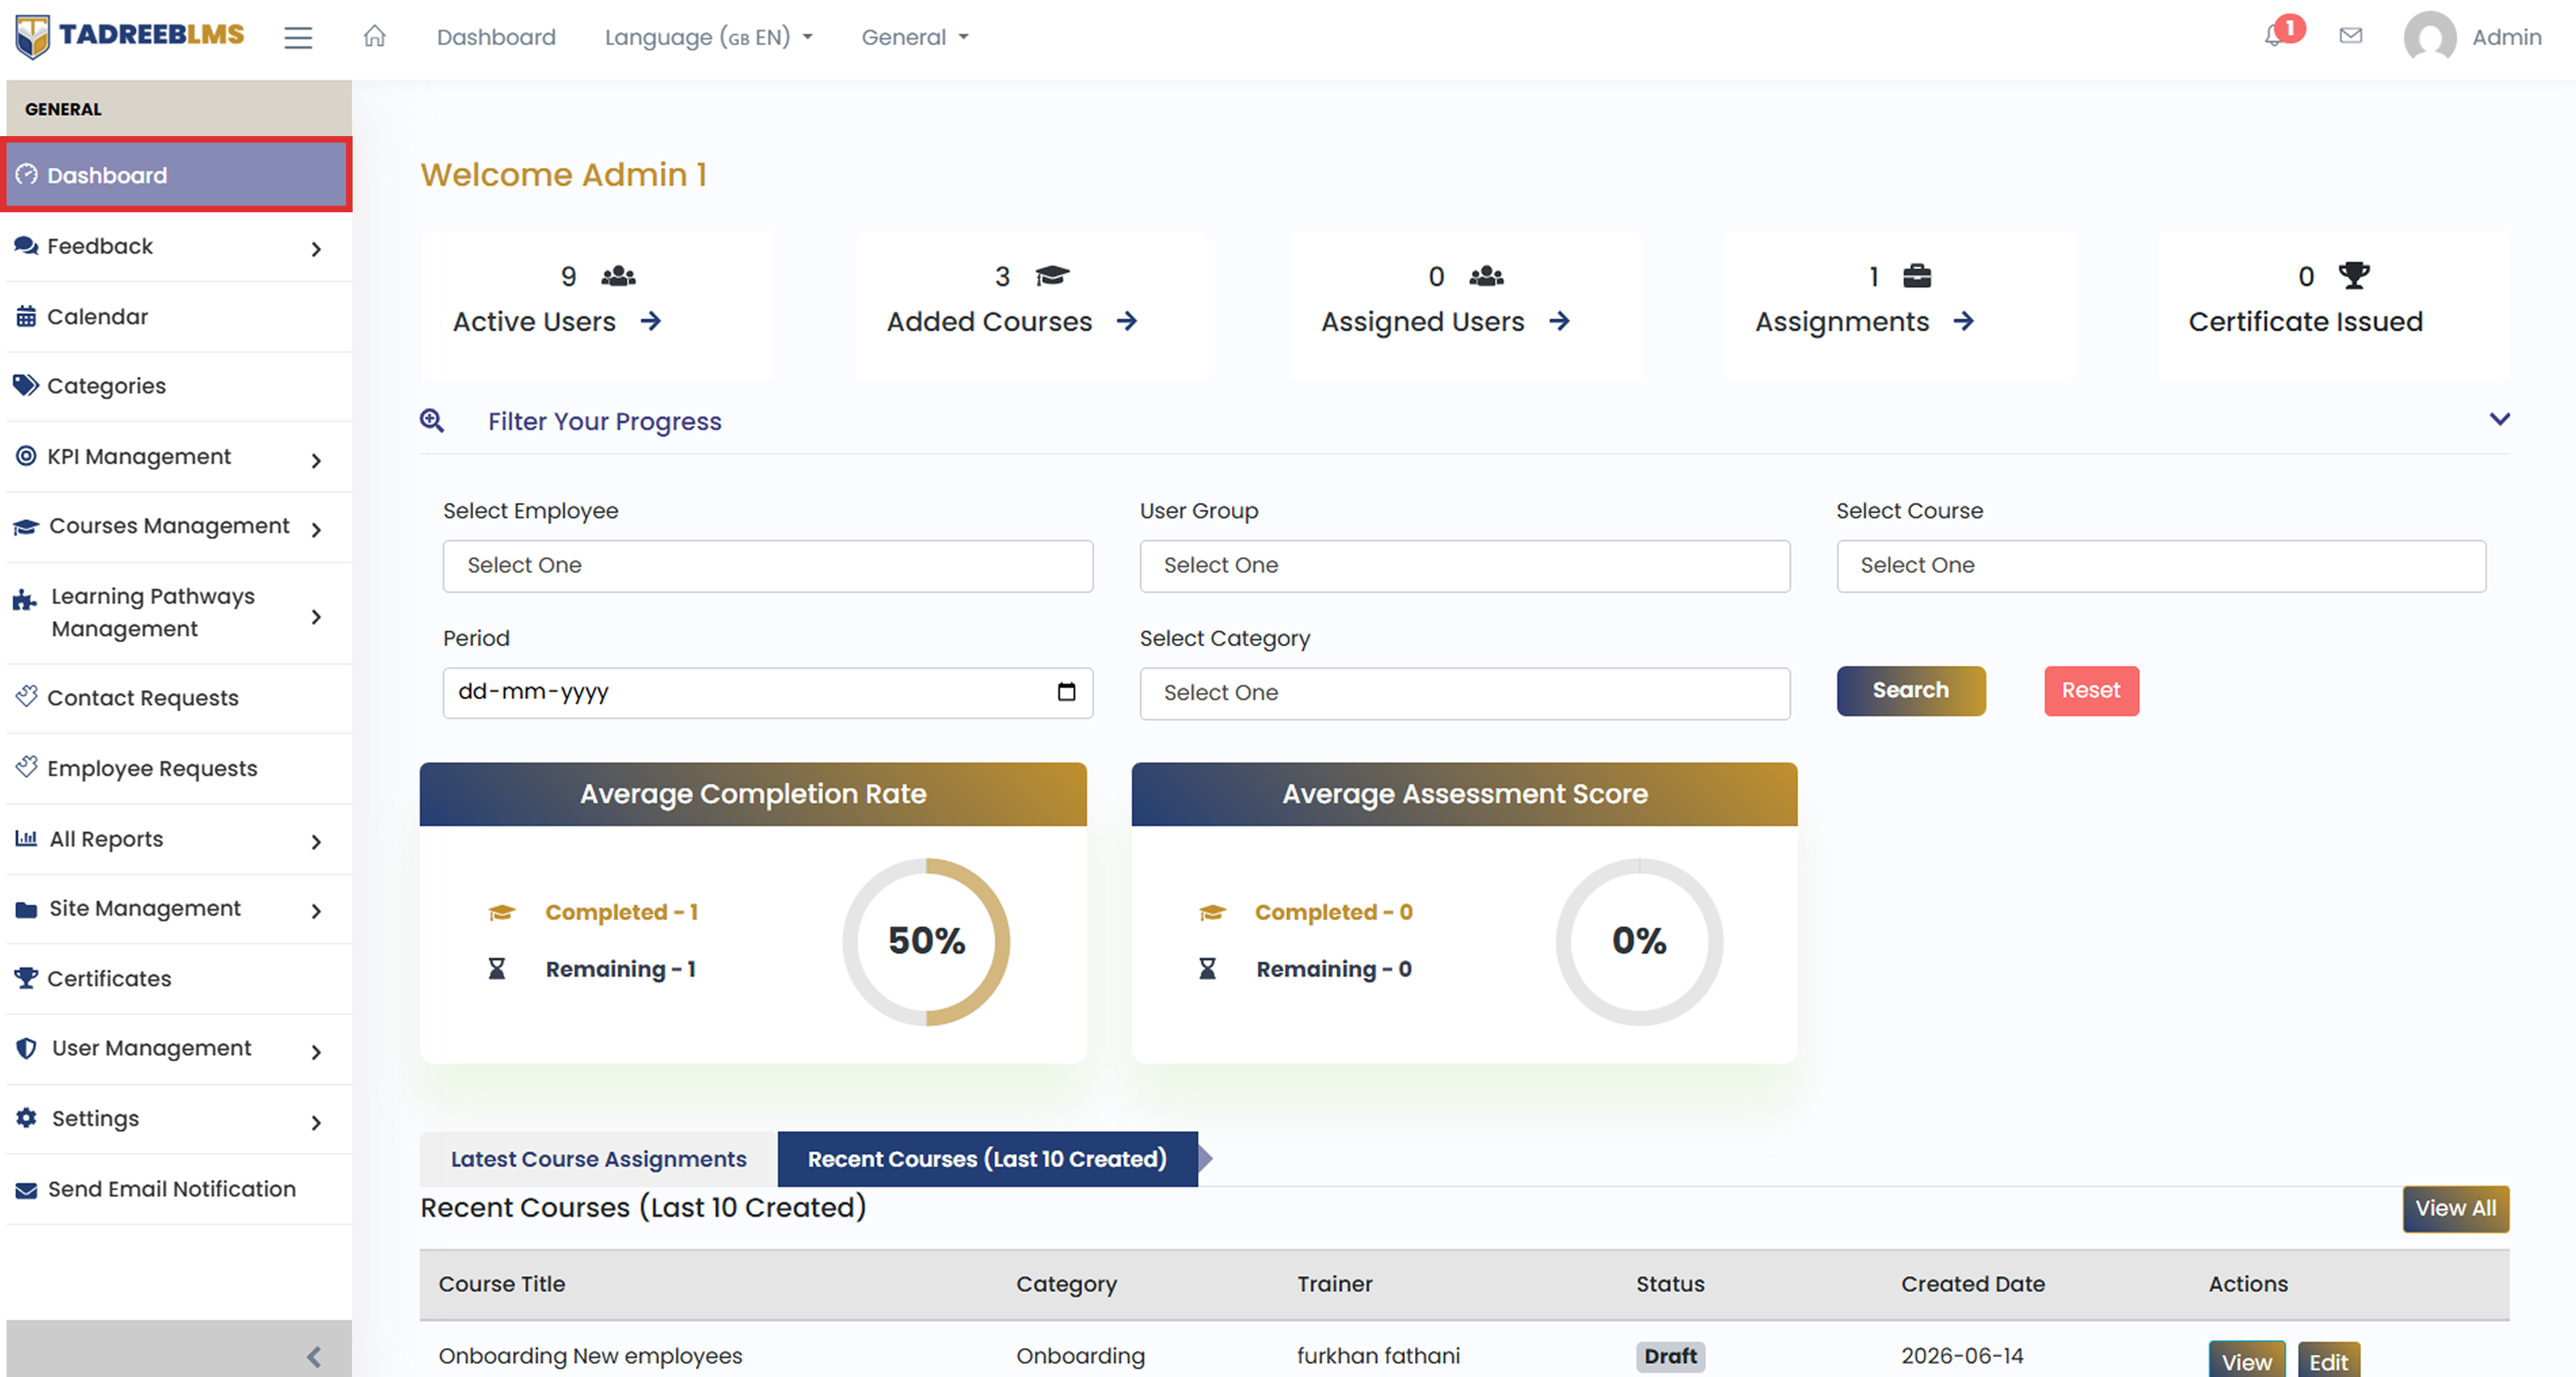
The Admin Dashboard is the first screen you see after logging in as an Admin. It gives you a quick overview of everything happening on the platform — how many users are active, how many courses have been created, how learners are progressing, and what courses were recently added.
You do not need to navigate through different sections to check the status. The dashboard brings all the key information together in one place, making it easier to monitor the platform at a glance.
1.1 Key Metrics
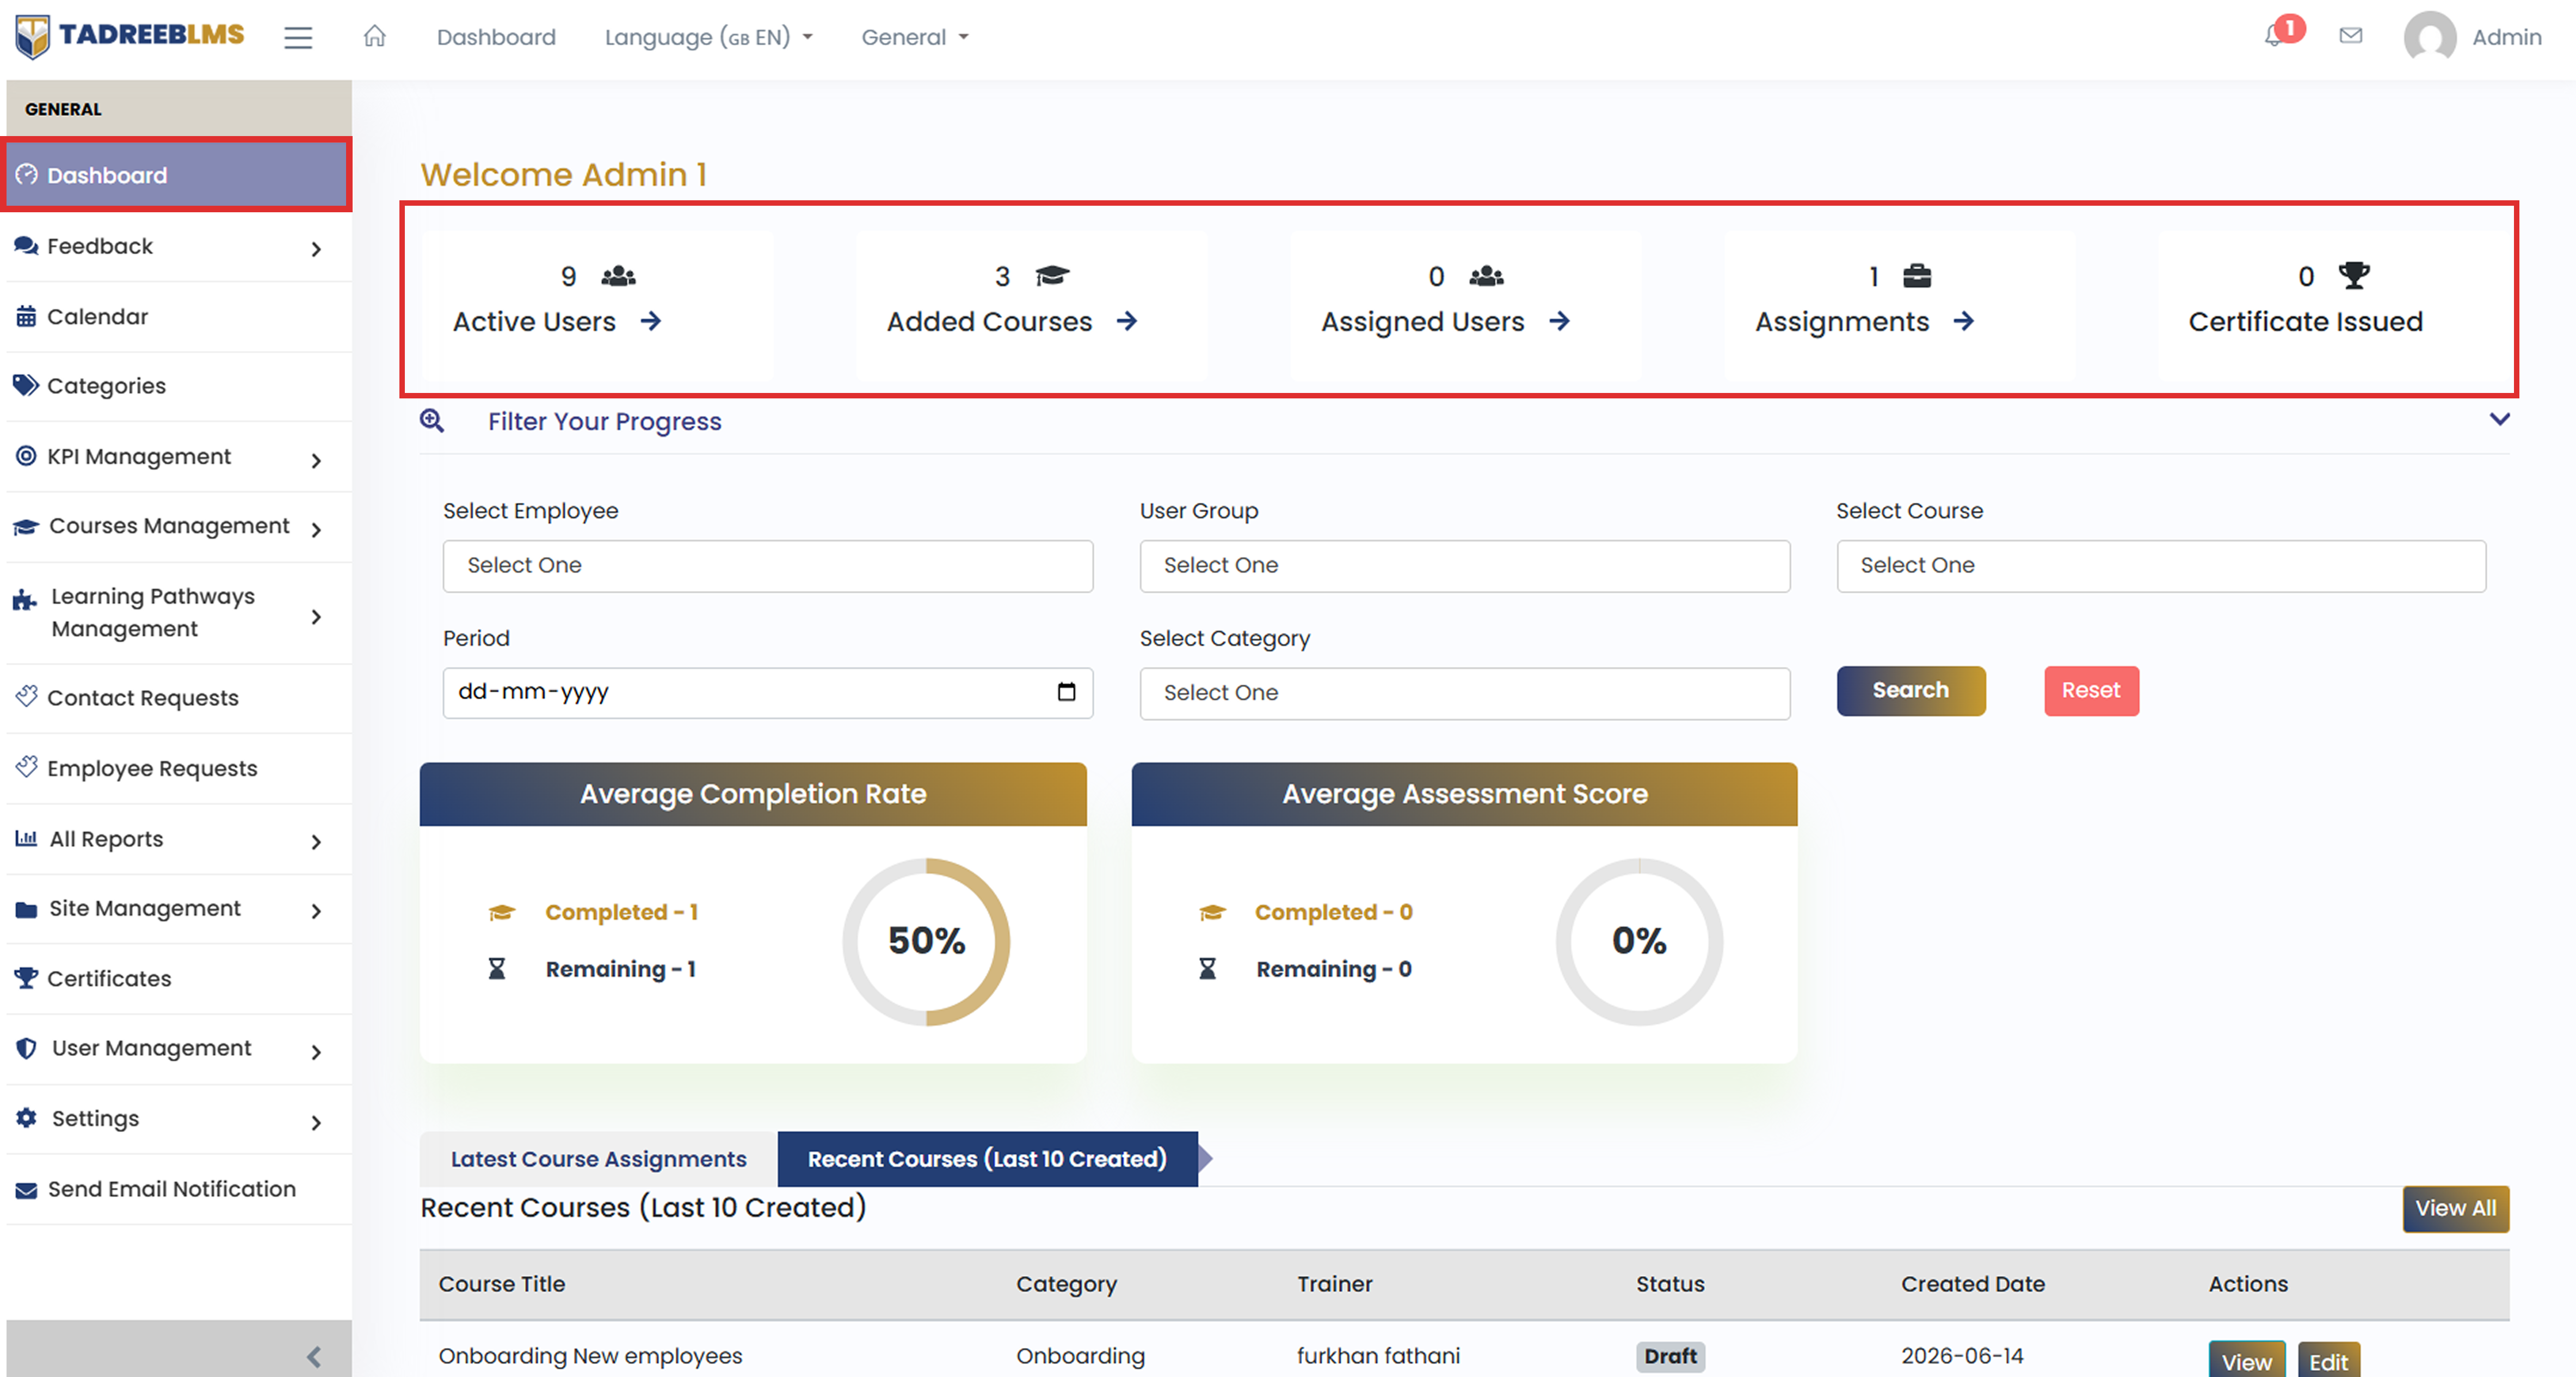
The Key Metrics section provides an overview of important platform statistics, showing the following summary metrics at the top:
- Active Users : Total number of users who are currently active on the platform.
- Added Courses : Total number of courses that have been added to the platform.
- Assigned Users : Number of users who have been assigned to at least one course.
- Assignments : Total number of course assignments created.
- Certificates Issued : Number of certificates that have been issued to learners upon course completion.
1.2 Filter Your Progress
The Filter Your Progress section allows you to analyse and track learner progress based on specific criteria. You can filter the data by employee, user group, course, category, and date.
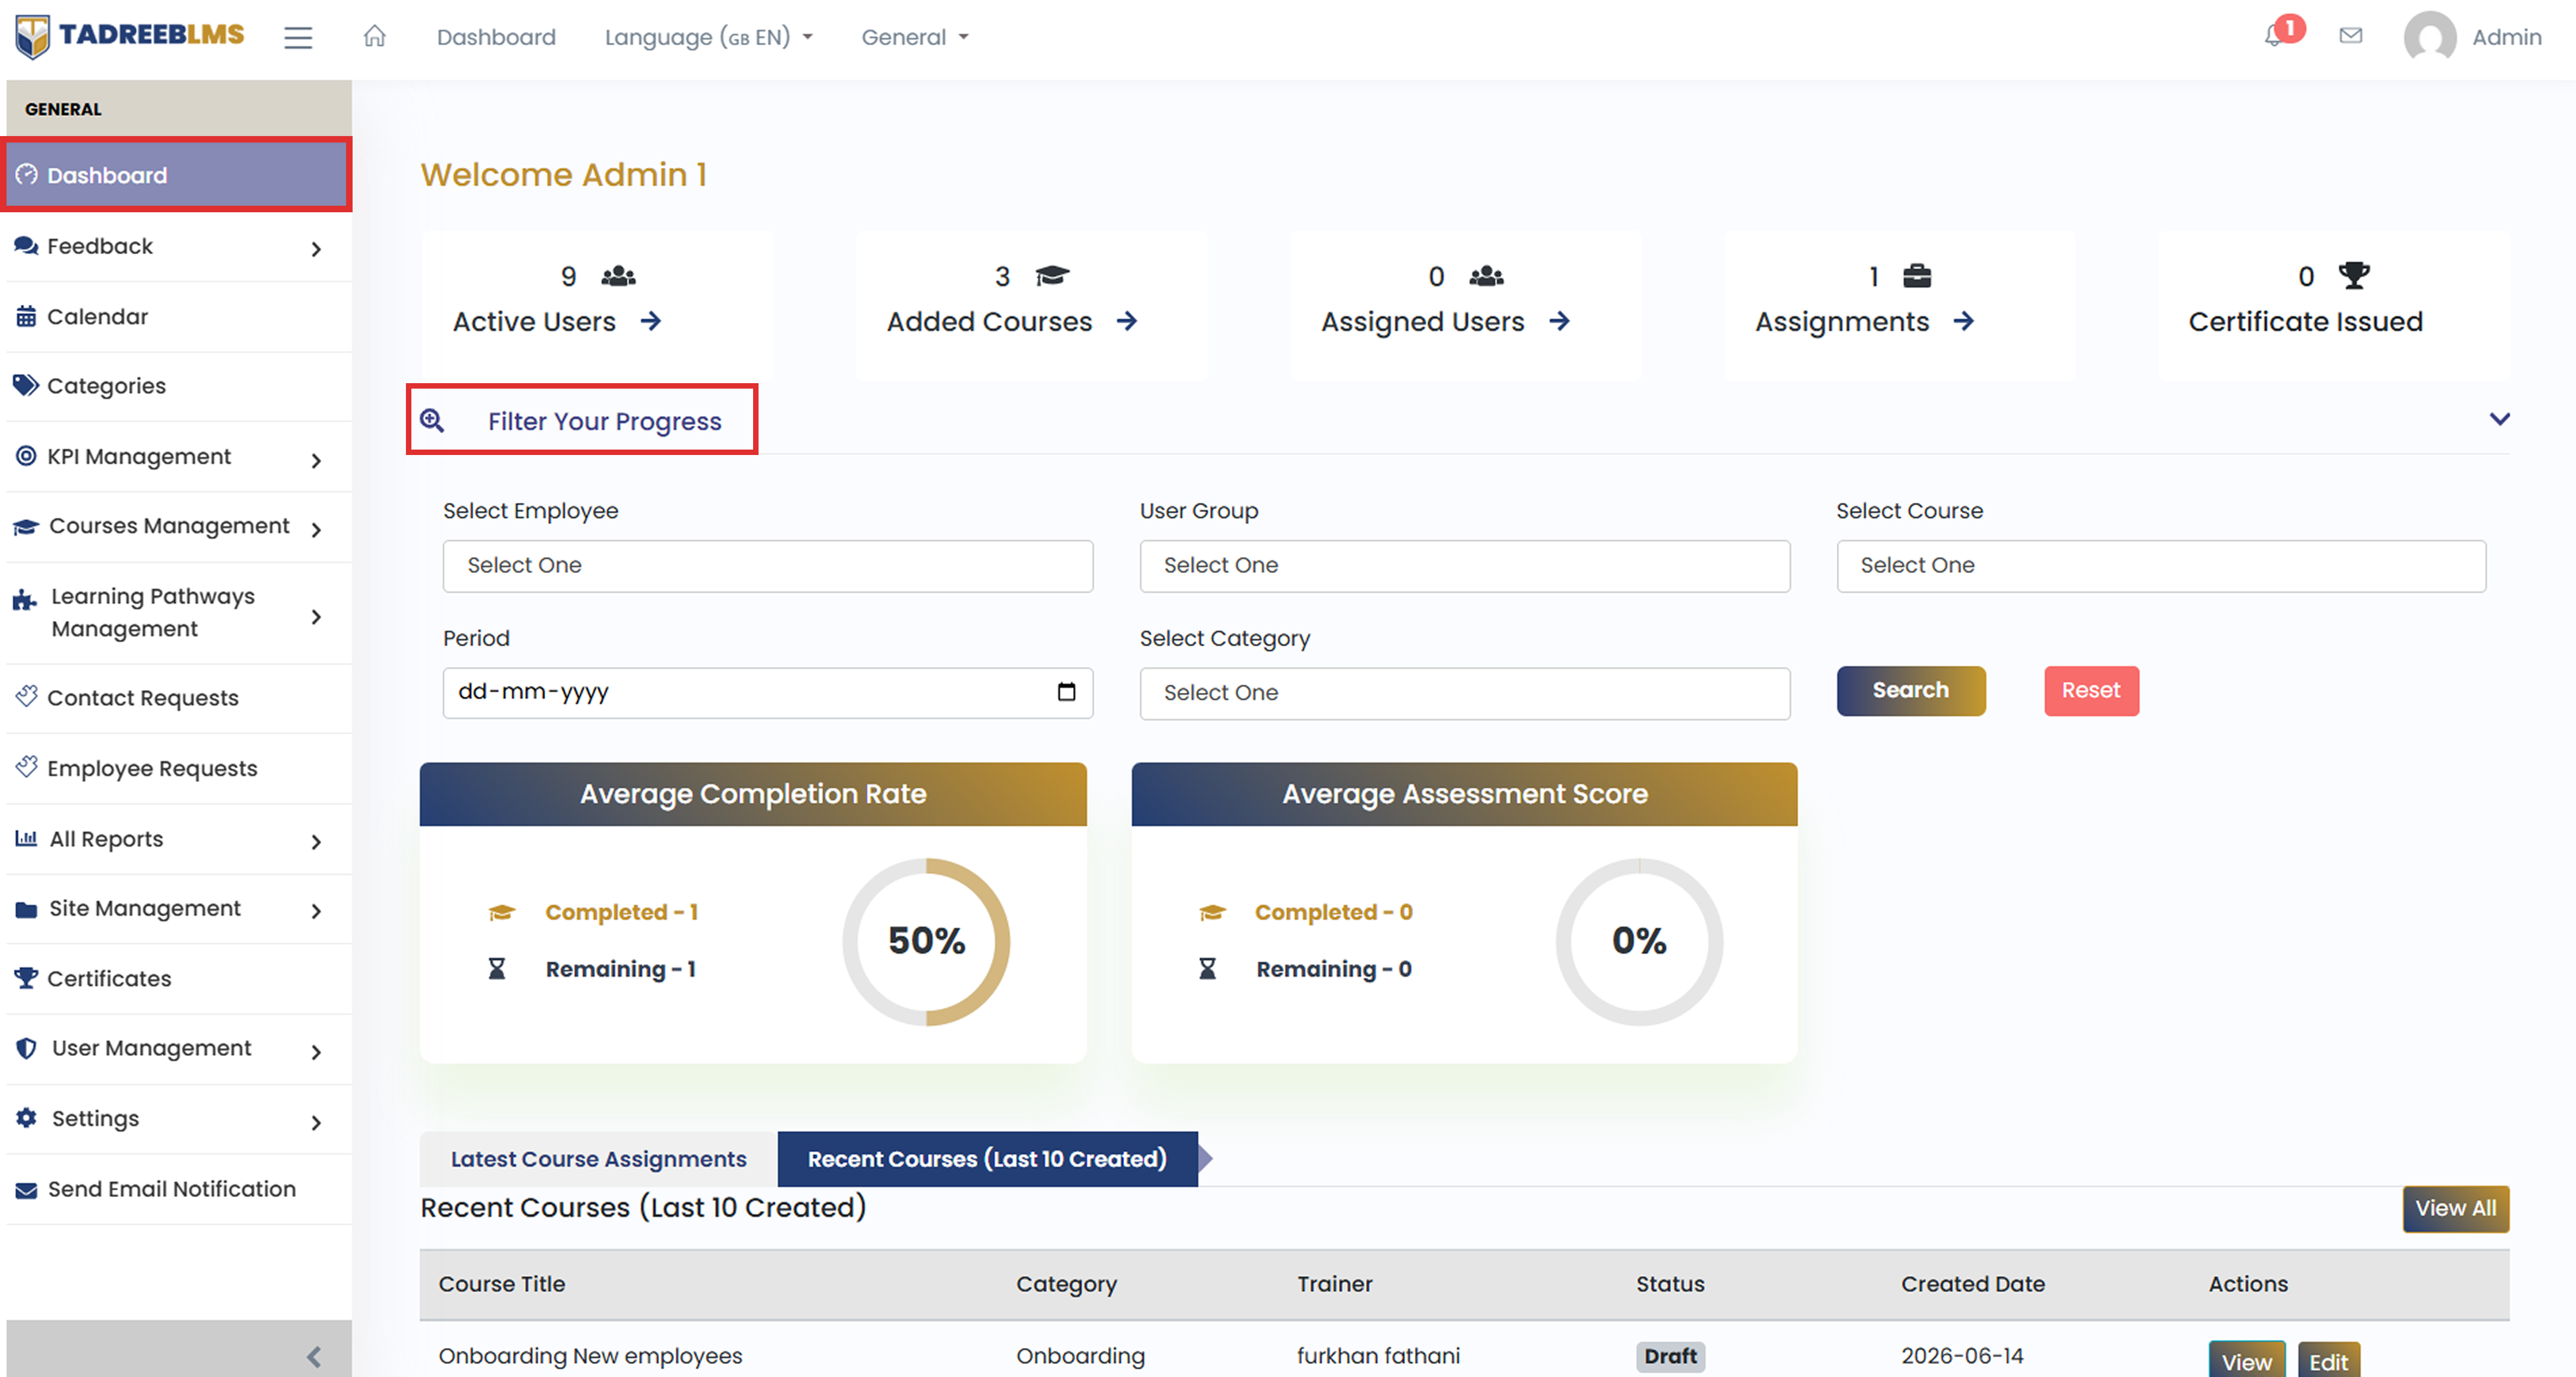
The following filters are available:
- Select Employee : Select an employee to view their learning progress.
- User Group : Select a user group to view progress for a User Group.
- Select Course : Select a course to view its progress details.
- Period : Select a date to view progress for a specific period.
- Select Category : Select a course category to filter the results.
📌 Note: Click Search to apply the selected filters to view the results, and click Reset to clear all filters.
1.3 Average Completion Rate
This section shows the percentage of courses learners have completed out of the total courses assigned to them.
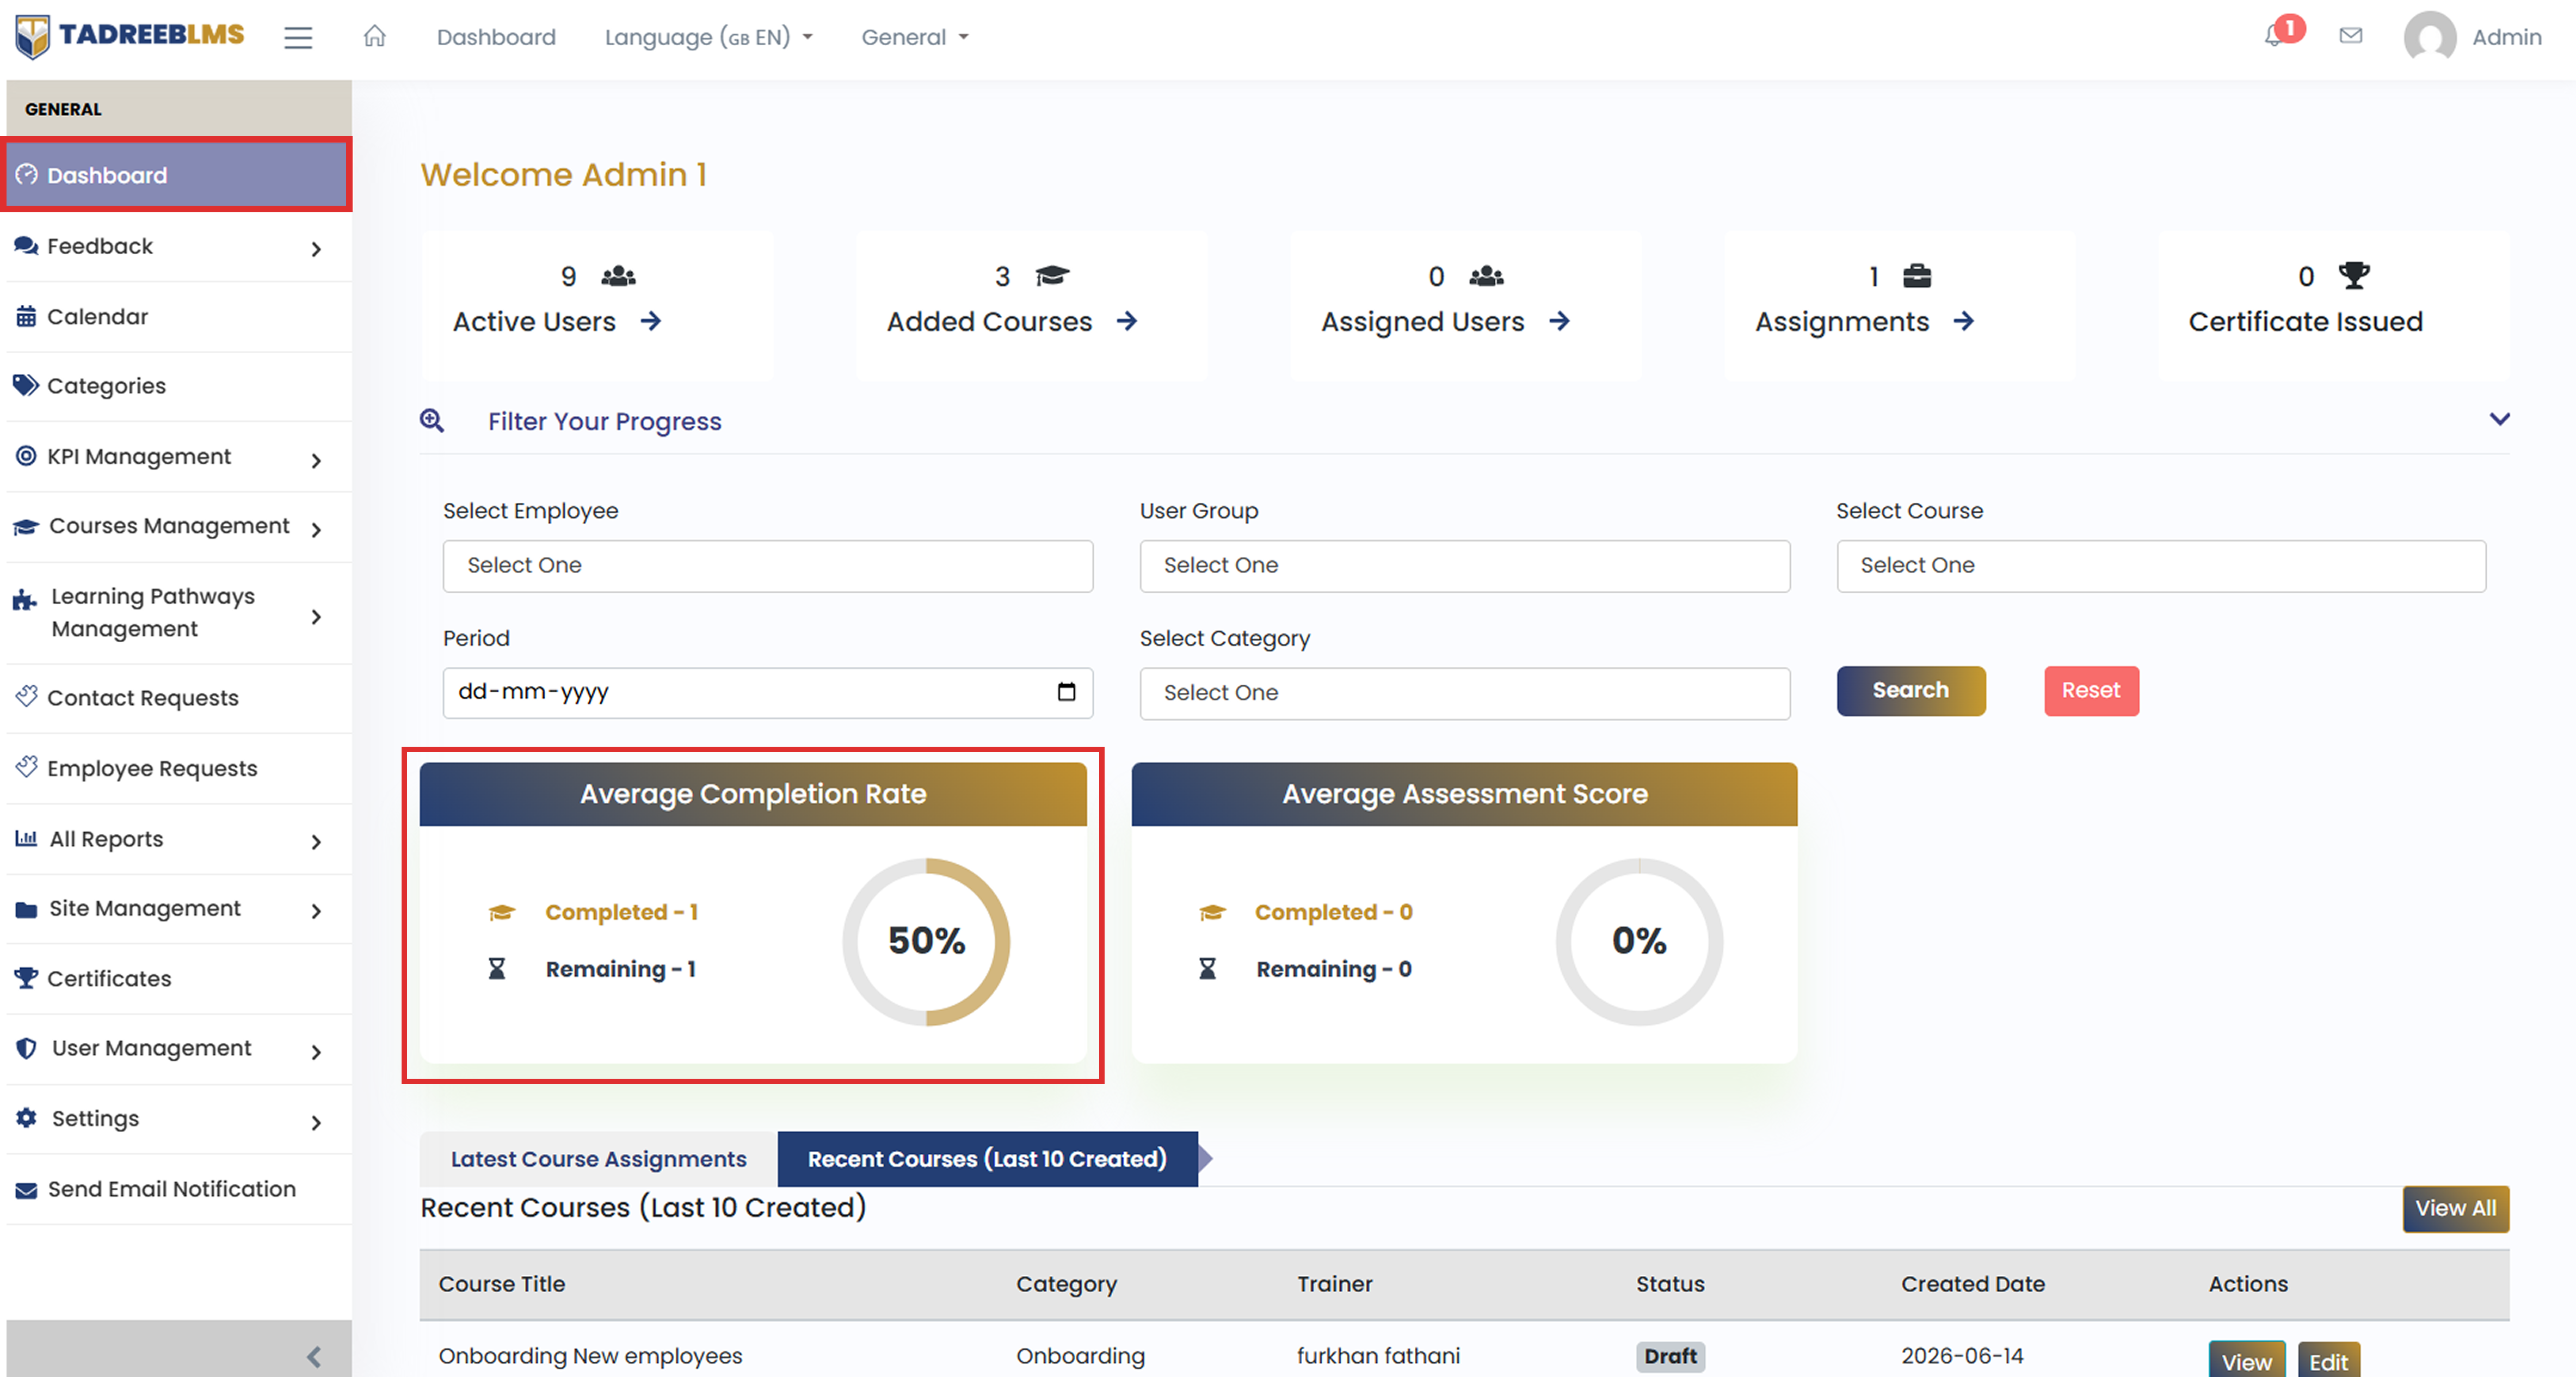
It shows two values:
- Completed : The number of completed courses.
- Remaining : The number of pending courses.
The circular chart visually shows the course completion percentage. For example, if 1 course is completed and 1 is remaining, the chart shows 50% progress. This helps you quickly understand whether learners are making progress or falling behind.
1.4 Average Assessment Score
This section shows the average score learners have achieved in assessments.
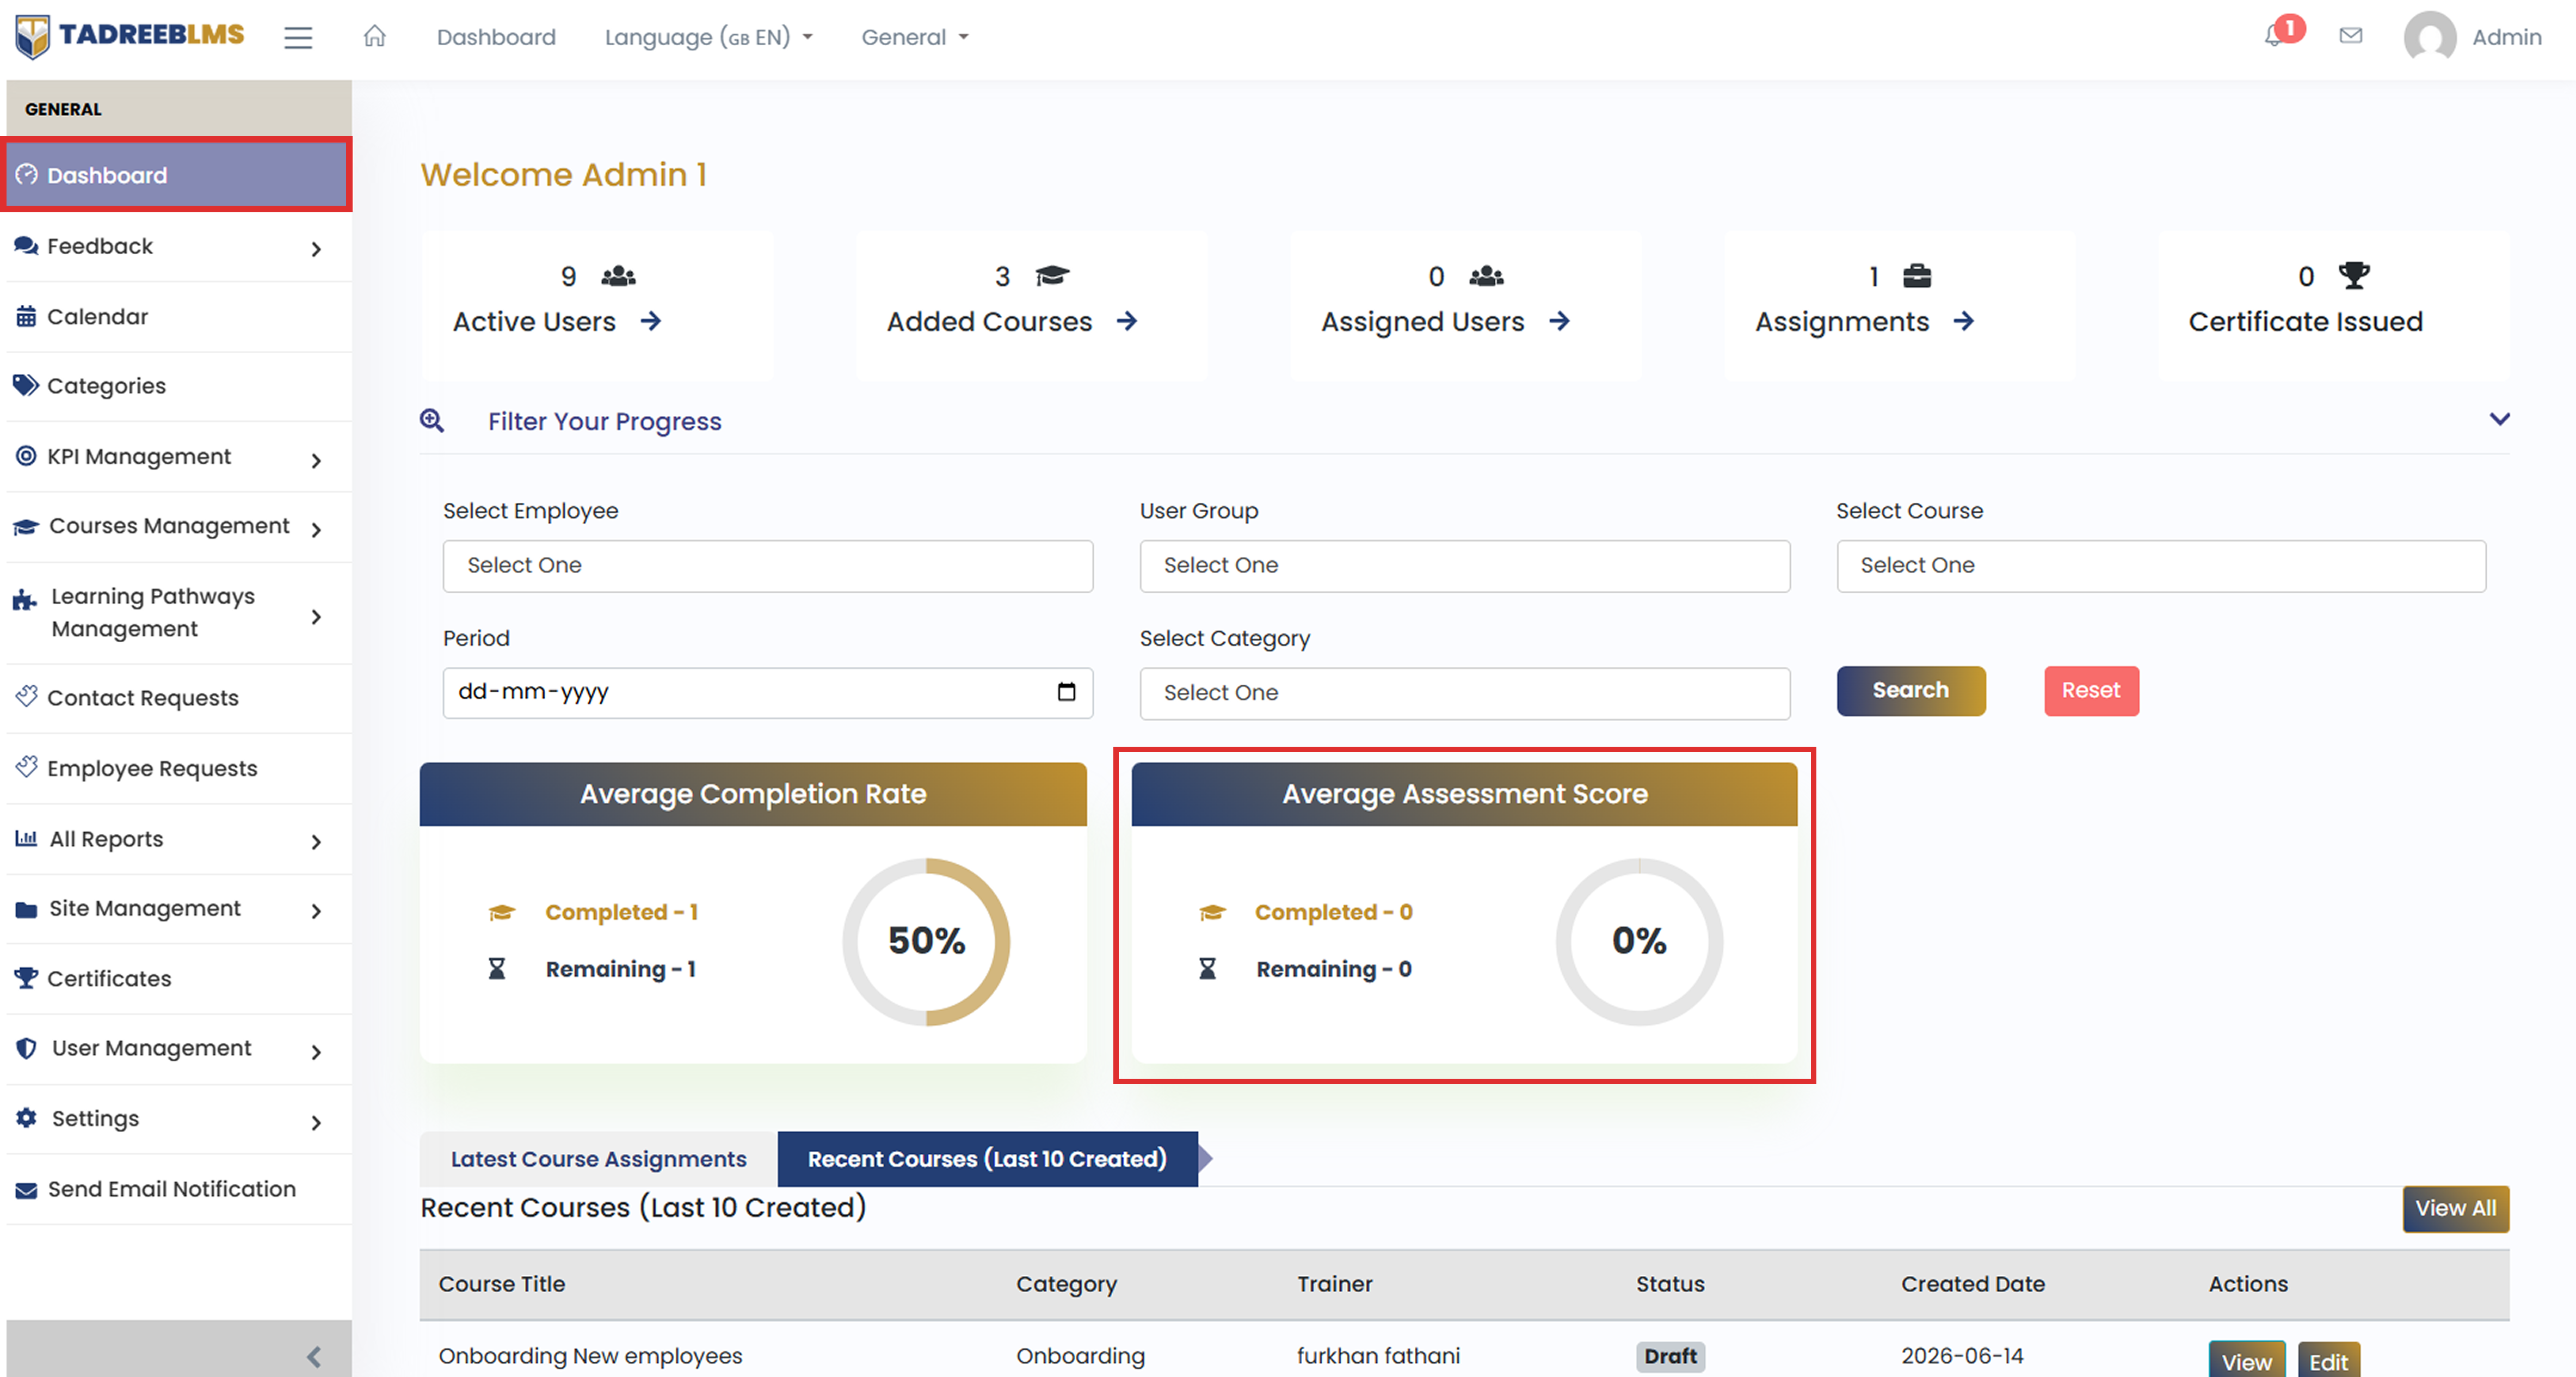
It shows two values:
- Completed : The number of completed assessments.
- Remaining : The number of pending assessments.
The circular chart shows the average assessment score as a percentage. For example, if no assessments have been completed, the chart shows 0%.
This provides an overview of learners' performance, not just whether they finished a course, but how well they did in it.
1.5 Latest Course Assignments
The Latest Course Assignments section shows recently assigned courses, who they were assigned to, and when they were assigned.
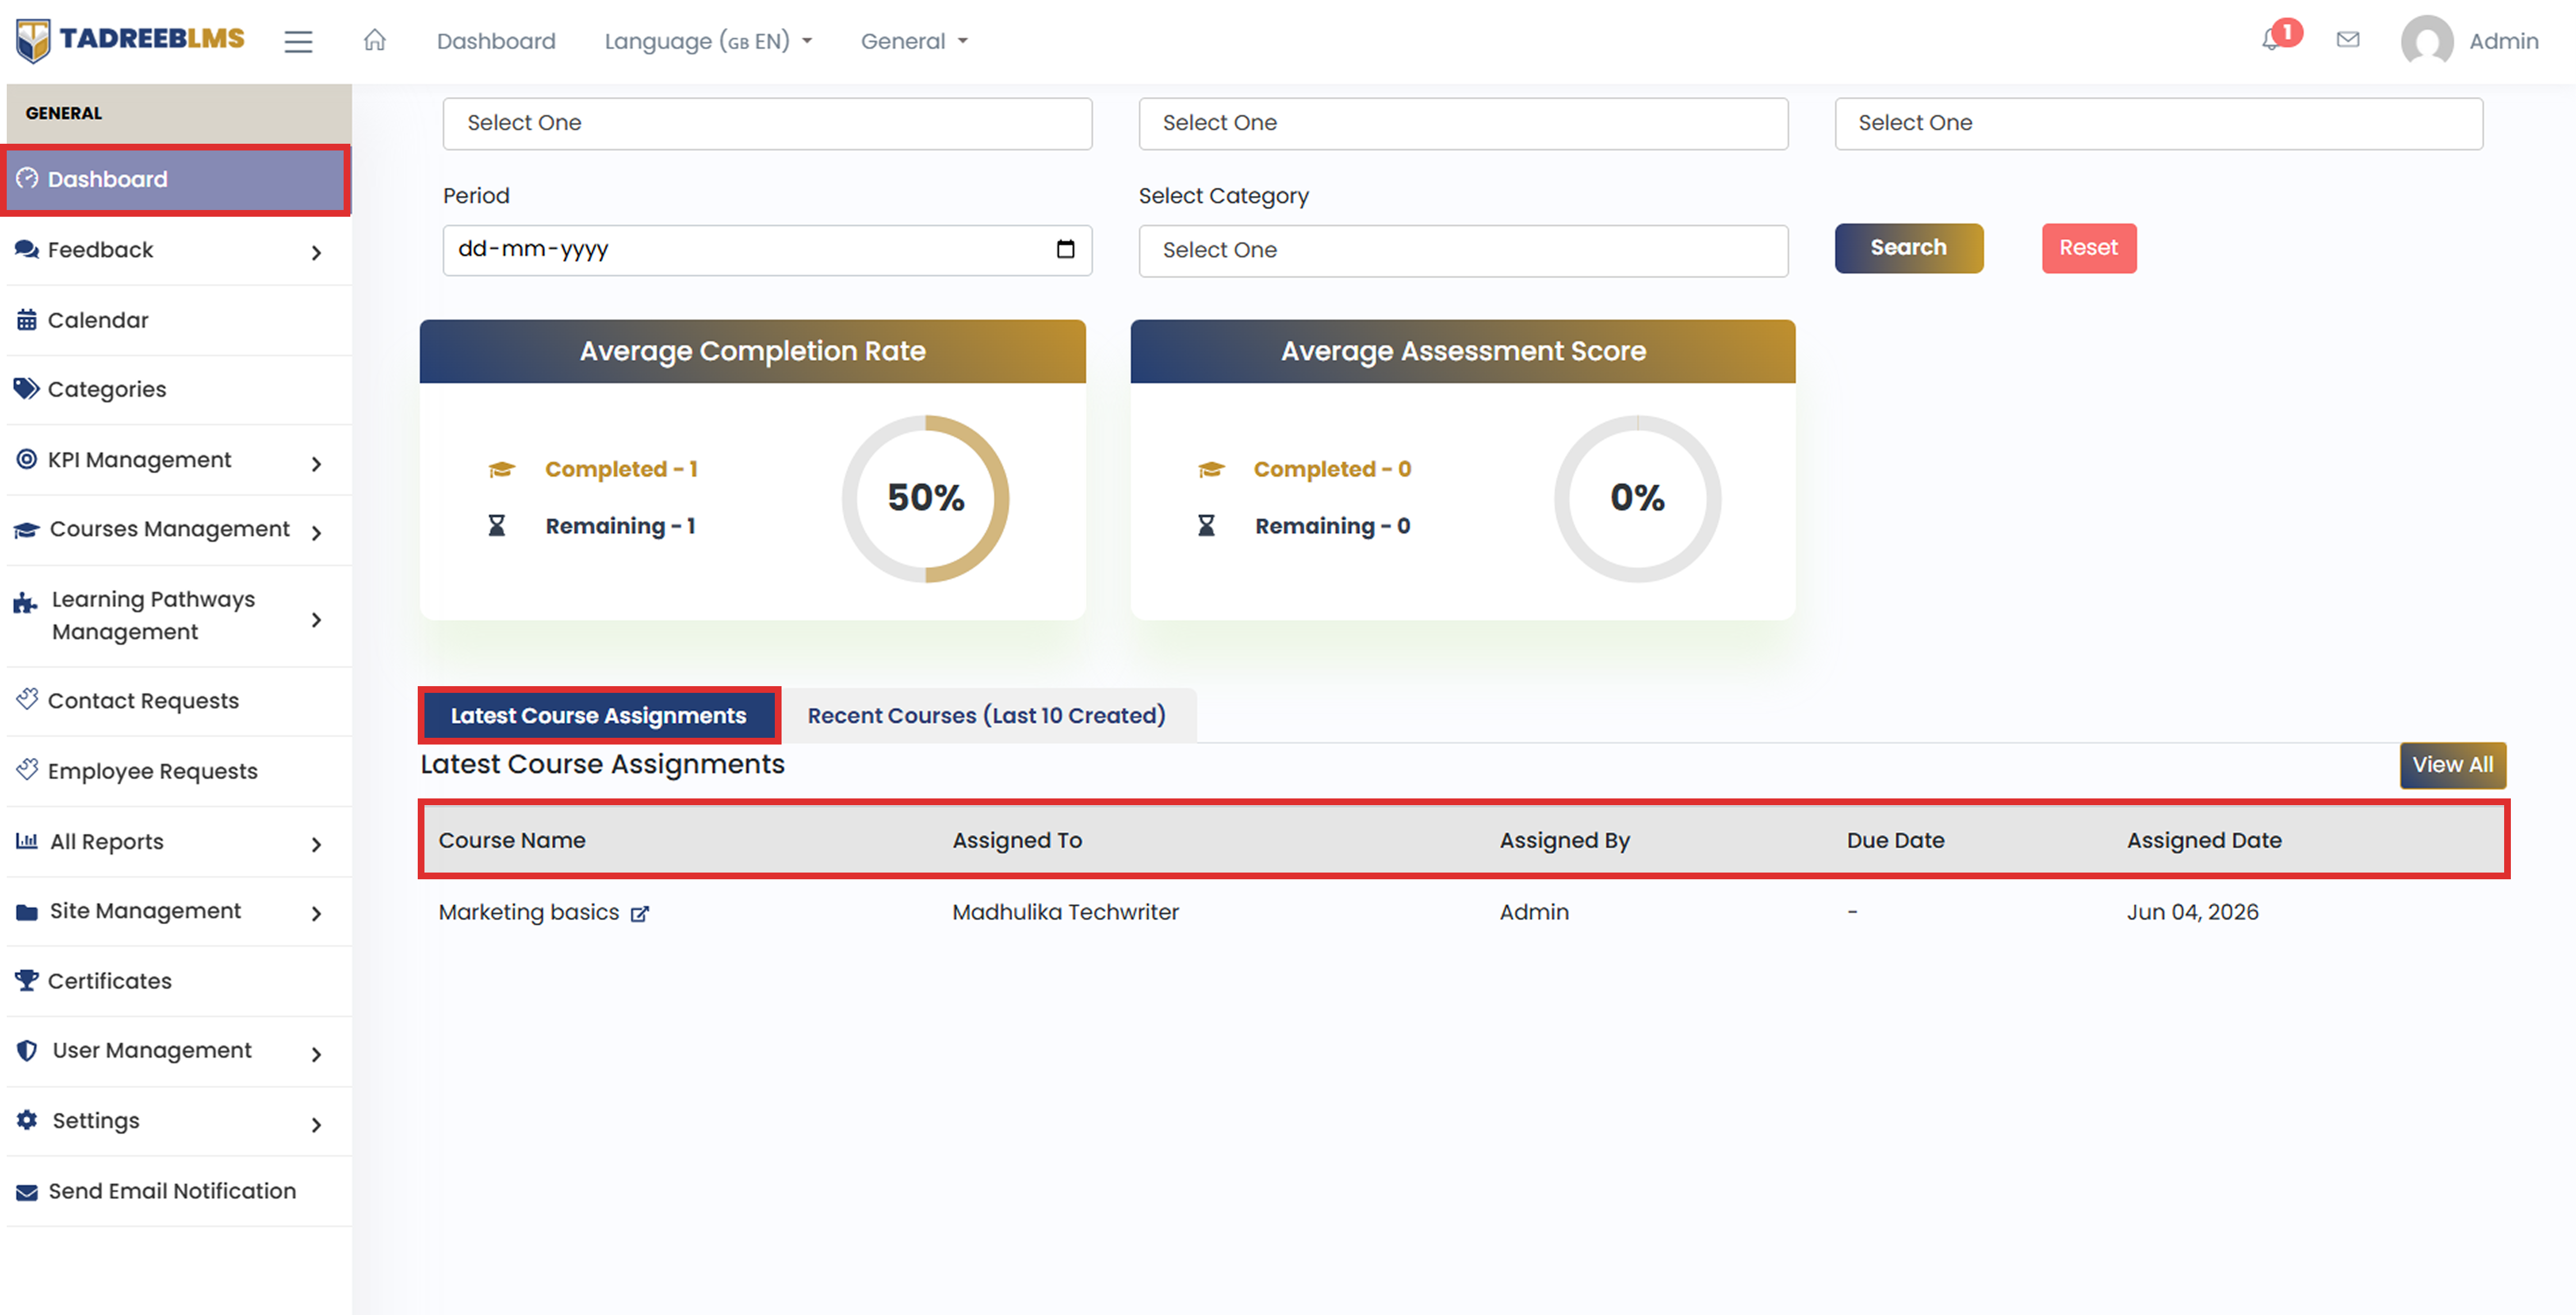
Table Headings
The table below describes the column information:
| Heading | Description |
|---|---|
| Course Name | The name of the assigned course. |
| Assigned to | The name of the learner assigned to that course. |
| Assigned by | Shows who assigned the course (Admin or Trainer). |
| Due Date | Shows the course completion deadline. |
| Assigned Date | Shows when the course was assigned. |
📌 Note: You can also click View All on the top right of this section to see the complete list of assigned courses.
1.6 Recent Courses (Last 10 Created)
The Recent Courses section shows the last 10 courses that were created on the platform. This helps you stay updated on newly added content without having to navigate to the Courses Management section.
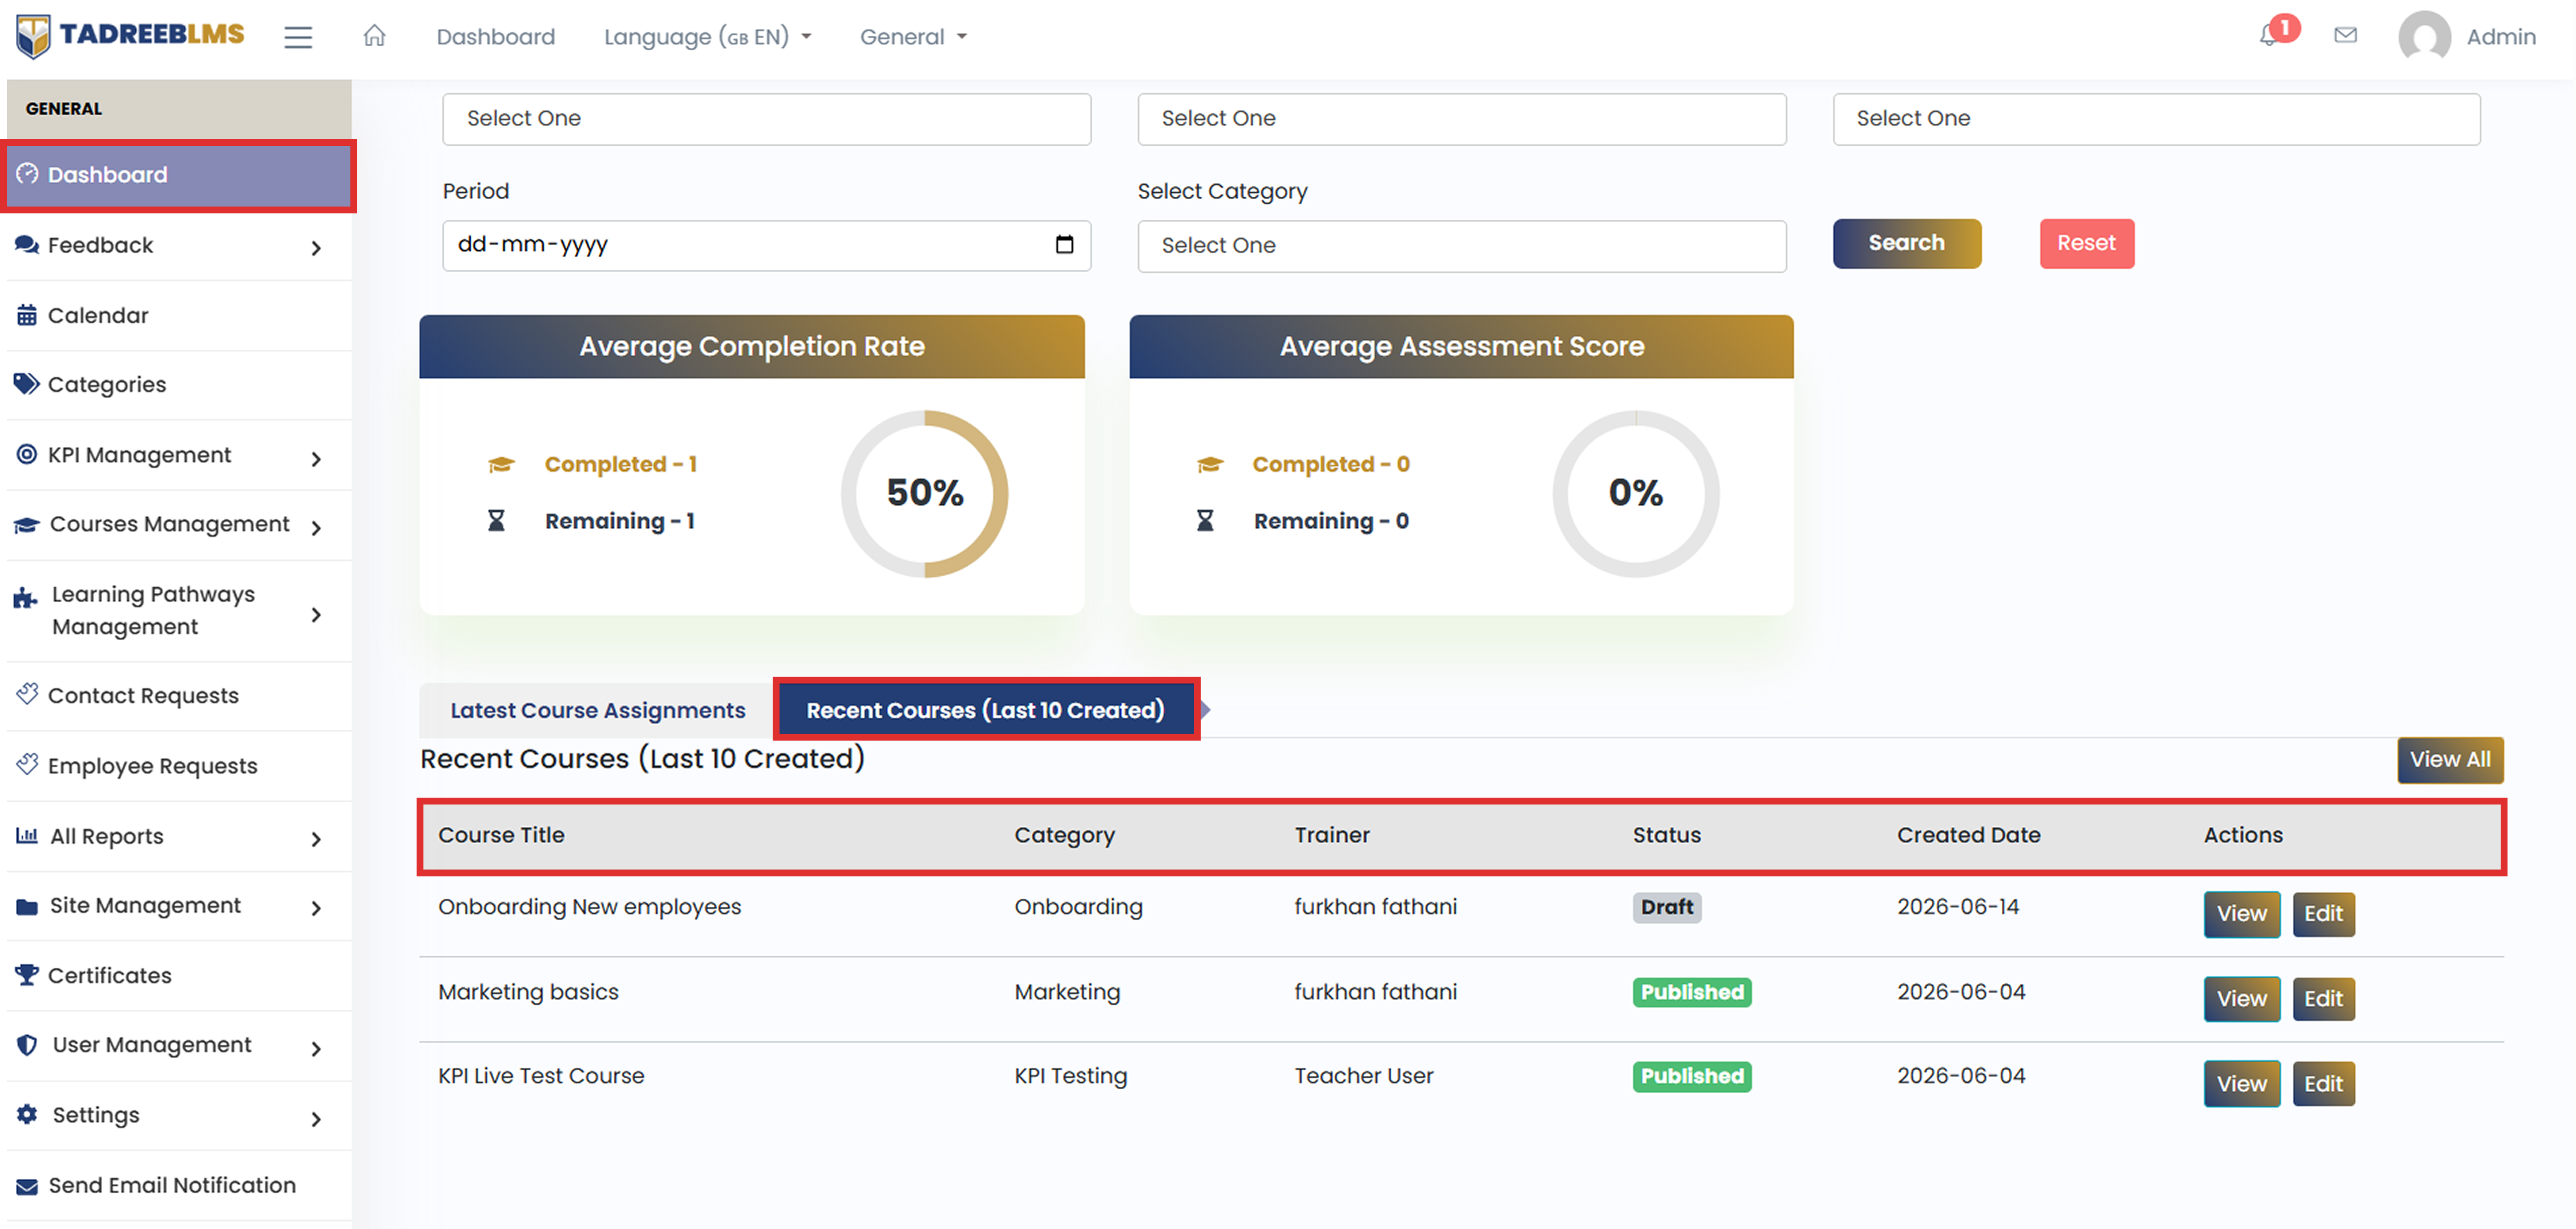
Table Headings
The table below describes the column information:
| Heading | Description |
|---|---|
| Course Title | The name of the course. |
| Category | The category the course belongs to (e.g., Onboarding, Marketing, KPI Testing). |
| Trainer | The name of the trainer assigned to that course. |
| Status | Whether the course is currently Published (live and accessible to learners) or in Draft (not yet published). |
| Created Date | The date on which the course was created. |
| Actions | View (to preview the course) and Edit (to make changes to the course). |
📌 Note: You can also click View All on the top right of this section to see the complete list of courses on the platform.
2. Feedback
Understanding how learners experience a course is essential for improving its quality. The Feedback section gives administrators the tools to collect, manage, and analyse learner feedback effectively. Administrators can create custom feedback questions, assign them to specific courses, and ensure learners share their feedback after completing a course.
All feedback responses are stored in the system and can be filtered, reviewed, and exported, making it easier to identify trends, address areas for improvement, and continuously enhance the learning experience.
2.1 Course Feedback Questions
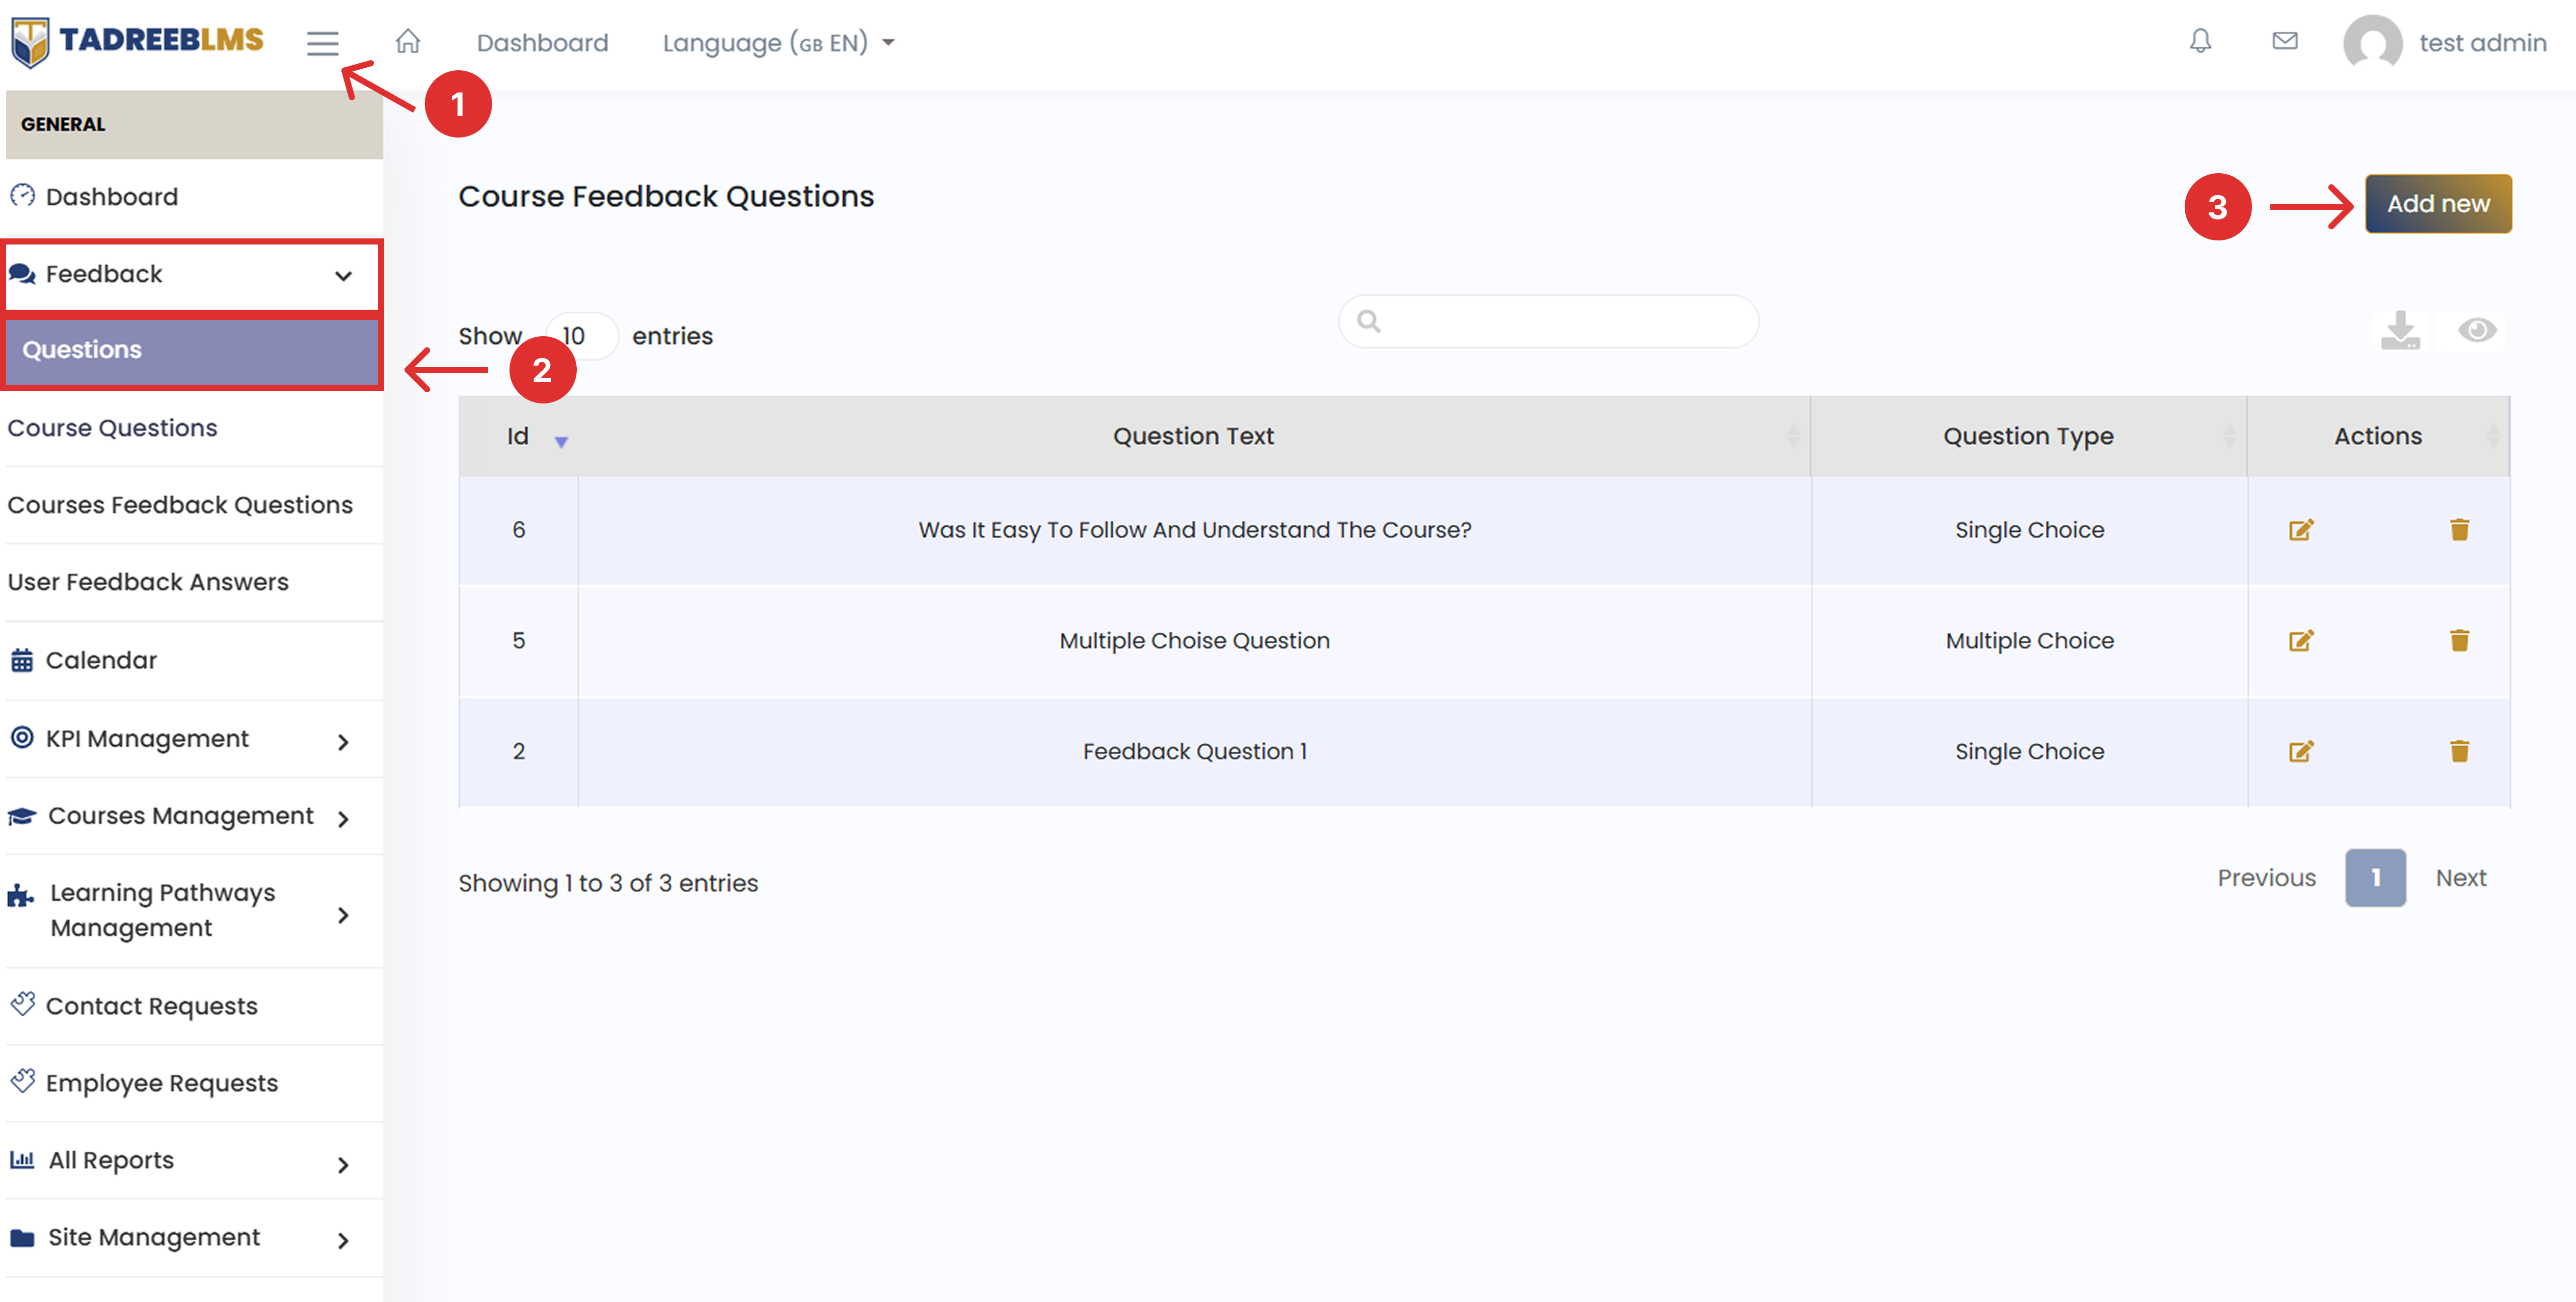
The Courses Feedback Questions page lets administrators add and manage feedback questions for learners. Learners answer these questions after completing a course, helping the organisation improve its training.
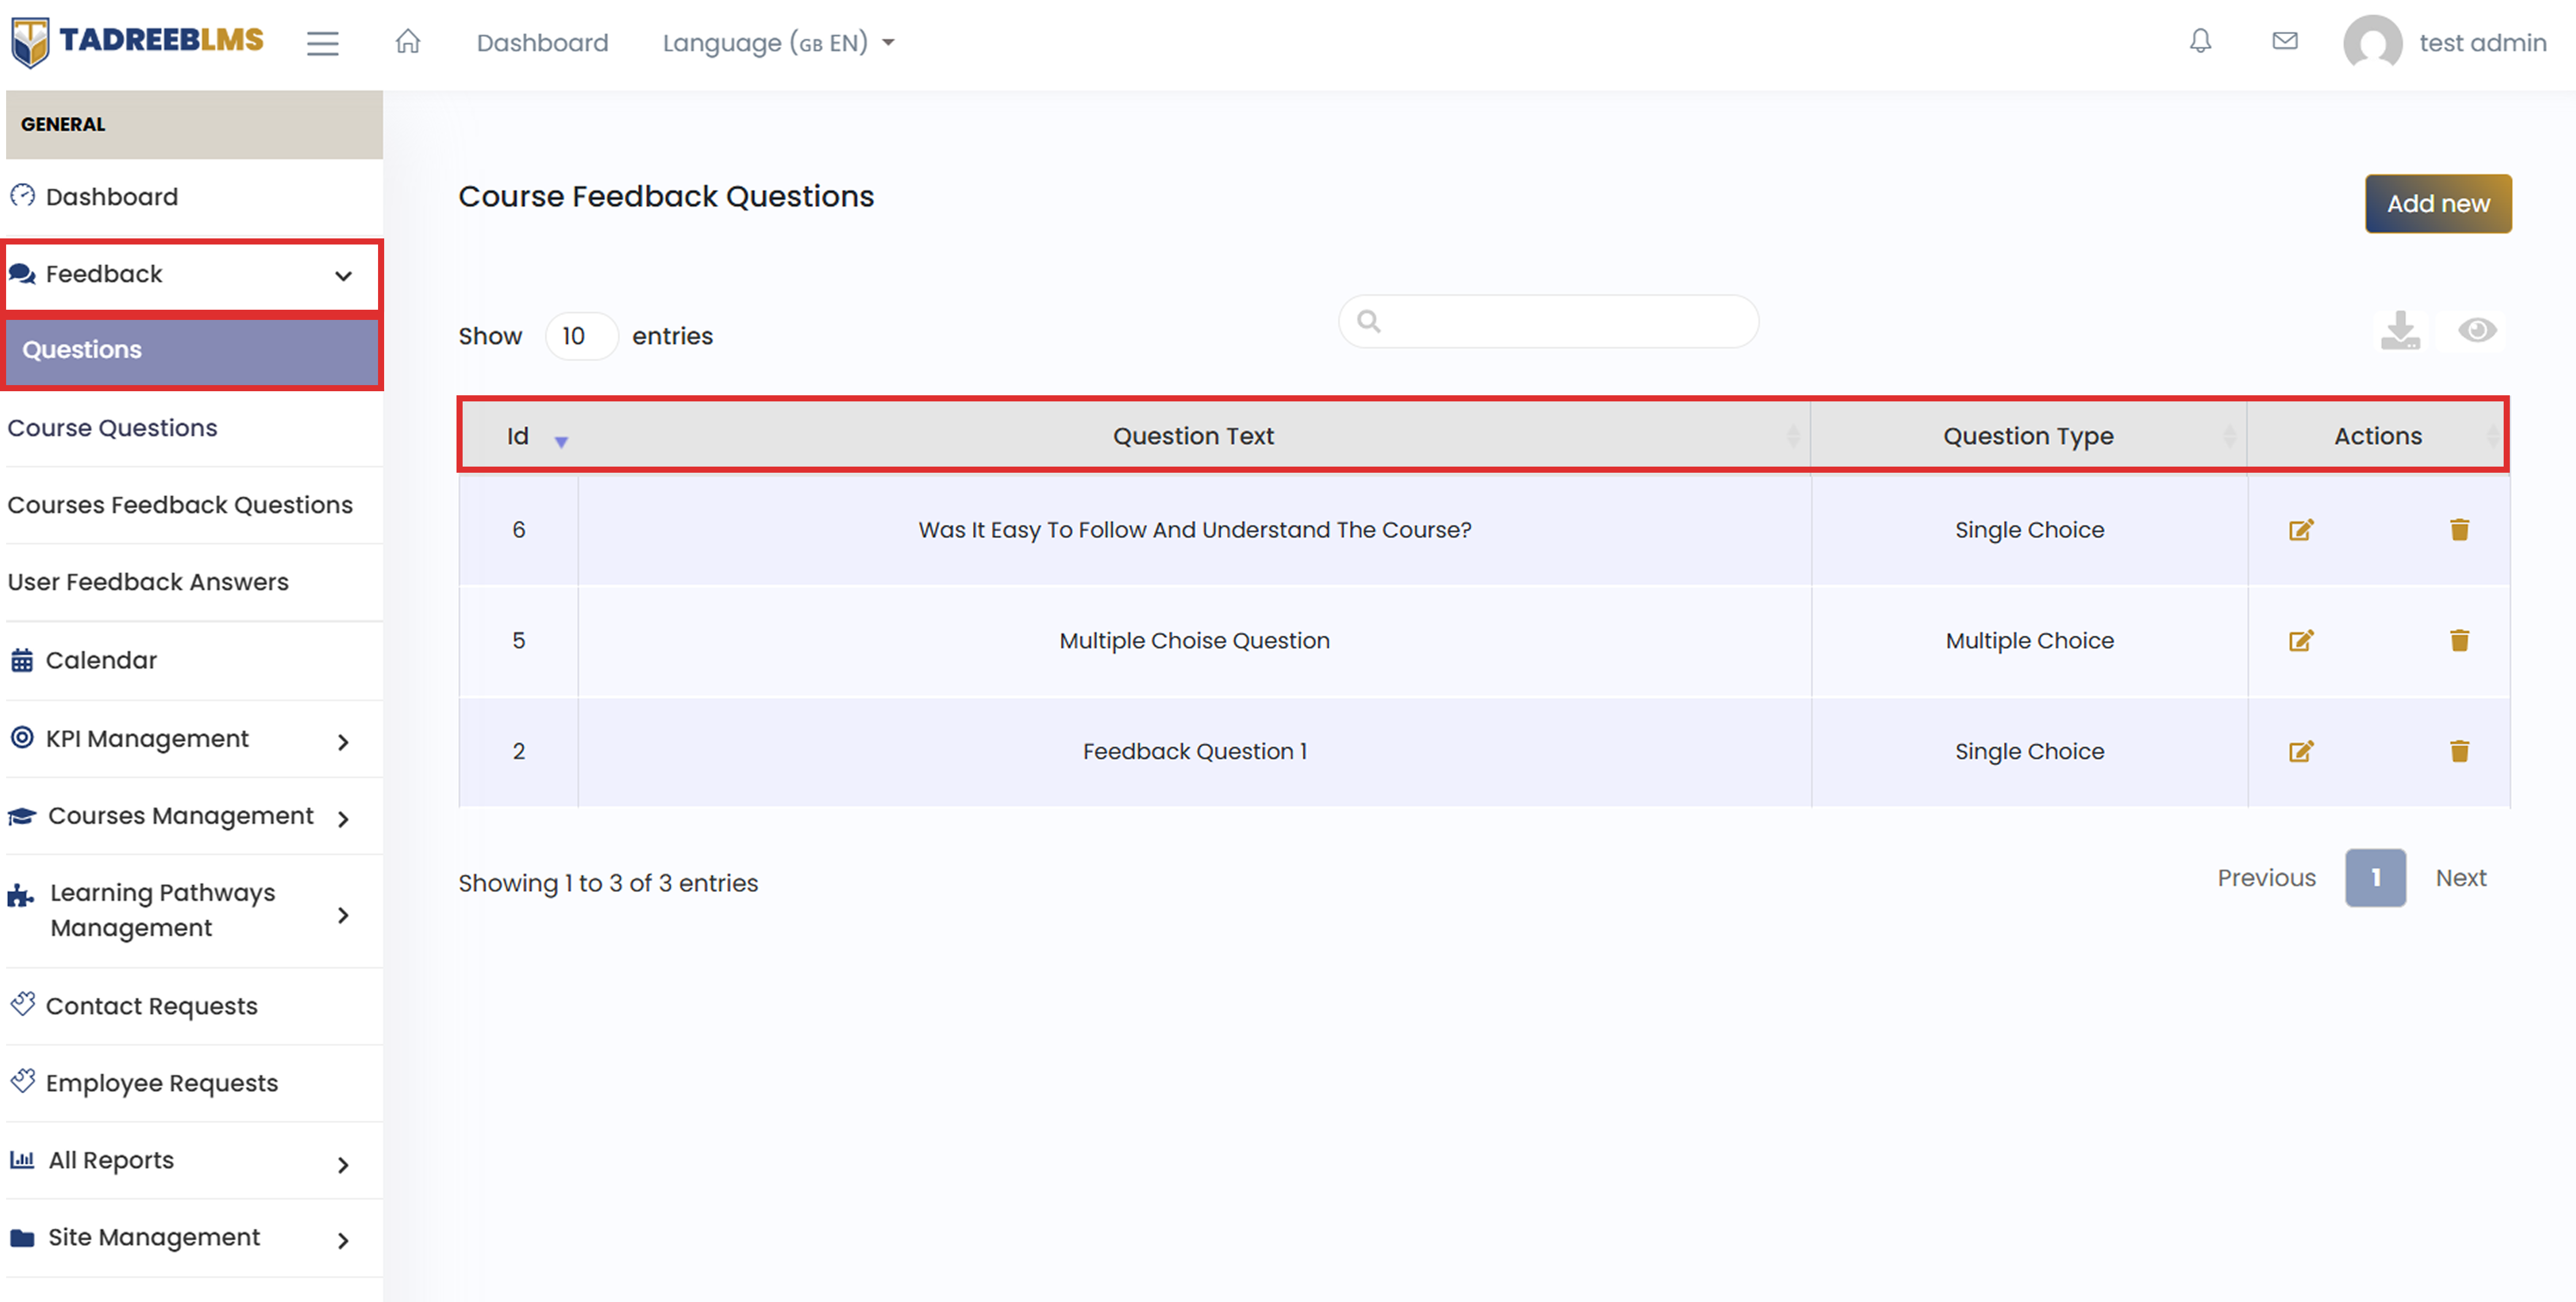
Table Headings
The table below describes the column information:
| Heading | Description |
|---|---|
| Id | The unique identifier for each feedback question. |
| Question Text | Shows the feedback question learners see after course completion. |
| Question Type | Shows the question type: Single Choice, Multiple Choice, or Short Answer. |
| Actions | Options to edit or delete a feedback question. |
2.1.1 Add a New Feedback Question
To add a new feedback question:
- Click the menu icon (☰) at the top left to open the sidebar menu.
- In the sidebar menu, go to Feedback > Questions.
- Click the Add New button at the top-right corner of the page.
- Select the appropriate Question Type: Single Choice, Multiple Choice or Short Answer.
- Enter the question text in the provided field.
- Enter an answer option (for example, Yes).
- Click Add Option to add additional options (for example, No).
- Save the question.
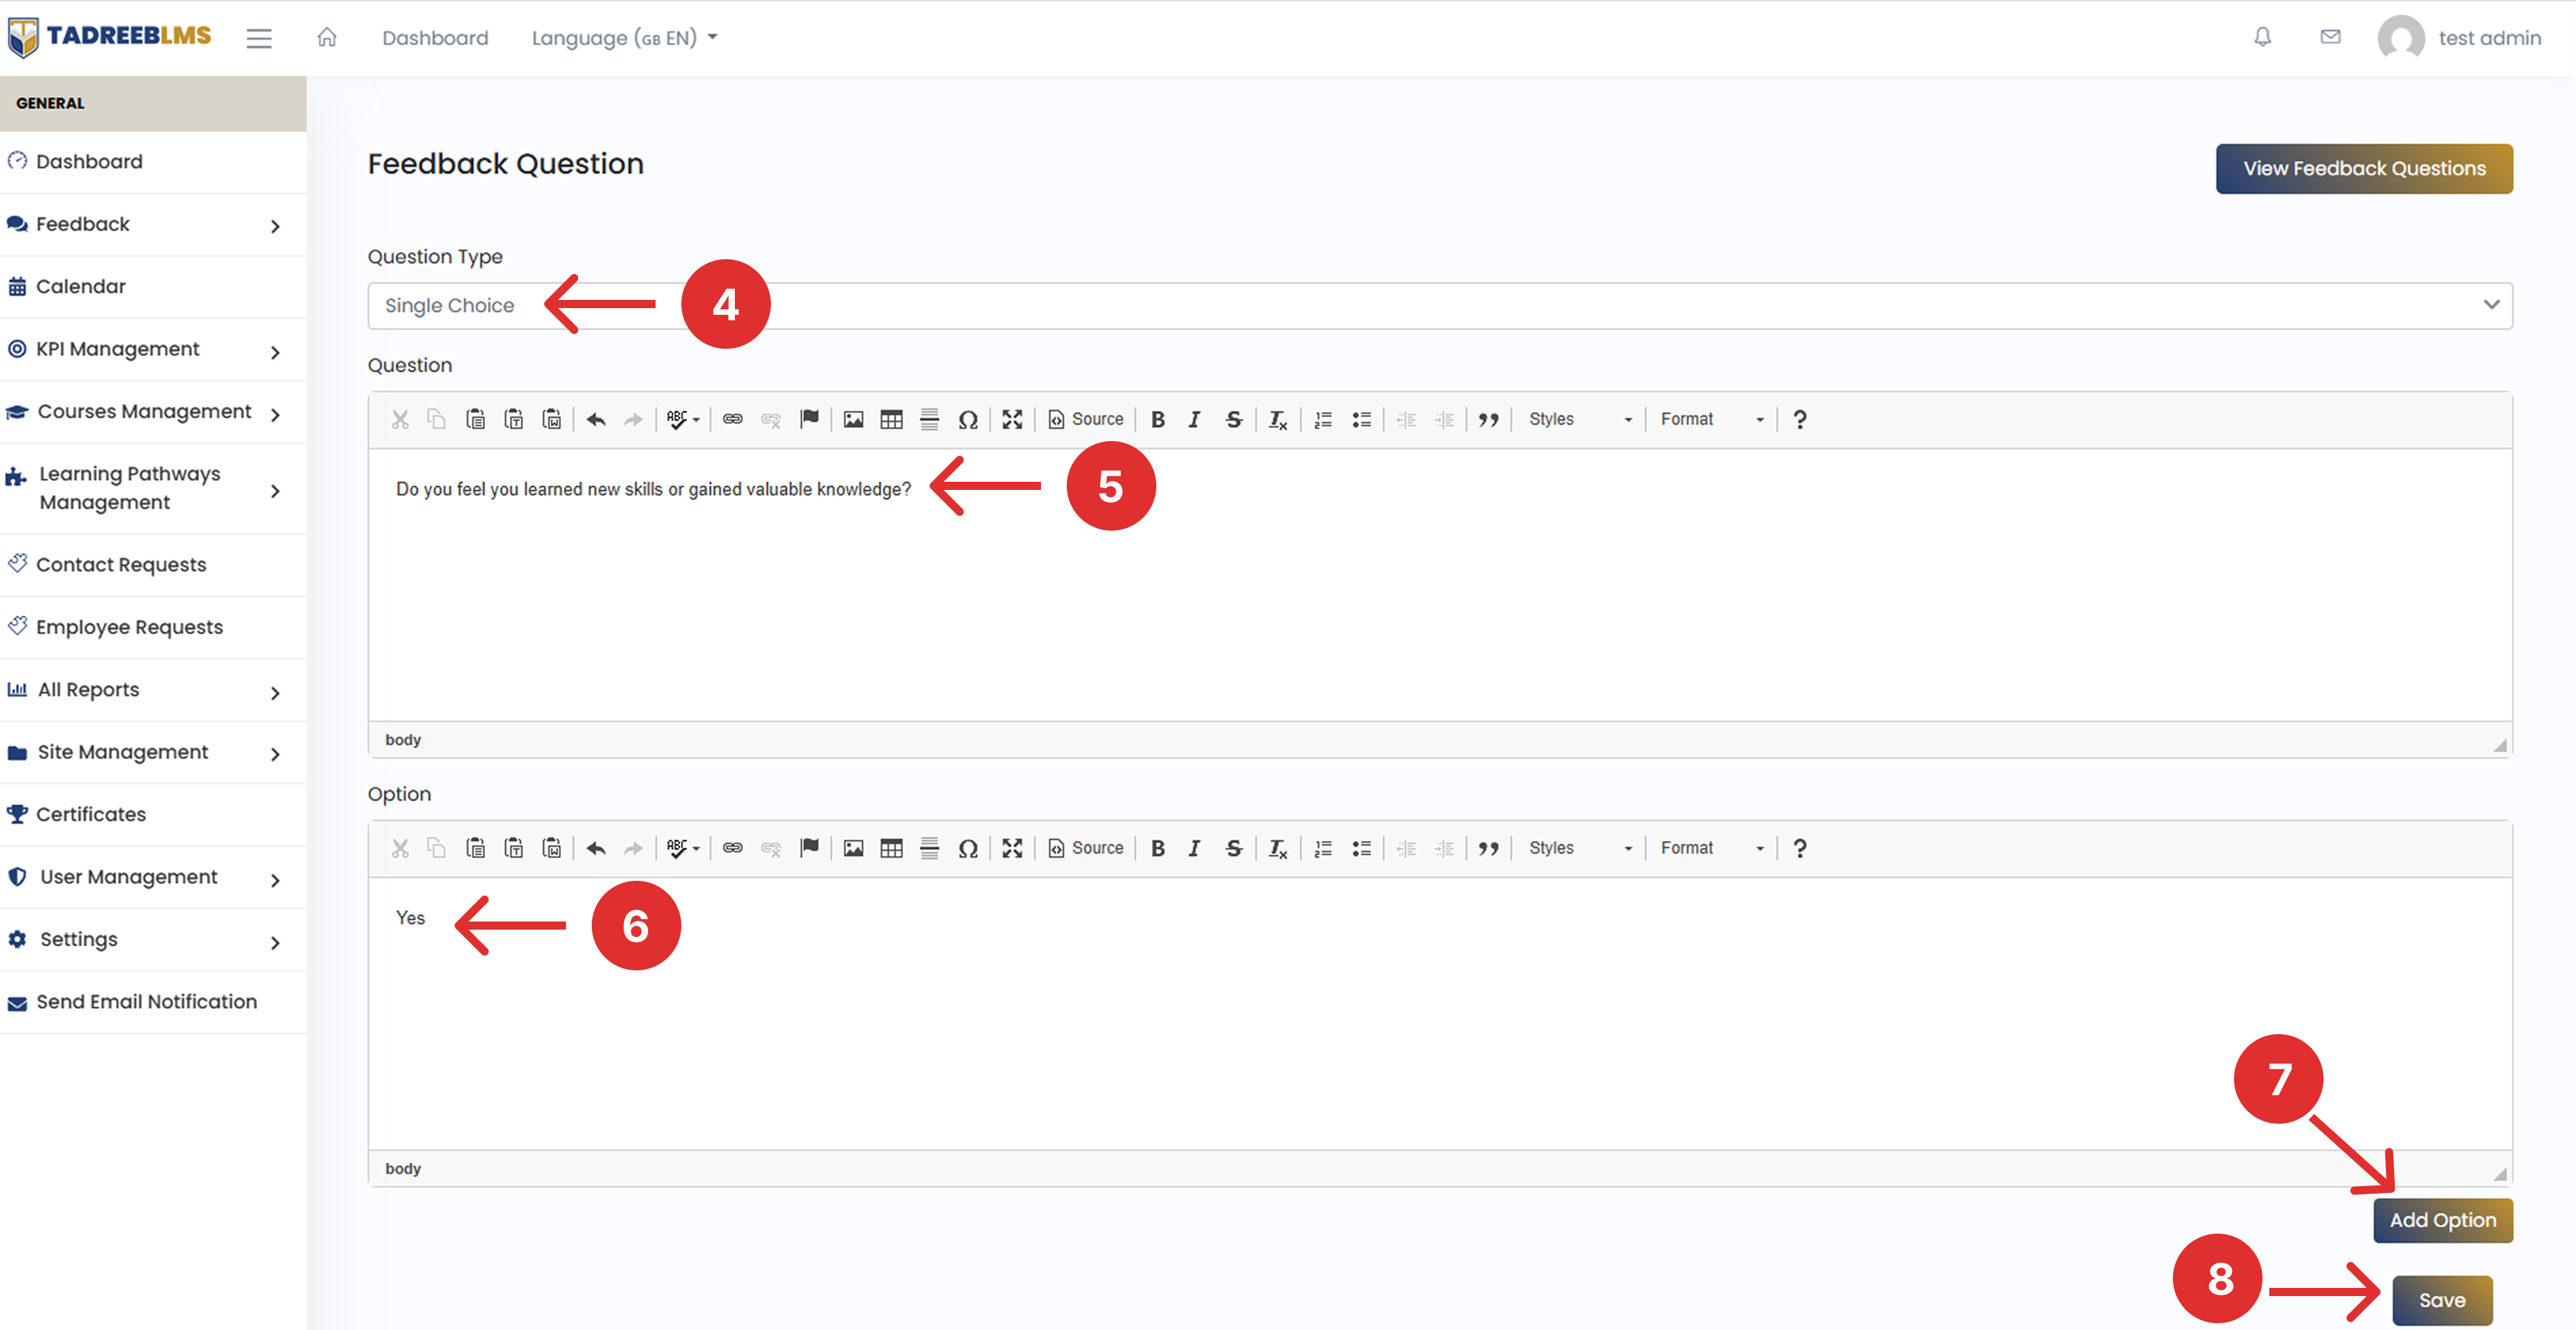
📌 Note: Click View Feedback Questions to view the added question or go back to the feedback question list.
2.2 Course Questions
The Course Questions page allows administrators to link existing feedback questions to a specific course. Once linked, these questions are shown to learners automatically when they complete that specific course.
To link feedback questions to a course:
- In the Courses field, select the course you want to assign feedback questions to from the dropdown menu.
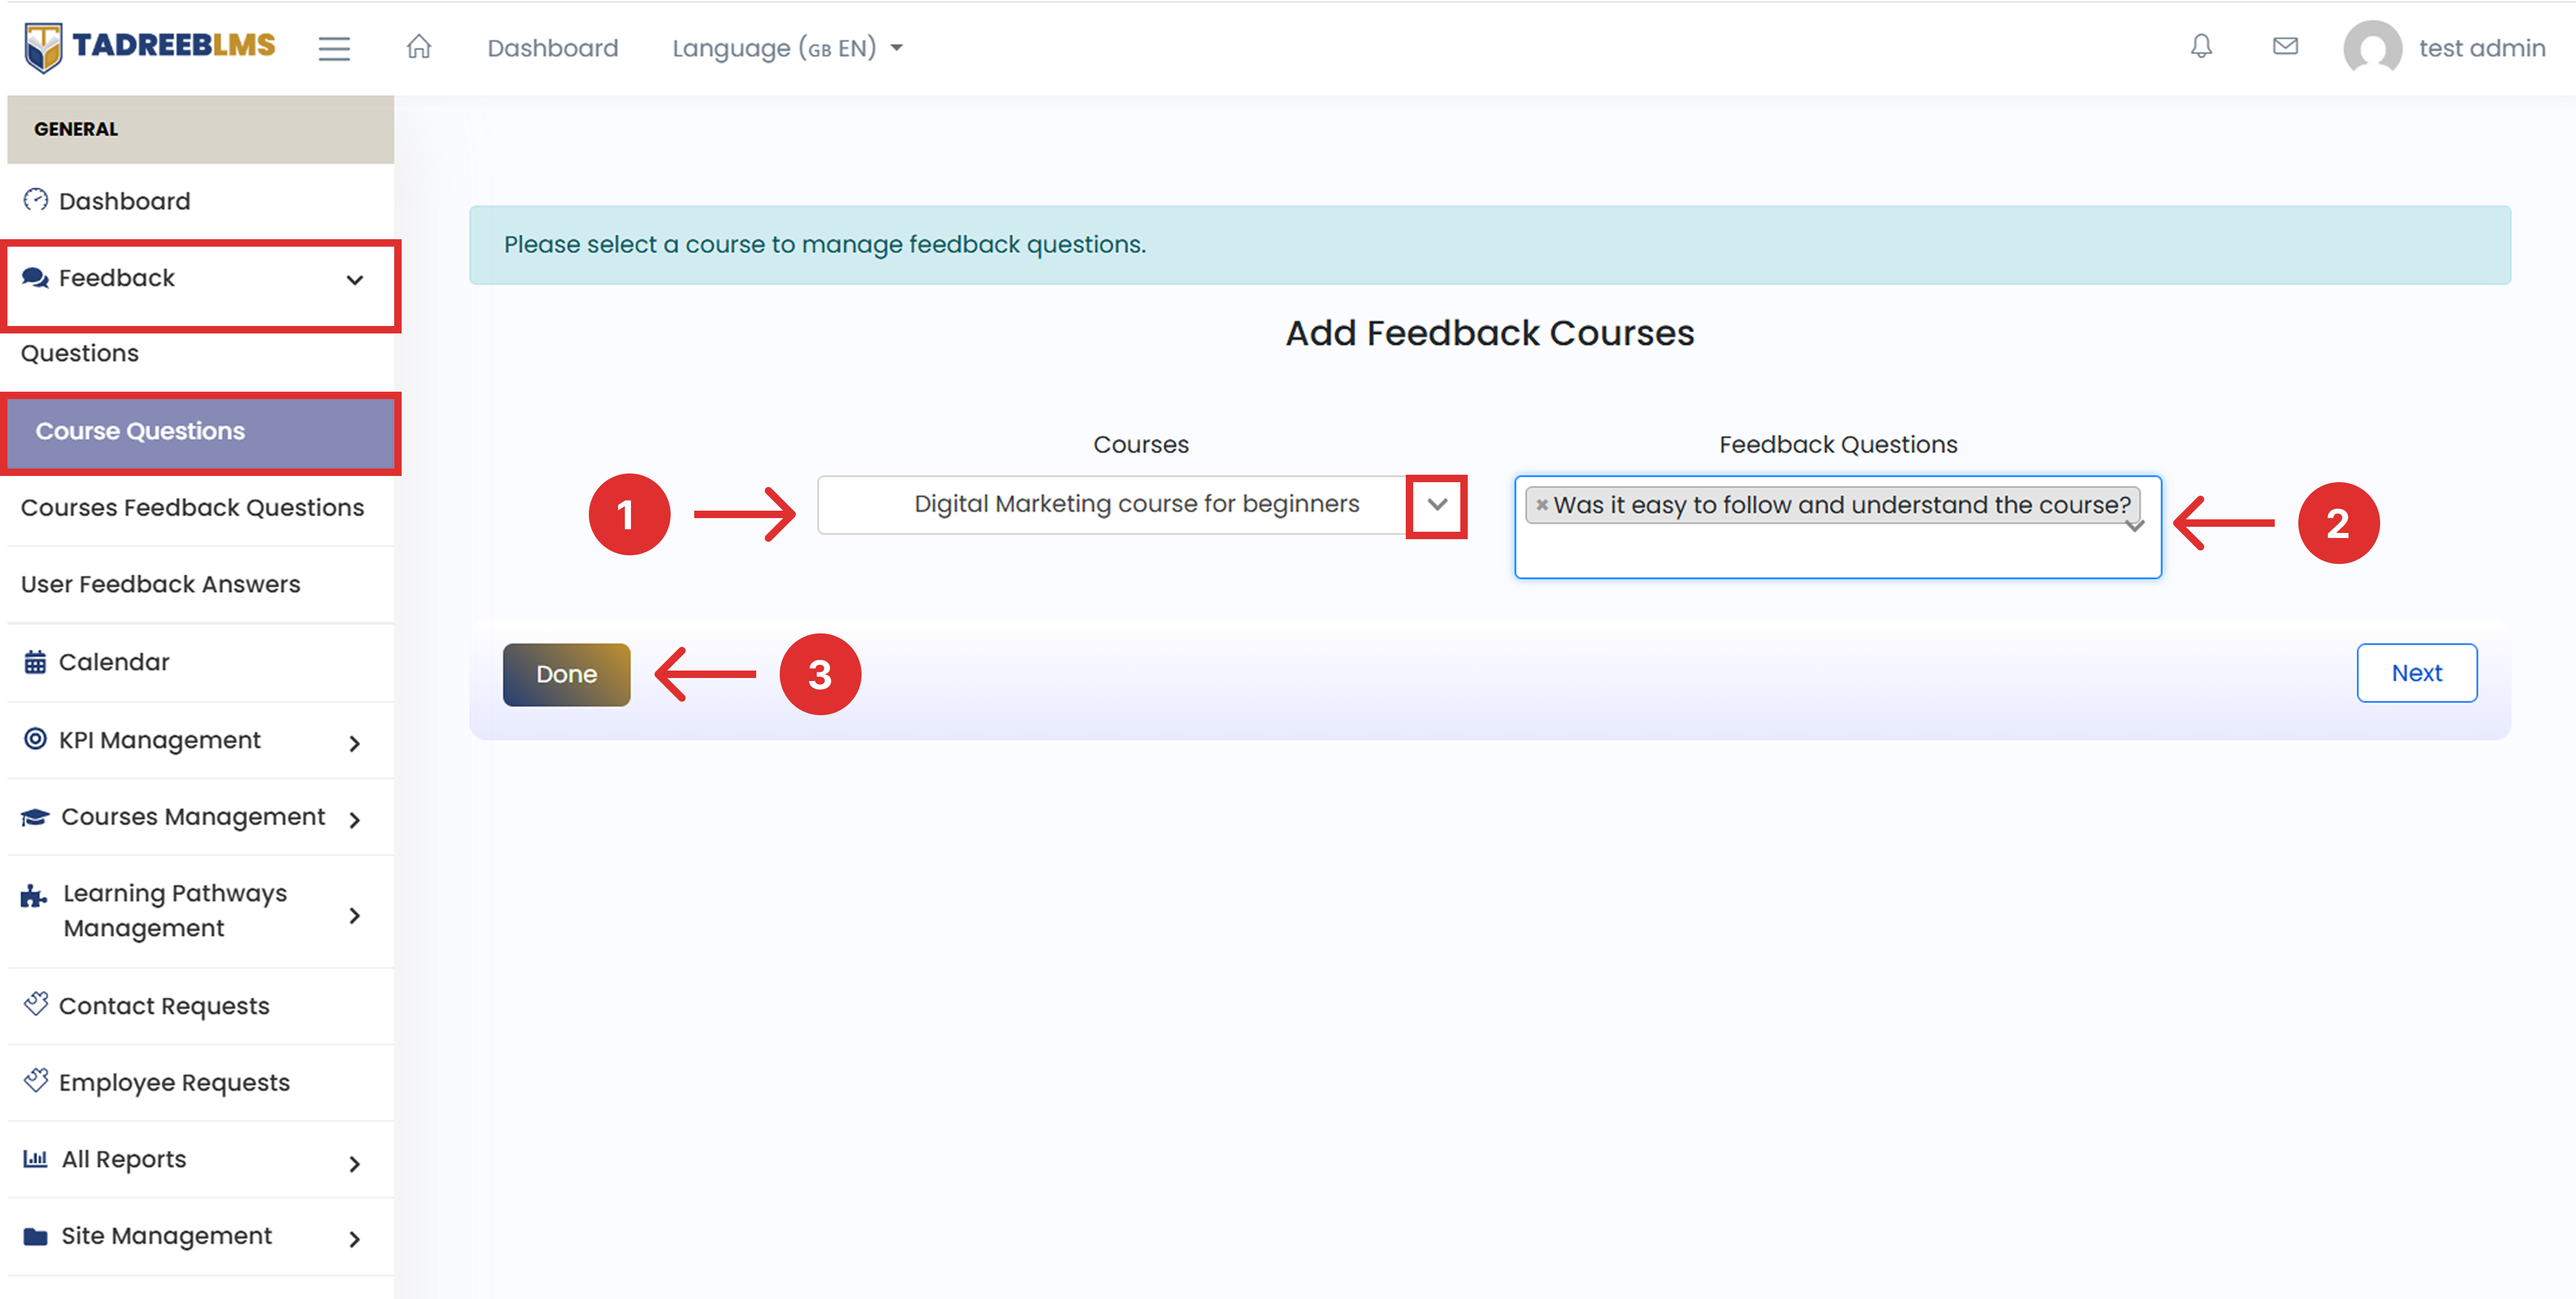
- In the Feedback Questions field, select the questions you want to link to that course.
- Click Done to save changes.
📌 Note: The feedback questions available here are the ones already created under Feedback > Questions. Make sure your questions are created there before linking them to a course.
2.3 Courses Feedback Questions
The Courses Feedback Questions page gives a quick view of which feedback questions are linked to each course. It shows the course-question mappings created on the Course Questions page.
Here you can also add or manage the feedback questions linked to a course. Actions like Edit help you update the course-question mapping, and Delete removes the mapping.
Table Headings
The table below describes the column information:
| Heading | Description |
|---|---|
| Course Name | The name of the selected course. |
| Question | The feedback question linked to that course. |
| Actions | Options to manage the linked question, such as editing or removing the course question association. |
| Add Question | Allows you to link an additional feedback question to the course directly from this page. |
2.4 User Feedback Answers
The User Feedback Answers page allows administrators to view the feedback responses submitted by learners after completing a course. Administrators can filter the feedback answers by course, user, or date range, and download the data for reporting purposes.
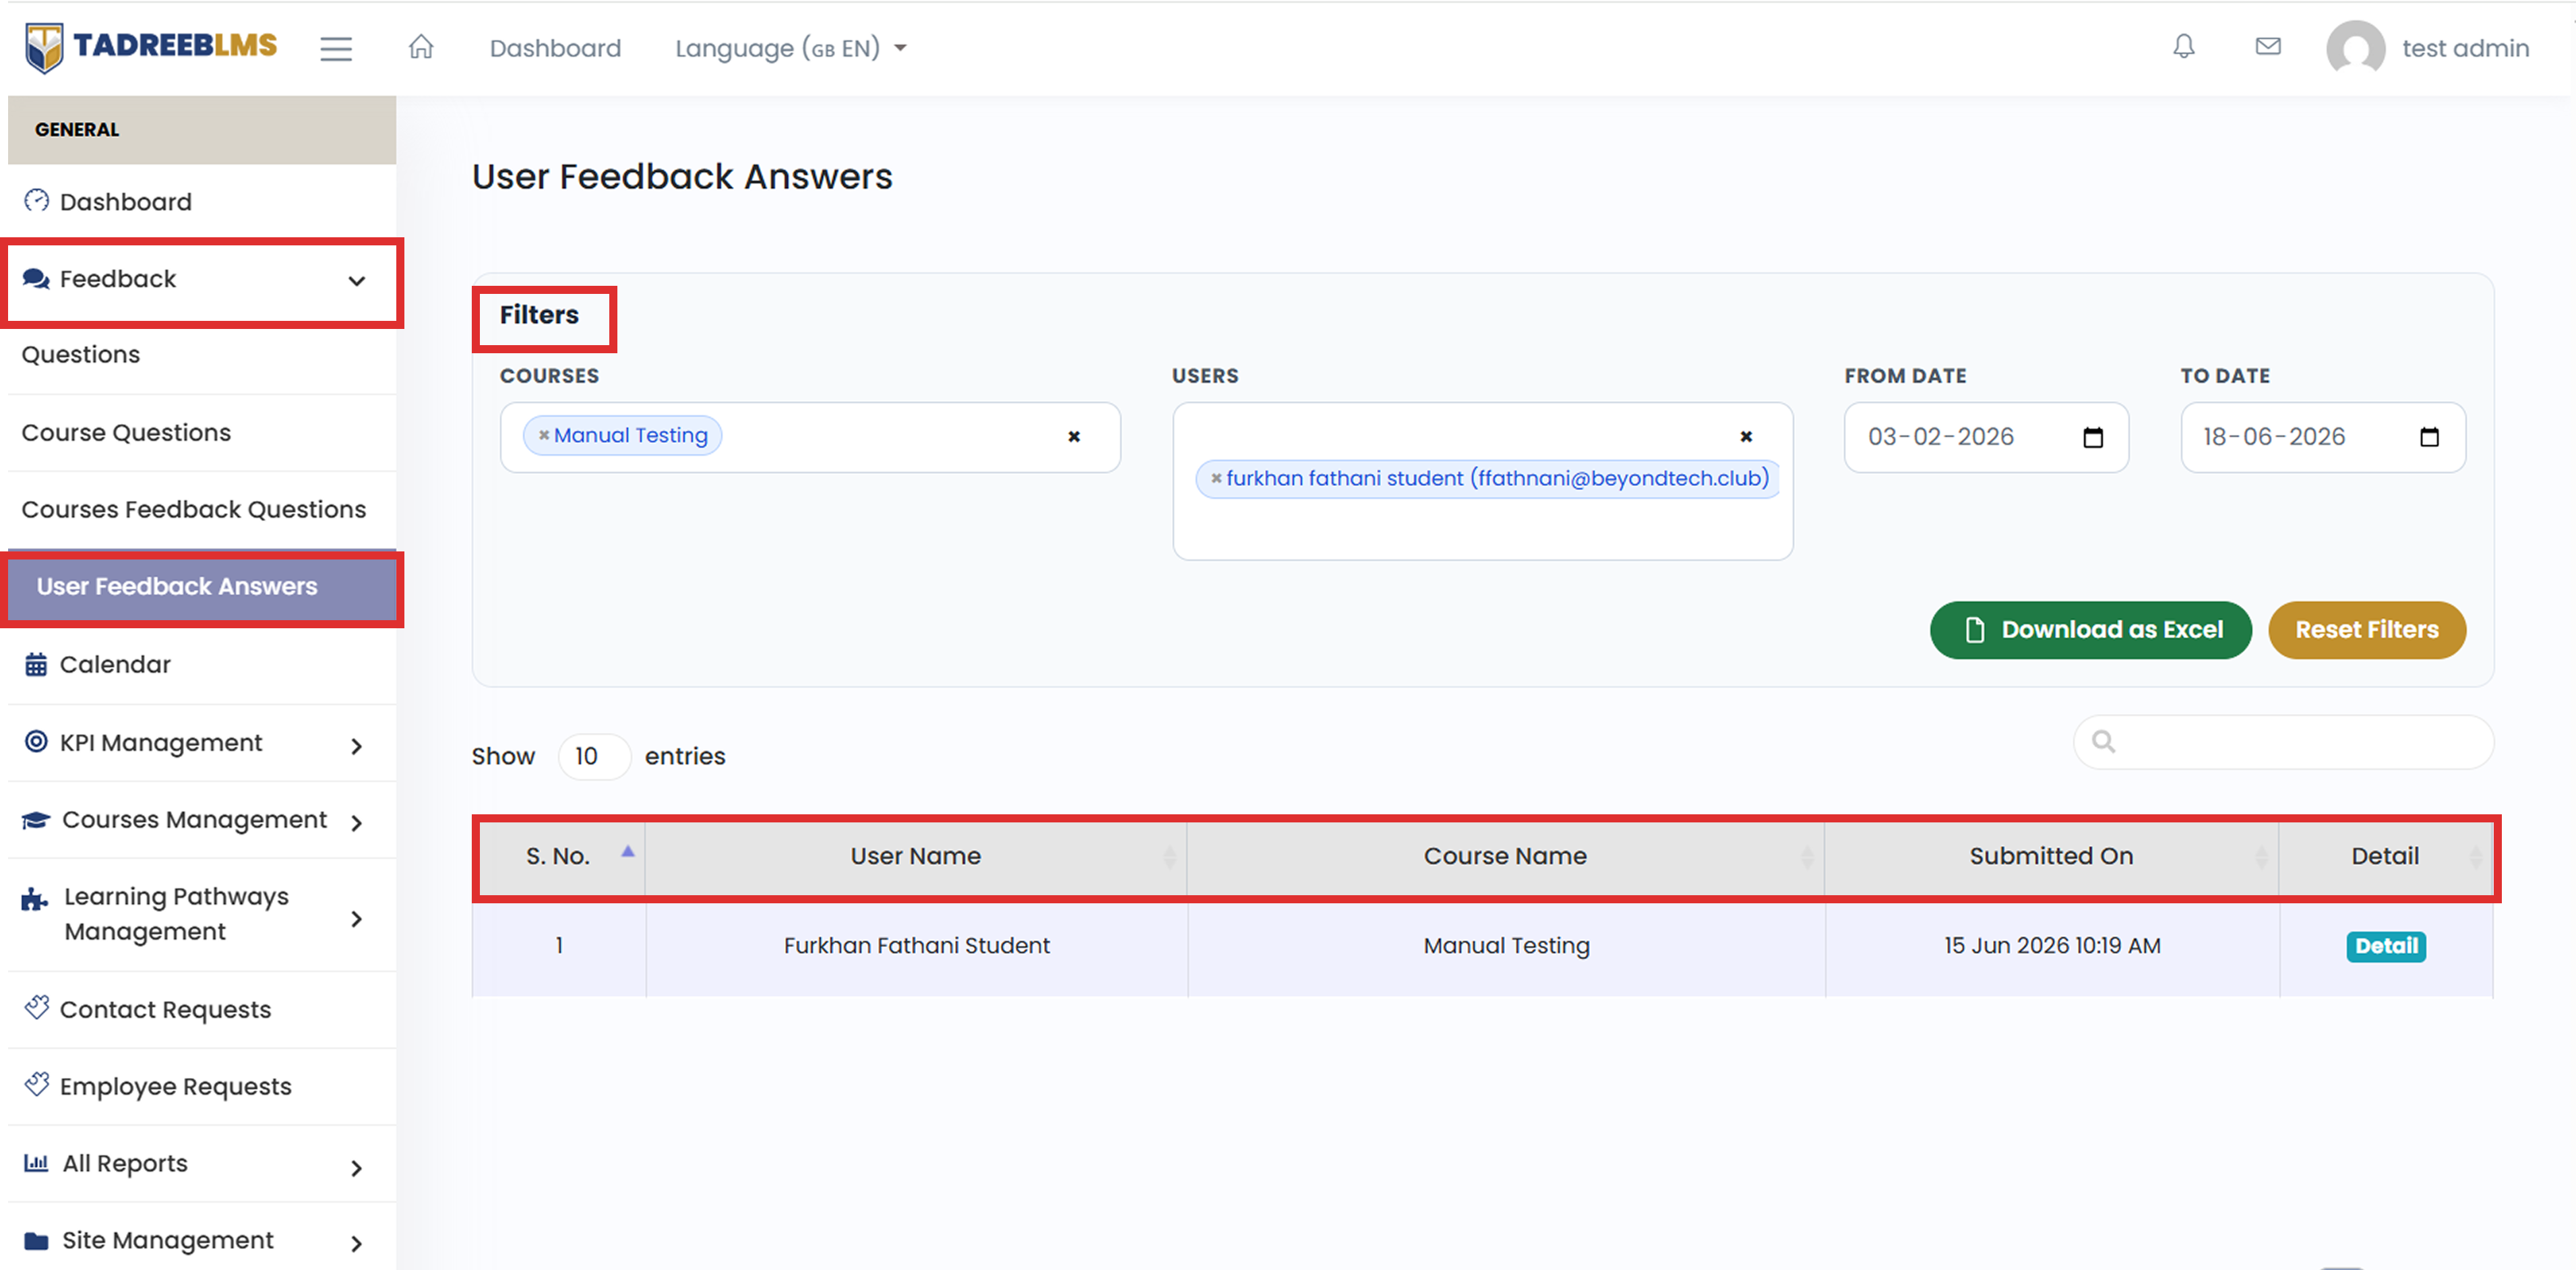
Table Headings
The table below describes the column information:
| Heading | Description |
|---|---|
| User Name | The learner's name who submitted the feedback. |
| Course Name | The name of the course for which the feedback was submitted. |
| Submitted On | The date and time when the learner submitted the feedback. |
| Detail | Click this button to view the full feedback response submitted by the learner. |
💡 Tip: Use the Search bar at the top-right of the table to find a specific entry quickly.
📌 Note: To clear all applied filters and return to the full list, click the Reset Filters button.
3. Calendar
The Calendar gives admins a quick, visual way to keep track of everything happening on the platform — lessons, live sessions, and scheduled events, all in one place.
1. Calendar Layout
The calendar uses a standard Sunday-to-Saturday weekly layout, with month-based navigation. Each date shows the events scheduled for that day, making it easy to view your week or month at a glance.
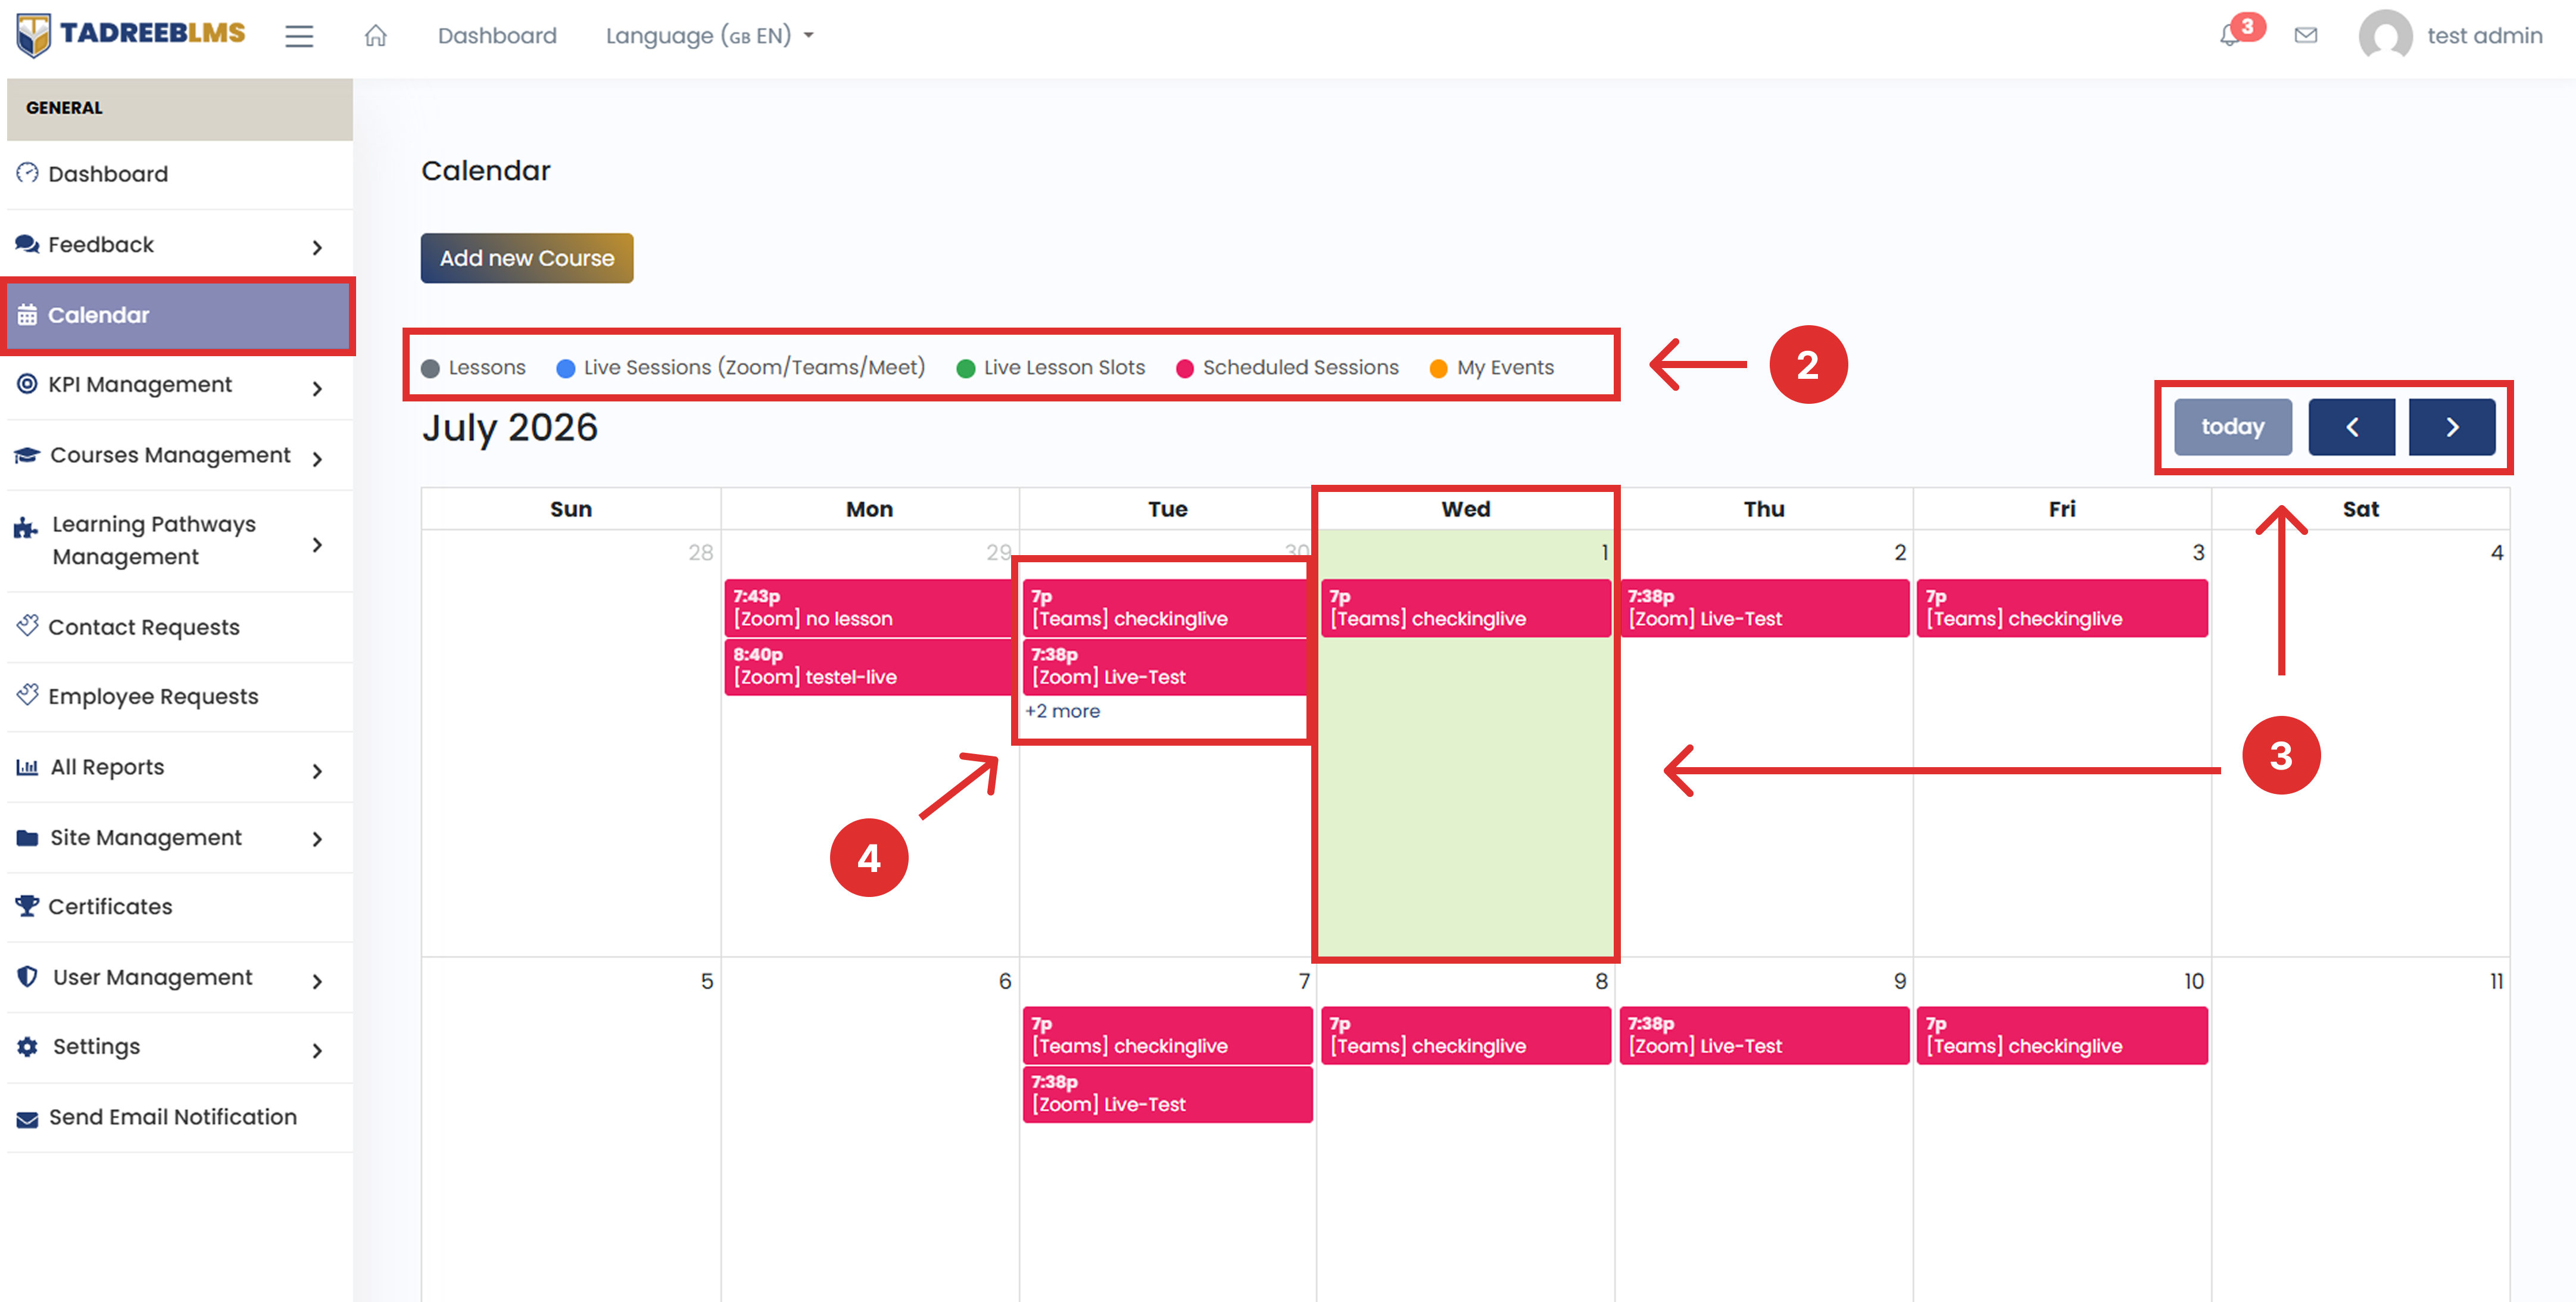
2. Colour Codes
The calendar uses colour codes so you can identify each event type:
| Colour | Event Type |
|---|---|
| Grey | Lessons |
| Blue | Live Sessions (Zoom/Teams/Meet) |
| Green | Live Lesson Slots |
| Red | Scheduled Sessions |
| Orange | My Events |
3. Navigation
Moving around the calendar is simple:
- Use the left and right arrow buttons to move between months.
- Click the Today button to jump straight back to the current date.
- The current date is highlighted with a light green background, so it's always easy to spot.
4. Event Display
- Each calendar cell shows the scheduled events for that day, along with the time, platform, and event title (for example, 7:00p [Teams] checkinglive).
- If a day has more events than can fit in the cell, an overflow indicator (like +2 more) appears at the bottom. Clicking this shows the complete list of events for that date.
3.1 Add New Course
4. KPI Management
KPI Management lets admins create, organise, and monitor key performance indicators (KPIs) in Tadreeb LMS. KPIs can measure metrics such as learning time, course completion, and platform activity.
From this section, an admin can:
- Create new KPIs (for example, "Time-KPI" or "Activity-KPI")
- Group KPIs into categories (for example, "Cloud Computing" or "Cyber Security")
- Set a target for each KPI (the expected result)
- See the current value each KPI has actually reached
- See how much each KPI contributes to the overall score, through its weighted score
- Deactivate, edit, or archive KPIs that are no longer needed
📋 Before you start: You need admin access to manage KPIs. Click the menu icon (☰), then go to KPI Management > KPIs.
In short, this is the control centre where an admin decides what gets measured (KPI), how important each measurement is (Weight), and what result is expected (Target).
4.1 KPI
KPI stands for Key Performance Indicator. It is a measurable value used to track performance. Think of it like a report card metric.
Instead of one big score for "performance," you break it down into smaller, specific things you can actually measure — like time spent studying, number of courses finished, or how active someone is. Each of those smaller measurements is a KPI.
In Tadreeb LMS, KPIs help admins measure student performance using metrics (number-based way) such as learning time, course completion, and platform activity.
Total KPI Weight
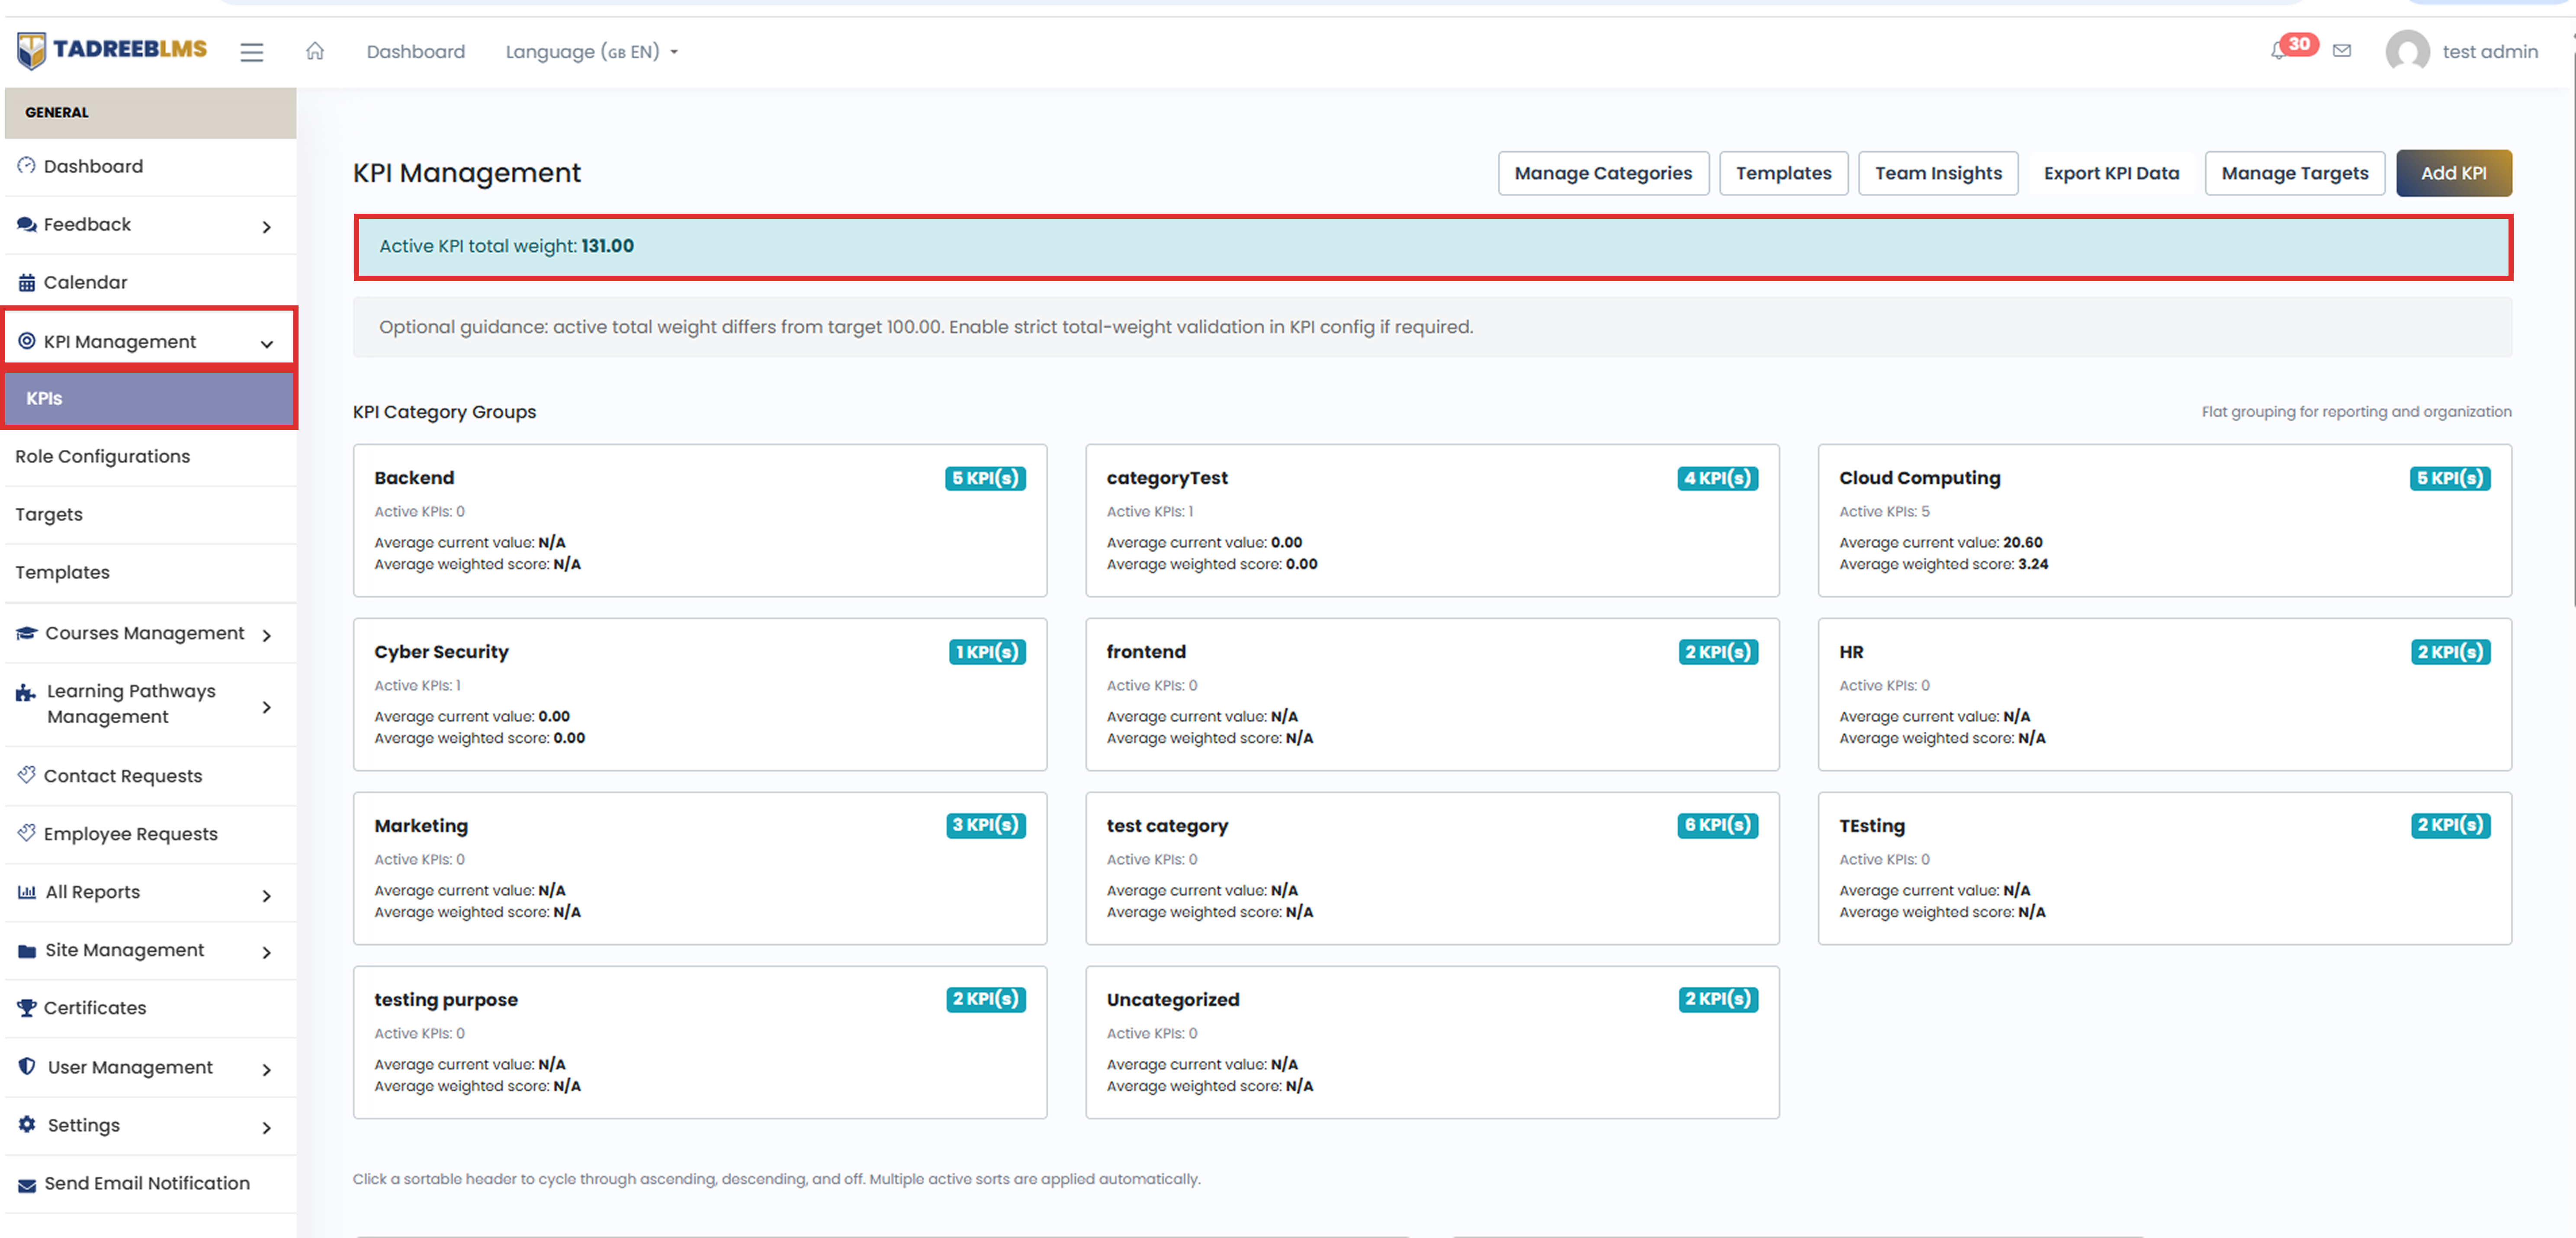
At the top of the KPI Management page, you can see the Active KPI total weight.
Each KPI has a weight that determines how much it contributes to the overall score. A higher weight gives the KPI a greater contribution.
Active KPI total weight is the sum of the weights of all active KPIs. For example, if the active KPIs have weights of 20, 40, 30, and 41:
20 + 40 + 30 + 41 = 131
So, the Active KPI total weight = 131.00.
📌 Note: The total weight does not have to equal 100 unless strict total-weight validation is enabled in the KPI configuration settings.
4.1.2 Category Groups
Category Groups help you organise KPIs by category. Each KPI you create can be assigned to one or more categories.
Examples include Backend, Cloud Computing, Cyber Security, HR, and Marketing.
To view all categories, go to KPI > Manage Category at the top of the page.
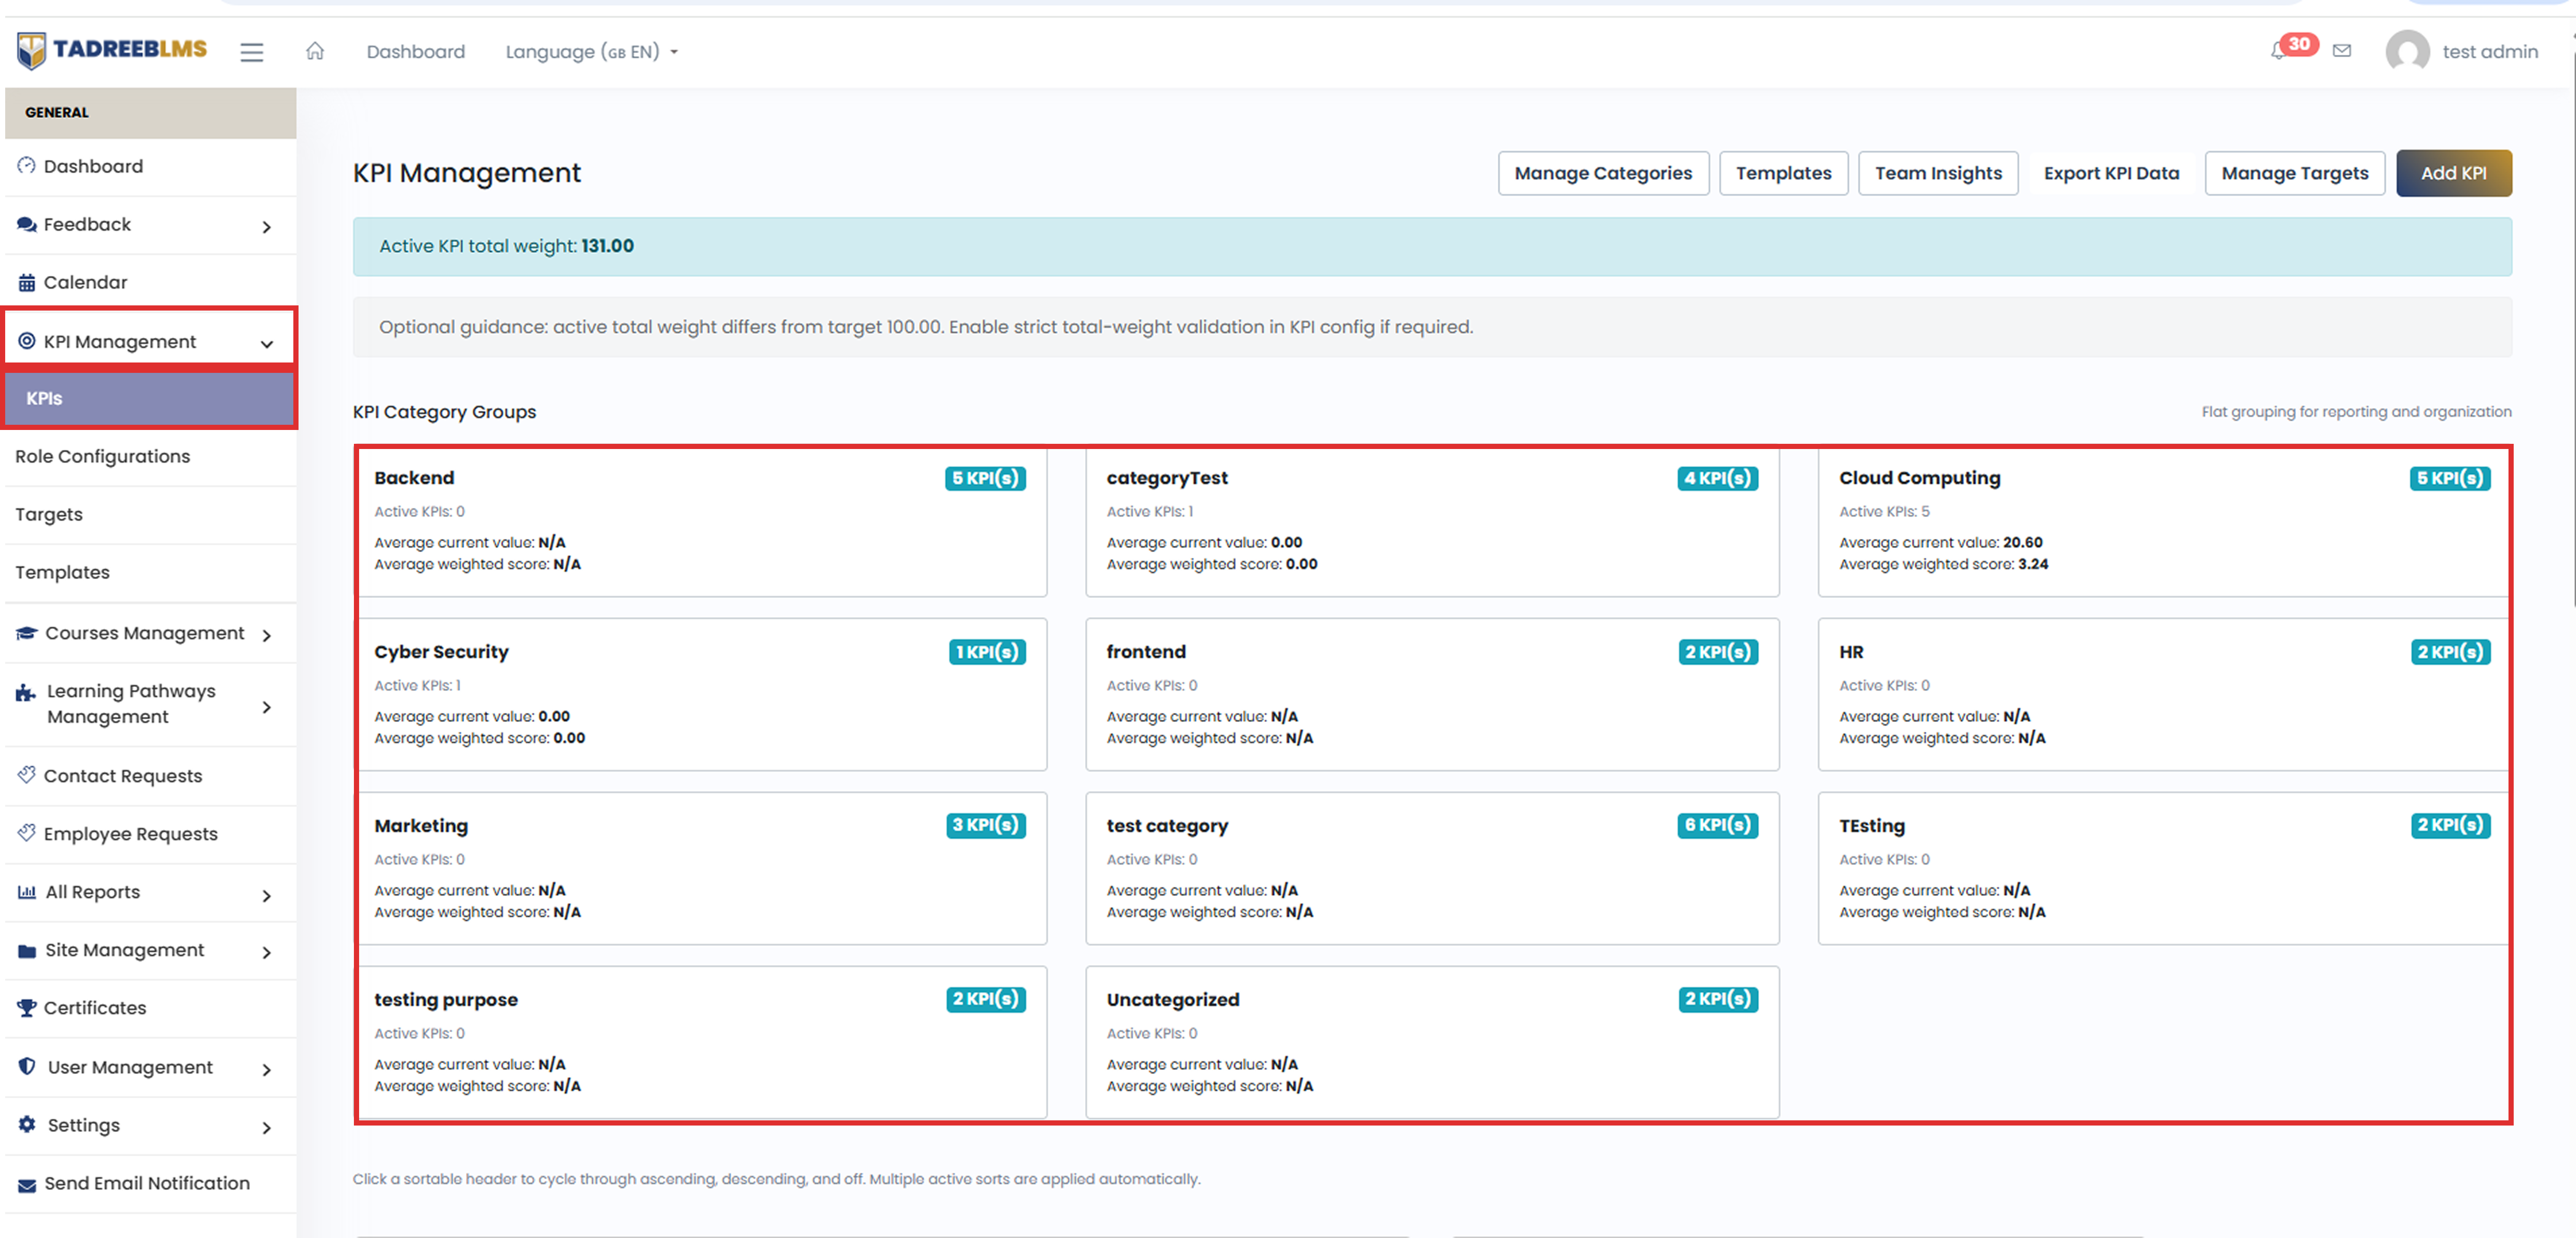
Each Category Group card shows you a quick summary:
-
KPI Count: Total number of KPIs in the category
-
Active KPIs: Number of active KPIs in the category
-
Average current value: The average of the current values of all active KPIs in this category
-
Average weighted score: The average of the weighted scores of all active KPIs in this category For example, the Cloud Computing category shows:
-
Active KPIs: 5
-
Average current value: 20.60 (average of the current values of the 5 active KPIs)
-
Average weighted score: 3.24 (average of the weighted scores of the 5 active KPIs)
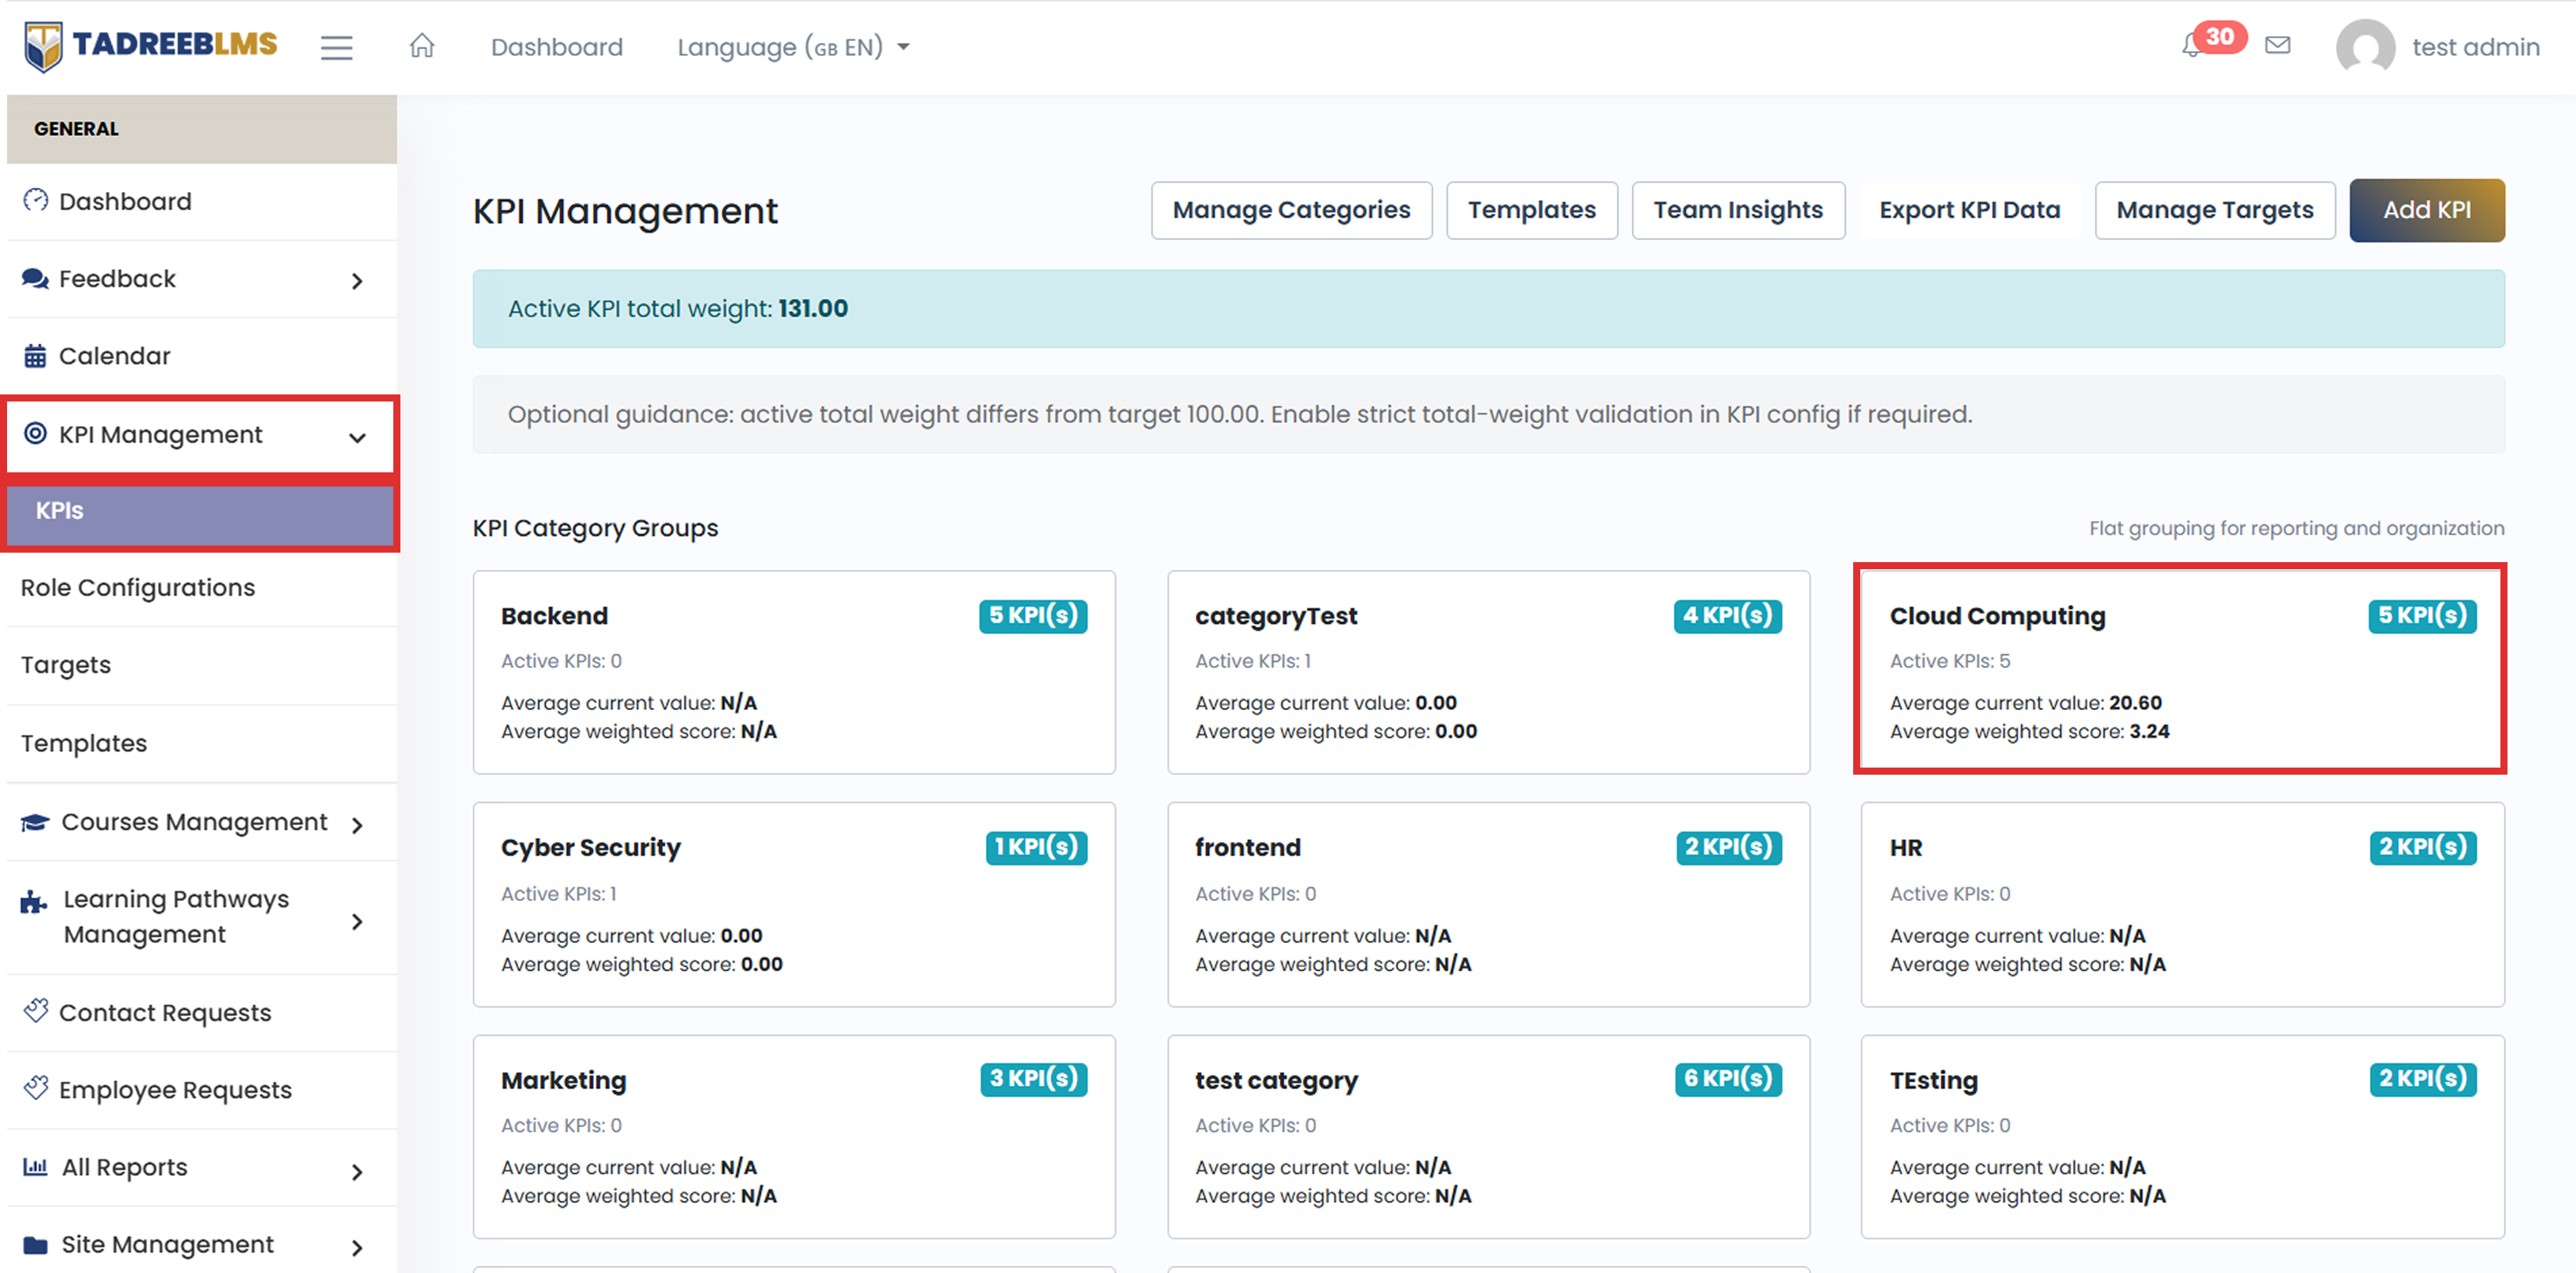
📌 Note: If a category has no active KPIs, the average values show N/A.
4.1.3 KPIs List
When you navigate to the KPIs list (the table view), you'll see every KPI listed individually, along with its metrics (numbers).
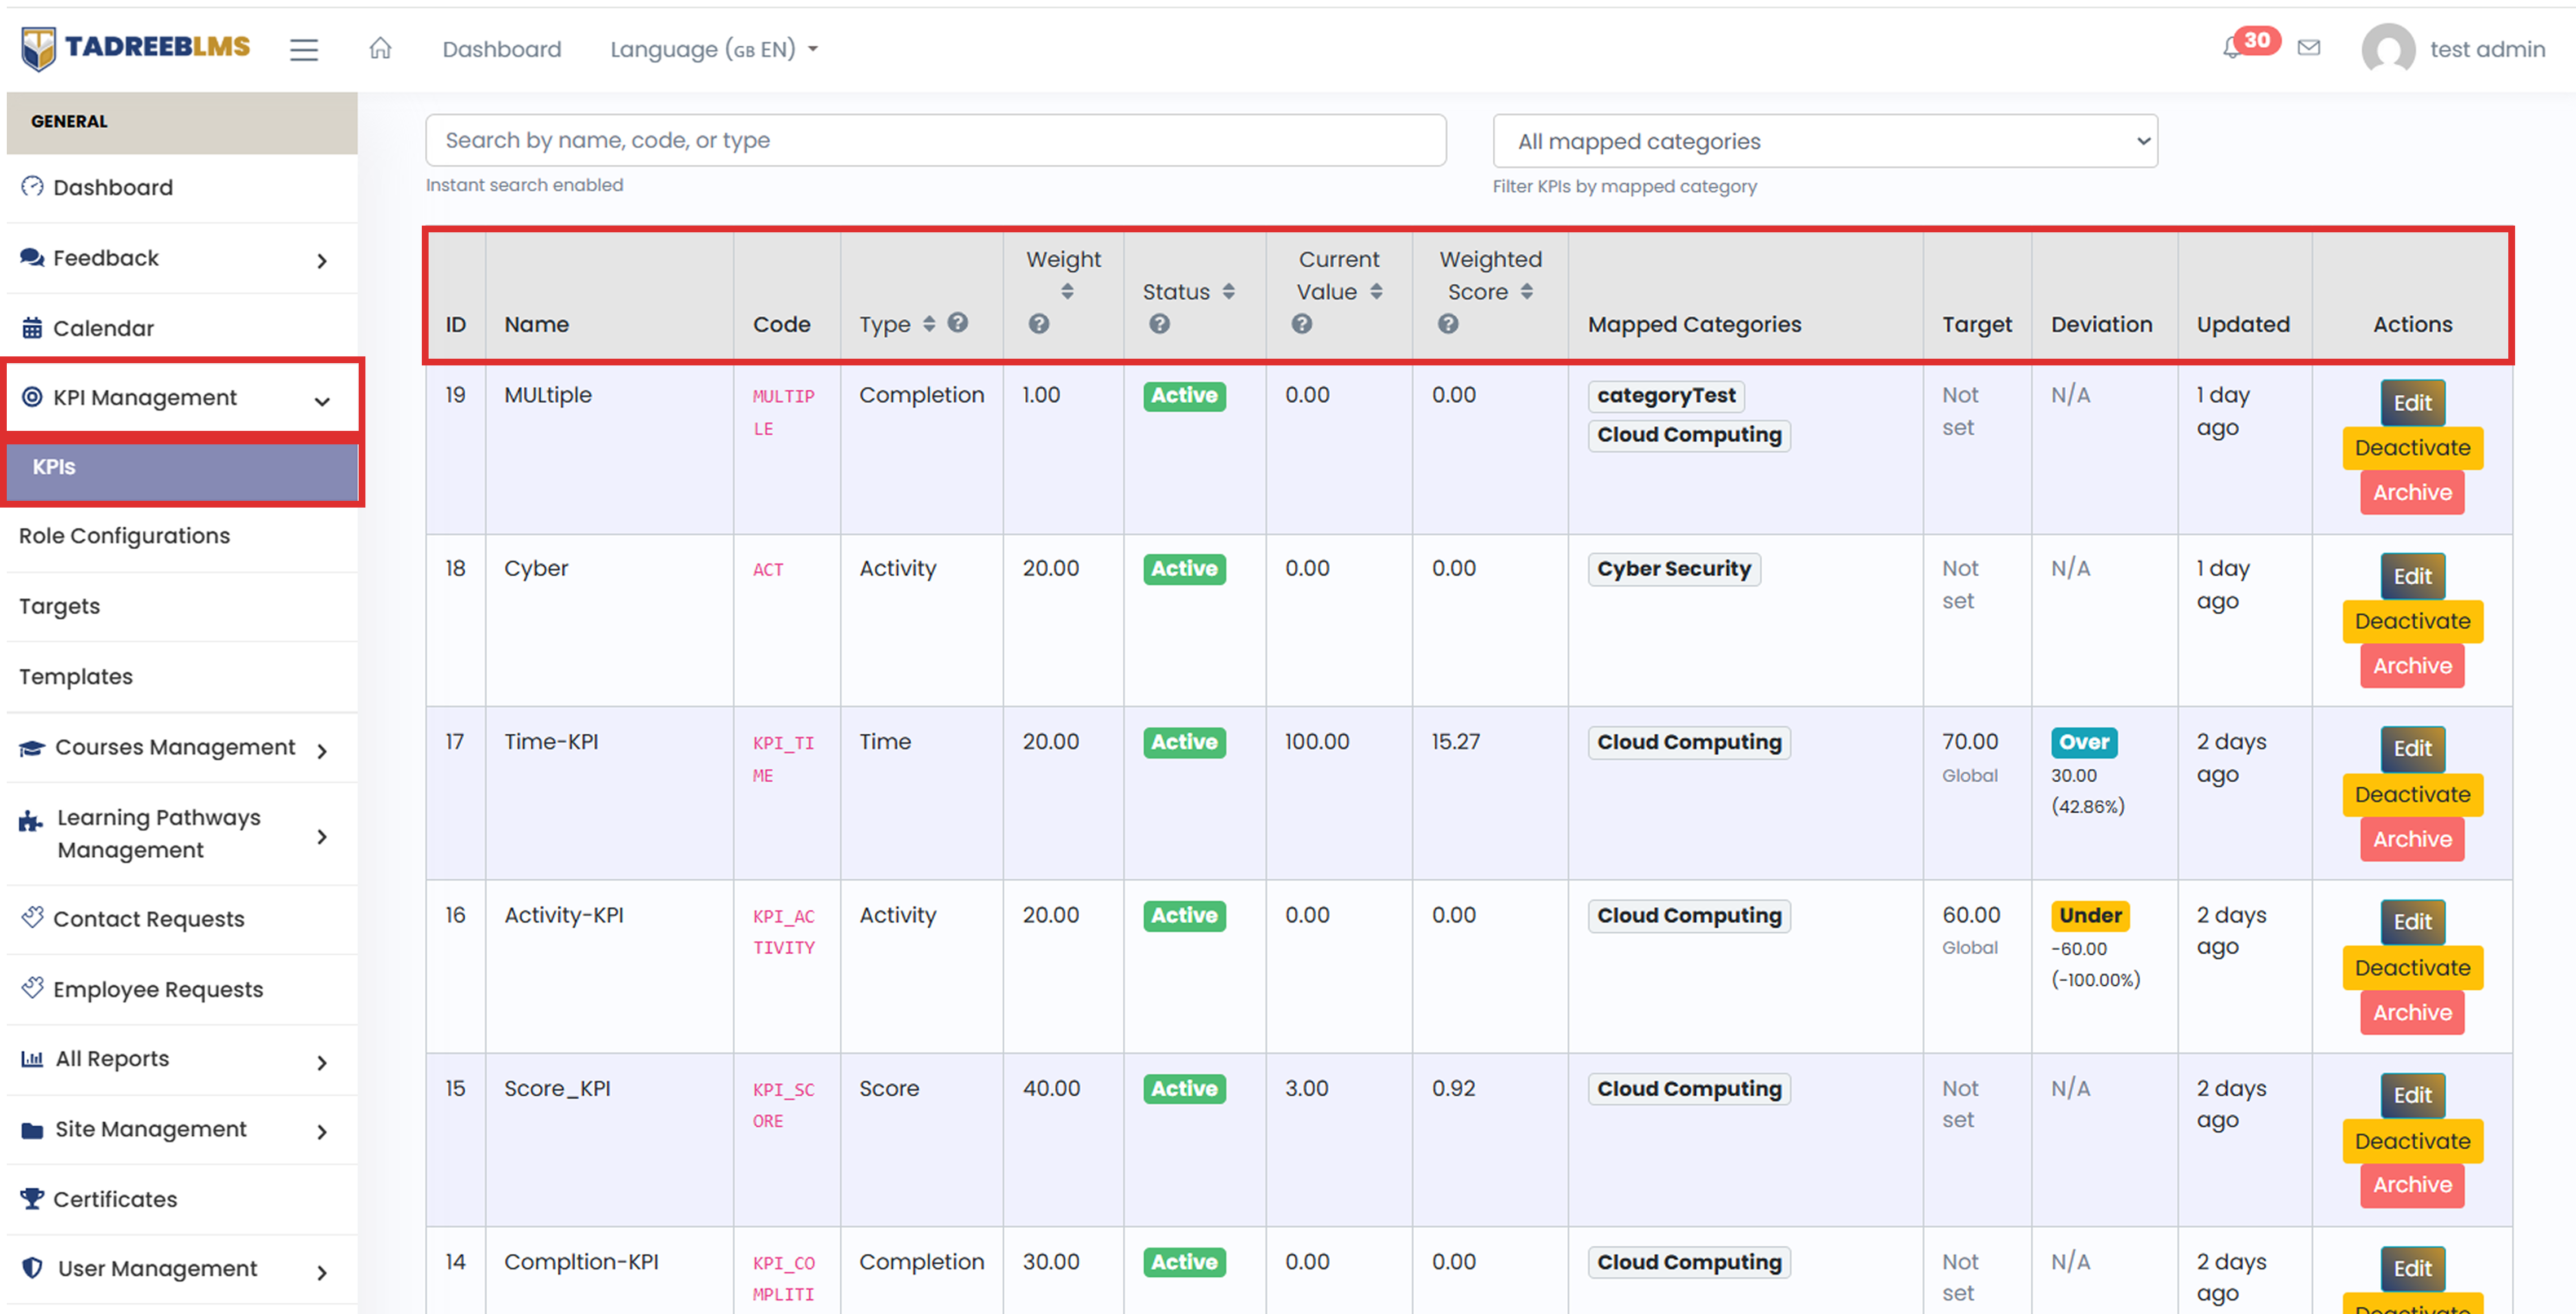
The table below describes the column information:
| Column | Description |
|---|---|
| ID | A unique number automatically assigned to the KPI. |
| Name | The name of the KPI, such as Time-KPI. |
| Code | A short code used to identify the KPI, such as KPI_TIME. |
| Type | The type of measurement used by the KPI, such as Completion, Activity, Time, or Score. |
| Weight | Determines how much the KPI contributes to the overall score compared with other active KPIs. The sum of the weights of all active KPIs within each category must equal the Active KPI total weight shown at the top of the page. |
| Status | Shows whether the KPI is Active. |
| Current Value | Shows the actual value measured for the KPI. |
| Weighted Score | Shows the KPI's contribution to the overall score after applying its weight. (See the weighted score calculation in the following section) |
| Mapped Categories | Shows the Category Groups assigned to the KPI. |
| Target | Shows the expected value for the KPI. Displays Not set if no target is configured. |
| Deviation | Shows the difference between the current value and the target, including whether the result is Over or Under. |
| Updated | Shows when the KPI was last updated. |
| Actions | Lets you Edit, Deactivate, or Archive the KPI. |
💡 Tip: Click a sortable column header, such as Weight, Status, or Weighted Score, to sort the table. Click the header again to change the sort order or turn sorting off. Use the search box to search by name, code, or type, or use the category dropdown to filter KPIs by mapped category.
4.1.3.1 Weighted Score Calculation
The Weighted Score shows how much a single KPI contributes to the overall KPI score based on its weight.
Formula:
Weighted Score = Current Value × (KPI Weight ÷ Total Active KPI Weight)
In simple terms, the formula first calculates the KPI's share of the total active weight and then applies that share to the Current Value.
Example: Time-KPI
For the Time-KPI:
- Current Value: 100
- KPI Weight: 20
- Total Active KPI Weight: 131
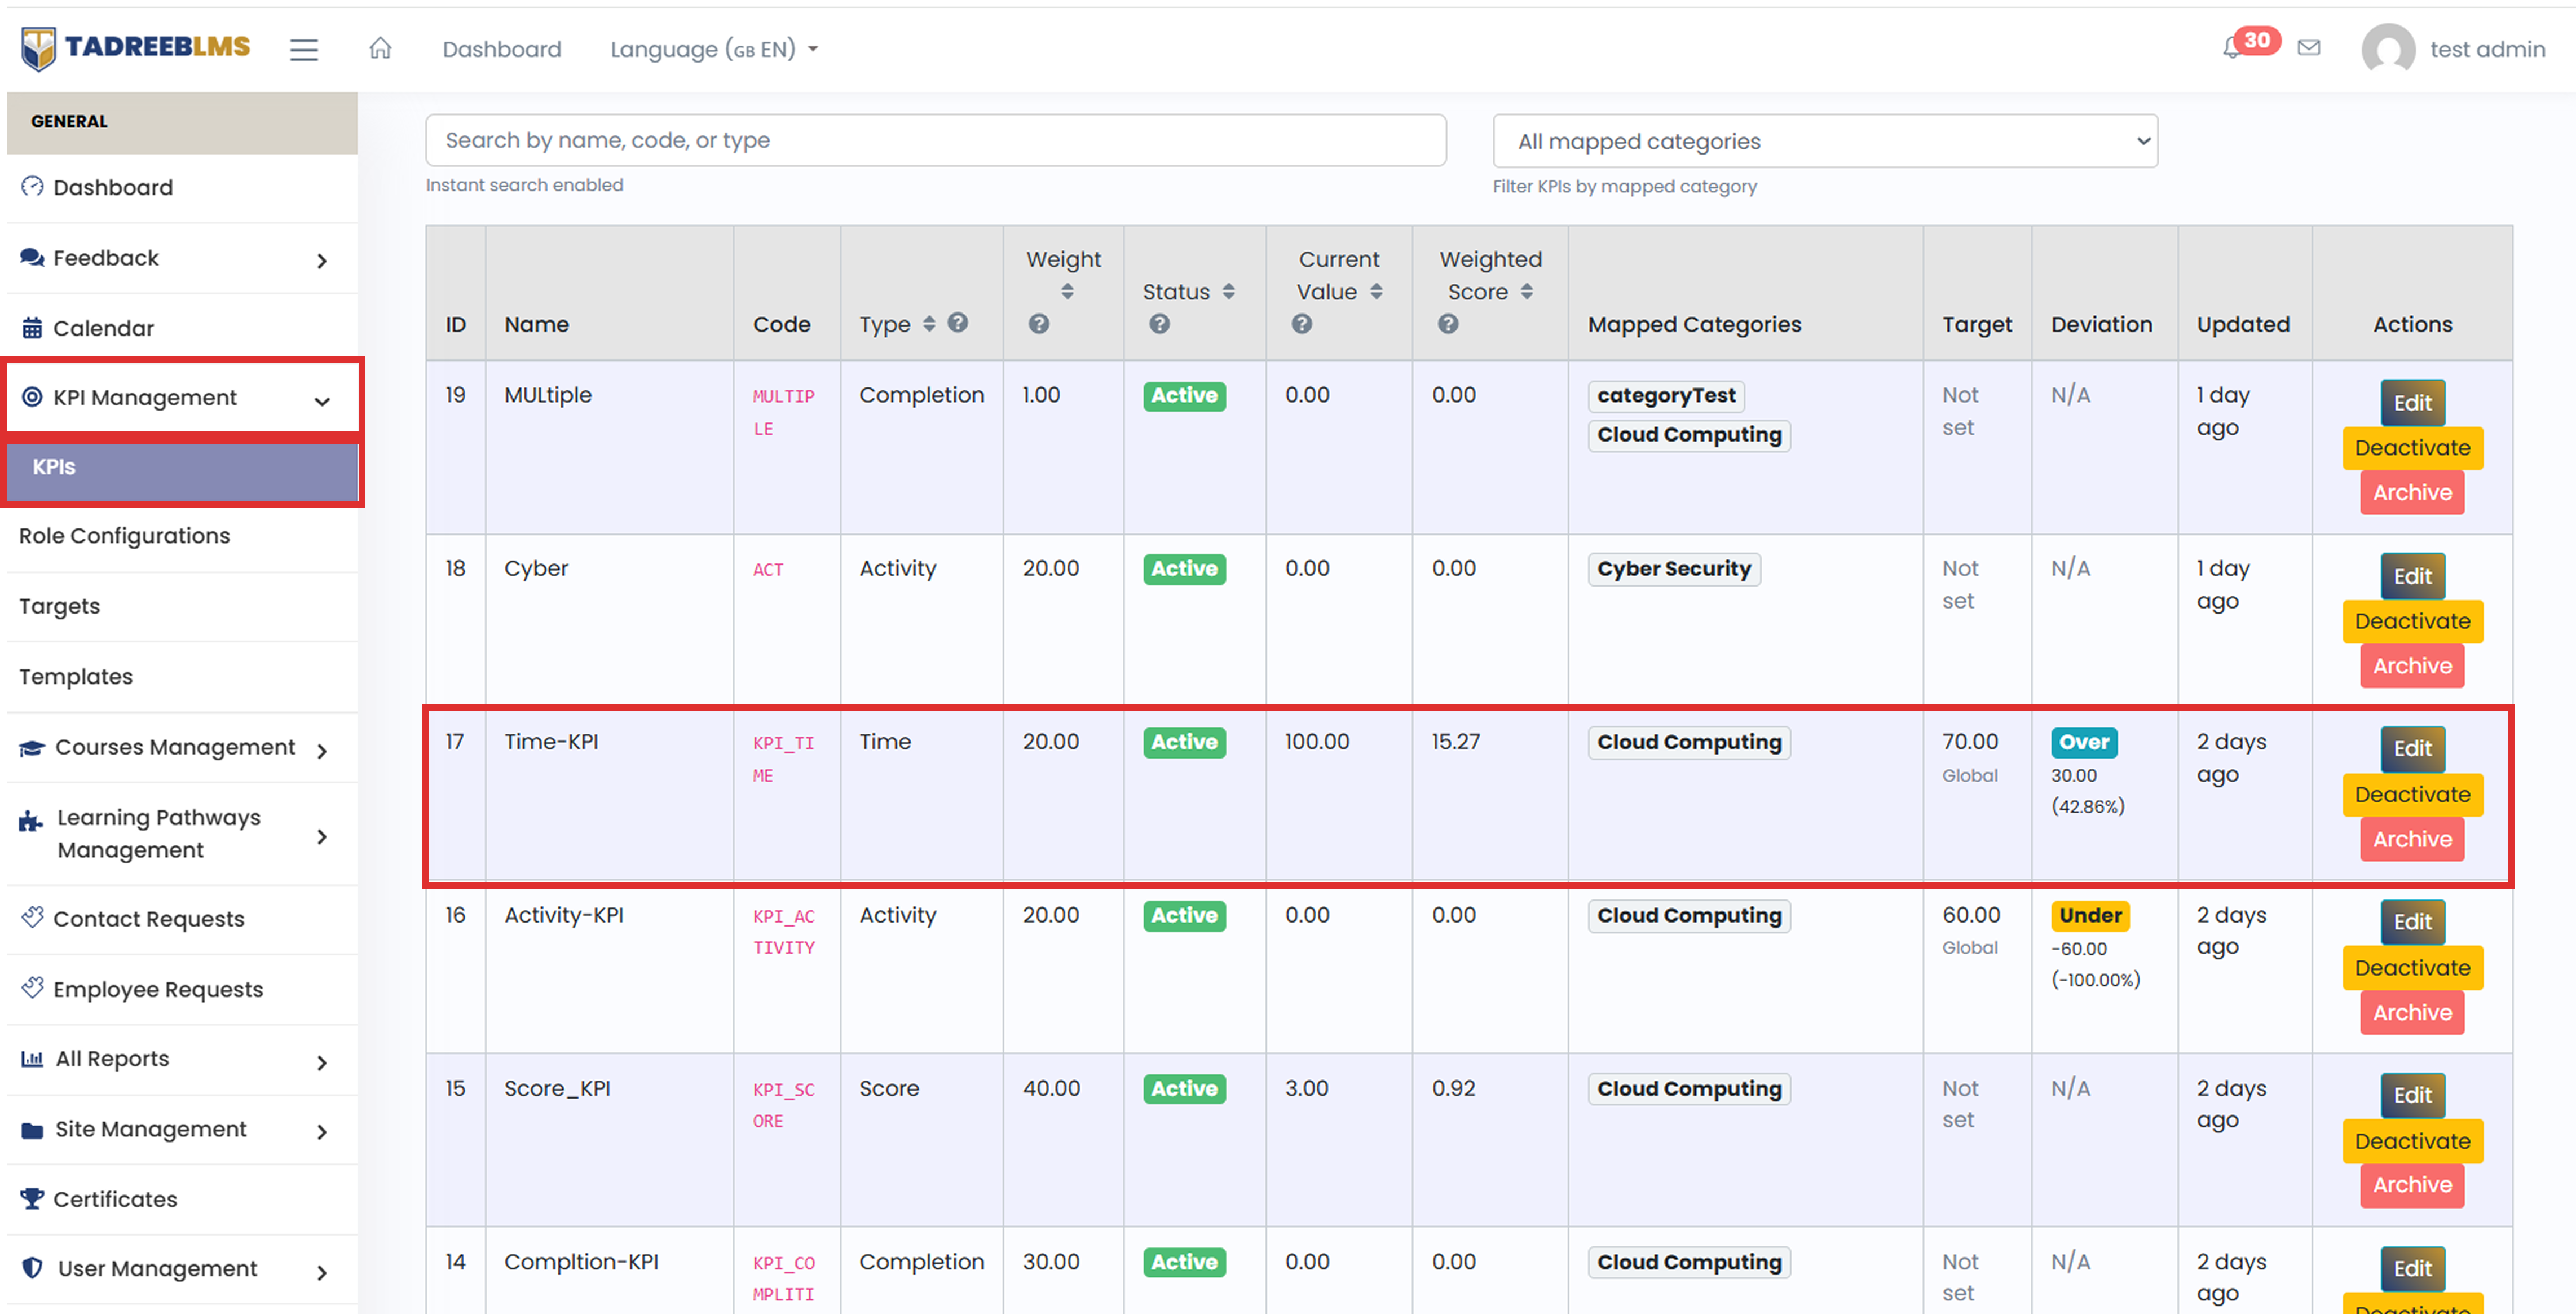
First, calculate the KPI's share of the total active weight:
20 ÷ 131 = 0.1527
So the Time-KPI has approximately 15.27% of the total active weight.
Next, apply this percentage to the Current Value:
100 × 15.27% = 15.27
Therefore, the Weighted Score is 15.27, which matches the value shown in the KPI table.
Calculation
Weighted Score = 100 × (20 ÷ 131) = 100 × 0.1527 = 15.27
Therefore, the Weighted Score is 15.27.
📌 Note: A KPI with a higher weight will produce a higher weighted score for the same current value, because it holds a bigger share of the total. Weight helps admins decide which KPIs should contribute more to the overall score.
4.1.3.2 Understanding Target and Deviation
Target is the value an admin expects a KPI to achieve. It can be set for a specific role and course.
For the Time-KPI in the example:
- Role: Student
- Course: All courses
- Target: 70 (shown as "Global" in the table, meaning it applies across all courses for that role) So the system is essentially saying: "For students, across all courses, we expect this KPI to reach a Target of 70."
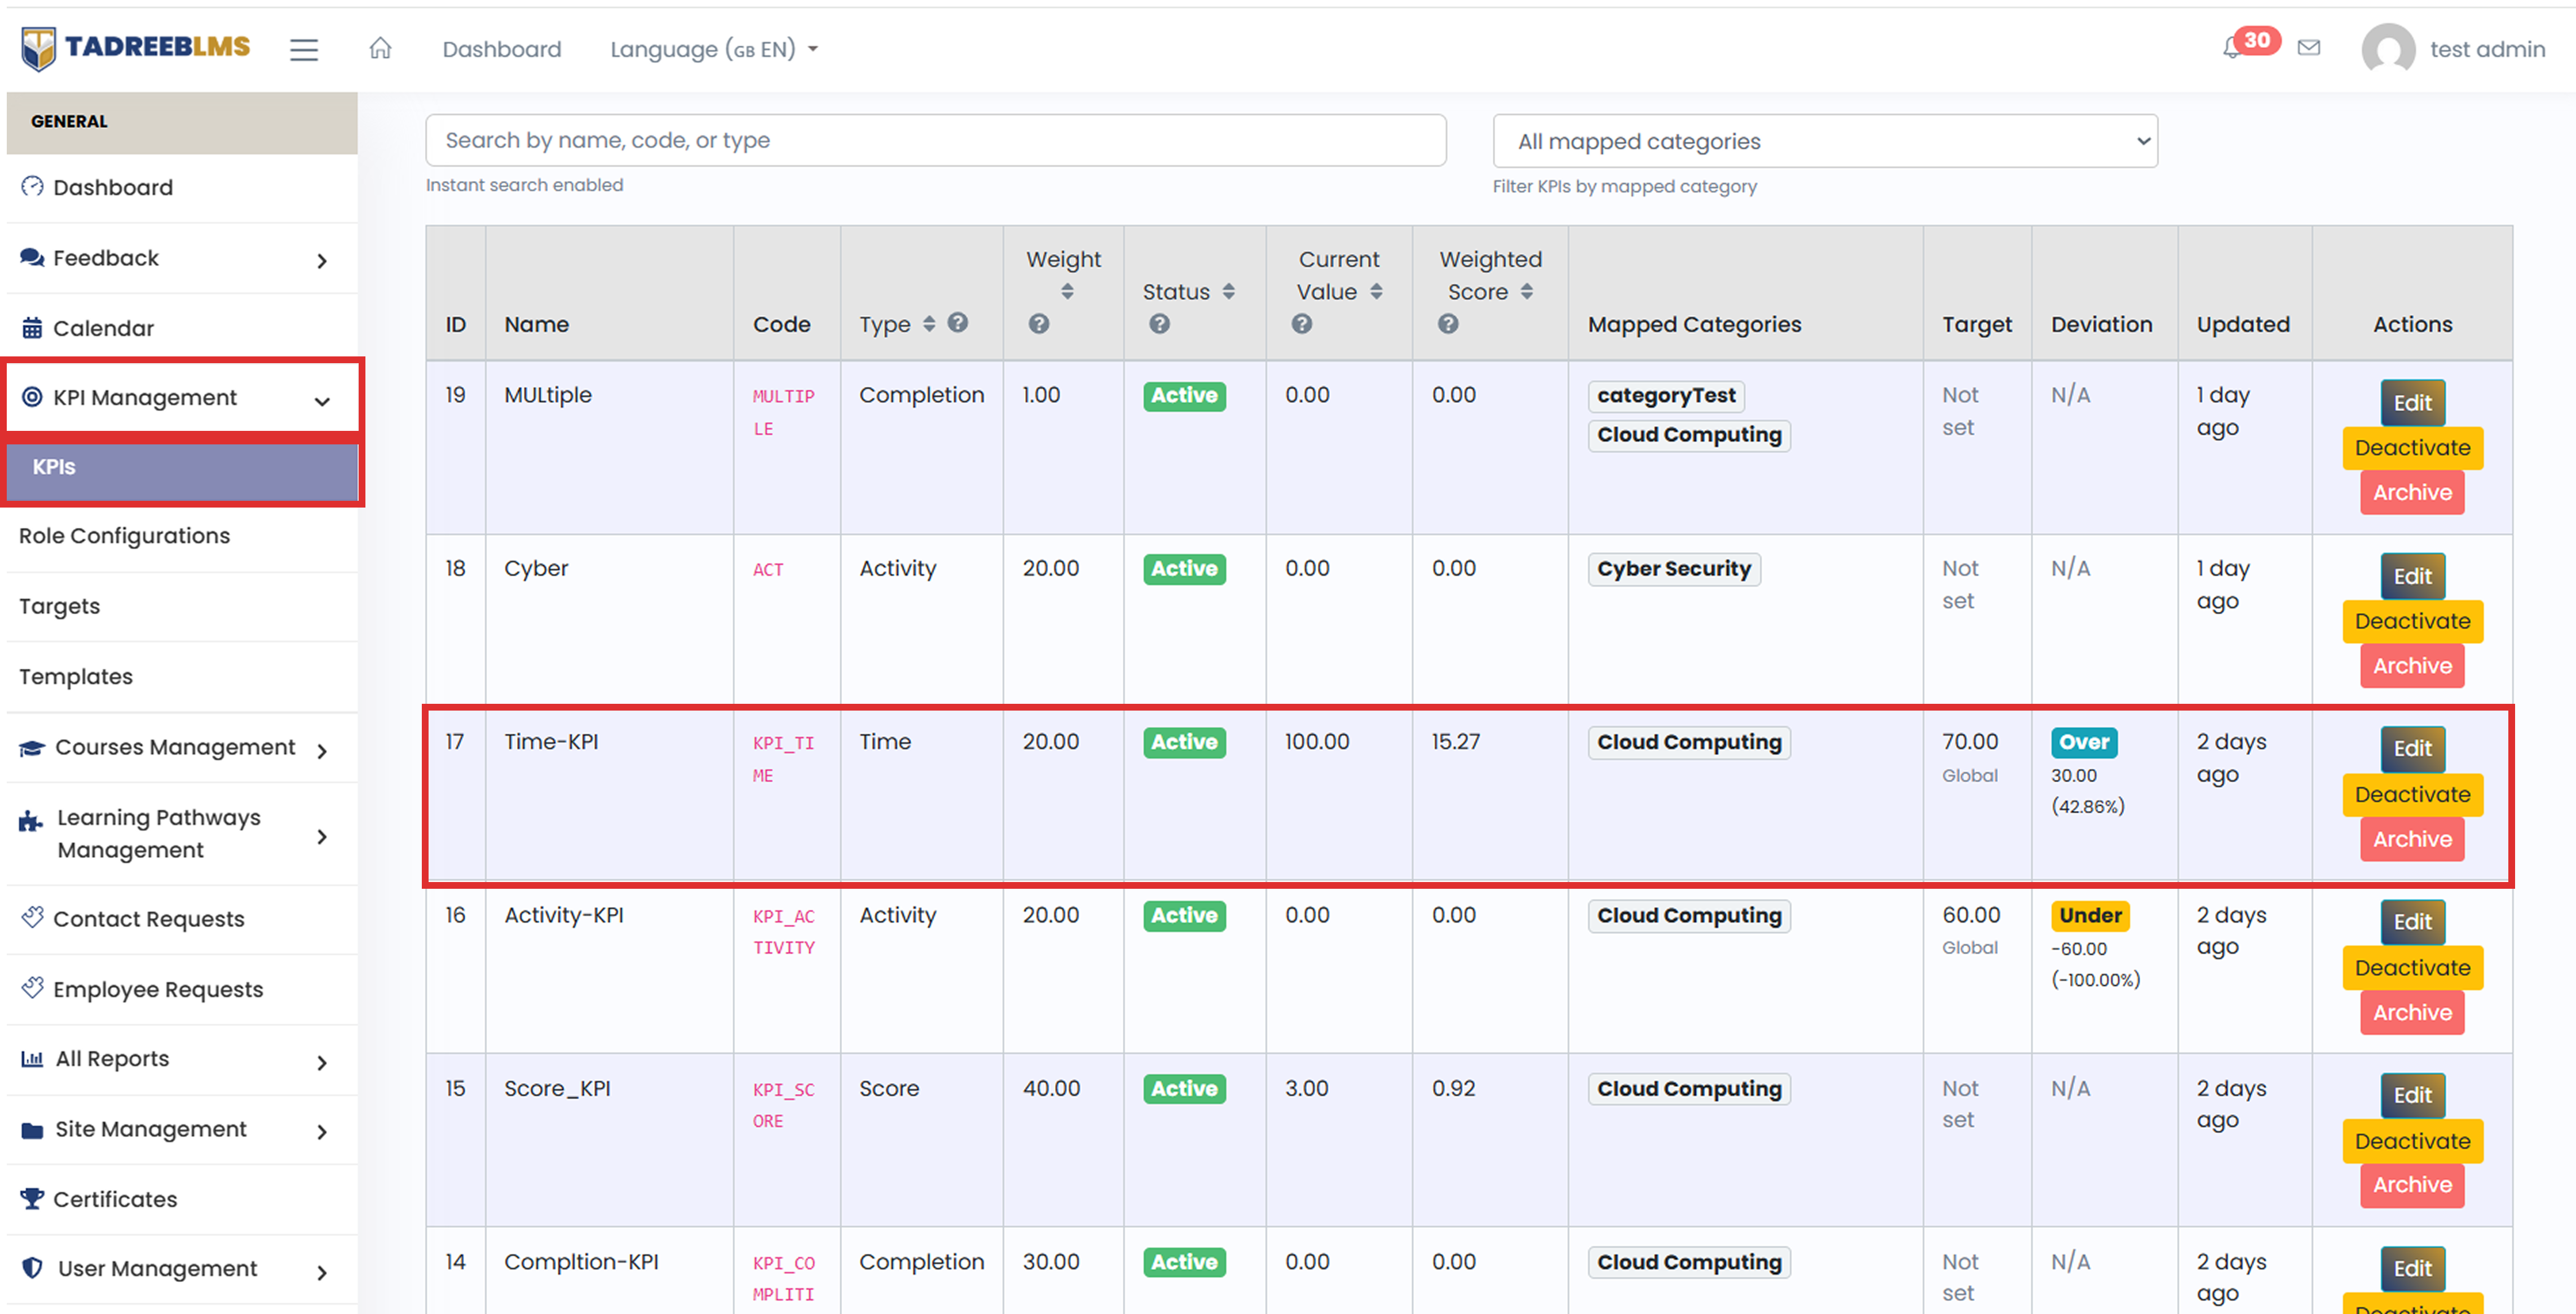
Deviation is the gap between what was actually achieved (Current Value) and what was expected (Target).
Formula:
Deviation = Current Value − Target
For the Time-KPI:
Deviation = 100 − 70 = +30
Because the Current Value is higher than the Target, the system shows:
Over 30.00
The system also shows the deviation as a percentage:
Deviation % = (Deviation ÷ Target) × 100
= (30 ÷ 70) × 100
= 42.86%
Therefore, the table shows:
Over 30.00 (42.86%)
This means the Current Value is 30 points, or 42.86%, above the Target.
📌 Note: If the Current Value is lower than the Target, the system shows Under followed by the difference and percentage.
Putting it all together, here's the full picture for Time-KPI:
| Step | Value | Meaning |
|---|---|---|
| Current Value | 100 | The actual value reached |
| Target | 70 | The expected value |
| Deviation | +30 (42.86%) | How much the Current Value differs from the Target |
| Weight | 20 | How important this KPI is compared to other KPIs |
| Total Active Weight | 131 | The total weight of all active KPIs |
| Weighted Score | 15.27 | This KPI's contribution to the overall score |
📌 Note: The Current Value comes from the activity or data measured by the KPI. For example, a Time-KPI may measure learning time or another time-based activity, depending on its configuration.
Quick Definitions:
| Term | Definition |
|---|---|
| KPI | A measurable indicator used to track performance. |
| Weight | Shows how important a KPI is compared to other KPIs. |
| Total Active KPI Weight | The combined weight of all active KPIs. |
| Current Value | The actual value achieved for a KPI. |
| Target | The expected value for a KPI. |
| Deviation | The difference between the Current Value and Target. |
| Weighted Score | The KPI's contribution to the overall score based on its weight. |
| Category Group | A group used to organize related KPIs. |
4.1.4 Add a KPI
This page lets an admin create a new KPI, select what it measures, assign it to course categories, and set its weight.
- Click the menu icon (☰) at the top left to open the sidebar menu.
- In the sidebar menu, go to KPI Management > KPIs > Add New KPI.
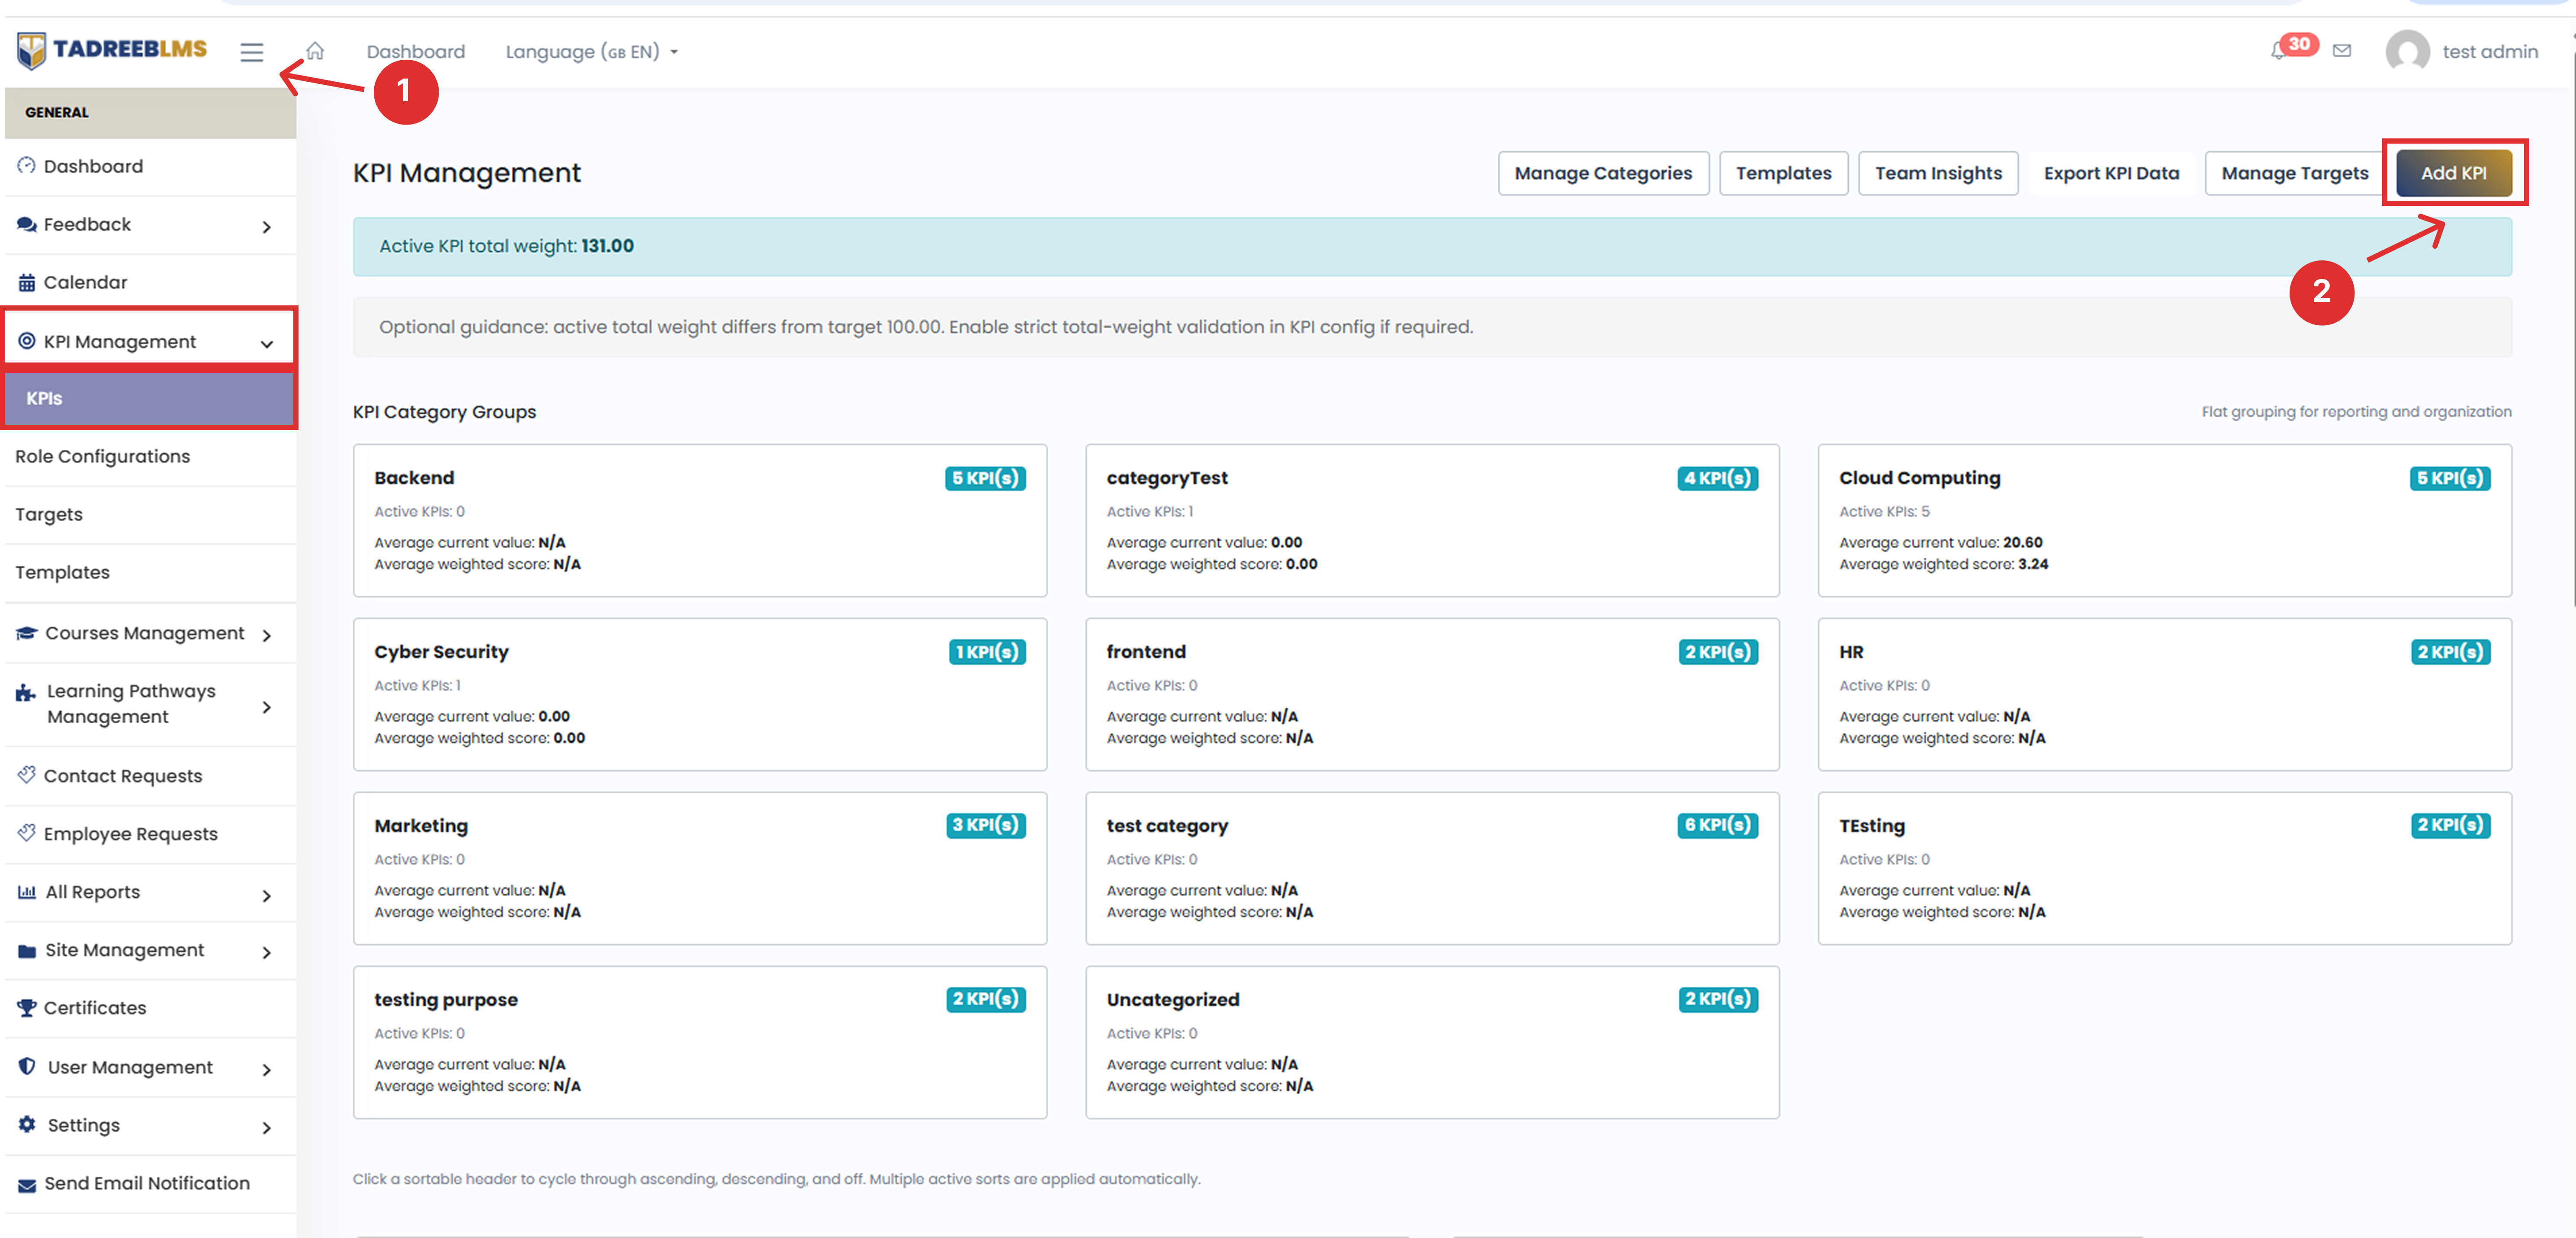
- In KPI Name, enter a name for the KPI, for example, Time to completion.
- In KPI Code, enter a unique code using uppercase letters, numbers, and underscores only. For example, TIME_TO_COMPLETE.
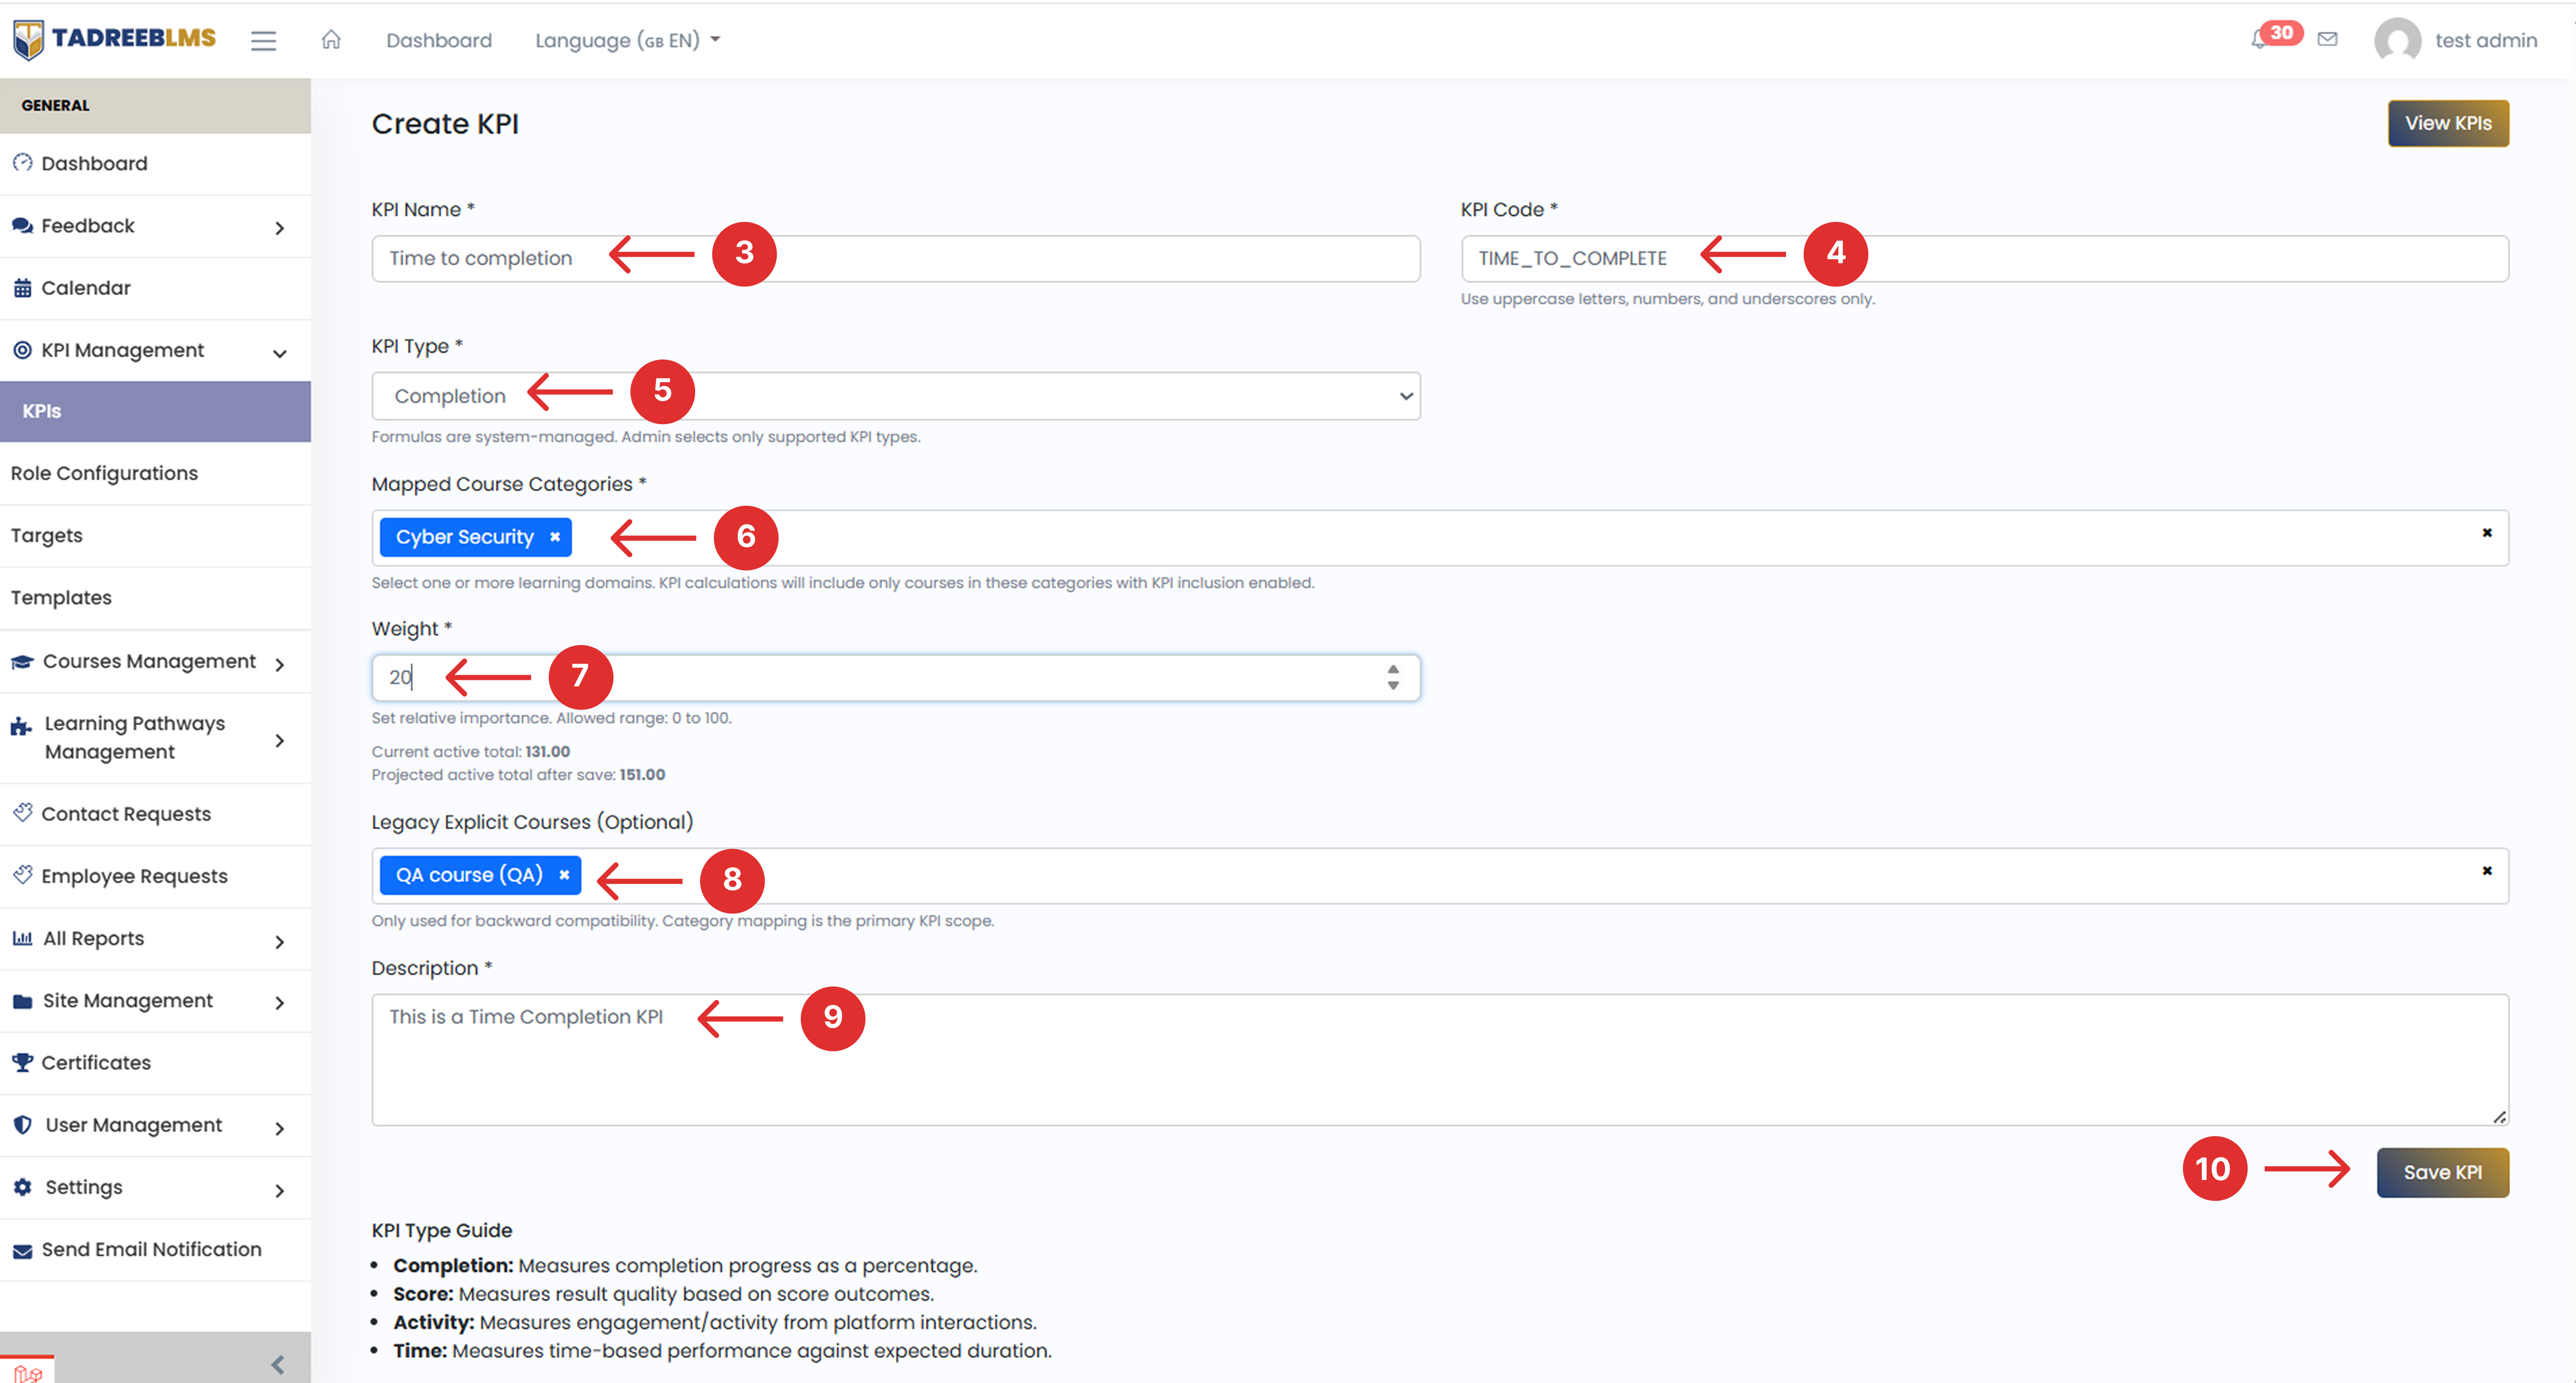
- From KPI Type, select the type of measurement:
- Completion
- Score
- Activity
- Time See the KPI Type Guide below for details.
- In Mapped Course Categories, select one or more course categories for the KPI. The KPI will apply to courses in the selected categories.
- In Weight, enter a value between 0 and 100 to set the KPI's importance compared to other active KPIs. The page shows the current total weight and the projected total after saving.
- Optional: In Legacy Explicit Courses, select individual courses for the KPI.
- In Description, enter a brief description of the KPI.
- Click Save KPI.
💡 Tip: Click View KPIs to return to the KPI list without saving.
KPI Type Guide
| Type | What it measures |
|---|---|
| Completion | Course completion progress as a percentage. |
| Score | Results based on score outcomes. |
| Activity | User engagement and platform activity. |
| Time | Time-based performance against the expected duration. |
📌 Note: KPI formulas are managed by the system. Admins only need to select the appropriate KPI type; no formula configuration is required.
4.1.5 Team Insights
Team Insights lets an admin step back from individual KPIs and see how an entire team is performing together, over a chosen date range, such as who's leading (top performer), who's falling behind (bottom performer), and which KPIs the team is strongest or weakest at.
- Click the menu icon (☰) at the top left to open the sidebar menu.
- In the sidebar menu, go to KPI Management > KPIs, then click Team Insights. Filtering the view
At the top of the page, you can narrow down the results:
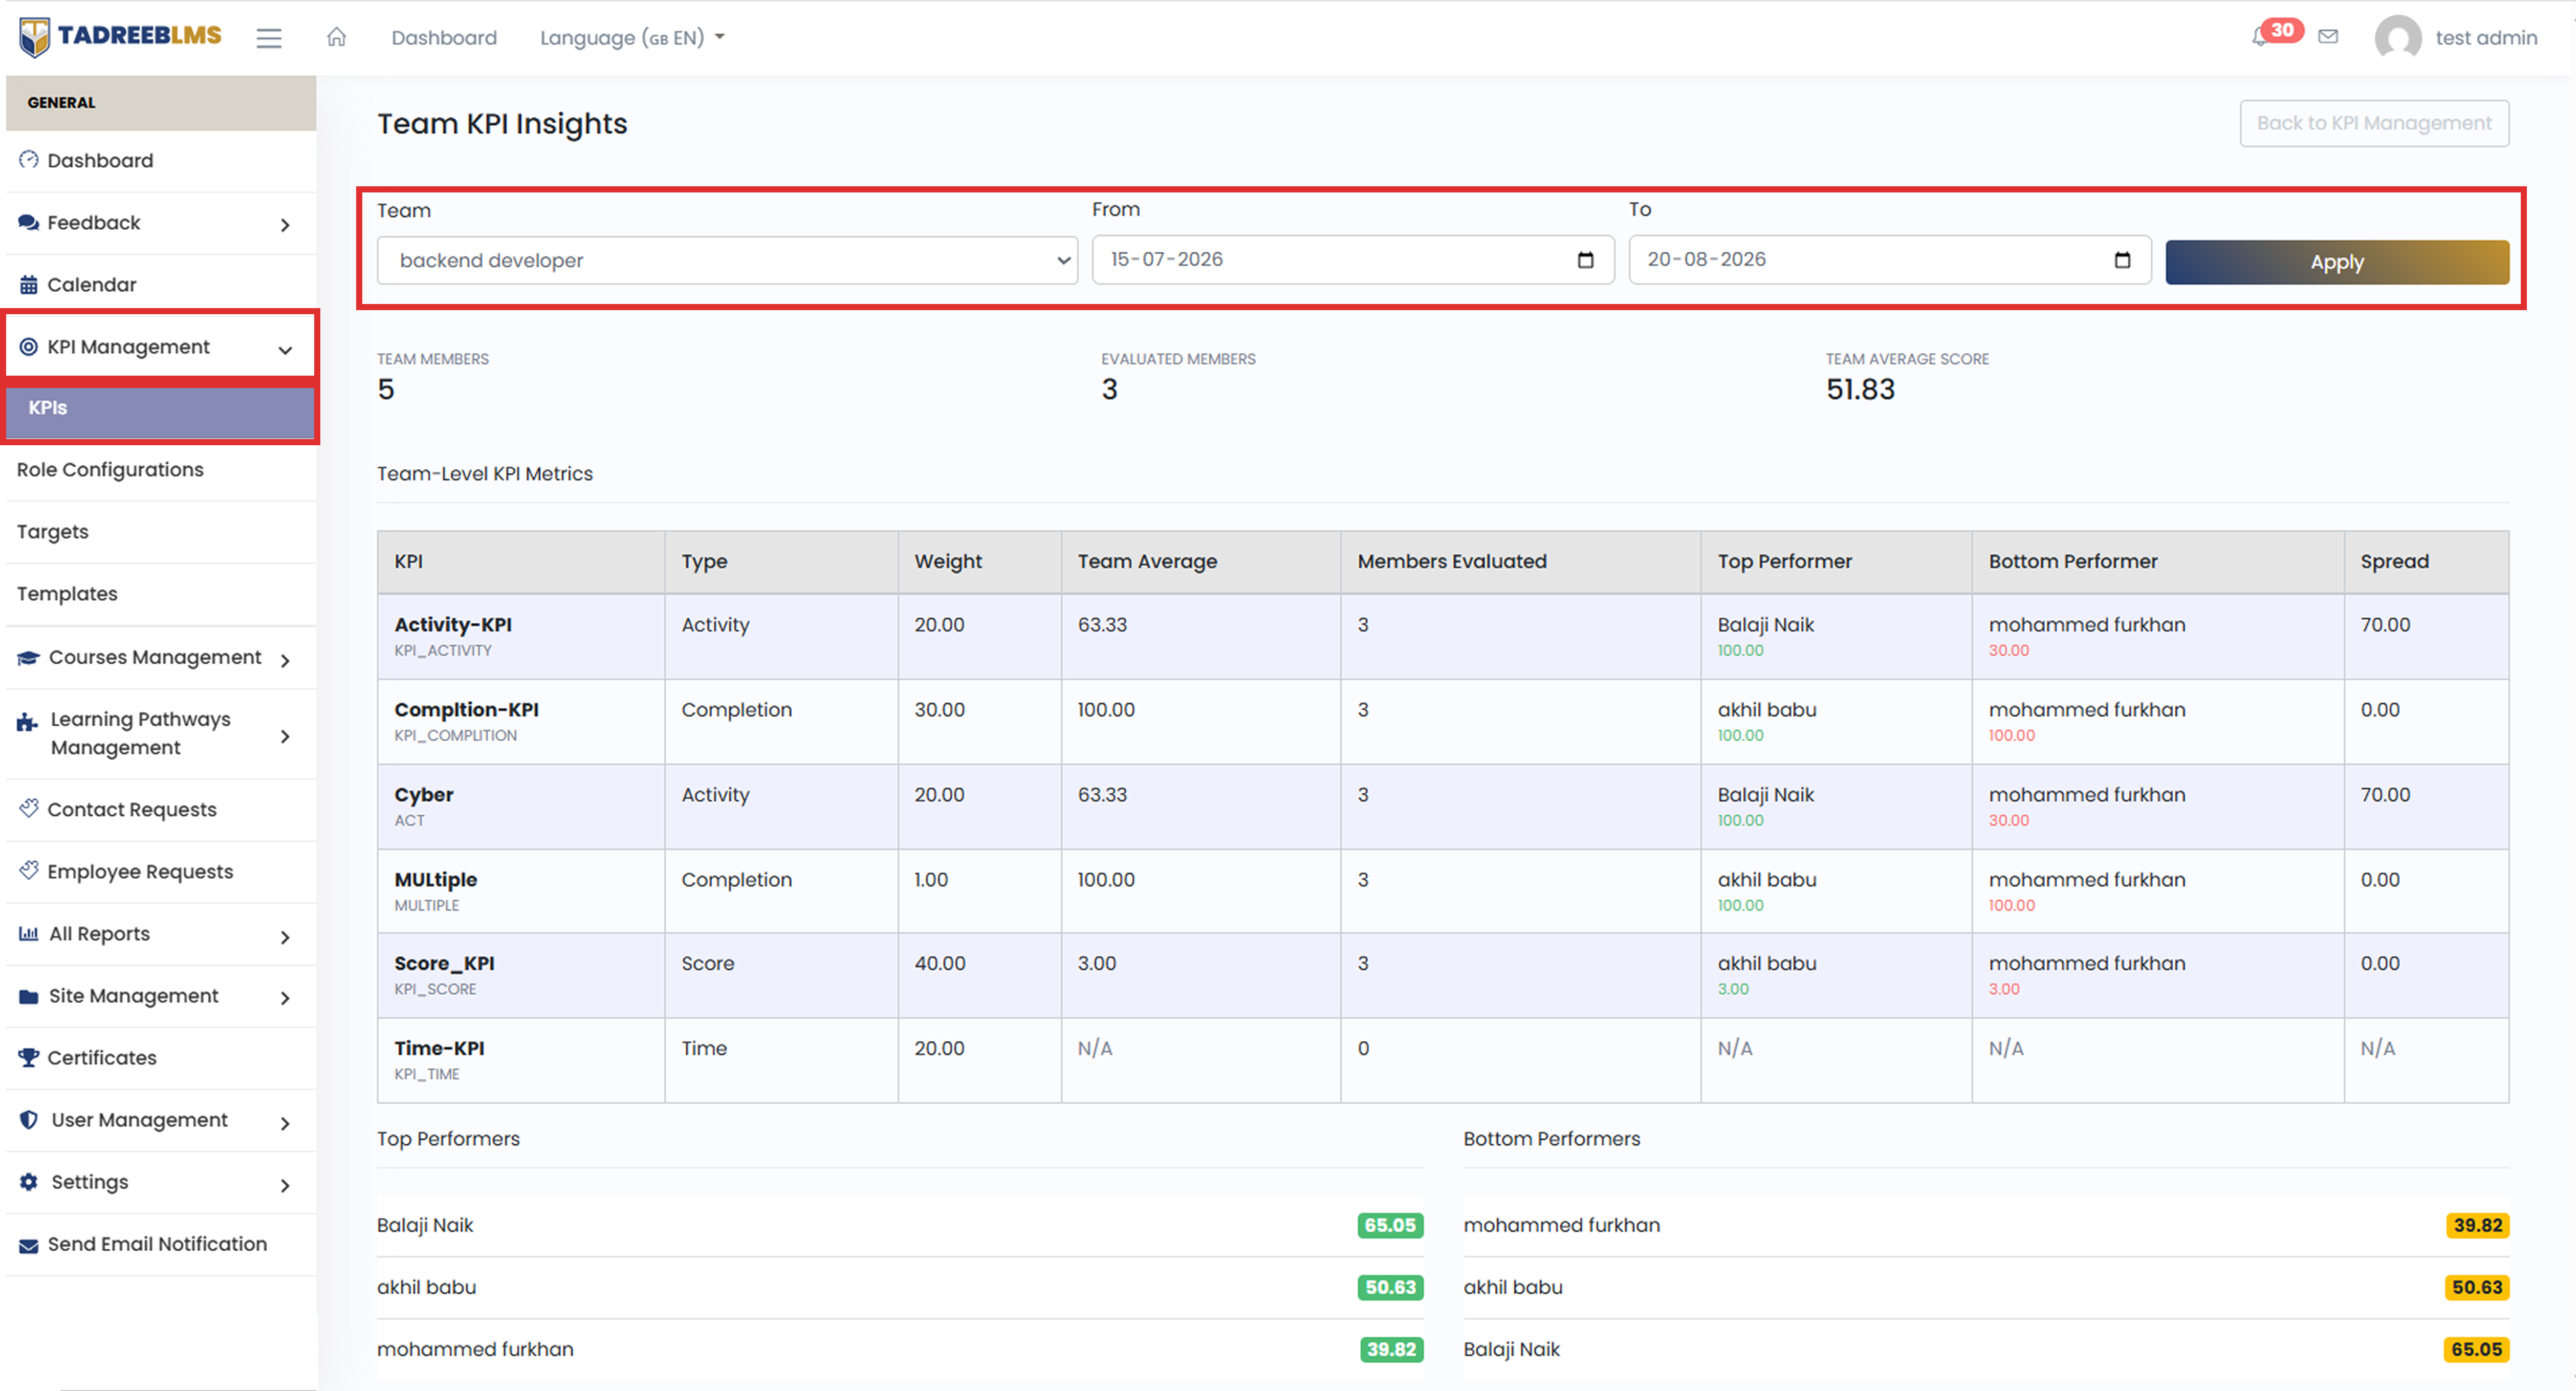
| Field | What it does |
|---|---|
| Team | Select the team you want to view. |
| From | Select the start date of the period you want to analyse. |
| To | Select the end date of the period you want to analyse. |
| Apply | Apply the selected team and date range. |
Summary metrics
Just below the filters, you'll see three quick summary numbers:
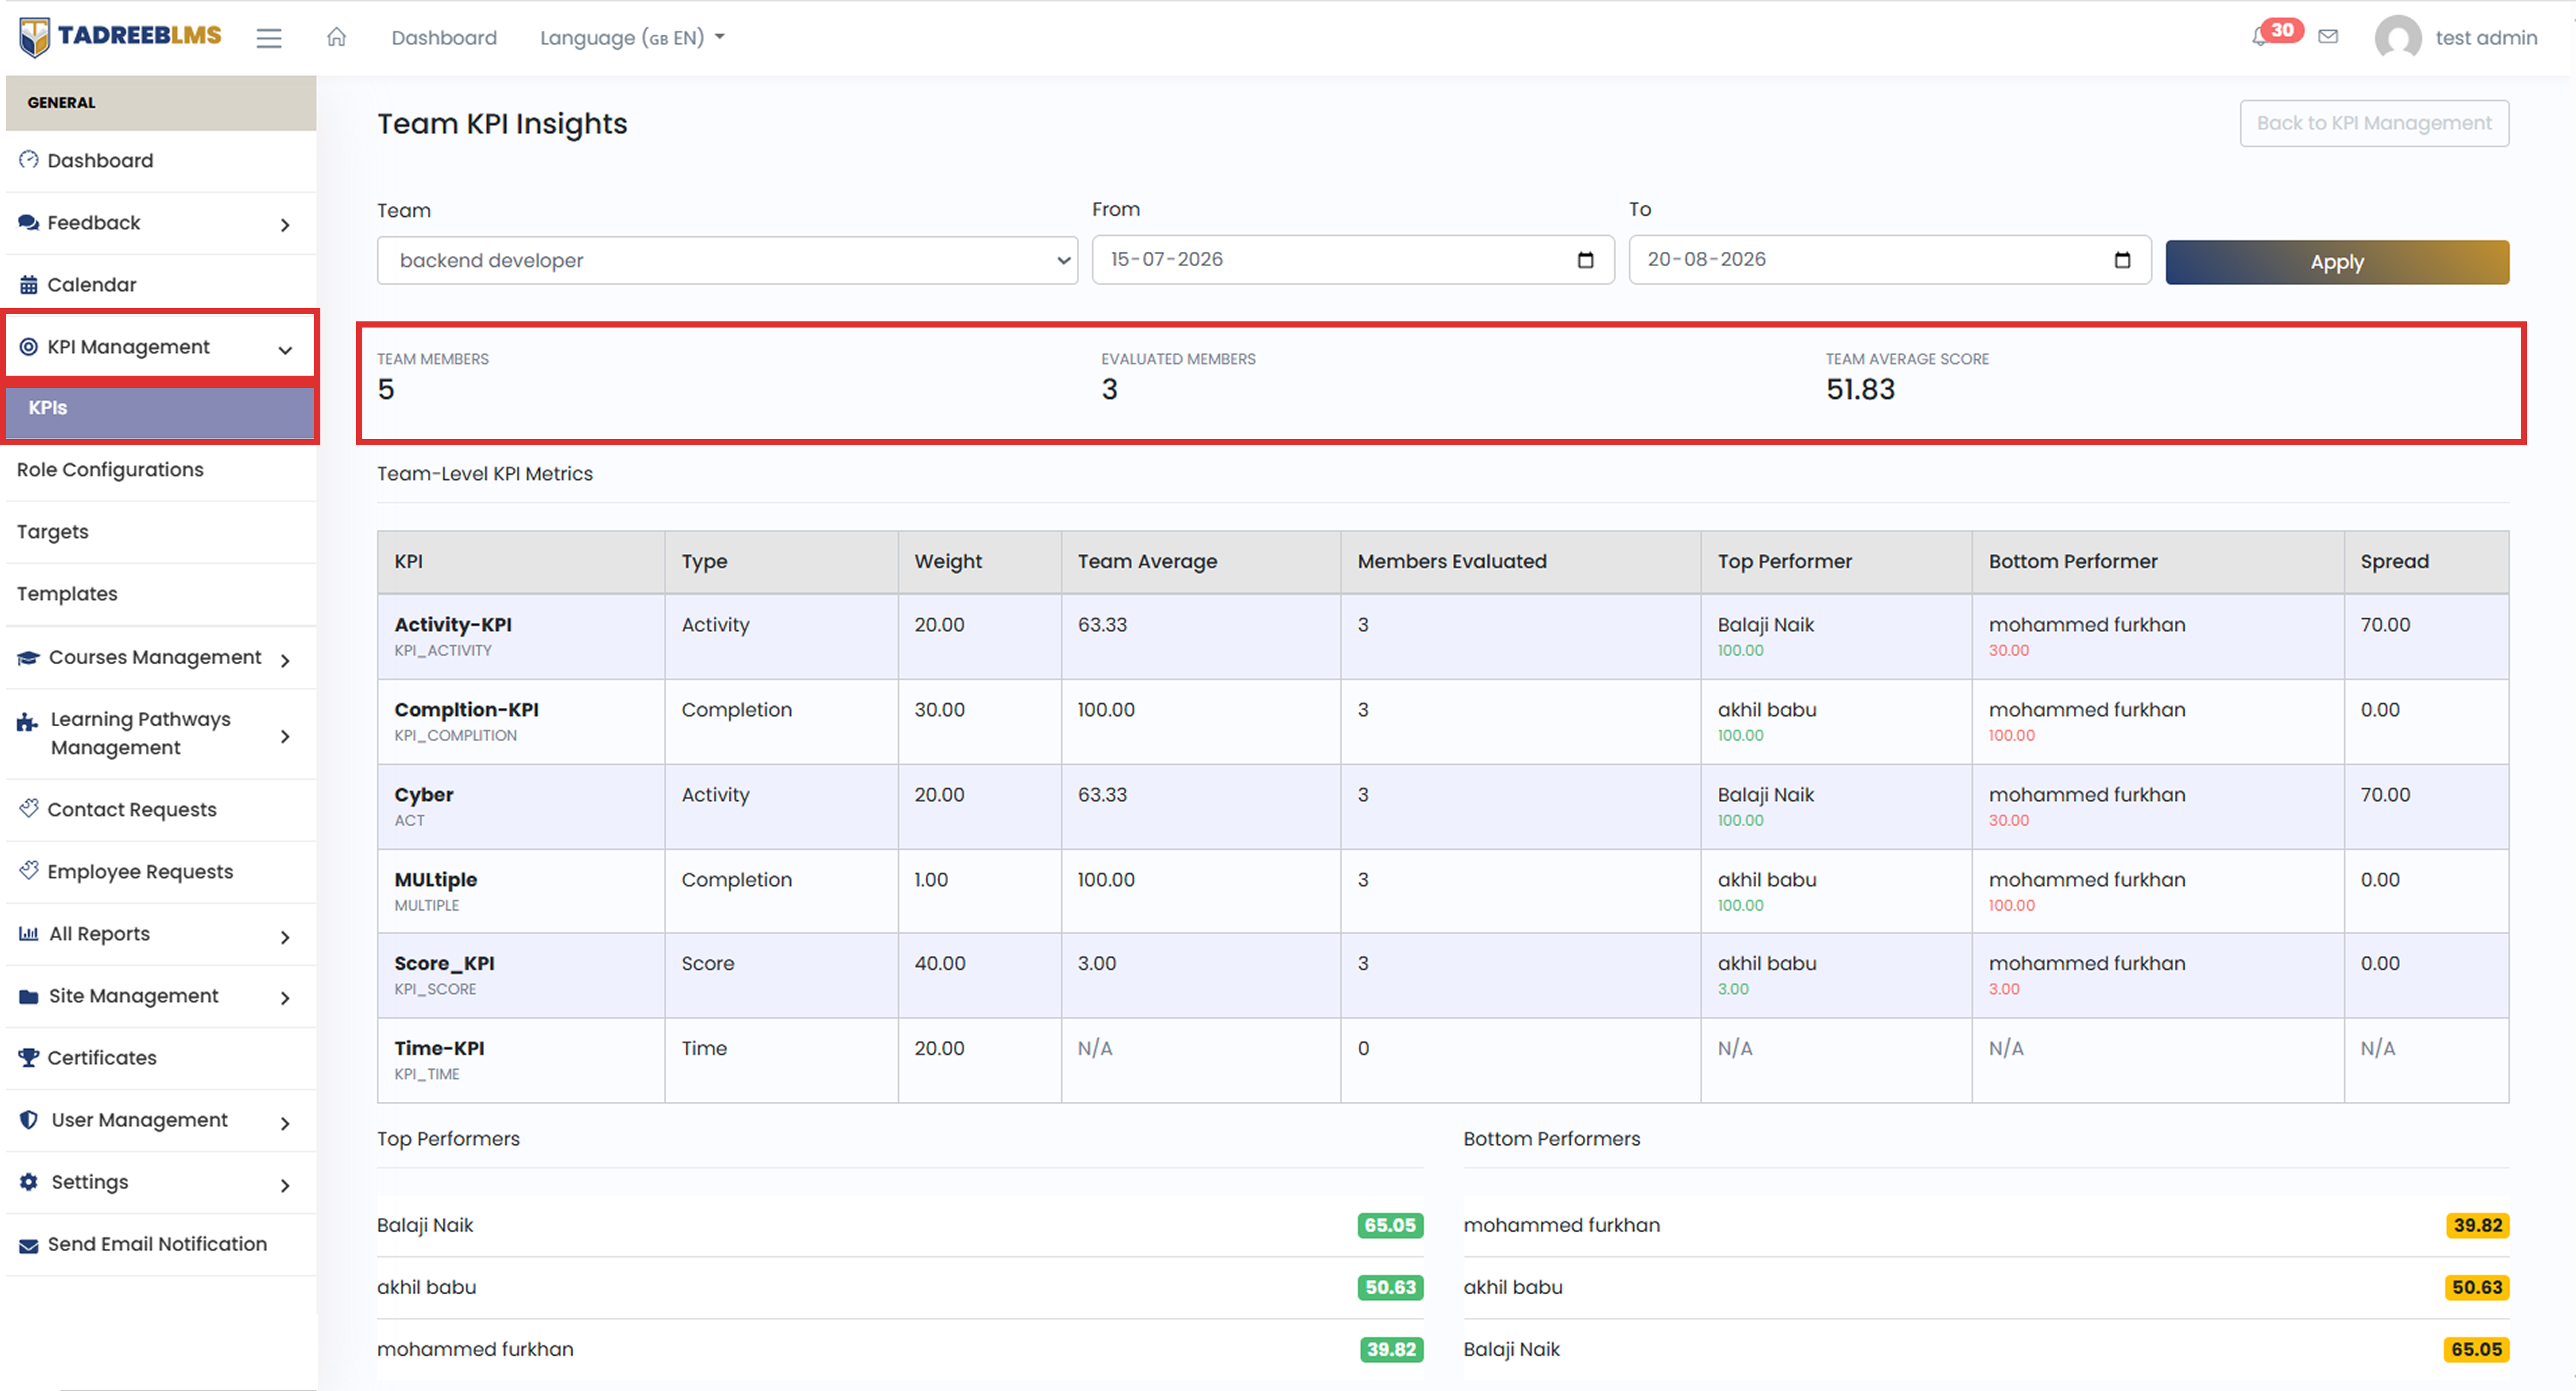
| Field | What it means |
|---|---|
| Team Members | The total number of people who belong to this team |
| Evaluated Members | The number of team members with KPI data for the selected date range |
| Team Average Score | The average overall KPI score of all evaluated members |
📌 Note: The Team Average Score is calculated from the overall scores of the evaluated members. In the screenshot, the three evaluated members have scores of 65.05, 50.63, and 39.82. Their average is 51.83, which matches the Team Average Score shown.
Understanding the Team-Level KPI Metrics table
This table breaks performance down KPI by KPI, so you can see exactly which KPIs the team is doing well on, and which ones need attention.
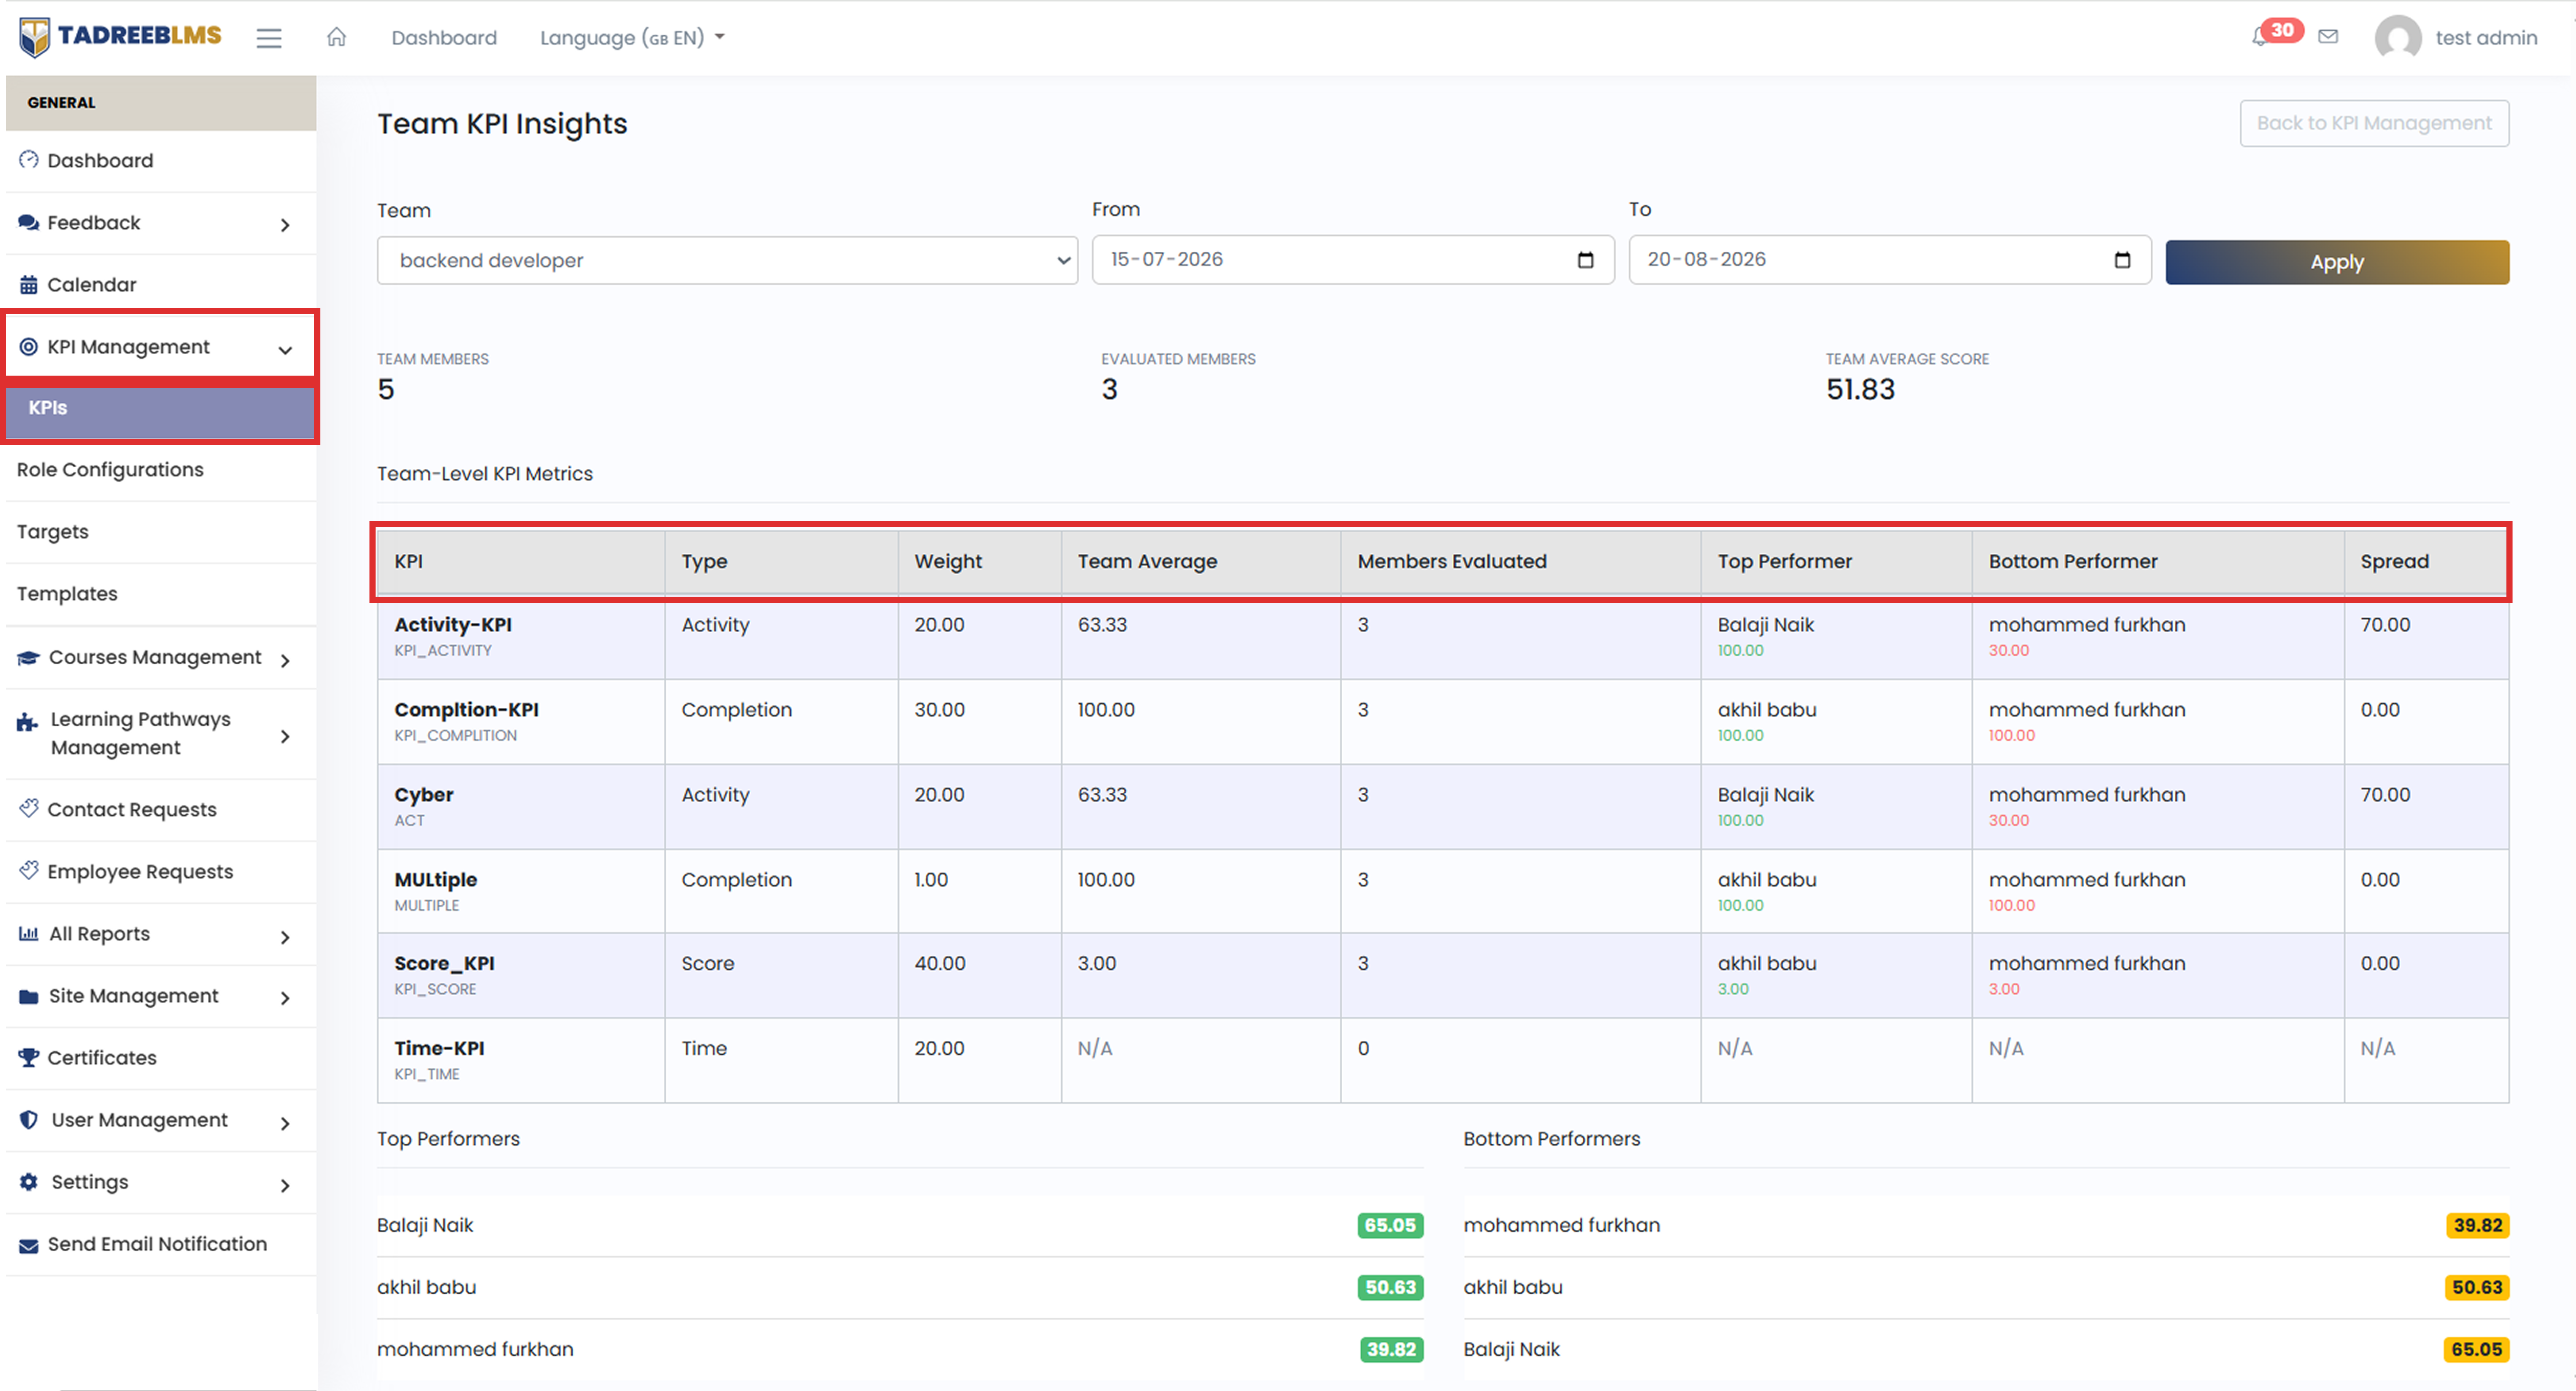
| Column | What it means |
|---|---|
| KPI | The name and code of the KPI. |
| Type | The type of KPI: Completion, Score, Activity, or Time. |
| Weight | The importance of the KPI compared to other KPIs. |
| Team Average | The average KPI value for the evaluated team members. |
| Members Evaluated | The number of team members with data for this KPI. |
| Top Performer | The team member with the highest result for this KPI, along with their value. |
| Bottom Performer | The team member with the lowest result for this KPI, along with their value. |
| Spread | The gap between the Top Performer's value and the Bottom Performer's value for this KPI |
Example: Activity-KPI
In the screenshot, the Activity-KPI row shows:
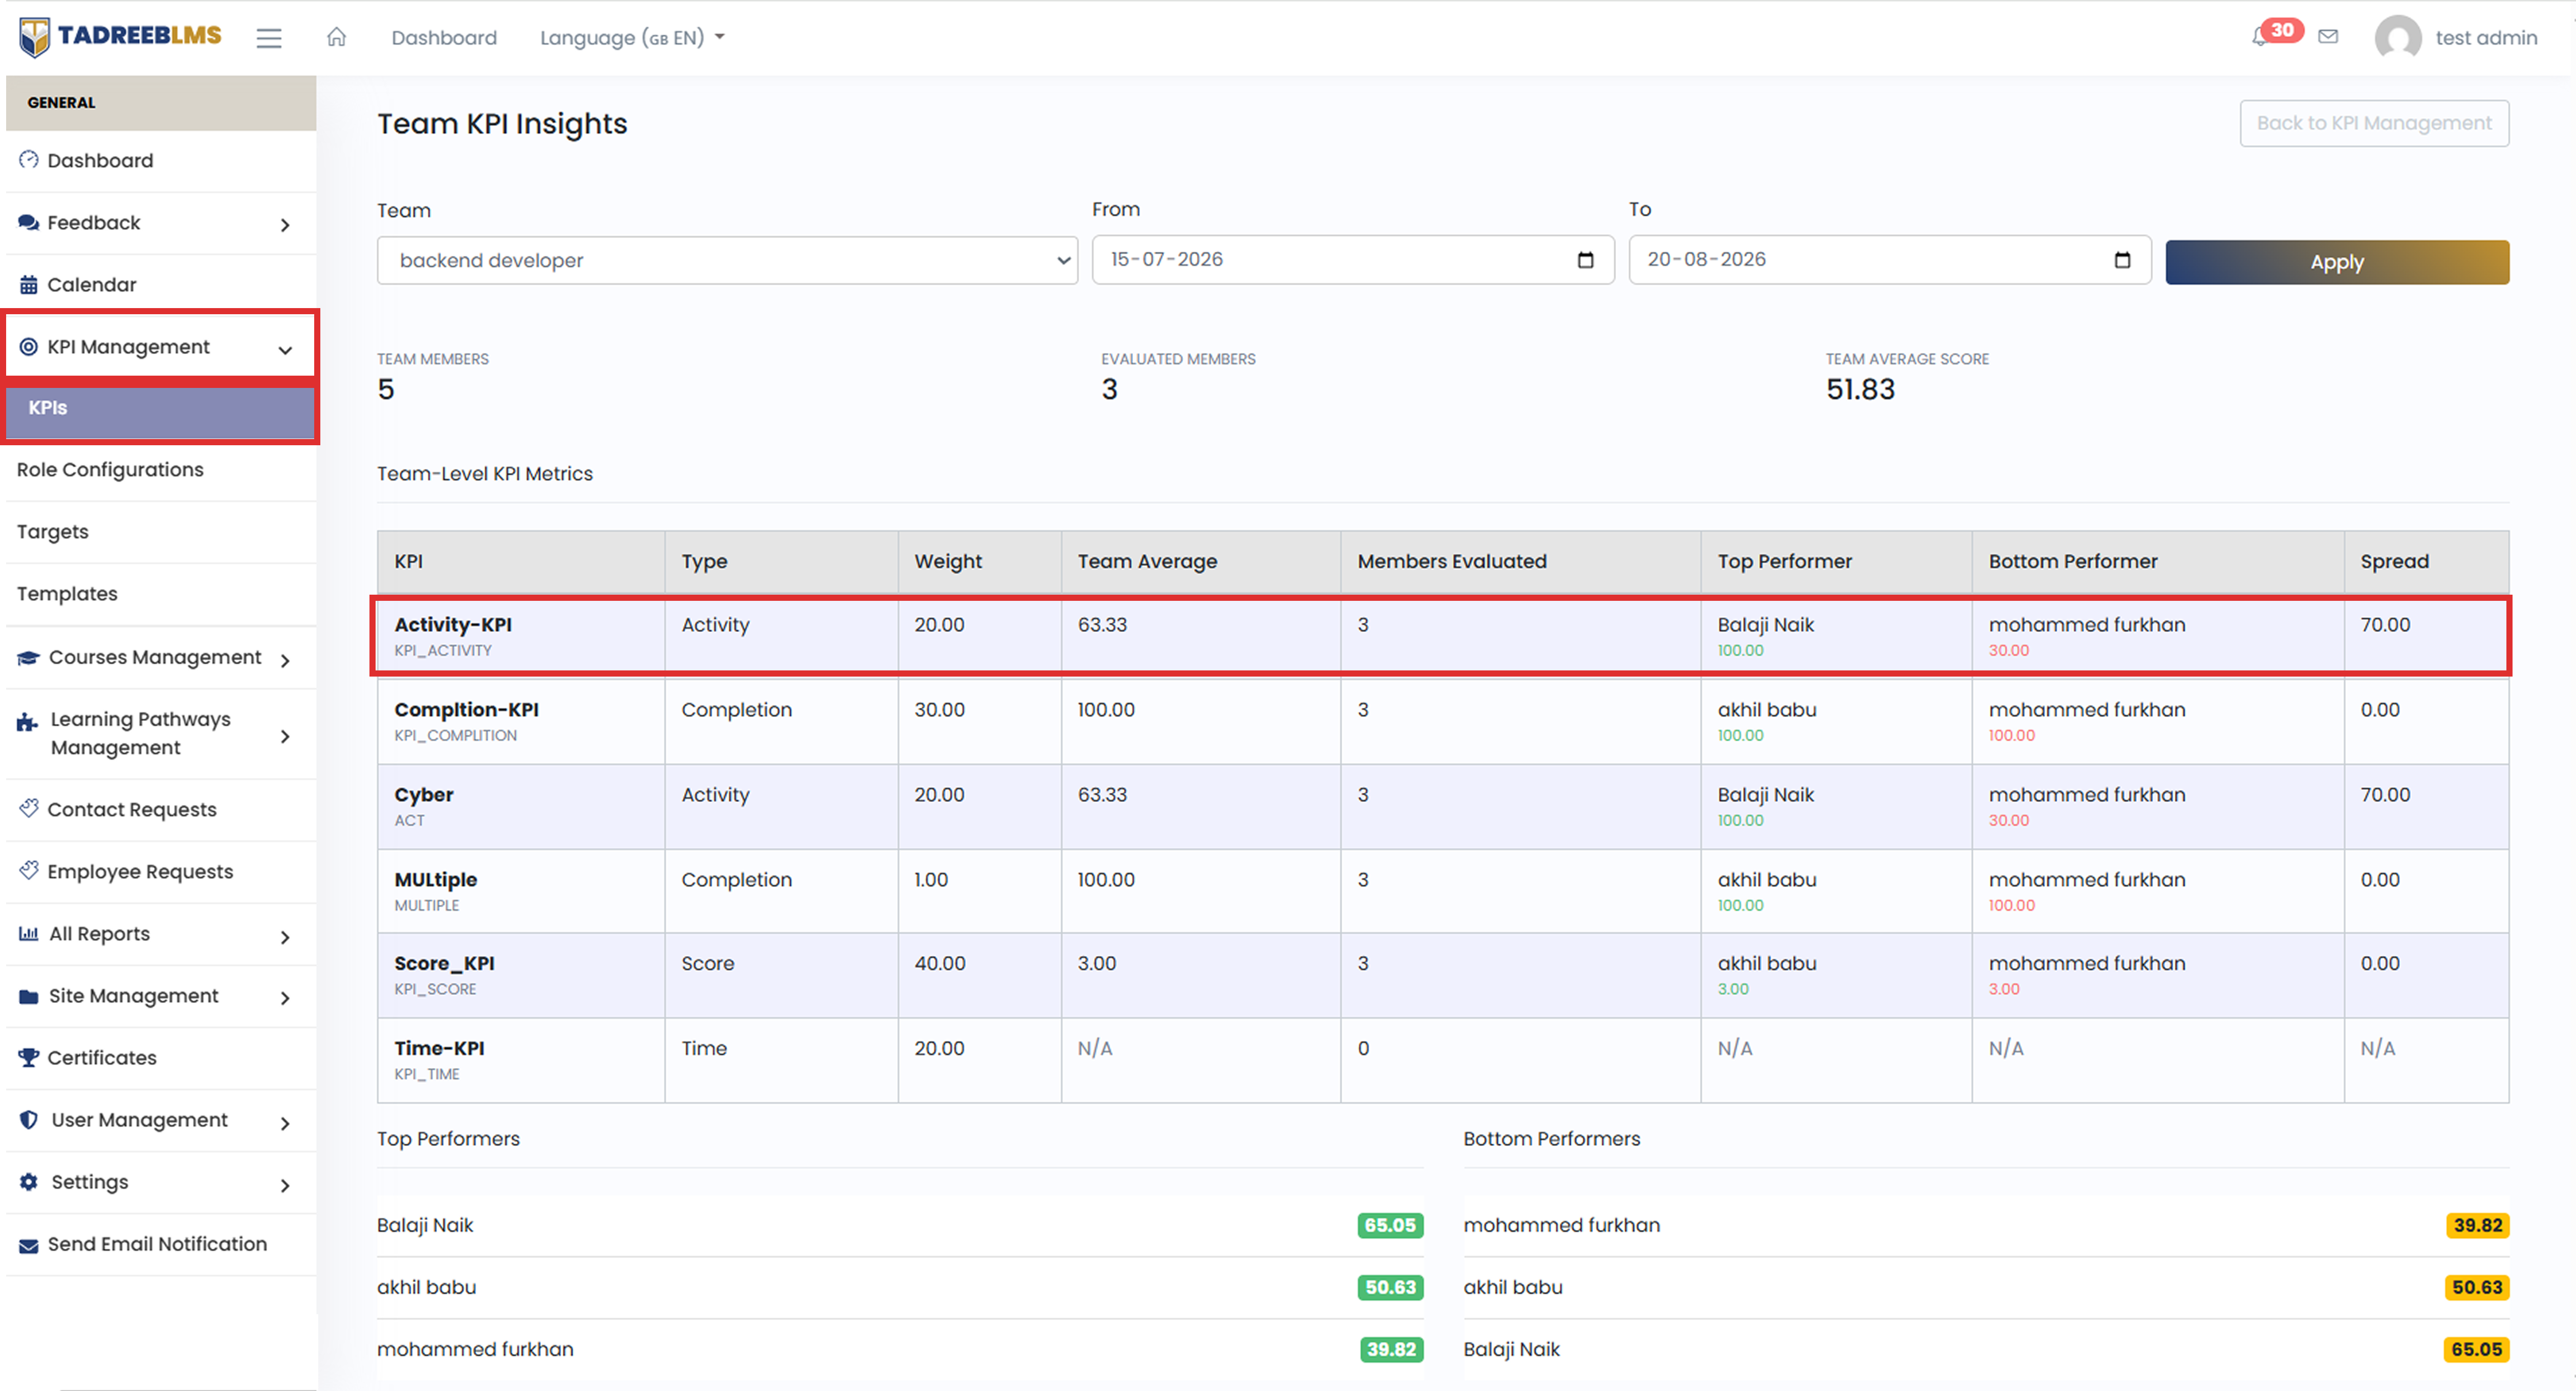
- Team Average: 63.33
- Top Performer: Balaji Naik — 100.00
- Bottom Performer: Mohammed Furkhan — 30.00
- Spread: 70.00 The Spread is calculated as:
100.00 − 30.00 = 70.00
A higher spread indicates a larger difference between the highest and lowest results for that KPI.
📌 Note: If no team members have data for a KPI, the Team Average, Top Performer, Bottom Performer, and Spread show N/A. For example, Time-KPI has 0 Members Evaluated in the screenshot.
Top Performers and Bottom Performers
At the bottom of the page, you'll find two lists:
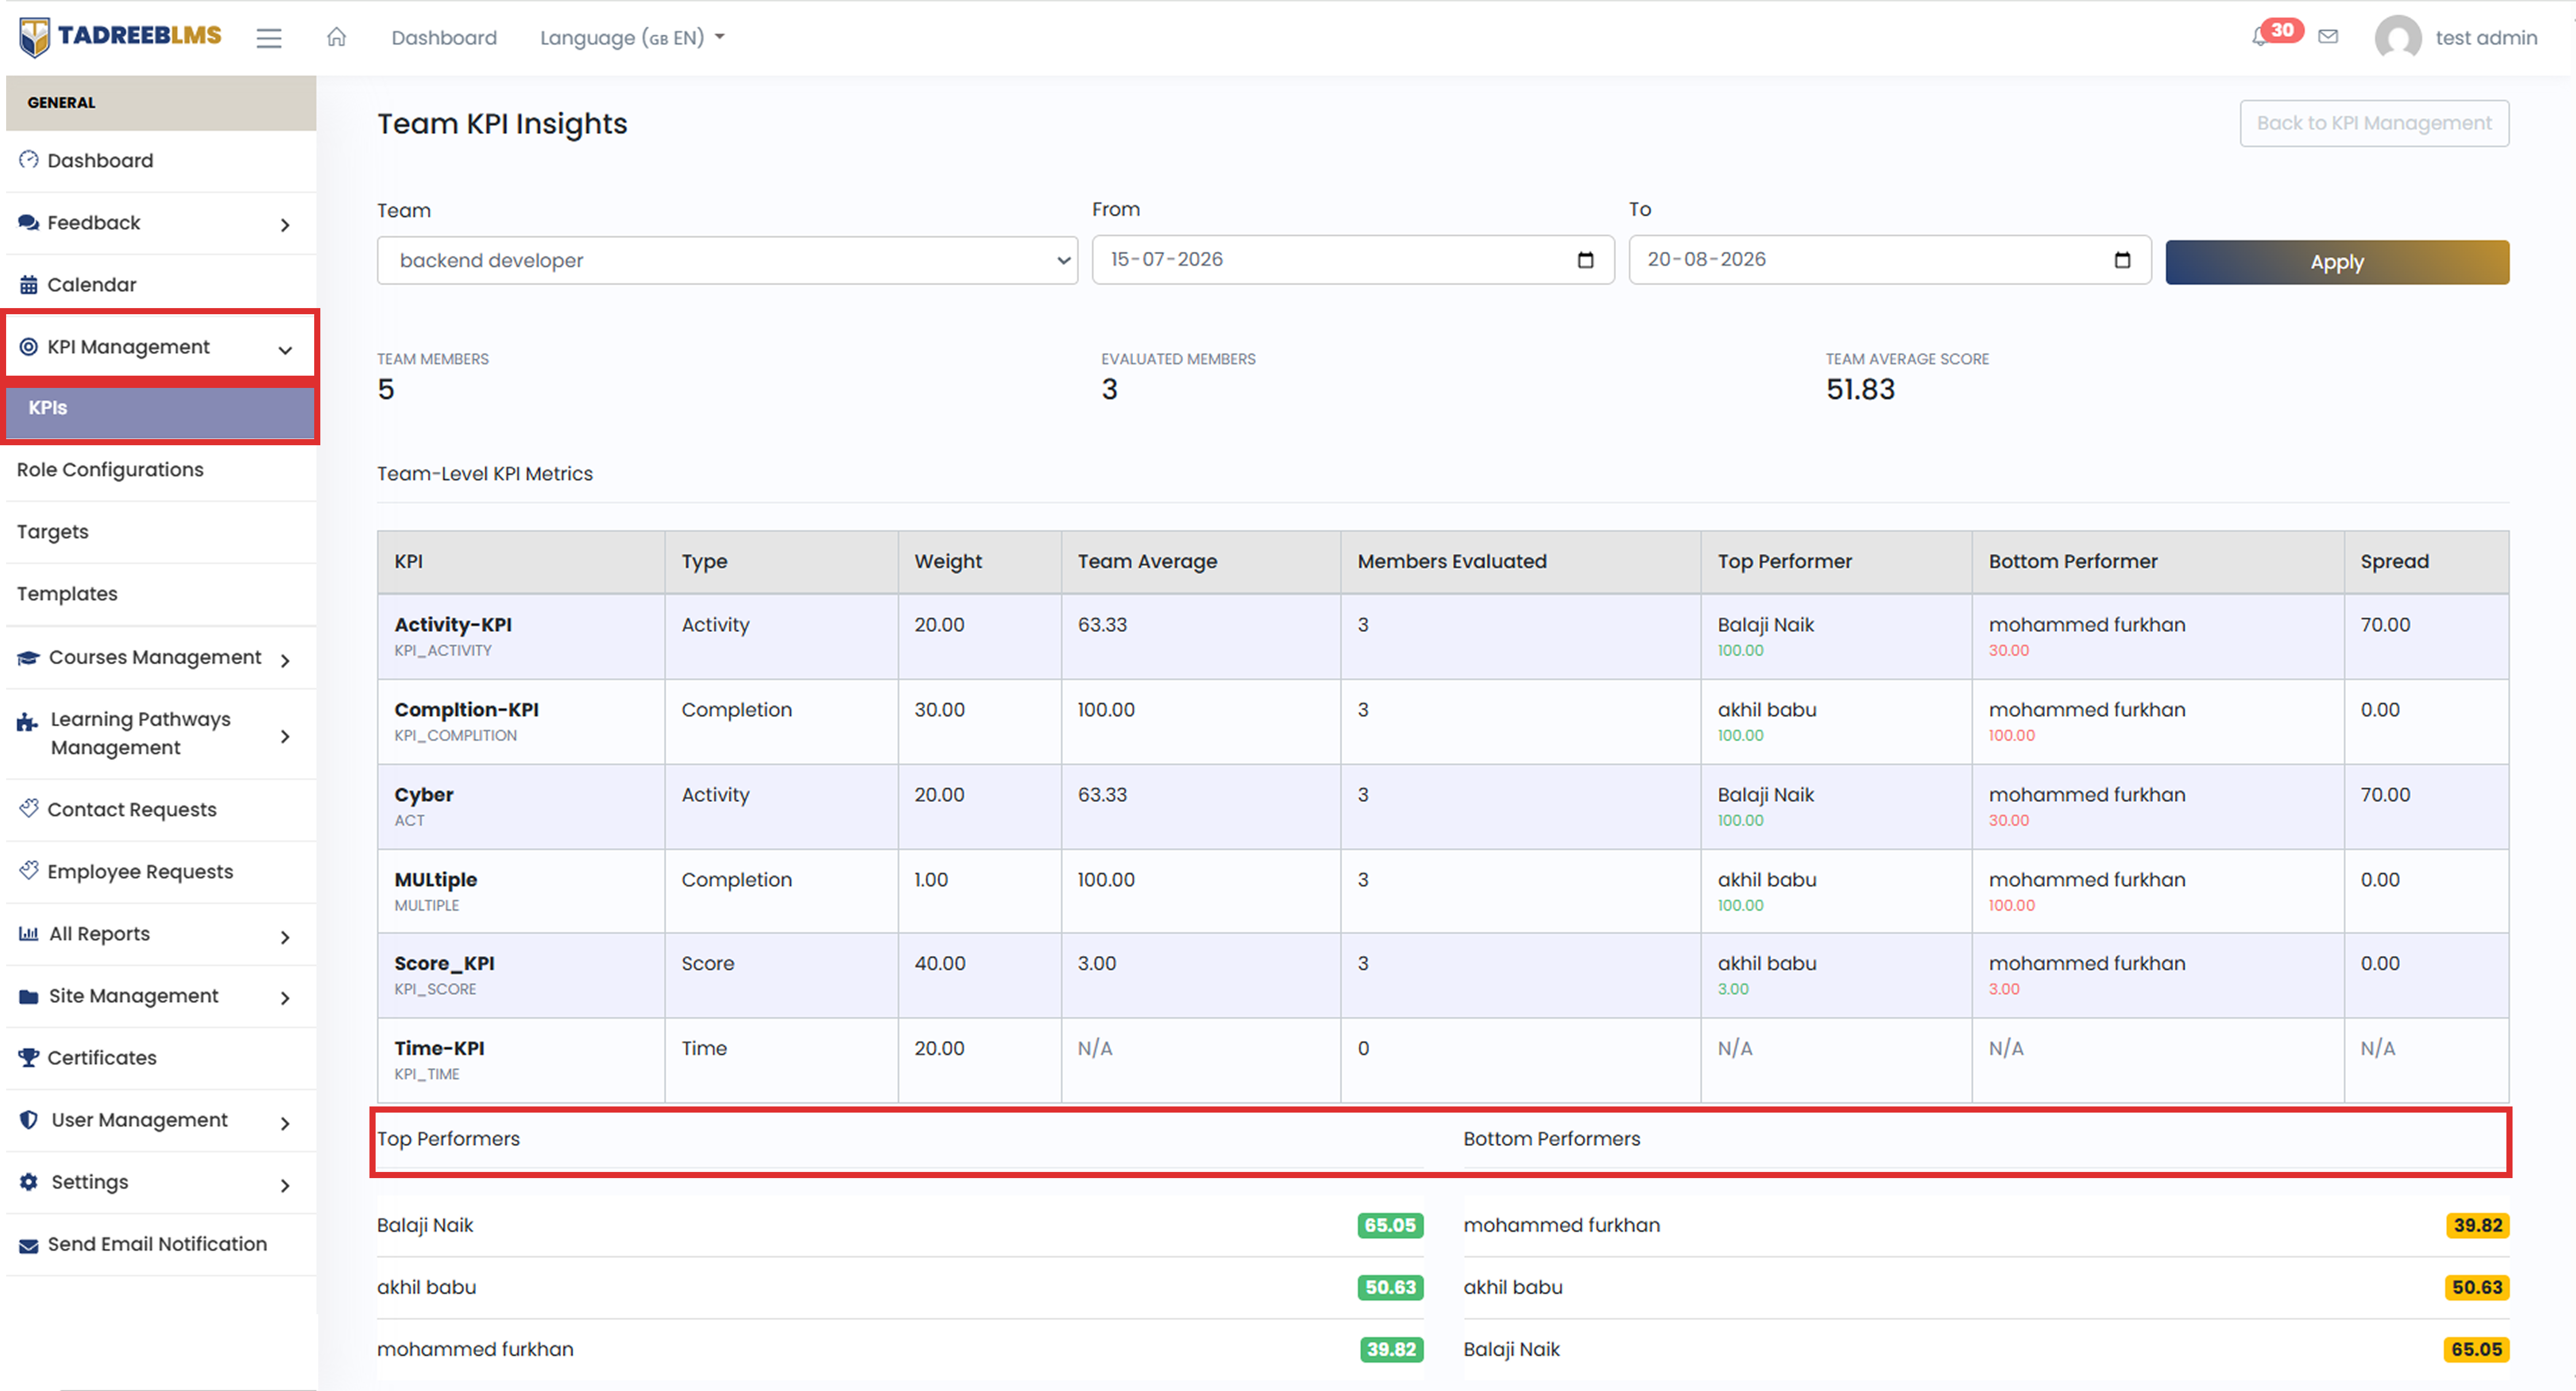
- Top Performers — lists team members from the highest overall score to the lowest.
- Bottom Performers — lists team members from the lowest overall score to the highest.
💡 Tip: Use the Team-Level KPI Metrics table to identify KPIs that may need attention. Use the Top Performers and Bottom Performers lists to quickly compare overall team performance.
4.2 Role Configurations
Role Configurations let an admin customise a KPI's weight or active status for a specific role without changing its global settings.
For example, if Activity-KPI has a global weight of 20, you can set its weight to 10 for the Administrator role only.
- Click the ☰ menu icon to open the sidebar.
- Go to KPI Management > Role Configurations. Alternatively, you can navigate to KPI > Role Configurations.
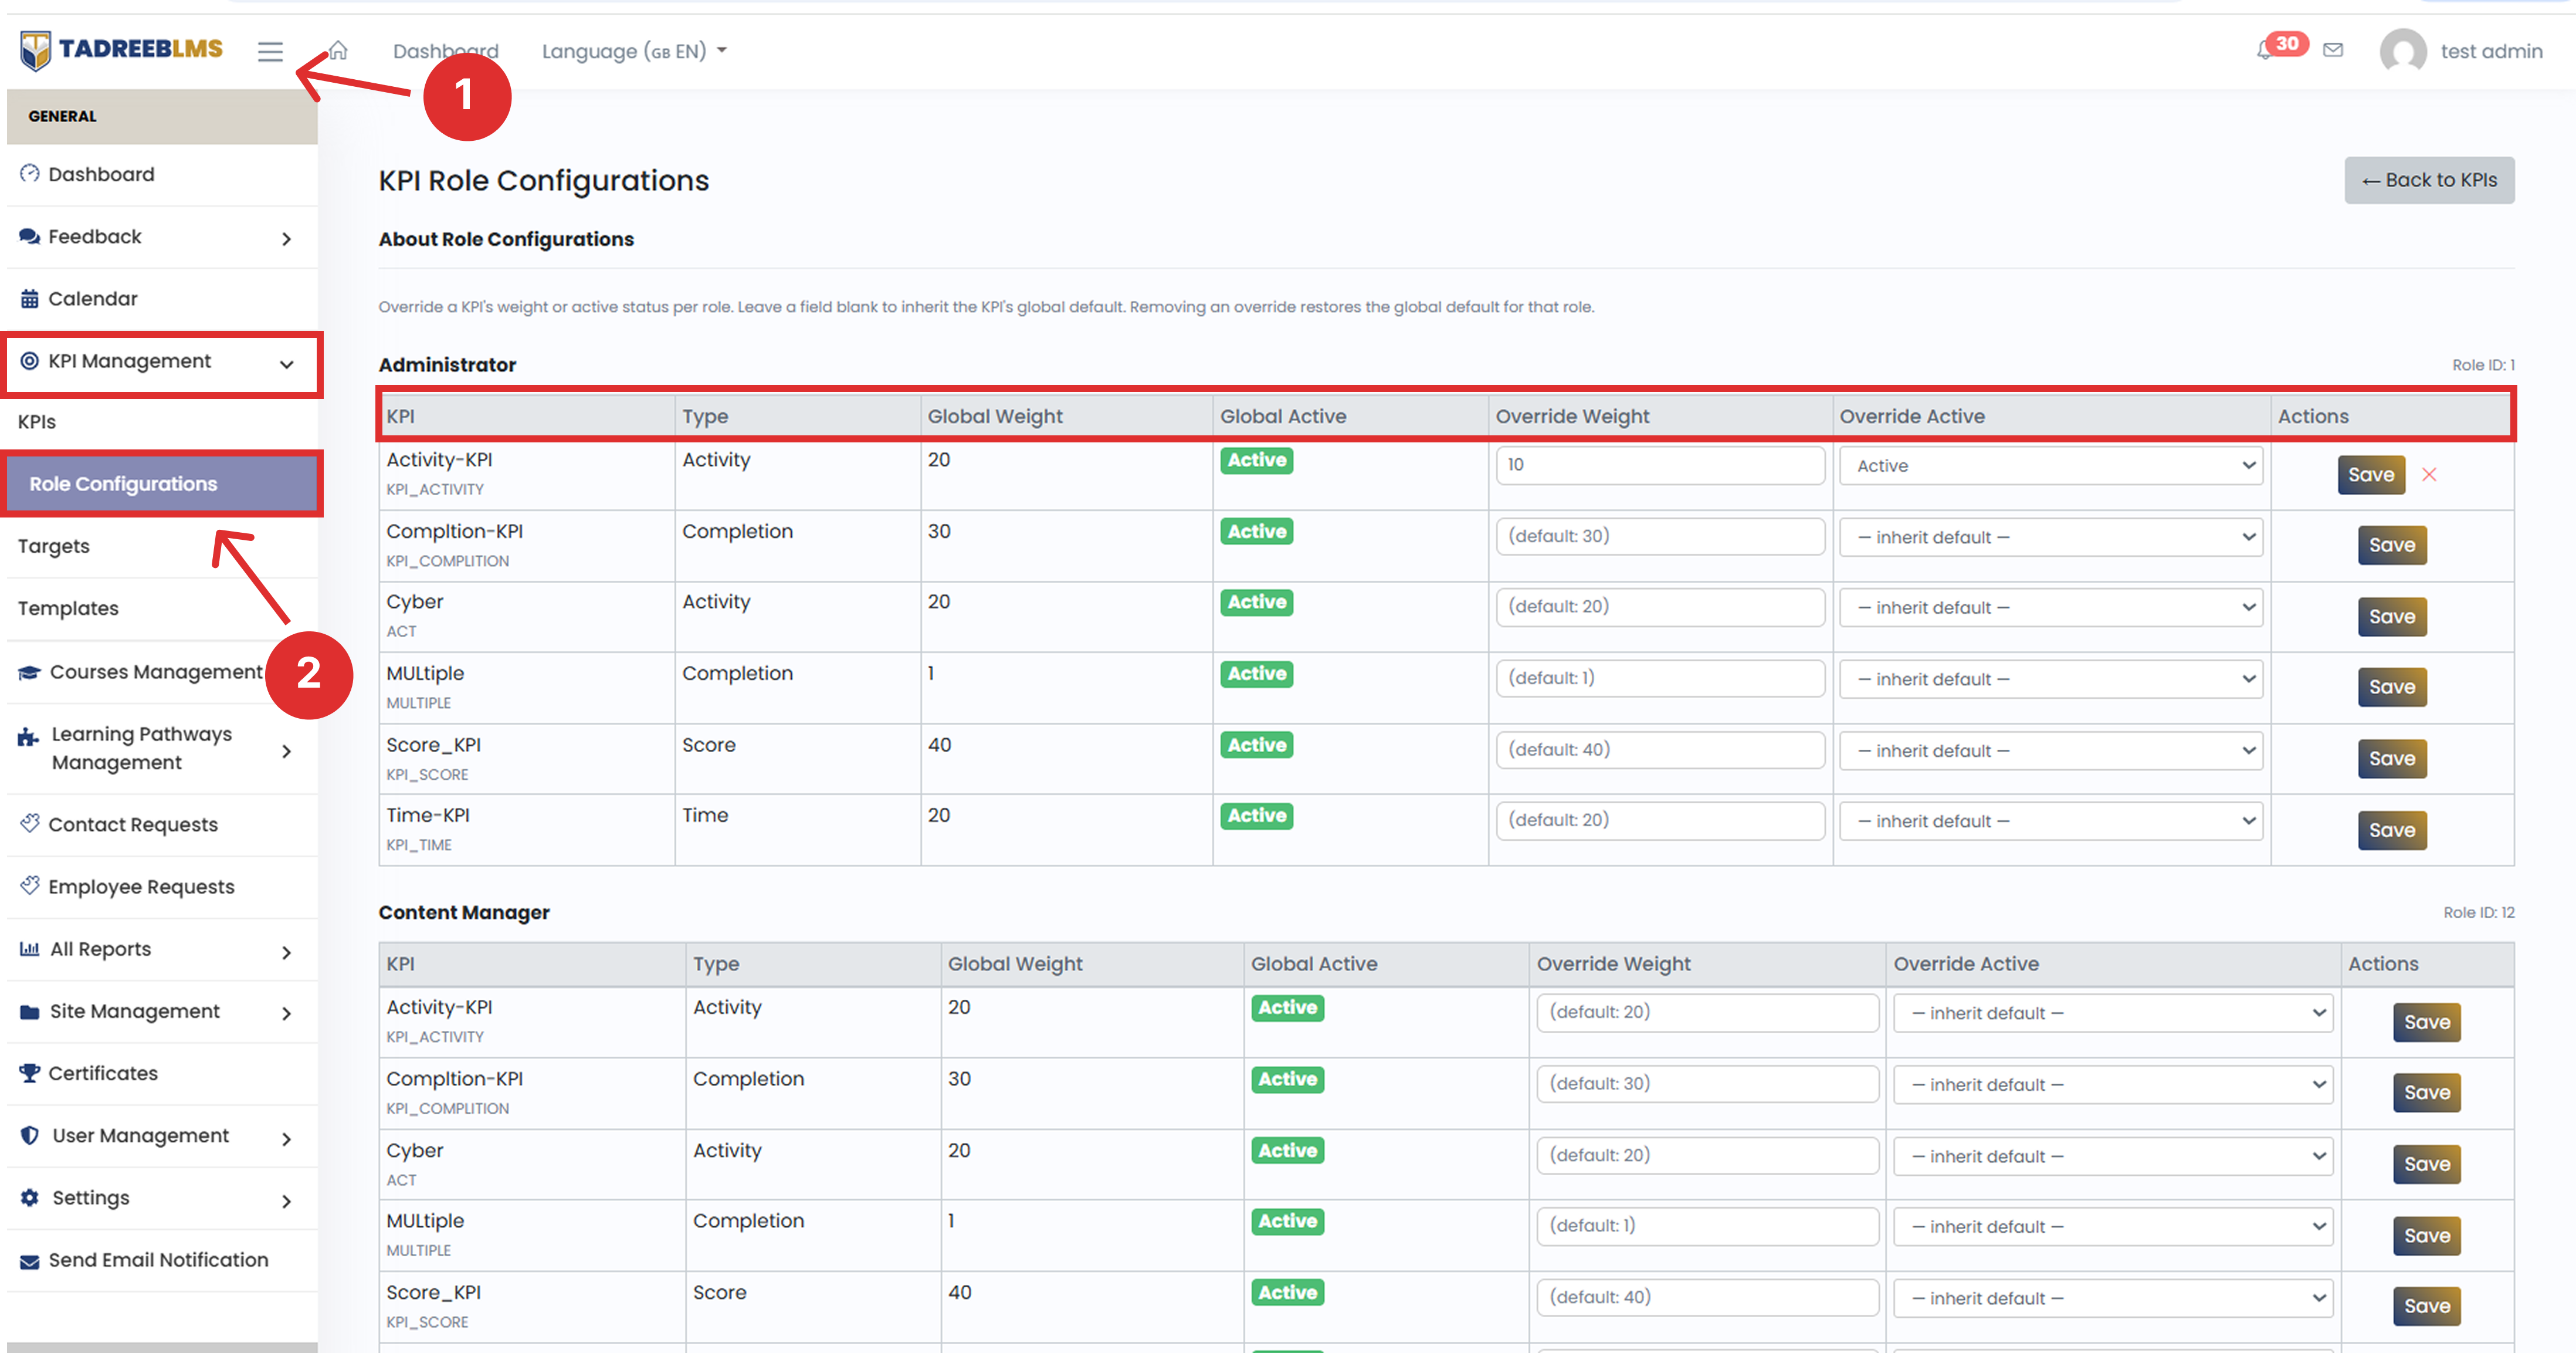
The page shows a separate table for each role, for example, the Administrator role.
Understanding the table
| Column | What it means |
|---|---|
| KPI | The name and code of the KPI. |
| Type | The type of KPI, such as Completion, Score, Activity, or Time. |
| Global Weight | The default weight of the KPI — the one it uses everywhere unless a role overrides it |
| Global Active | Shows whether the KPI is active by default. |
| Override Weight | A field where you can enter a different weight for this KPI, but only for this specific role |
| Override Active | Set the KPI as Active or Inactive for this specific role. |
| Actions | Use the Save button to apply your override for that row |
Example
In the Administrator section, Activity-KPI has:
- Global Weight: 20
- Global Active: Active
- Override Weight: 10
- Override Active: Active This means:
Activity-KPI normally has a weight of 20, but for Administrators, its weight is 10.
The global weight of 20 remains unchanged for other roles.
If you don't want to change a KPI
Leave Override Weight as the default value and keep Override Active as --- inherit default ---.
The KPI will then use its global settings.
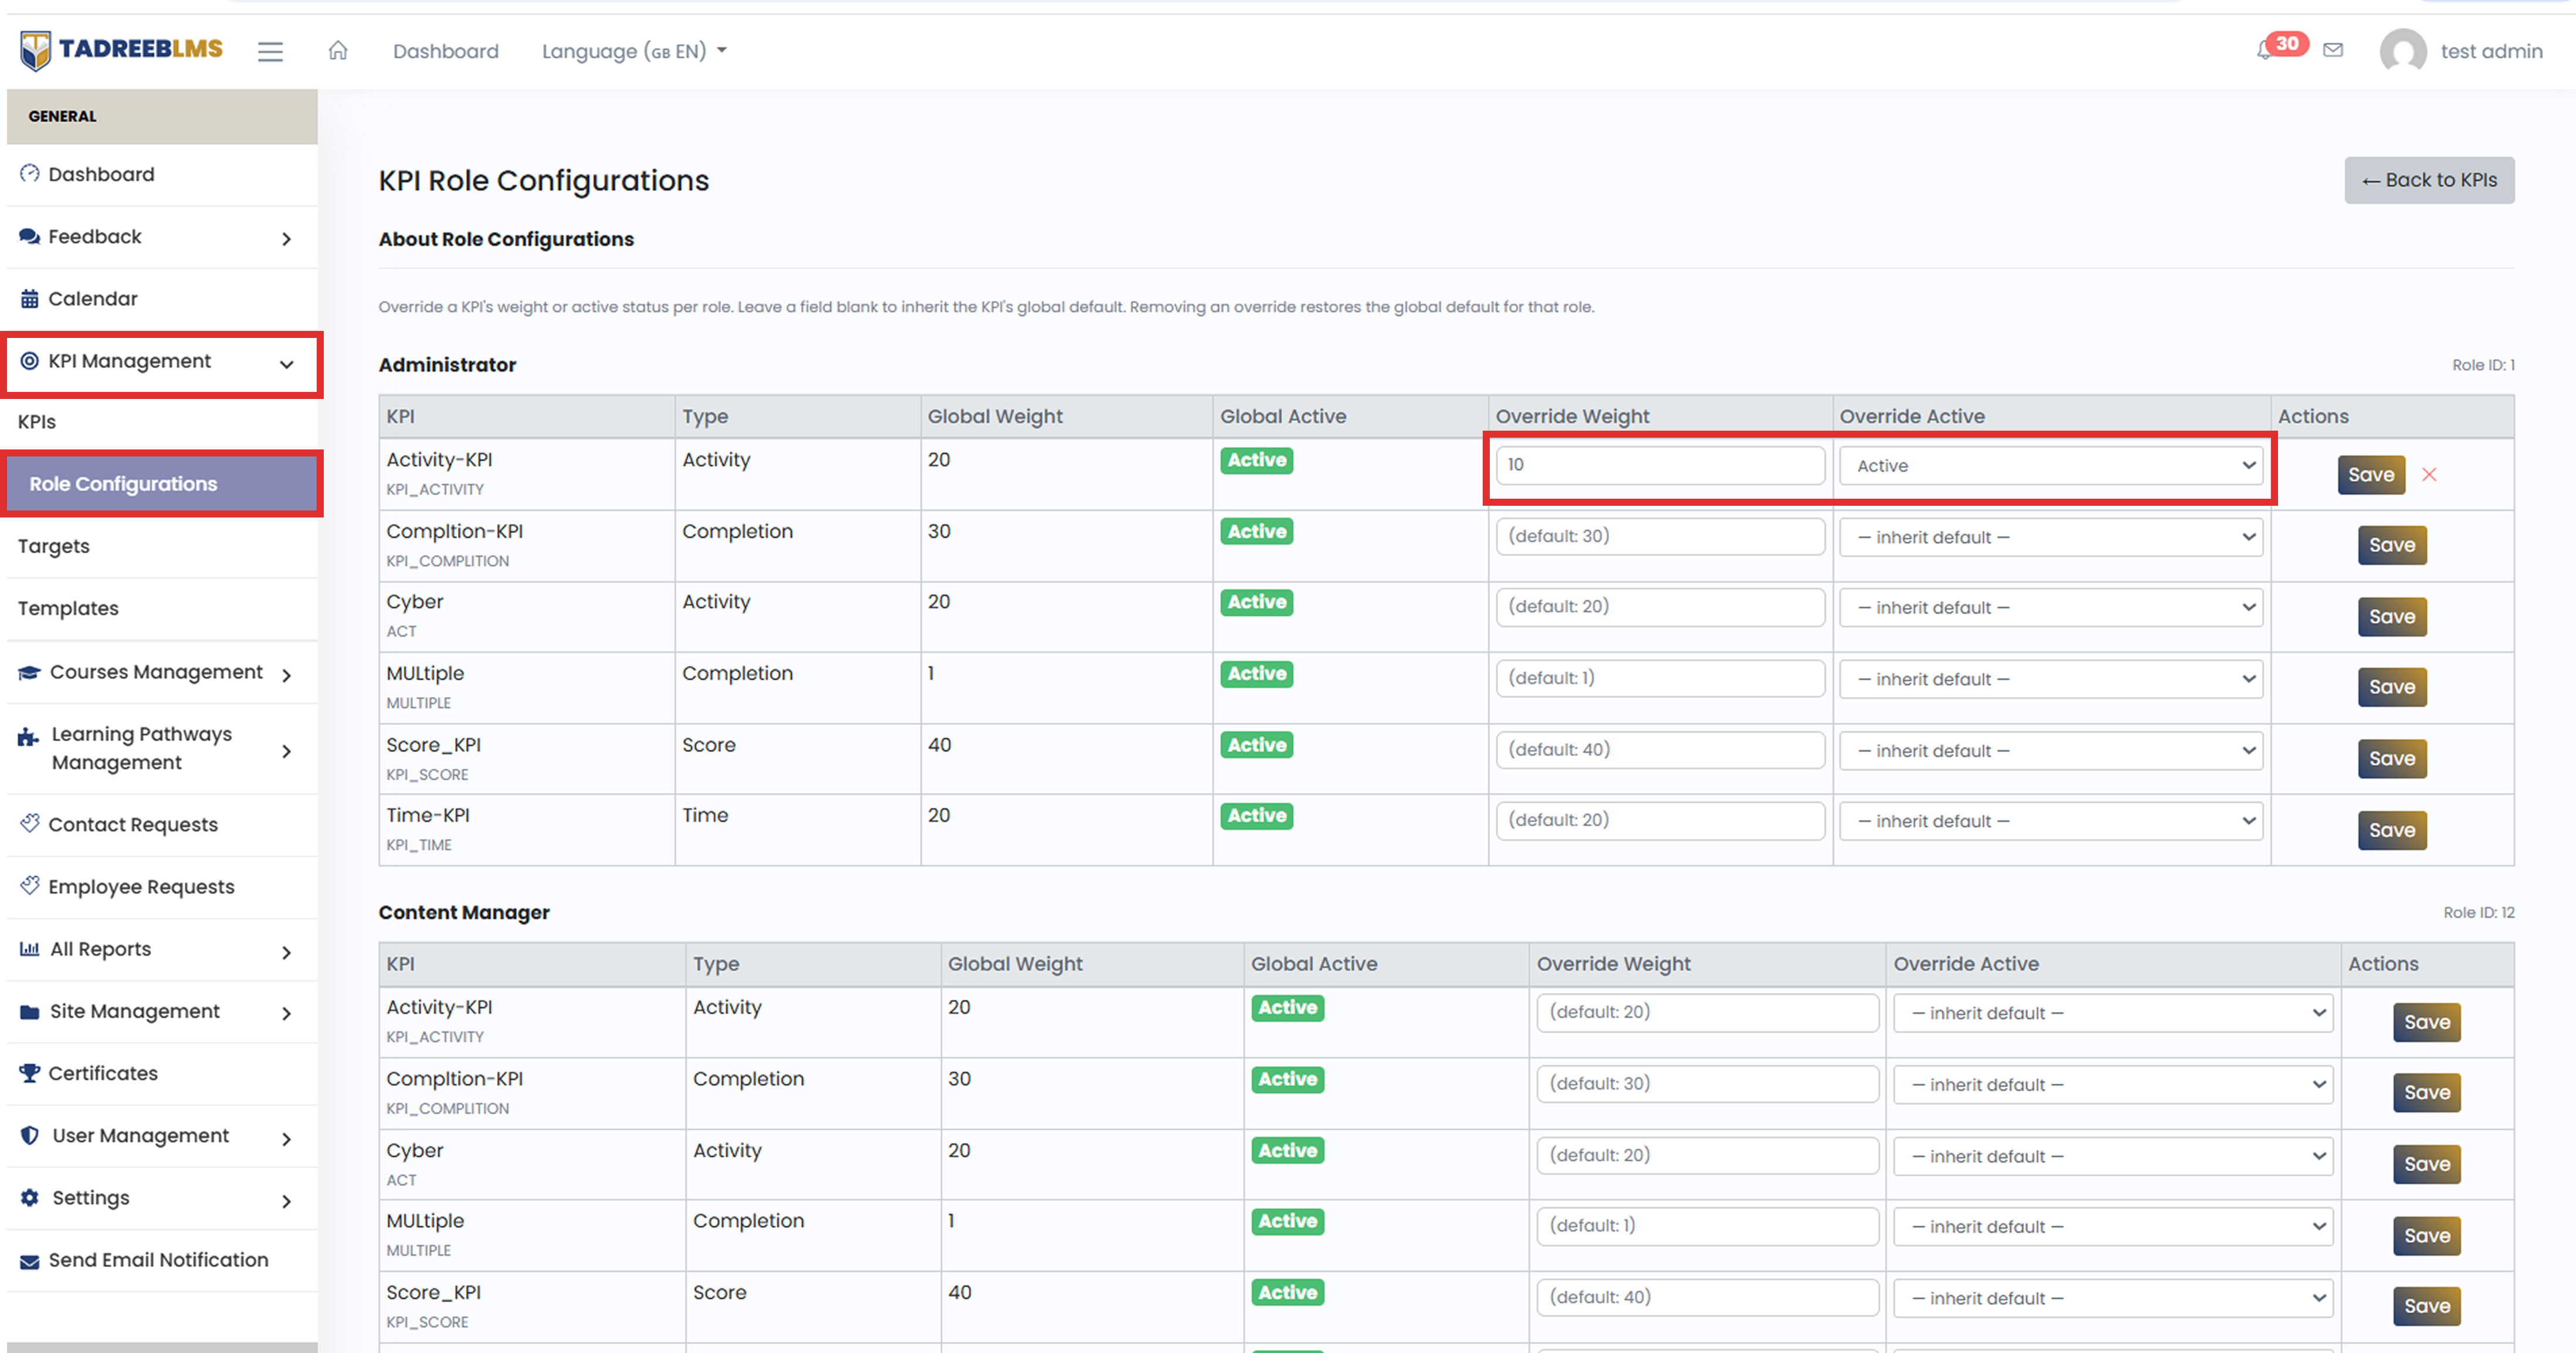
To change a KPI for a role
- In the required role's table, enter a value in Override Weight and/or select Active or Inactive in Override Active.
- Click Save.
📌 Note: Role-specific overrides affect only the selected role. They do not change the KPI's global settings or its settings for other roles.
4.3 Targets
The Targets page lets an admin set the expected value for a KPI — the number it should ideally reach. A target can apply to all roles and courses or to a specific role, course, or role-and-course combination.
- Click the ☰ menu icon to open the sidebar.
- Go to KPI Management > Targets.
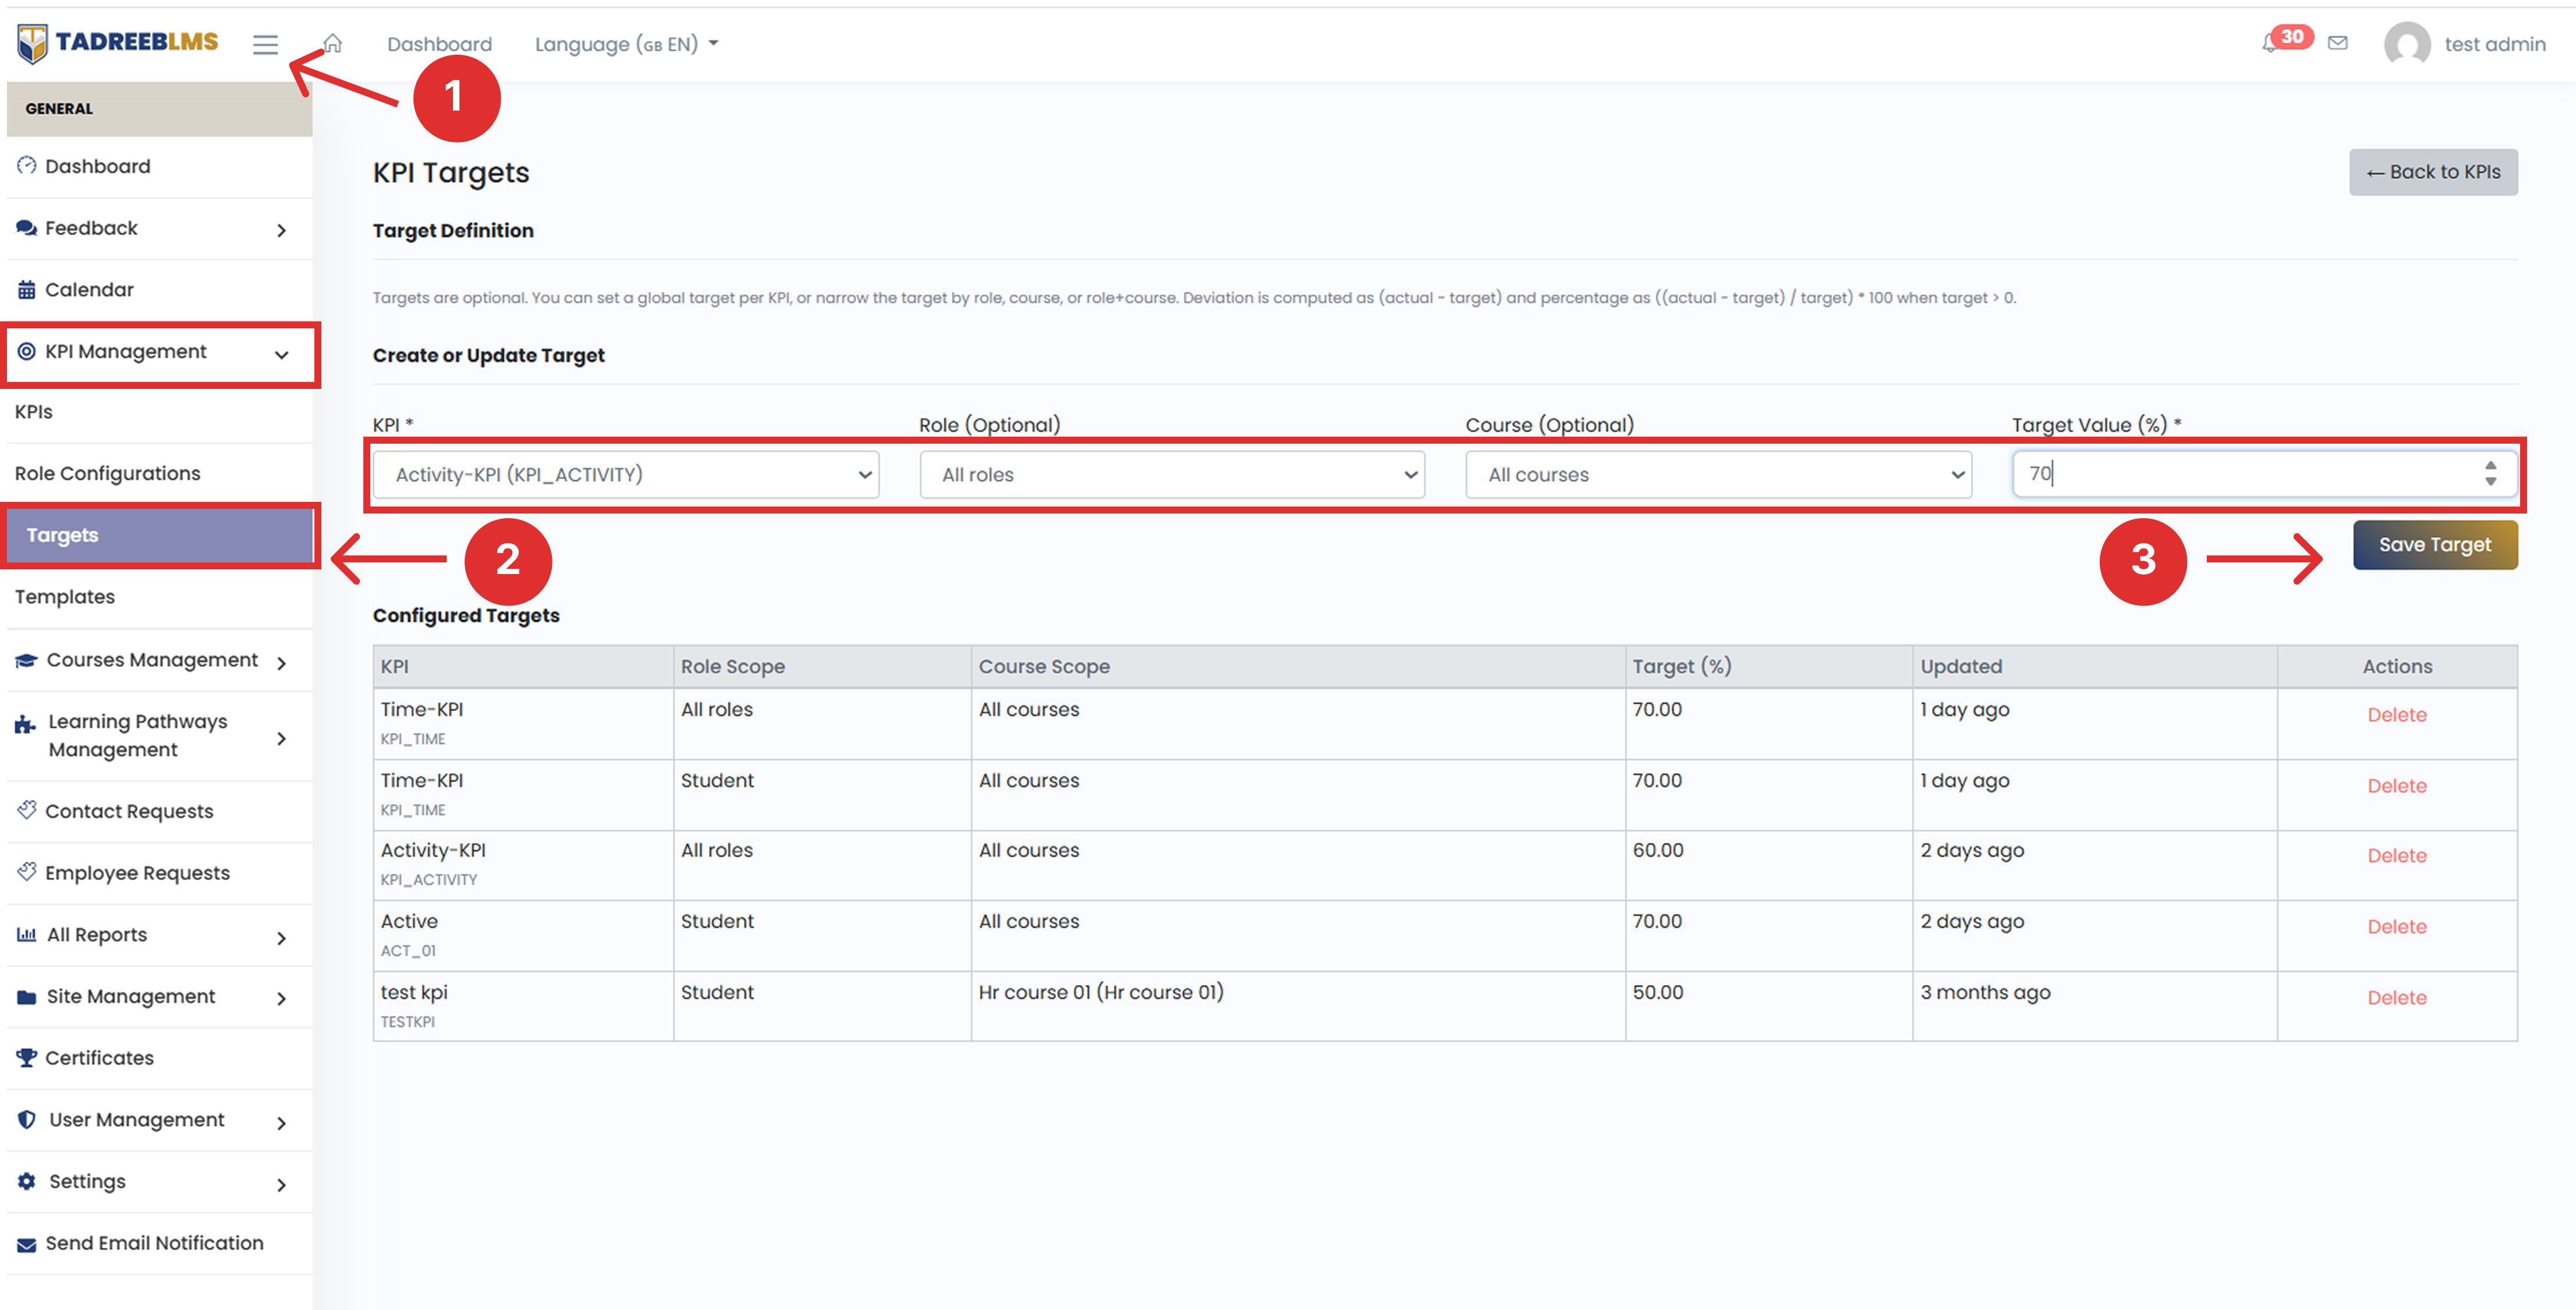
Creating or Updating a Target
Under Create or Update Target, enter the following:
| Field | What it means |
|---|---|
| KPI | Select the KPI for which you want to set a target. |
| Role (Optional) | Select a specific role, such as Student, or leave All roles to apply the target to all roles. |
| Course (Optional) | Select a specific course, or leave All courses to apply the target to all courses. |
| Target Value (%) | Enter the expected KPI value as a percentage. |
- Click Save Target.
💡 Tip: Use All roles and All courses for a general target. Select a specific role or course when you want the target to apply only to that group.
Understanding the Configured Targets Table
The Configured Targets table displays the targets that have been set.
| Column | What it means |
|---|---|
| KPI | The name and code of the KPI. |
| Role Scope | The role to which the target applies. |
| Course Scope | The course to which the target applies. |
| Target (%) | The expected KPI value. |
| Updated | When the target was last updated. |
| Actions | Allows you to delete the target. |
Example
In the screenshot, Time-KPI has two targets:
- 70.00 for All roles and All courses
- 70.00 for Student and All courses
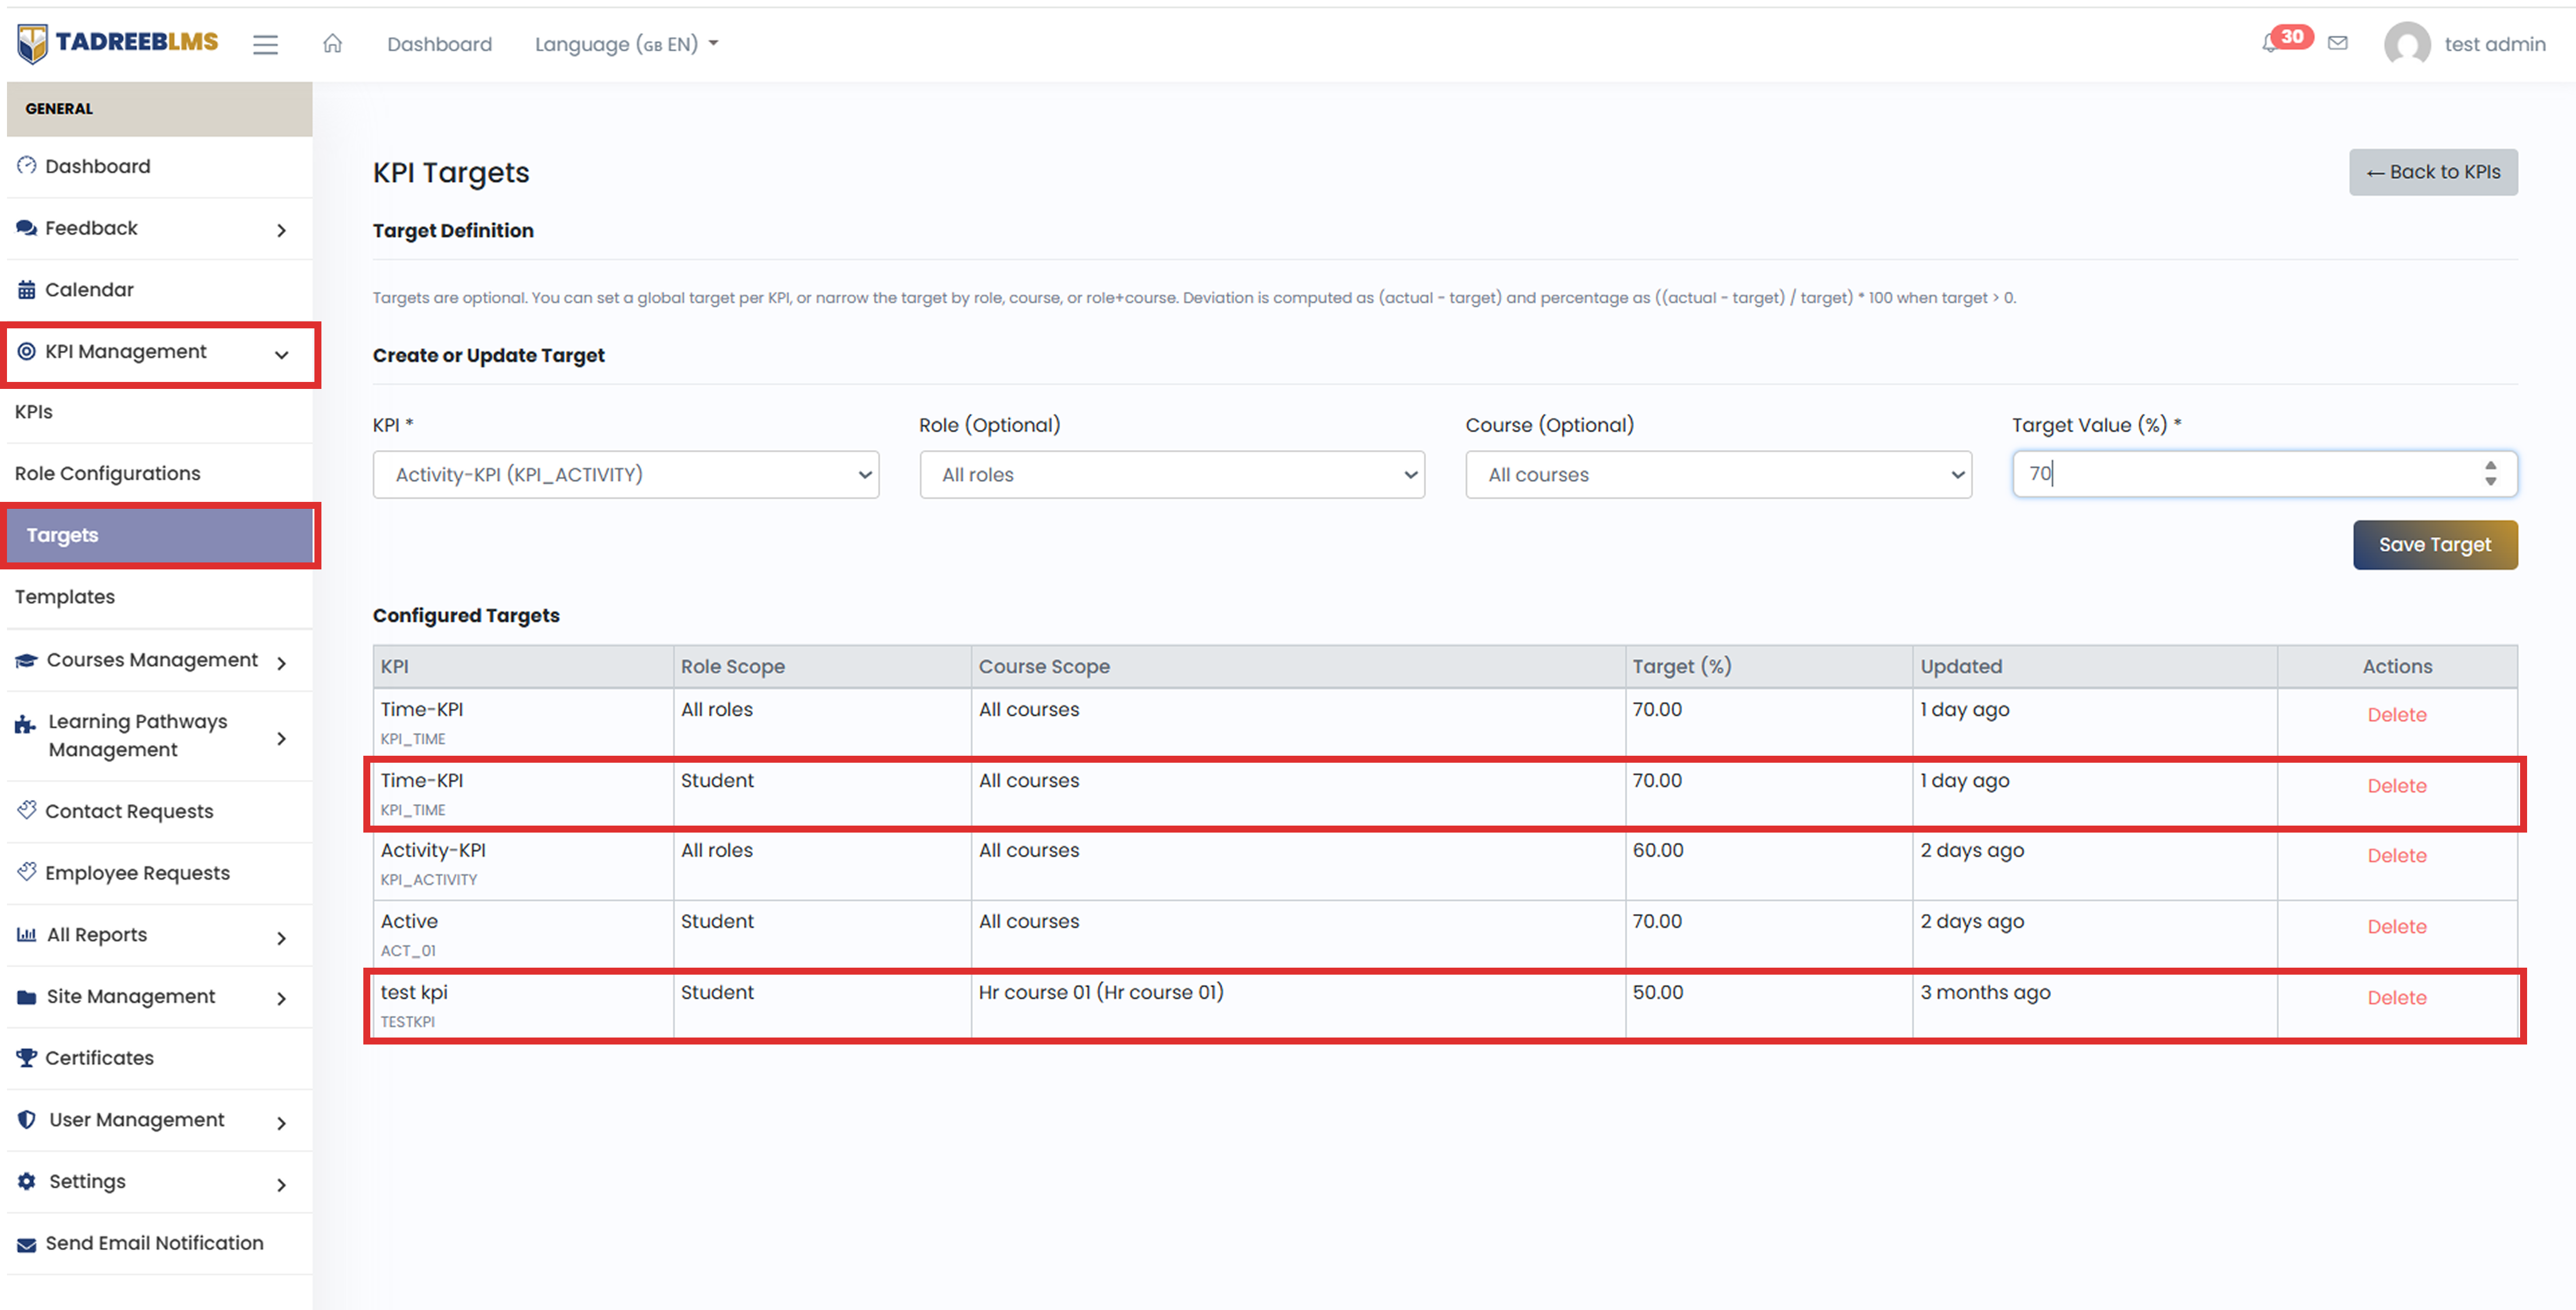
The screenshot also shows the test kpi with:
- Role: Student
- Course: Hr course 01
- Target: 50.00 This means the target is set specifically for Students taking Hr course 01.
📌 Note: Targets are optional. If no target is set for a KPI, the system does not calculate deviation for that KPI.
📌 Note: As explained at the top of the page, once a target is set, the system automatically works out two things for you:
- Deviation = Current Value − Target
- Deviation % = (Deviation ÷ Target) × 100 — only calculated when the target is greater than 0
You don't need to calculate these yourself — they're shown automatically wherever this KPI's performance is displayed (see Section 6 and Section 8 for a full walkthrough with numbers).
Deleting a Target
To remove a target, click Delete next to the target in the Configured Targets table.
4.4 KPI Templates
KPI Templates provide ready-made blueprints that help admins create KPIs more quickly. A template can contain predefined KPI settings, so you can reuse the same setup instead of creating each KPI from scratch.
- Click the ☰ menu icon to open the sidebar.
- Go to KPI Management > Templates.
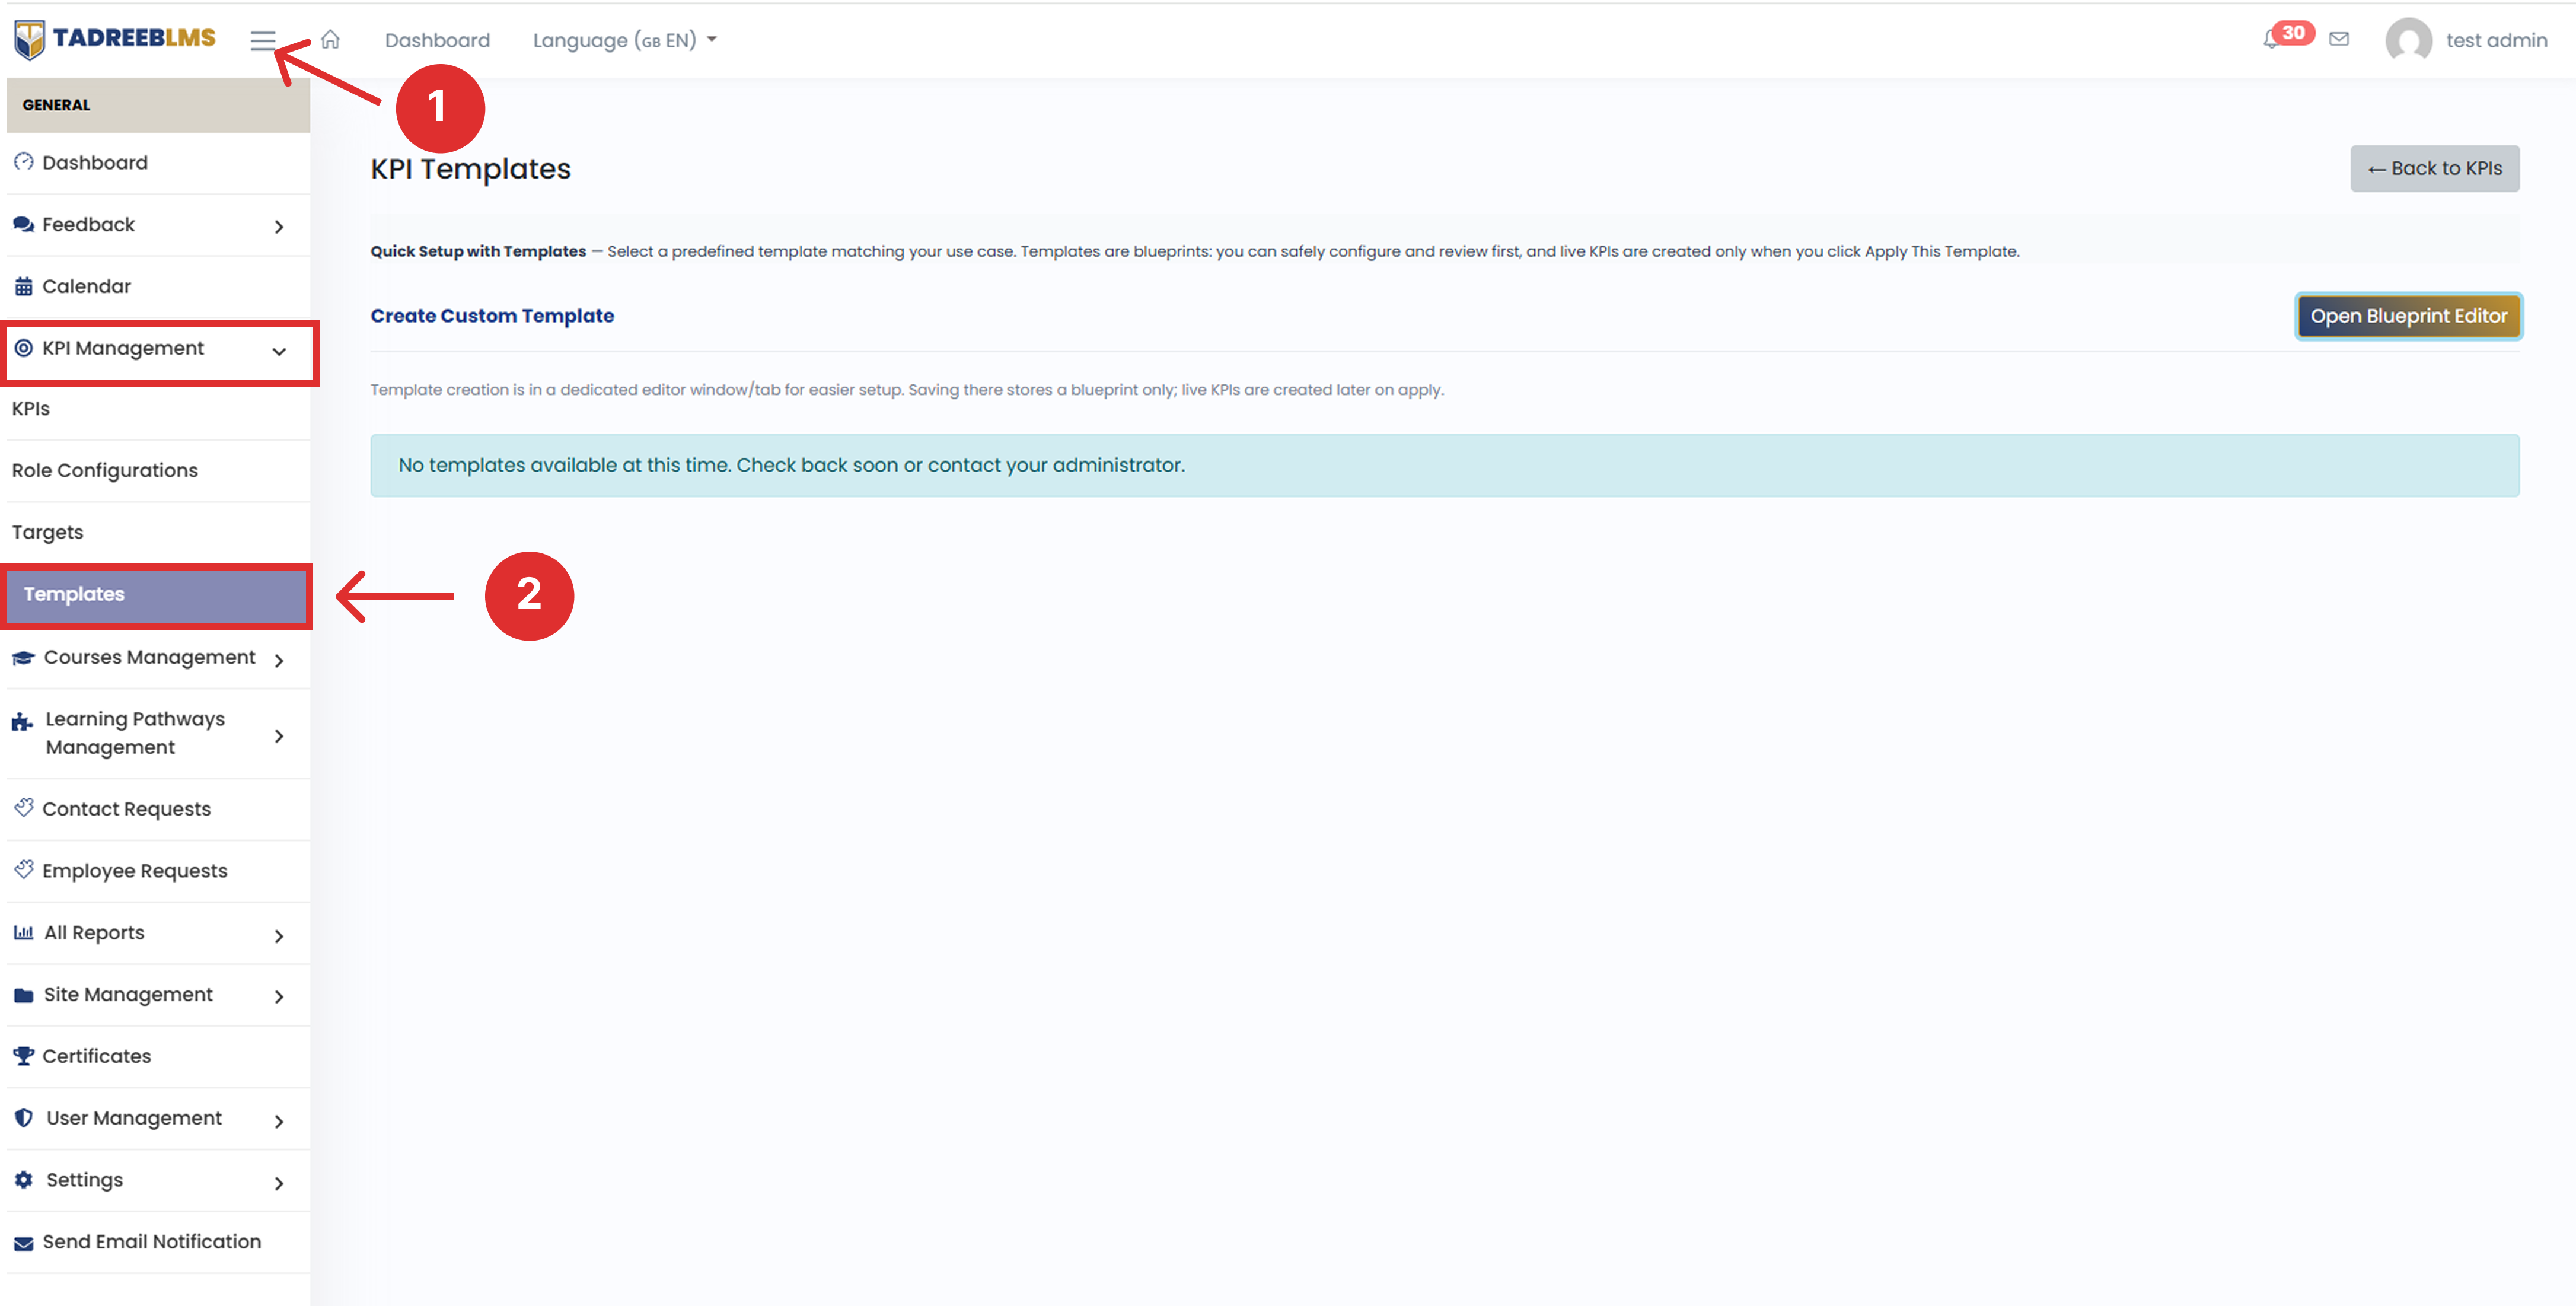
The Quick Setup with Templates section lets you use a predefined template for a specific use case.
Review the available template and click Apply This Template to use it.
📌 Note: A template is a blueprint. Applying a template creates the corresponding live KPI based on the template settings.
Create Custom Template
If you need a template that is not available, click Open Blueprint Editor to create your own template.
The template is saved as a blueprint and can be used later to create KPIs.
📌 Note: Creating or saving a template does not itself create a live KPI. The KPI is created when the template is applied.
When no templates are available
If the page displays "No templates available at this time," no predefined templates are currently available.
You can click Open Blueprint Editor to create a custom template.
5. Course Management
This section walks administrators through creating and managing courses in Tadreeb LMS. This includes creating course categories, courses, lessons, and quizzes/final assessments. Administrators will also learn how to review the short answers submitted by learners, manage tests (quizzes and final assessments), and assign courses to individual learners or user groups. Essentially, it's the complete workflow for getting a course from creation to being live and assigning it to trainees.
5.1 Categories
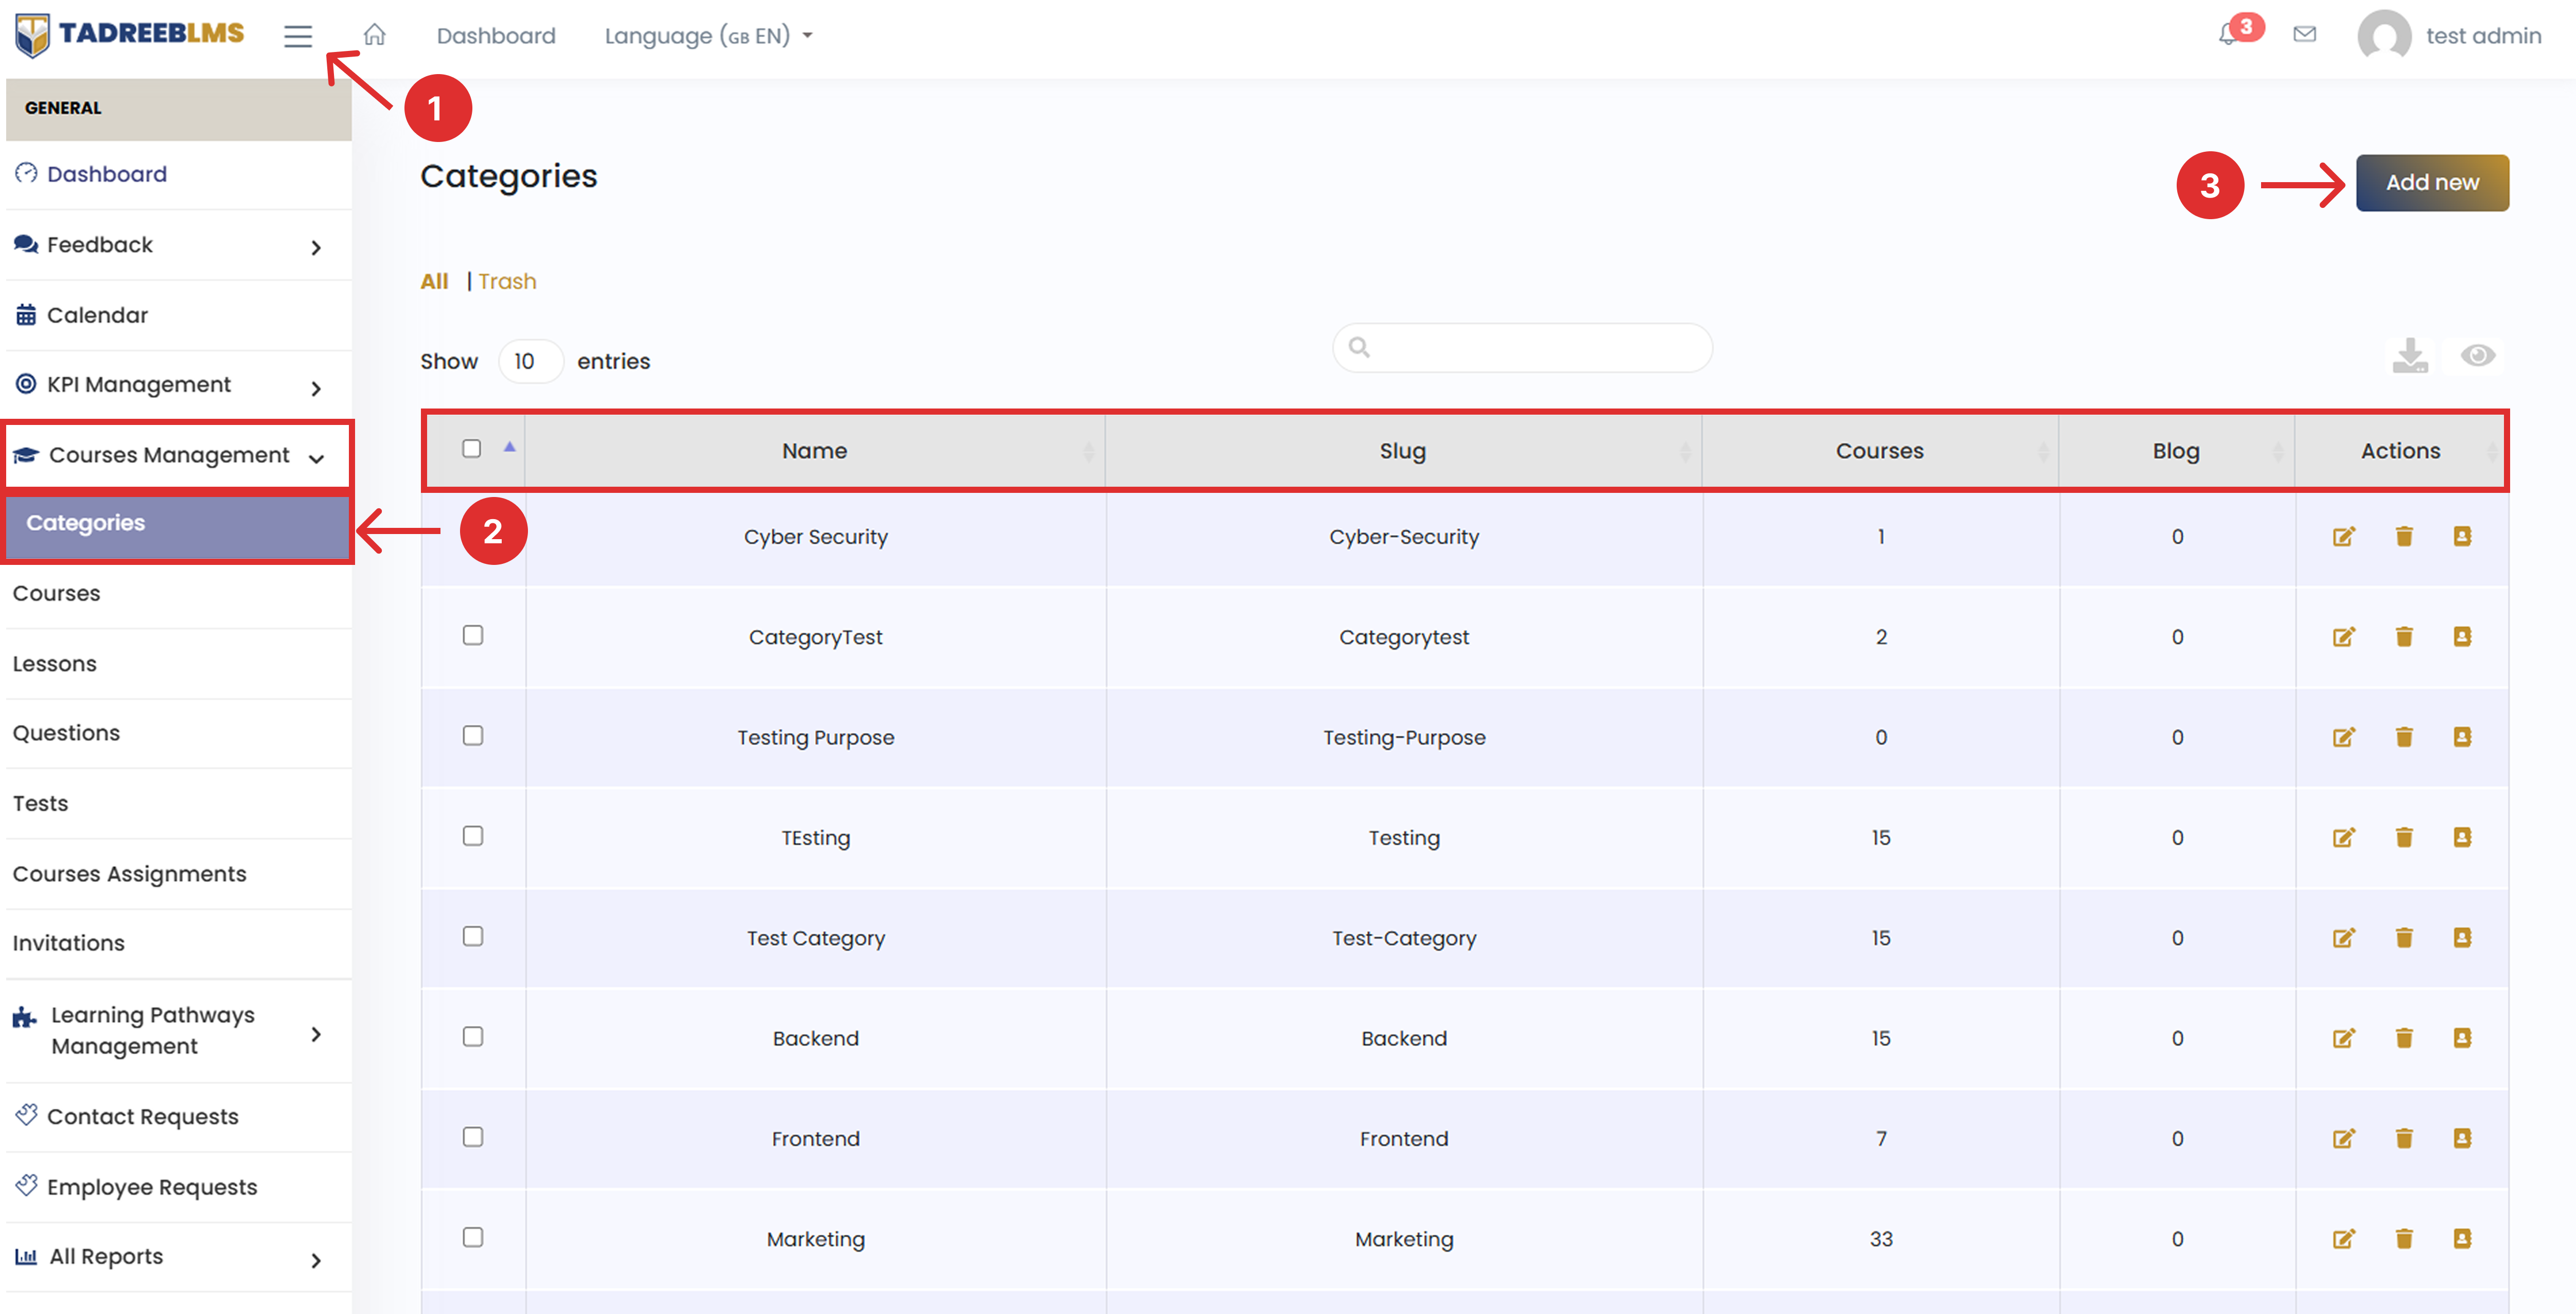
The Categories page lets you group related courses together. For example, a Networking category can include courses such as Network Security Principles, Introduction to TCP/IP, and Routing. From this page, you can add, edit, or delete categories and see how many courses are linked to each category.
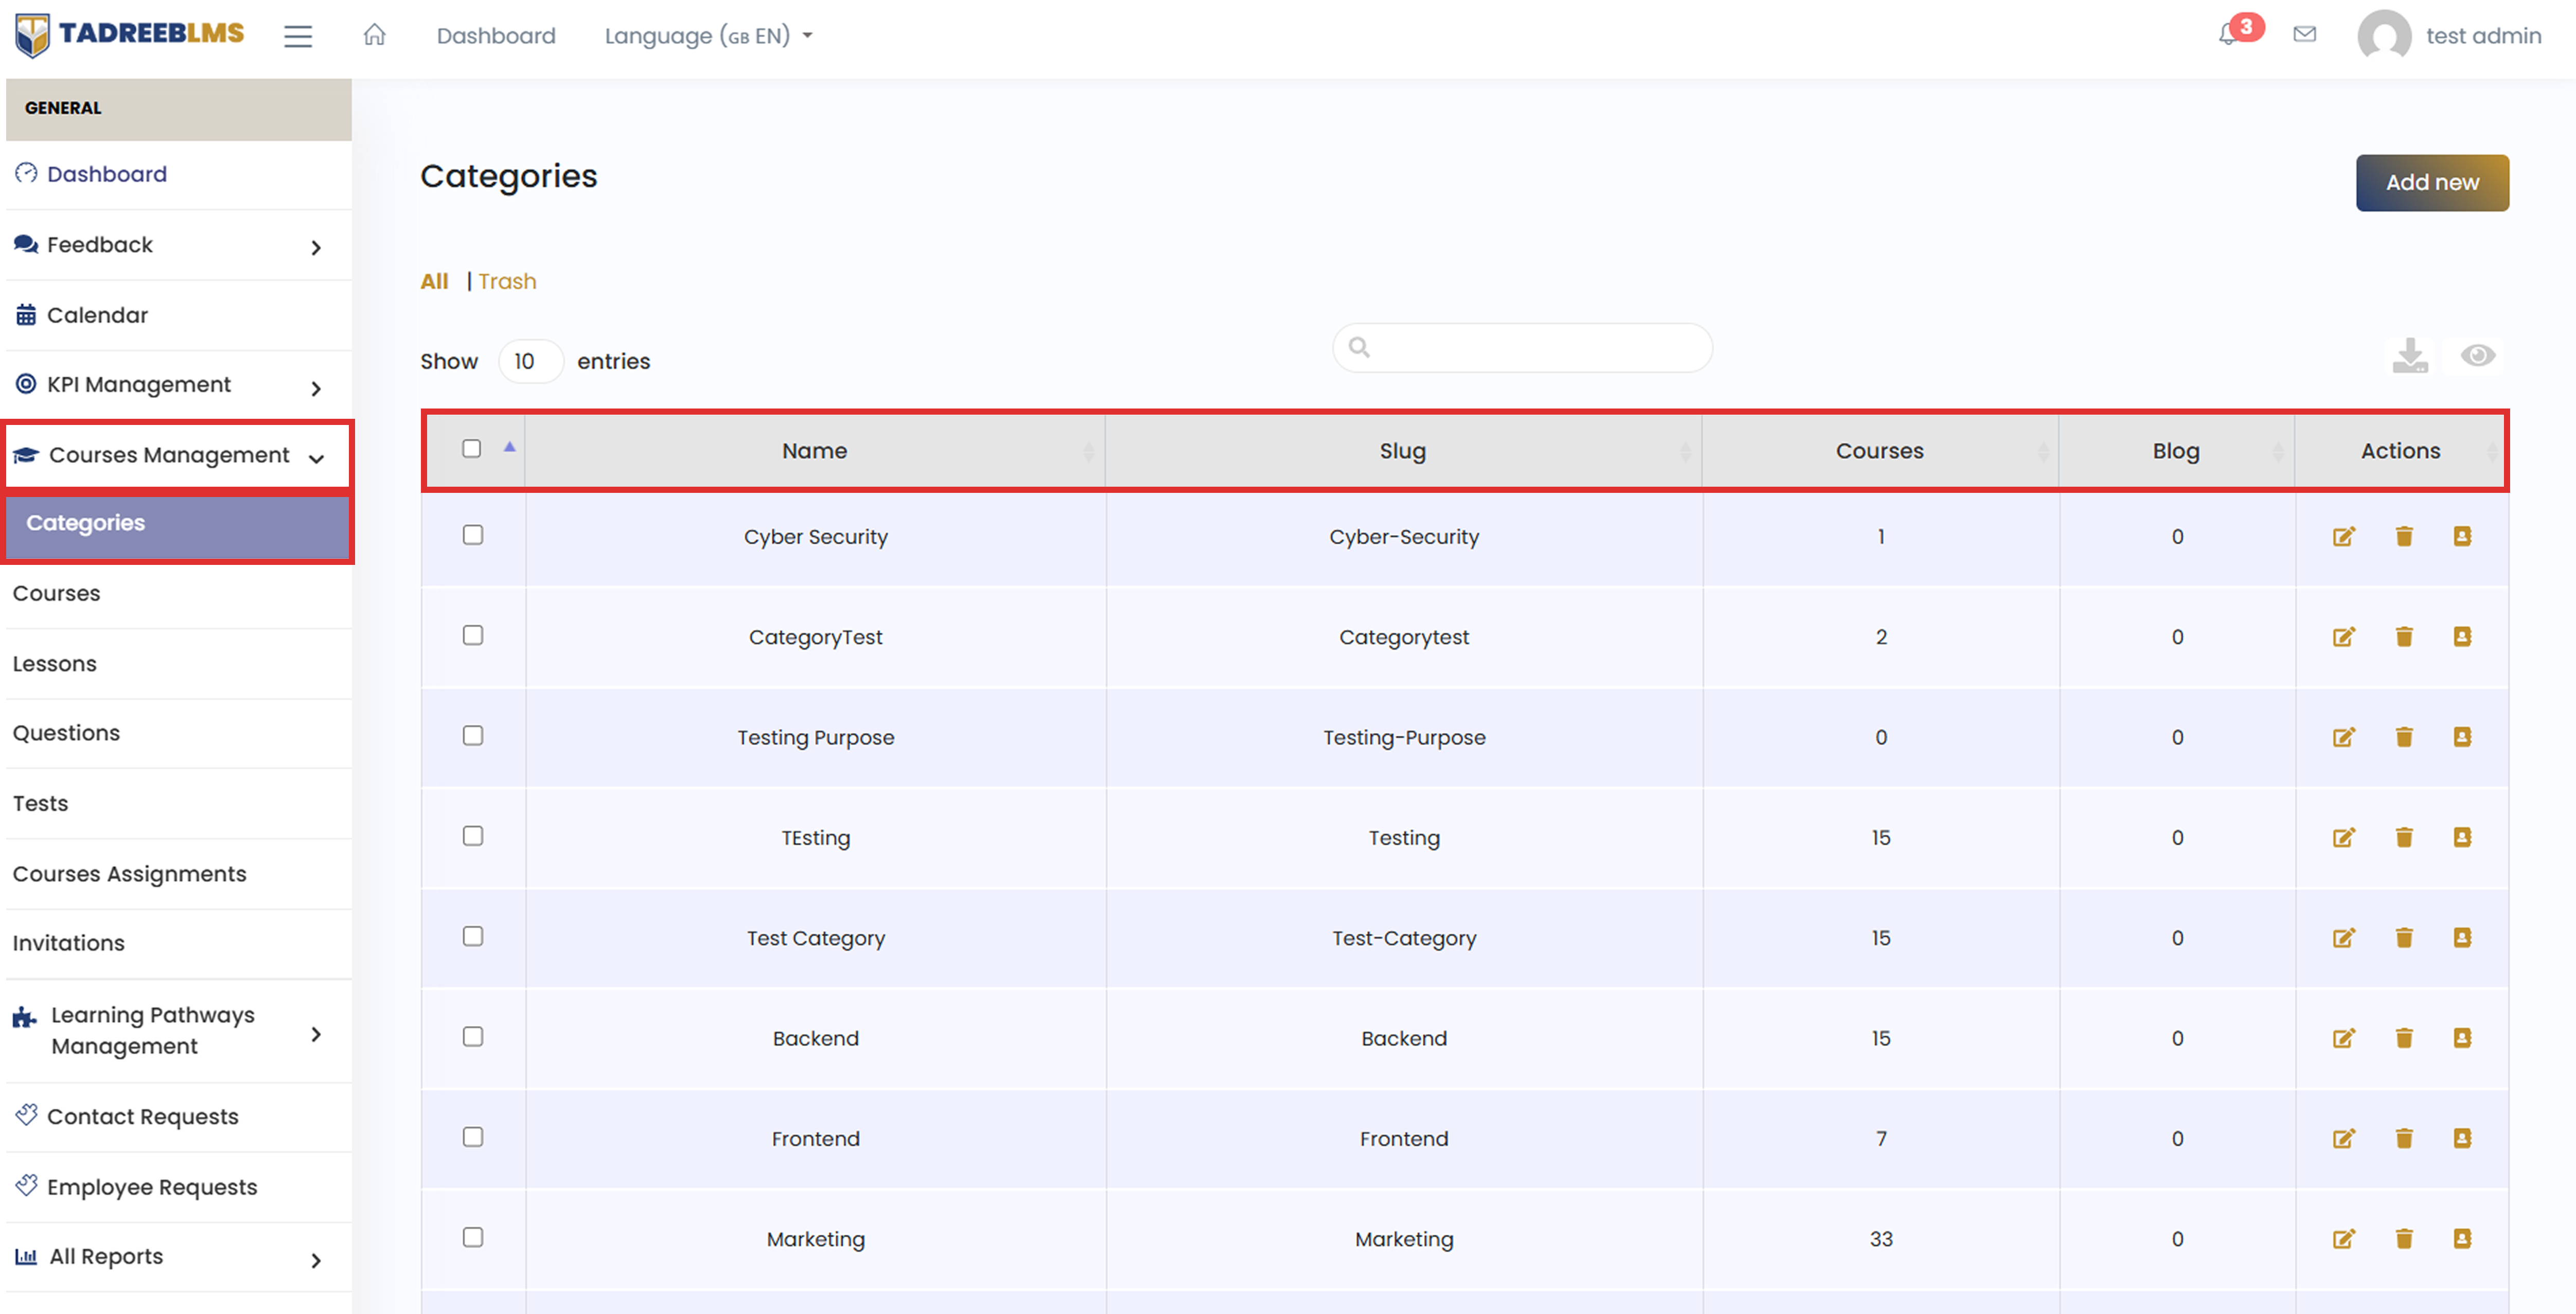
Table Headings
The table below describes the column information.
| Heading | Description |
|---|---|
| Name | The name of the category (e.g., Cyber Security, Frontend, Marketing) |
| Slug | The category name used in the URL |
| Courses | The number of courses assigned to this category |
| Blog | The number of blog posts assigned to this category |
| Actions | Options to Edit or Delete the category, or view the list of courses assigned to it |
💡 Tip: Use the Search bar to find a category by name quickly.
📌 Note: When you delete a category, it moves to the Trash. You can restore it anytime if needed. Use the download icon above the table to export the category list as a CSV or PDF file.
5.1.1 Add New Category
Create a new category to group related courses.
To create a new category:
- Click the menu icon (☰) at the top left to open the sidebar menu.
- In the sidebar menu, go to Courses Management and select Categories.
- Click the Add New button in the top right corner of the page.
- Enter a Name for the category (e.g., Machine Learning).
- Click Save to create the category.
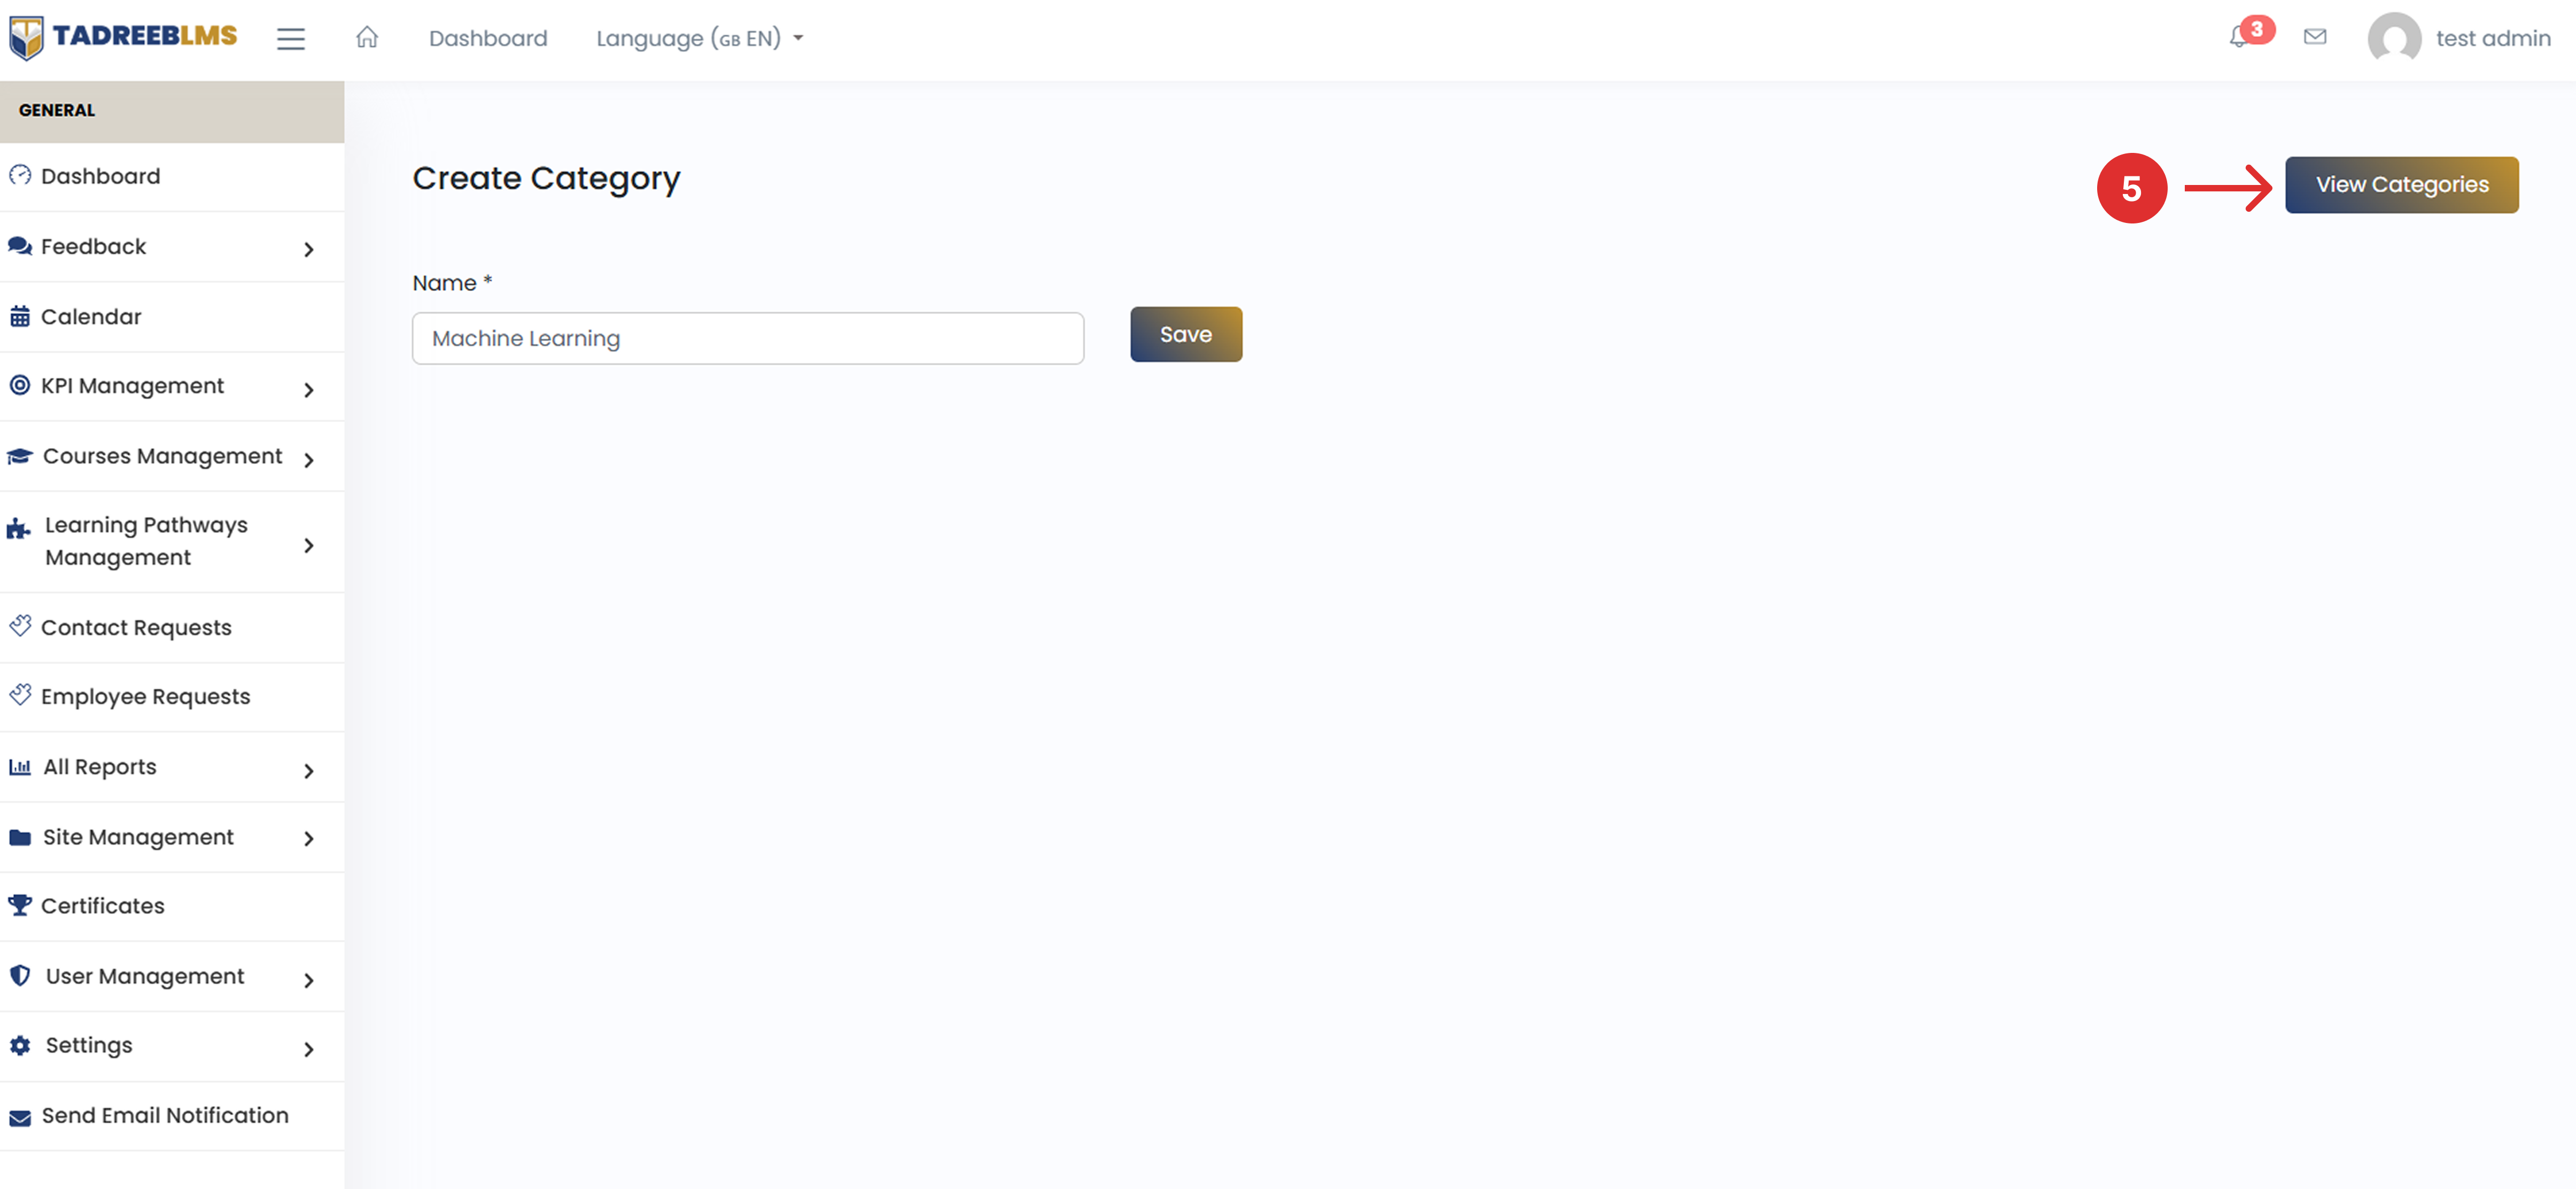
📌 Note: Click View Categories in the top right corner to go back to the category list if needed.
5.2 Courses
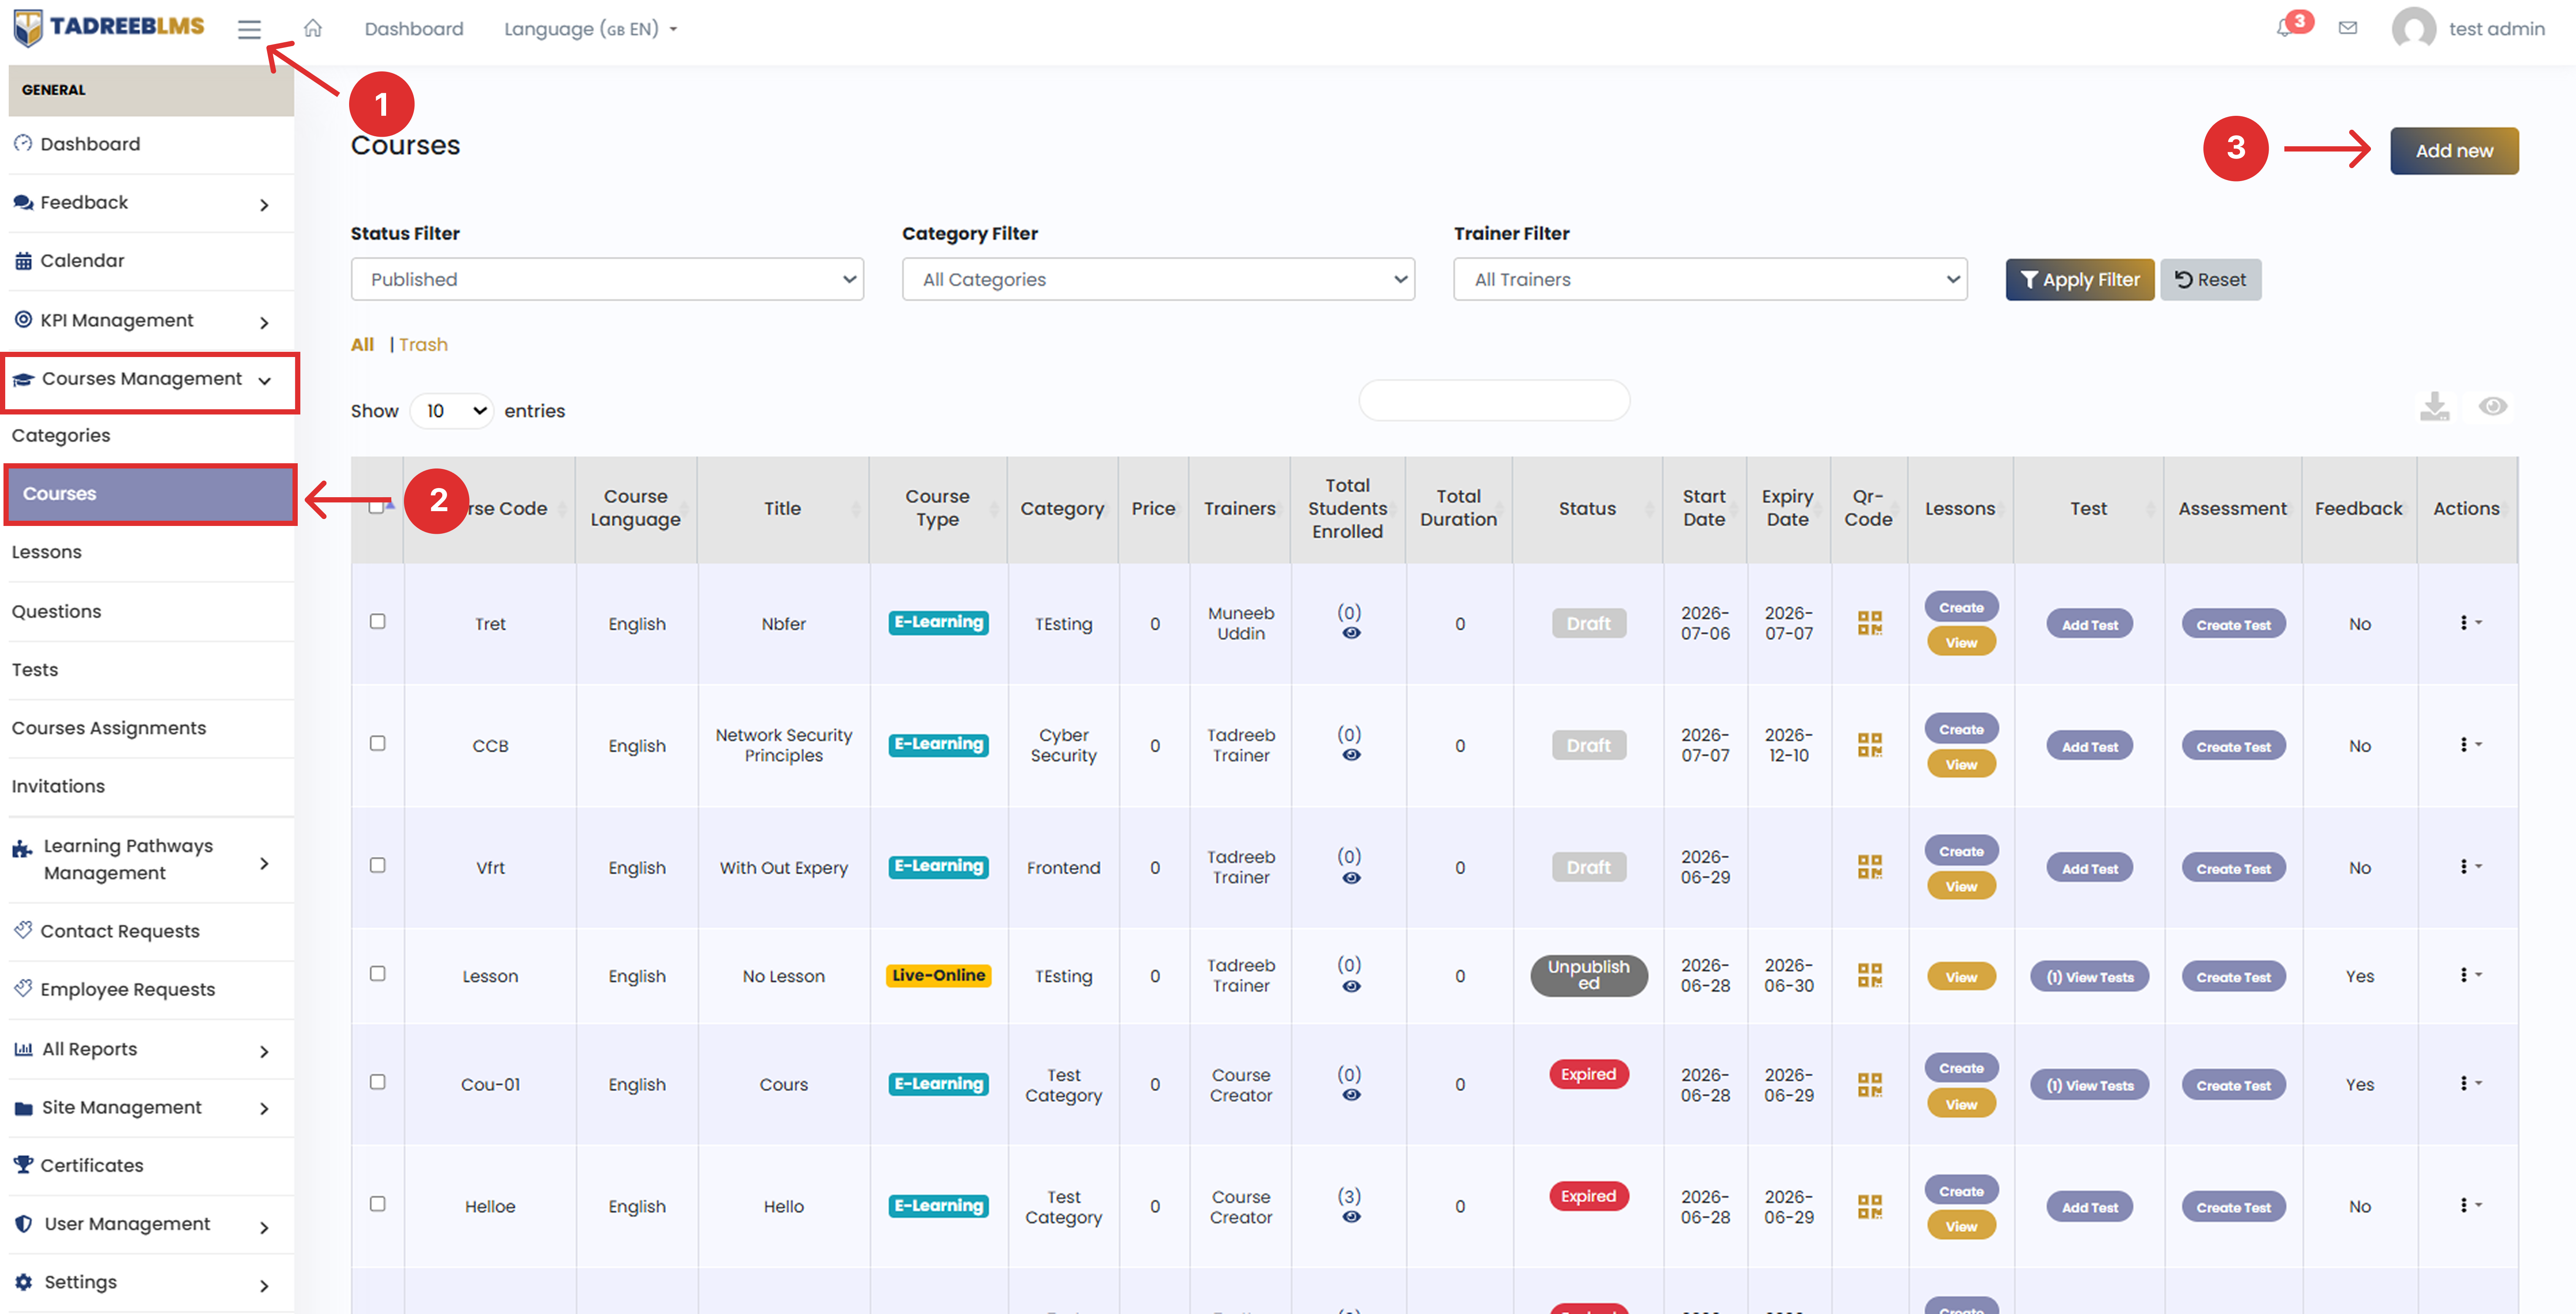
The Courses page lists all courses created on the Tadreeb LMS platform. You can filter courses by status, category, or trainer. Once you've made your selections, click Apply Filter to view the results, or Reset to clear all filters.
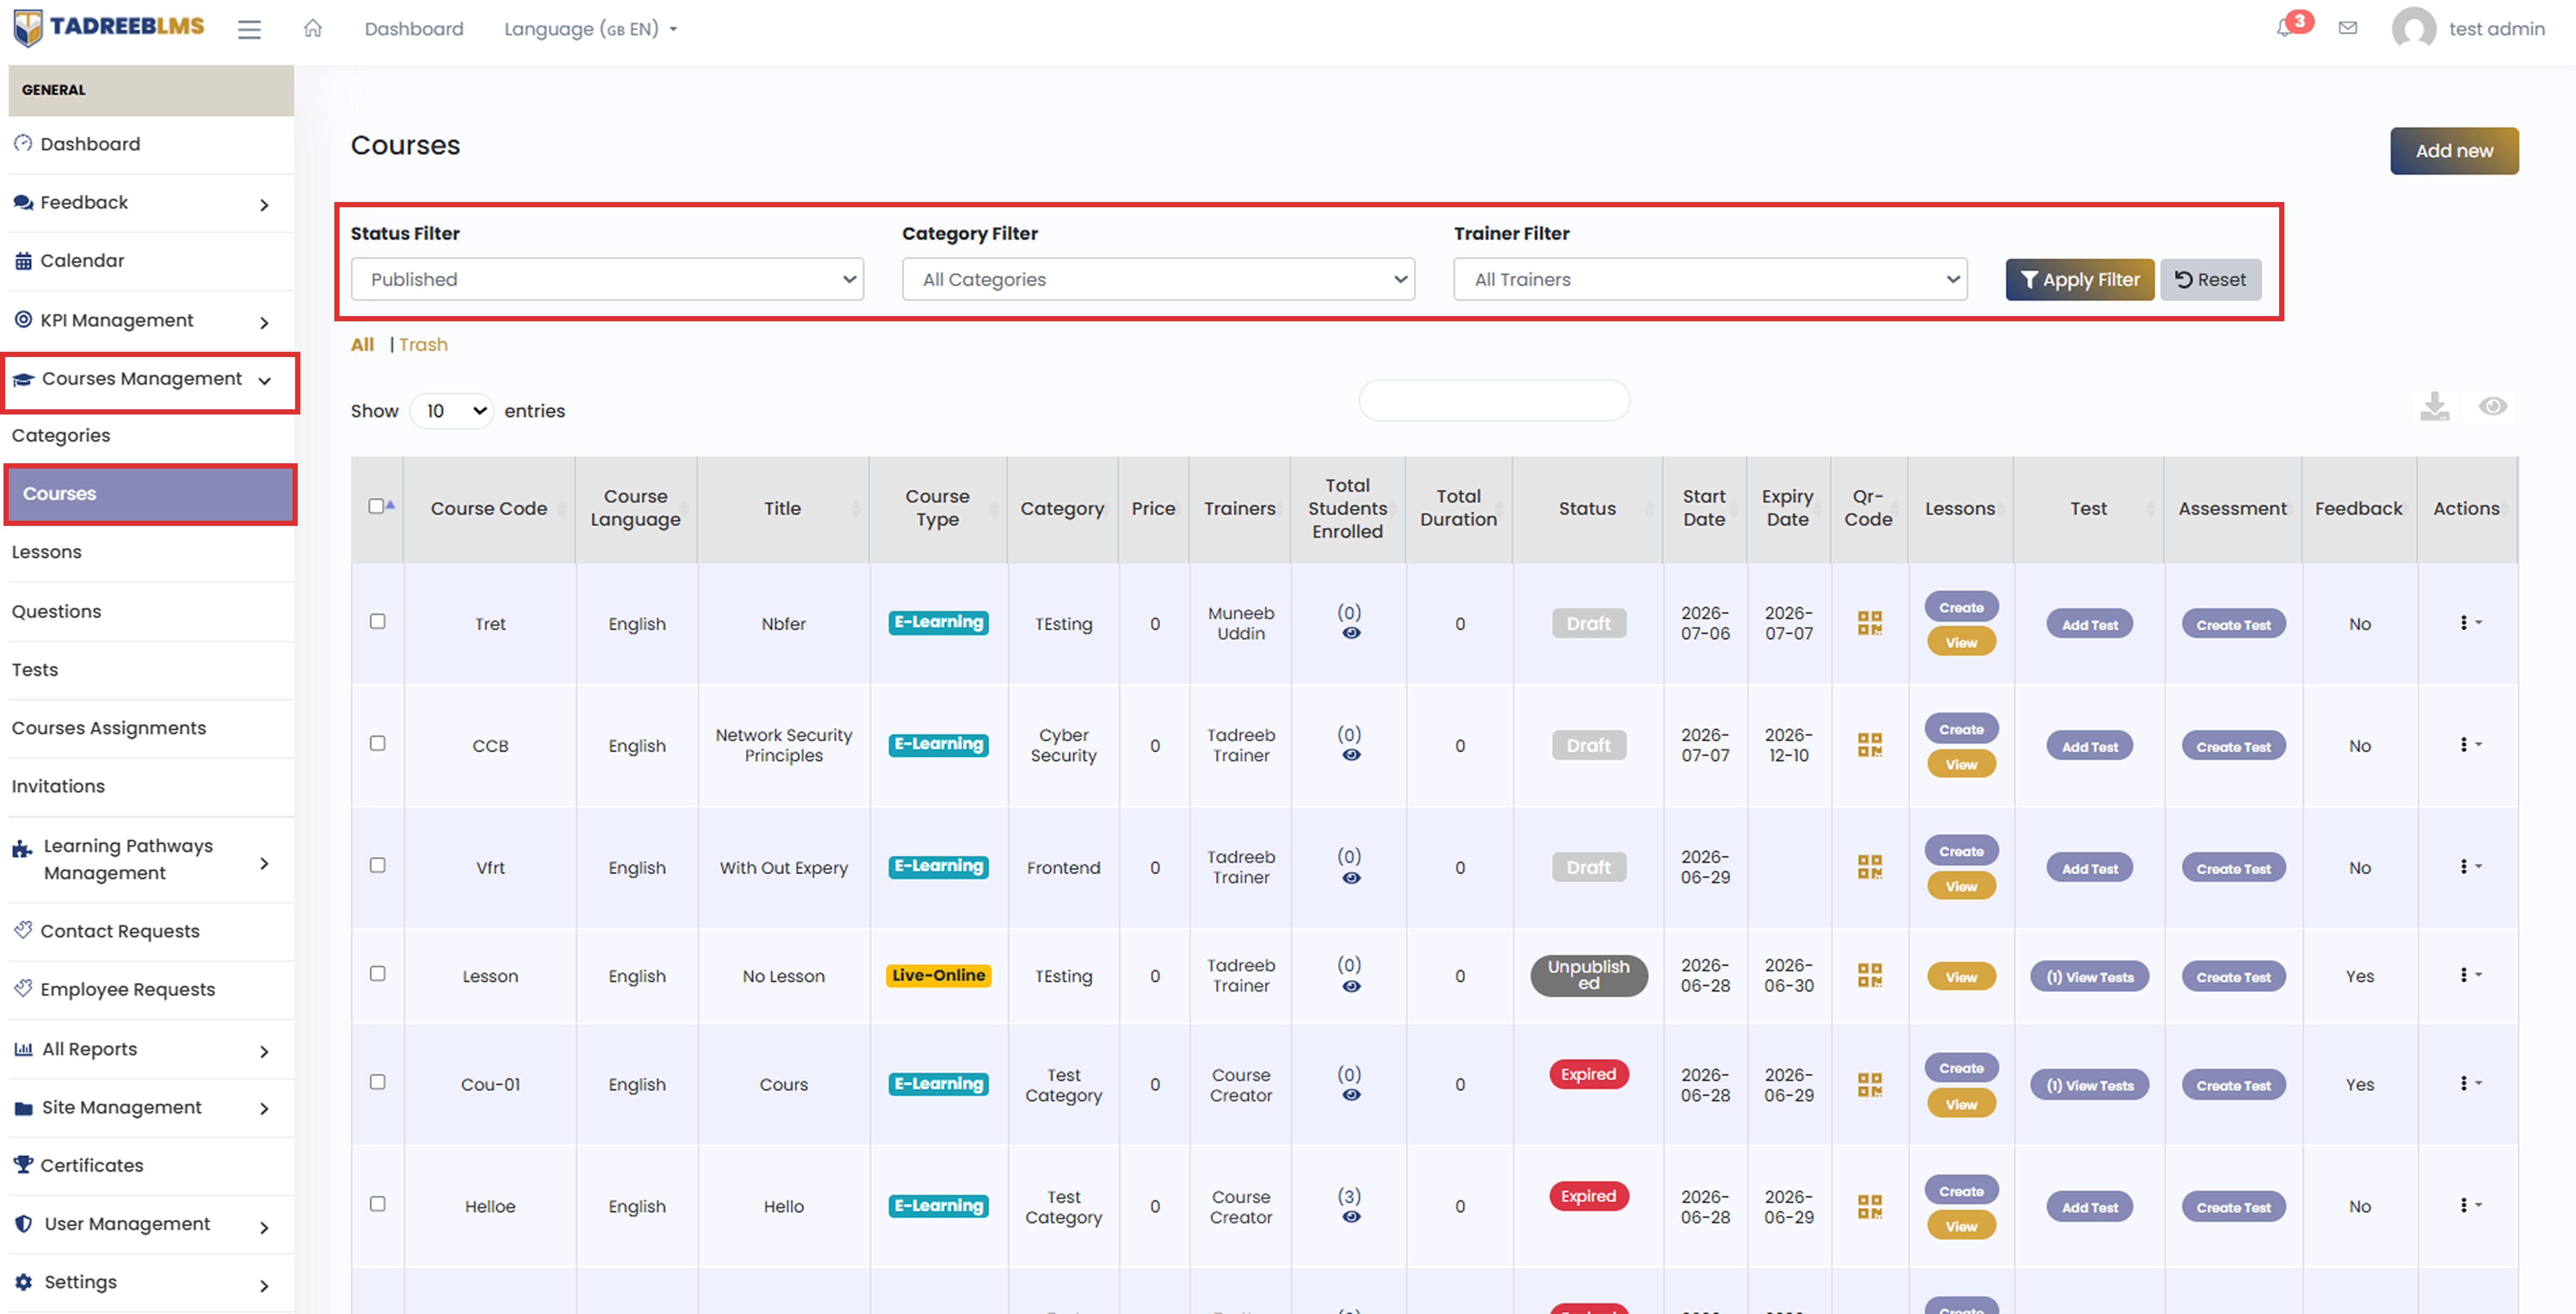
You can narrow down the list using the following filters:
| Filter | Description |
|---|---|
| Status Filter | Filter courses by their current status, such as Published, Draft, Unpublished, or Expired |
| Category Filter | Filter courses by the category they belong to |
| Trainer Filter | Filter courses by the trainer assigned to them |
As an administrator, you can also track enrolments and course details and take quick actions such as editing, deleting, viewing, or publishing a course.
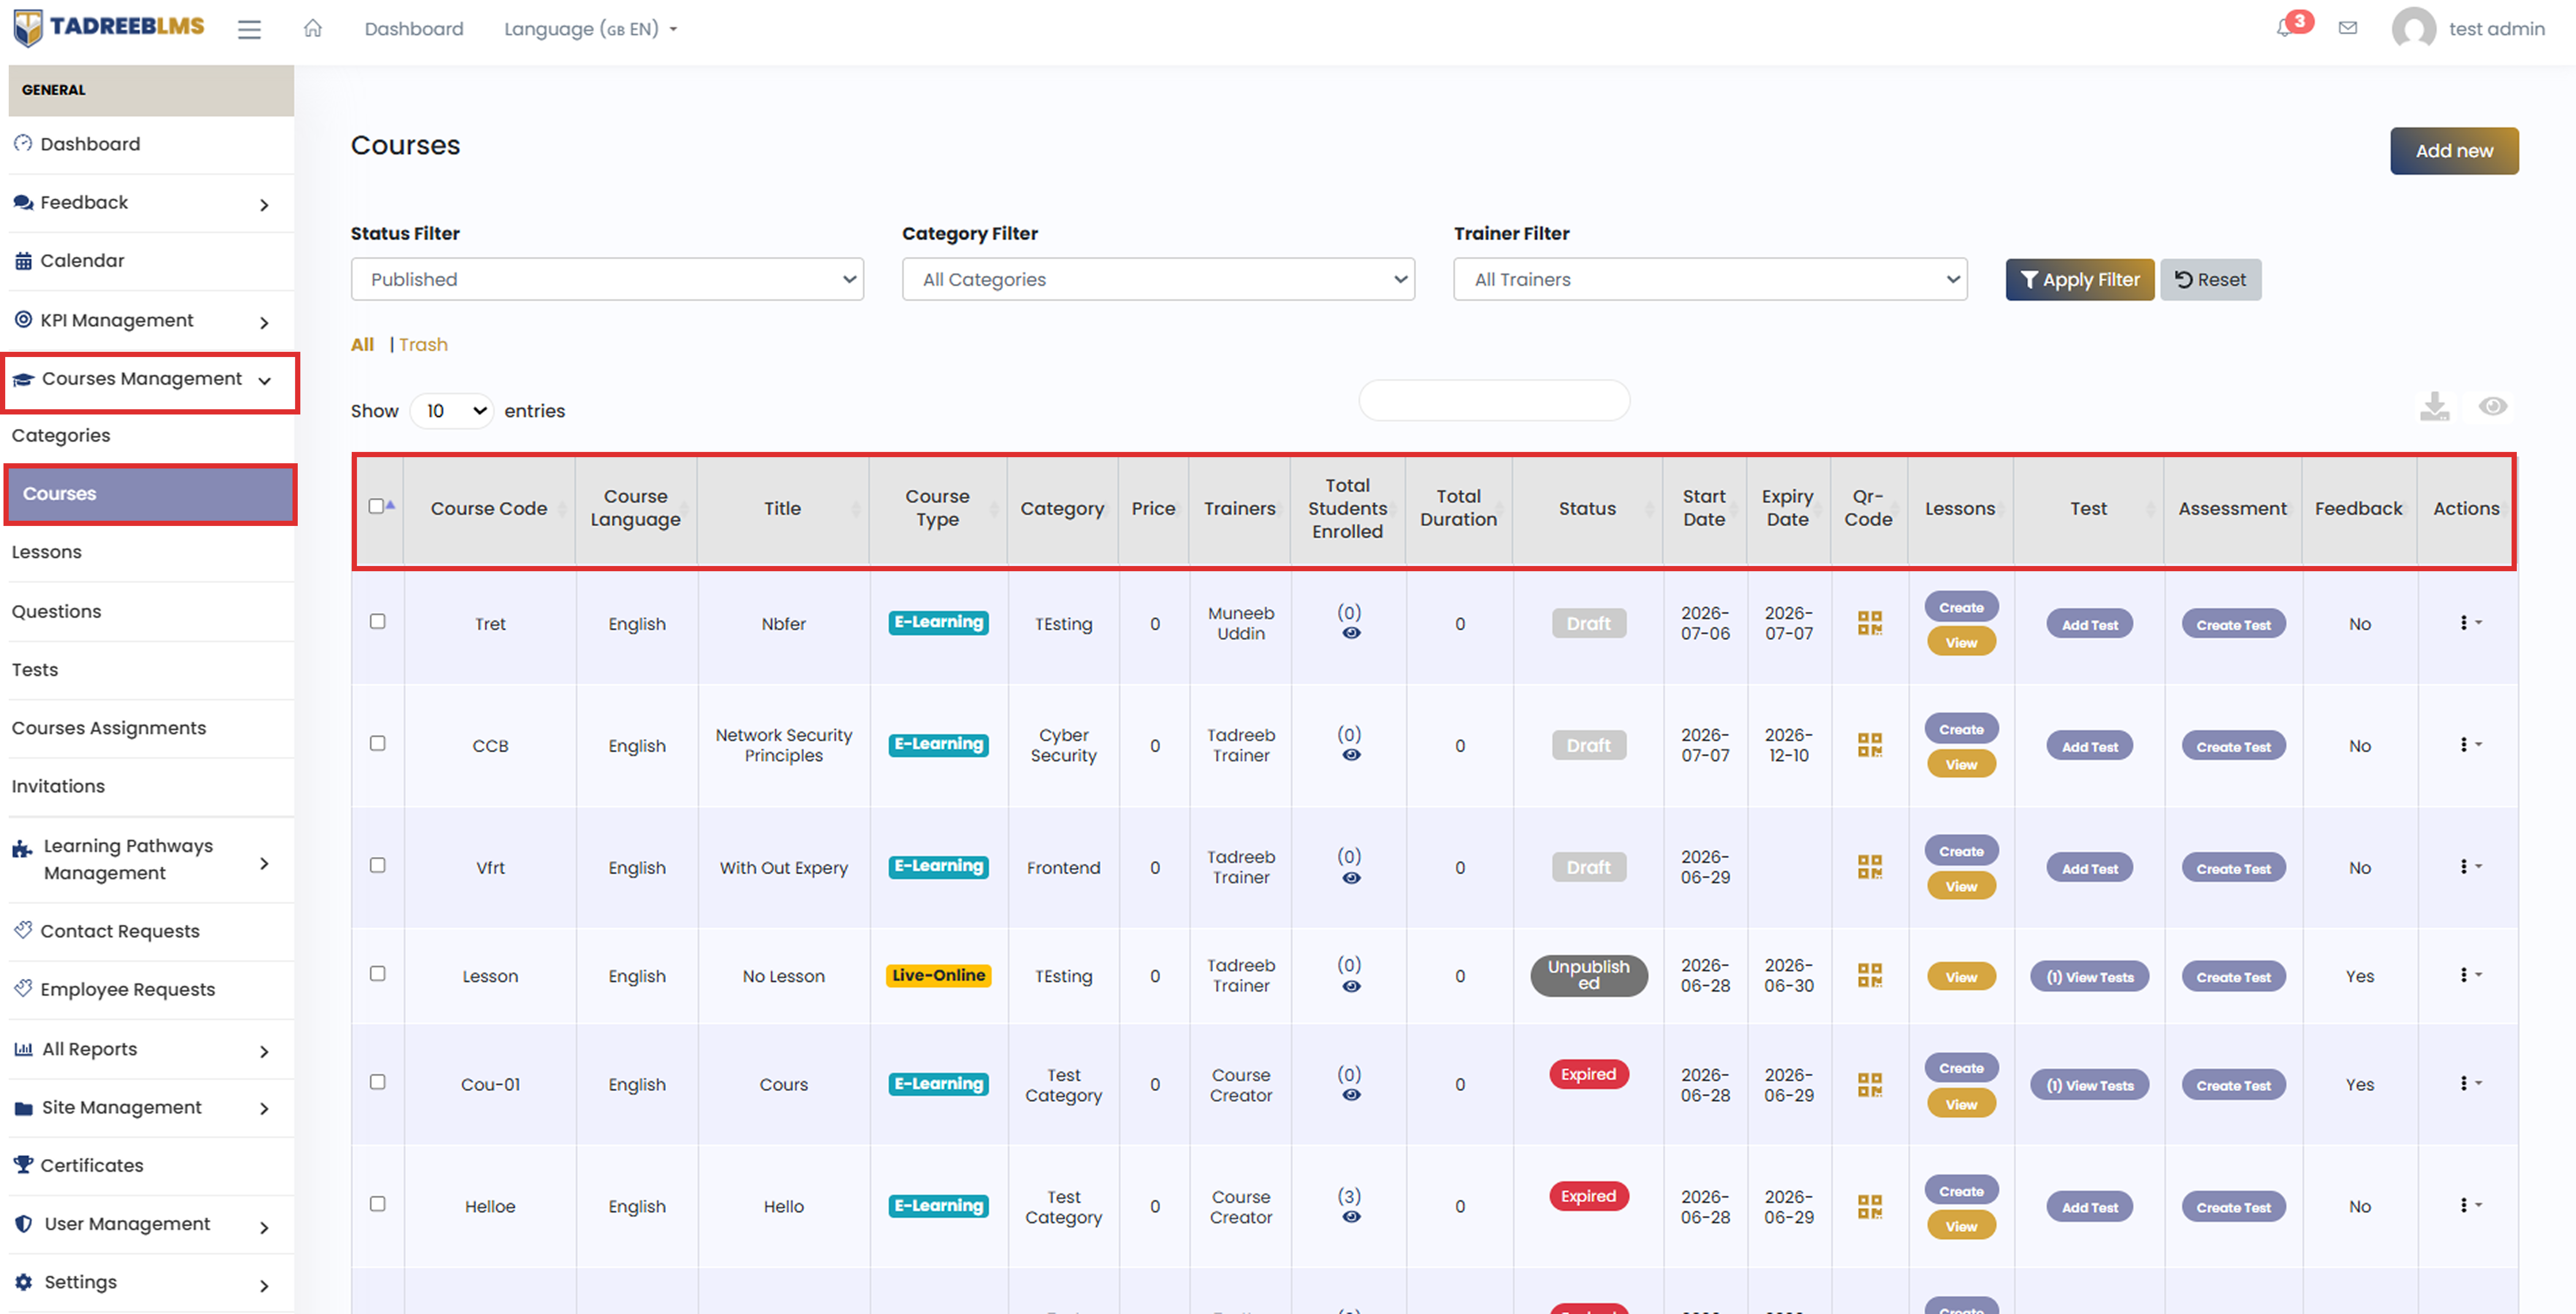
Table Headings
The table below describes the column information.
| Heading | Description |
|---|---|
| Course Code | The unique code assigned to the course |
| Course Language | The language of the course |
| Title | The name of the course |
| Course Type | Shows how the course is delivered — E-Learning or Live-Online |
| Category | The category the course belongs to |
| Price | The price set for the course |
| Trainers | The trainer(s) assigned to the course |
| Total Students Enrolled | The number of students currently enrolled in the course |
| Total Duration | The total duration of the course |
| Status | Shows whether the course is Published, Draft, Unpublished, or Expired |
| Start Date | The date the course starts |
| Expiry Date | The date the course expires |
| Qr-Code | A scannable QR code for quick access to the course |
| Lessons | Options to create or view the lessons under the course |
| Test | Options to add or view tests linked to the course |
| Assessment | Option to create an assessment for the course |
| Feedback | Shows whether feedback has been collected for the course |
| Actions | Options to Edit, Delete, View, or Publish the course |
💡 Tip: Use the Search bar to find a course by name quickly.
📌 Note: When you delete a course, it moves to the Trash tab. You can restore it anytime if needed. Use the download icon above the table to export the course list, and the eye icon to choose which columns are visible in the table.
5.2.1 Add Course
Add a new course and set up its details, schedule, and pricing before it goes live on the platform.
📋 Before you start: Have the course code, title, category, and trainer details ready, along with a course image if you choose to add one.
To add a new course:
- Click the menu icon (☰) at the top left to open the sidebar menu.
- In the sidebar menu, go to Courses Management and select Courses.
- Click the Add New button in the top right corner of the page.
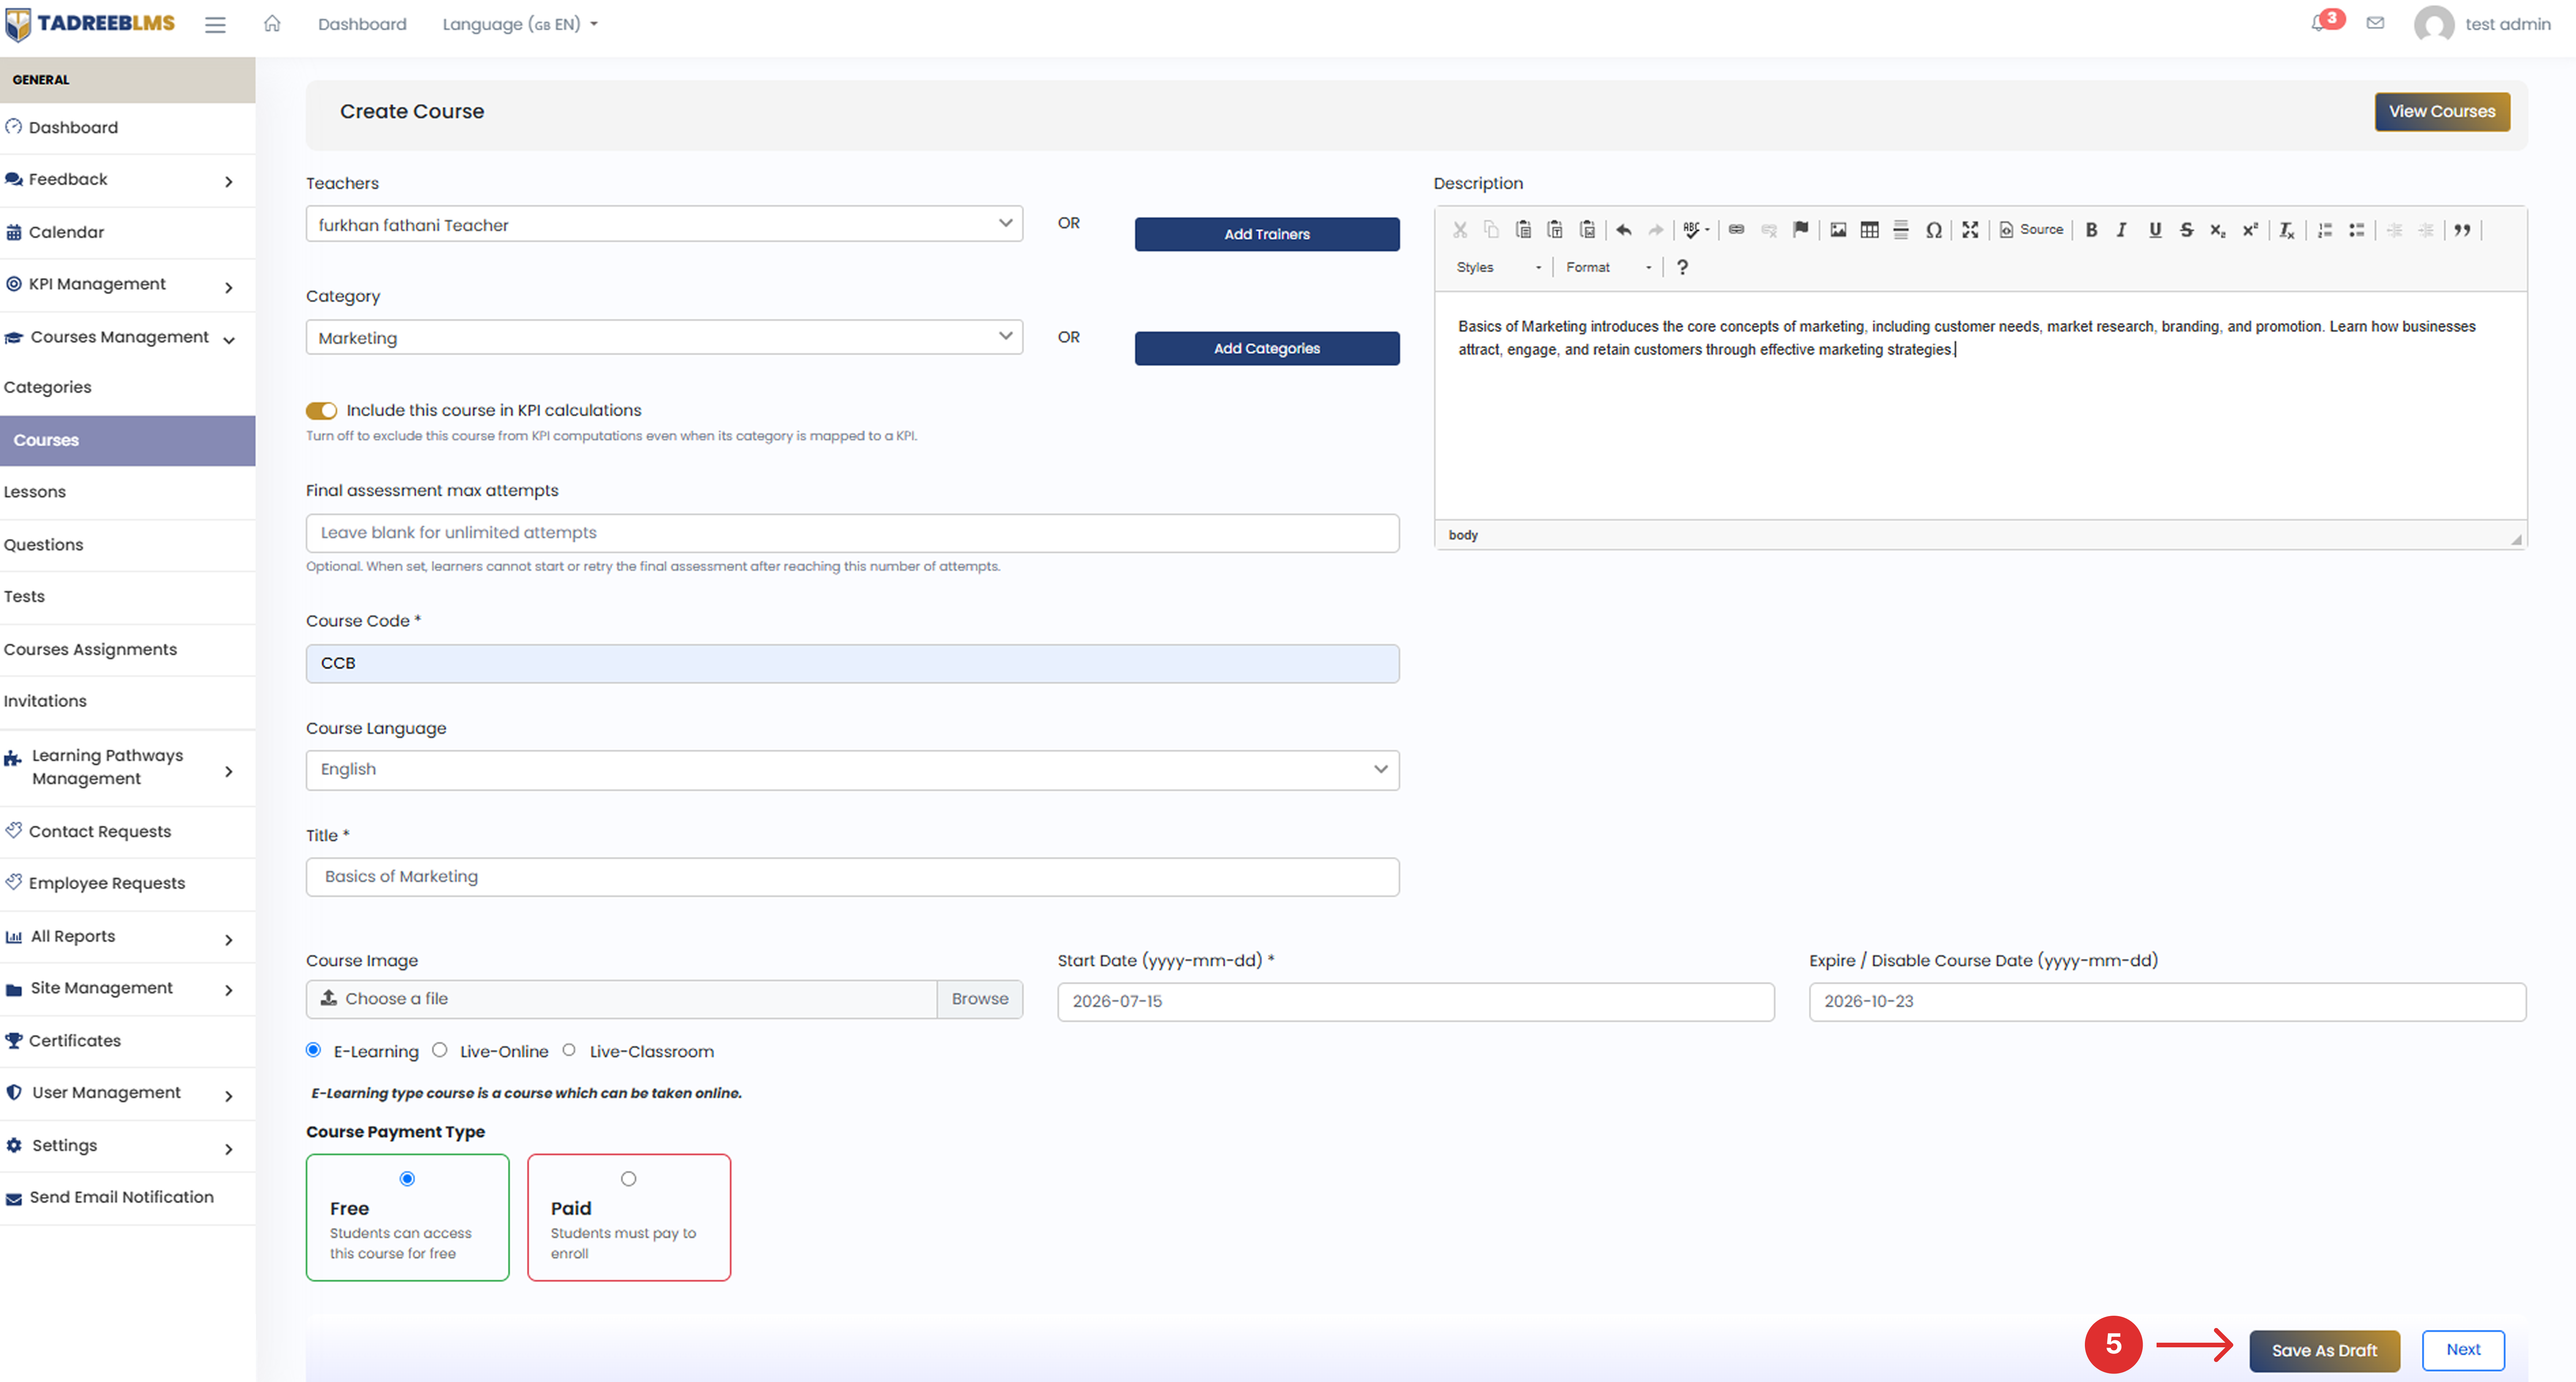
- Fill in the course details:
- Select a Teacher from the dropdown, or click Add Trainers to add a new one
- Select a Category from the dropdown, or click Add Categories to add a new one
- Toggle Include this course in KPI calculations on or off, depending on whether this course should count towards KPI computations
- Enter the Final assessment max attempts, if you want to limit how many times learners can attempt the final assessment (leave blank for unlimited attempts)
- Enter a unique Course Code
- Select the Course Language
- Enter the Title of the course
- Add a Description using the text editor
- Upload a Course Image
- Enter the Start Date
- Enter an Expire / Disable Course Date, if applicable
- Choose the Course Type: E-Learning, Live-Online, or Live-Classroom
- Choose the Course Payment Type: Free or Paid
- Click Save As Draft to save your progress without publishing, or click Next to set up a Lesson for that Course.
📌 Note: Click View Categories in the top right corner to go back to the courses list if needed.
5.3 Lessons
The Lessons page lists all the lessons created under your courses. From here, you can filter lessons by course or published status, check key details like duration and attendance, and take quick actions like viewing or deleting a lesson.
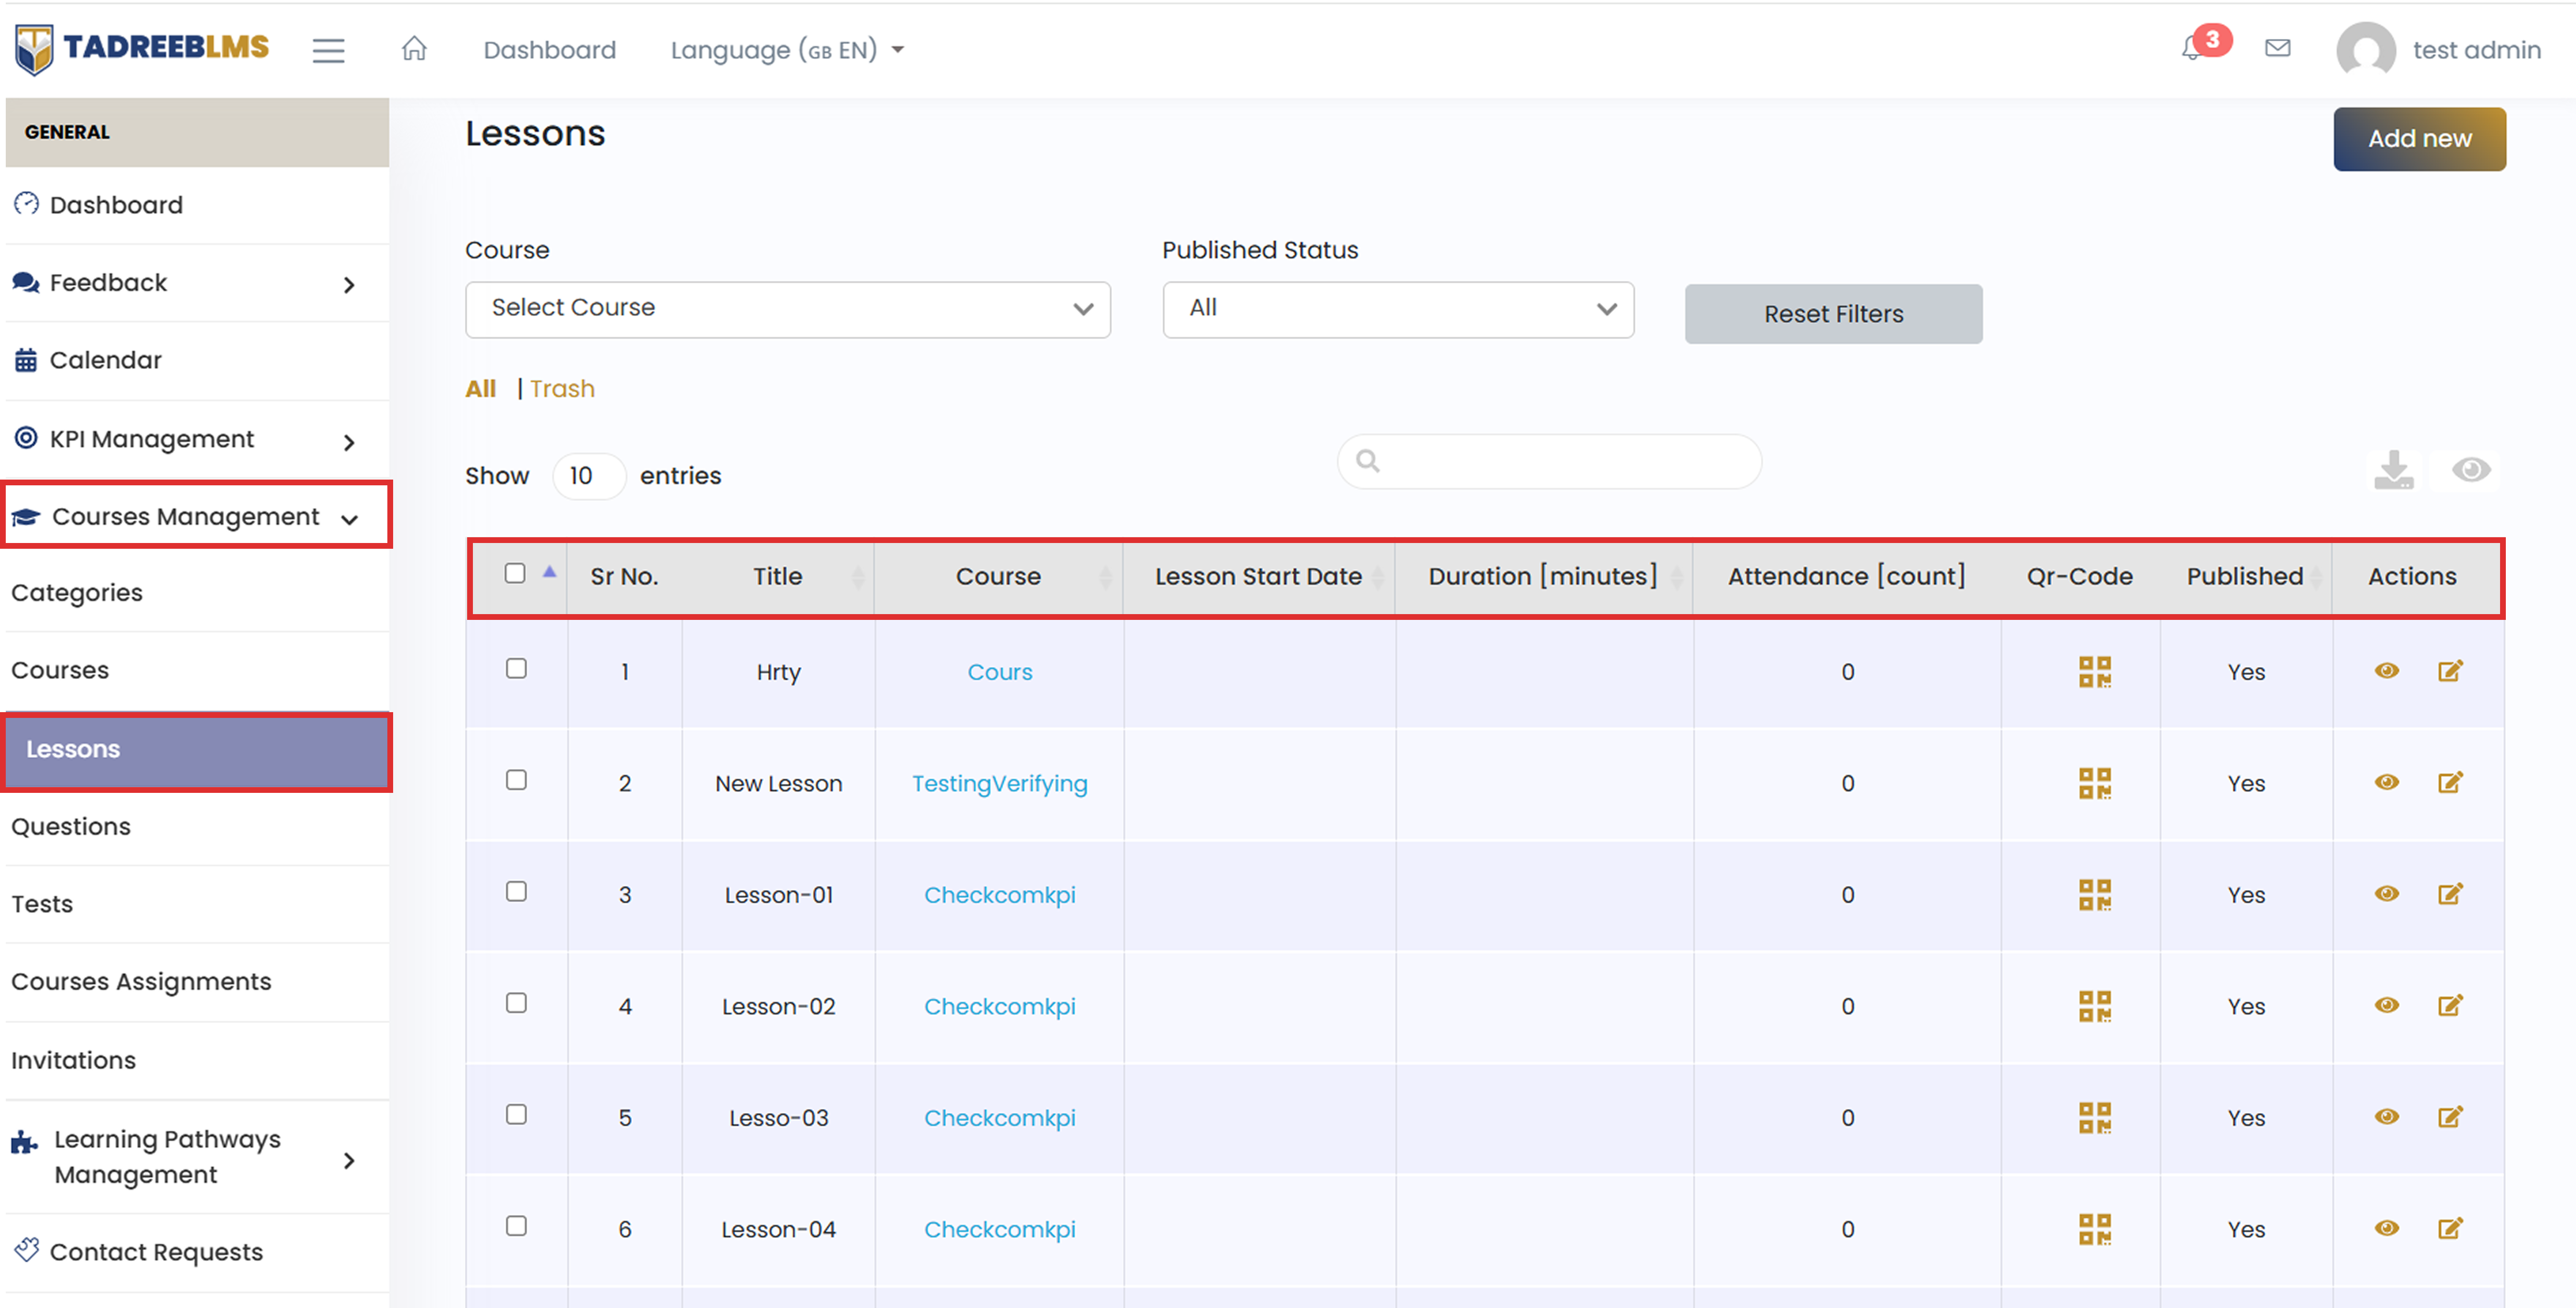
Table Headings
The table below describes the column information.
| Heading | Description |
|---|---|
| Title | The name of the lesson |
| Course | The course this lesson belongs to |
| Lesson Start Date | The date when the lesson is scheduled to begin. |
| Duration | The total length of the lesson in minutes. |
| Attendance | The number of learners who attended the lesson |
| QR-Code | A scannable QR code to quickly open the lesson |
| Published | Shows whether the lesson is currently published |
| Actions | Options to View or Delete the lesson |
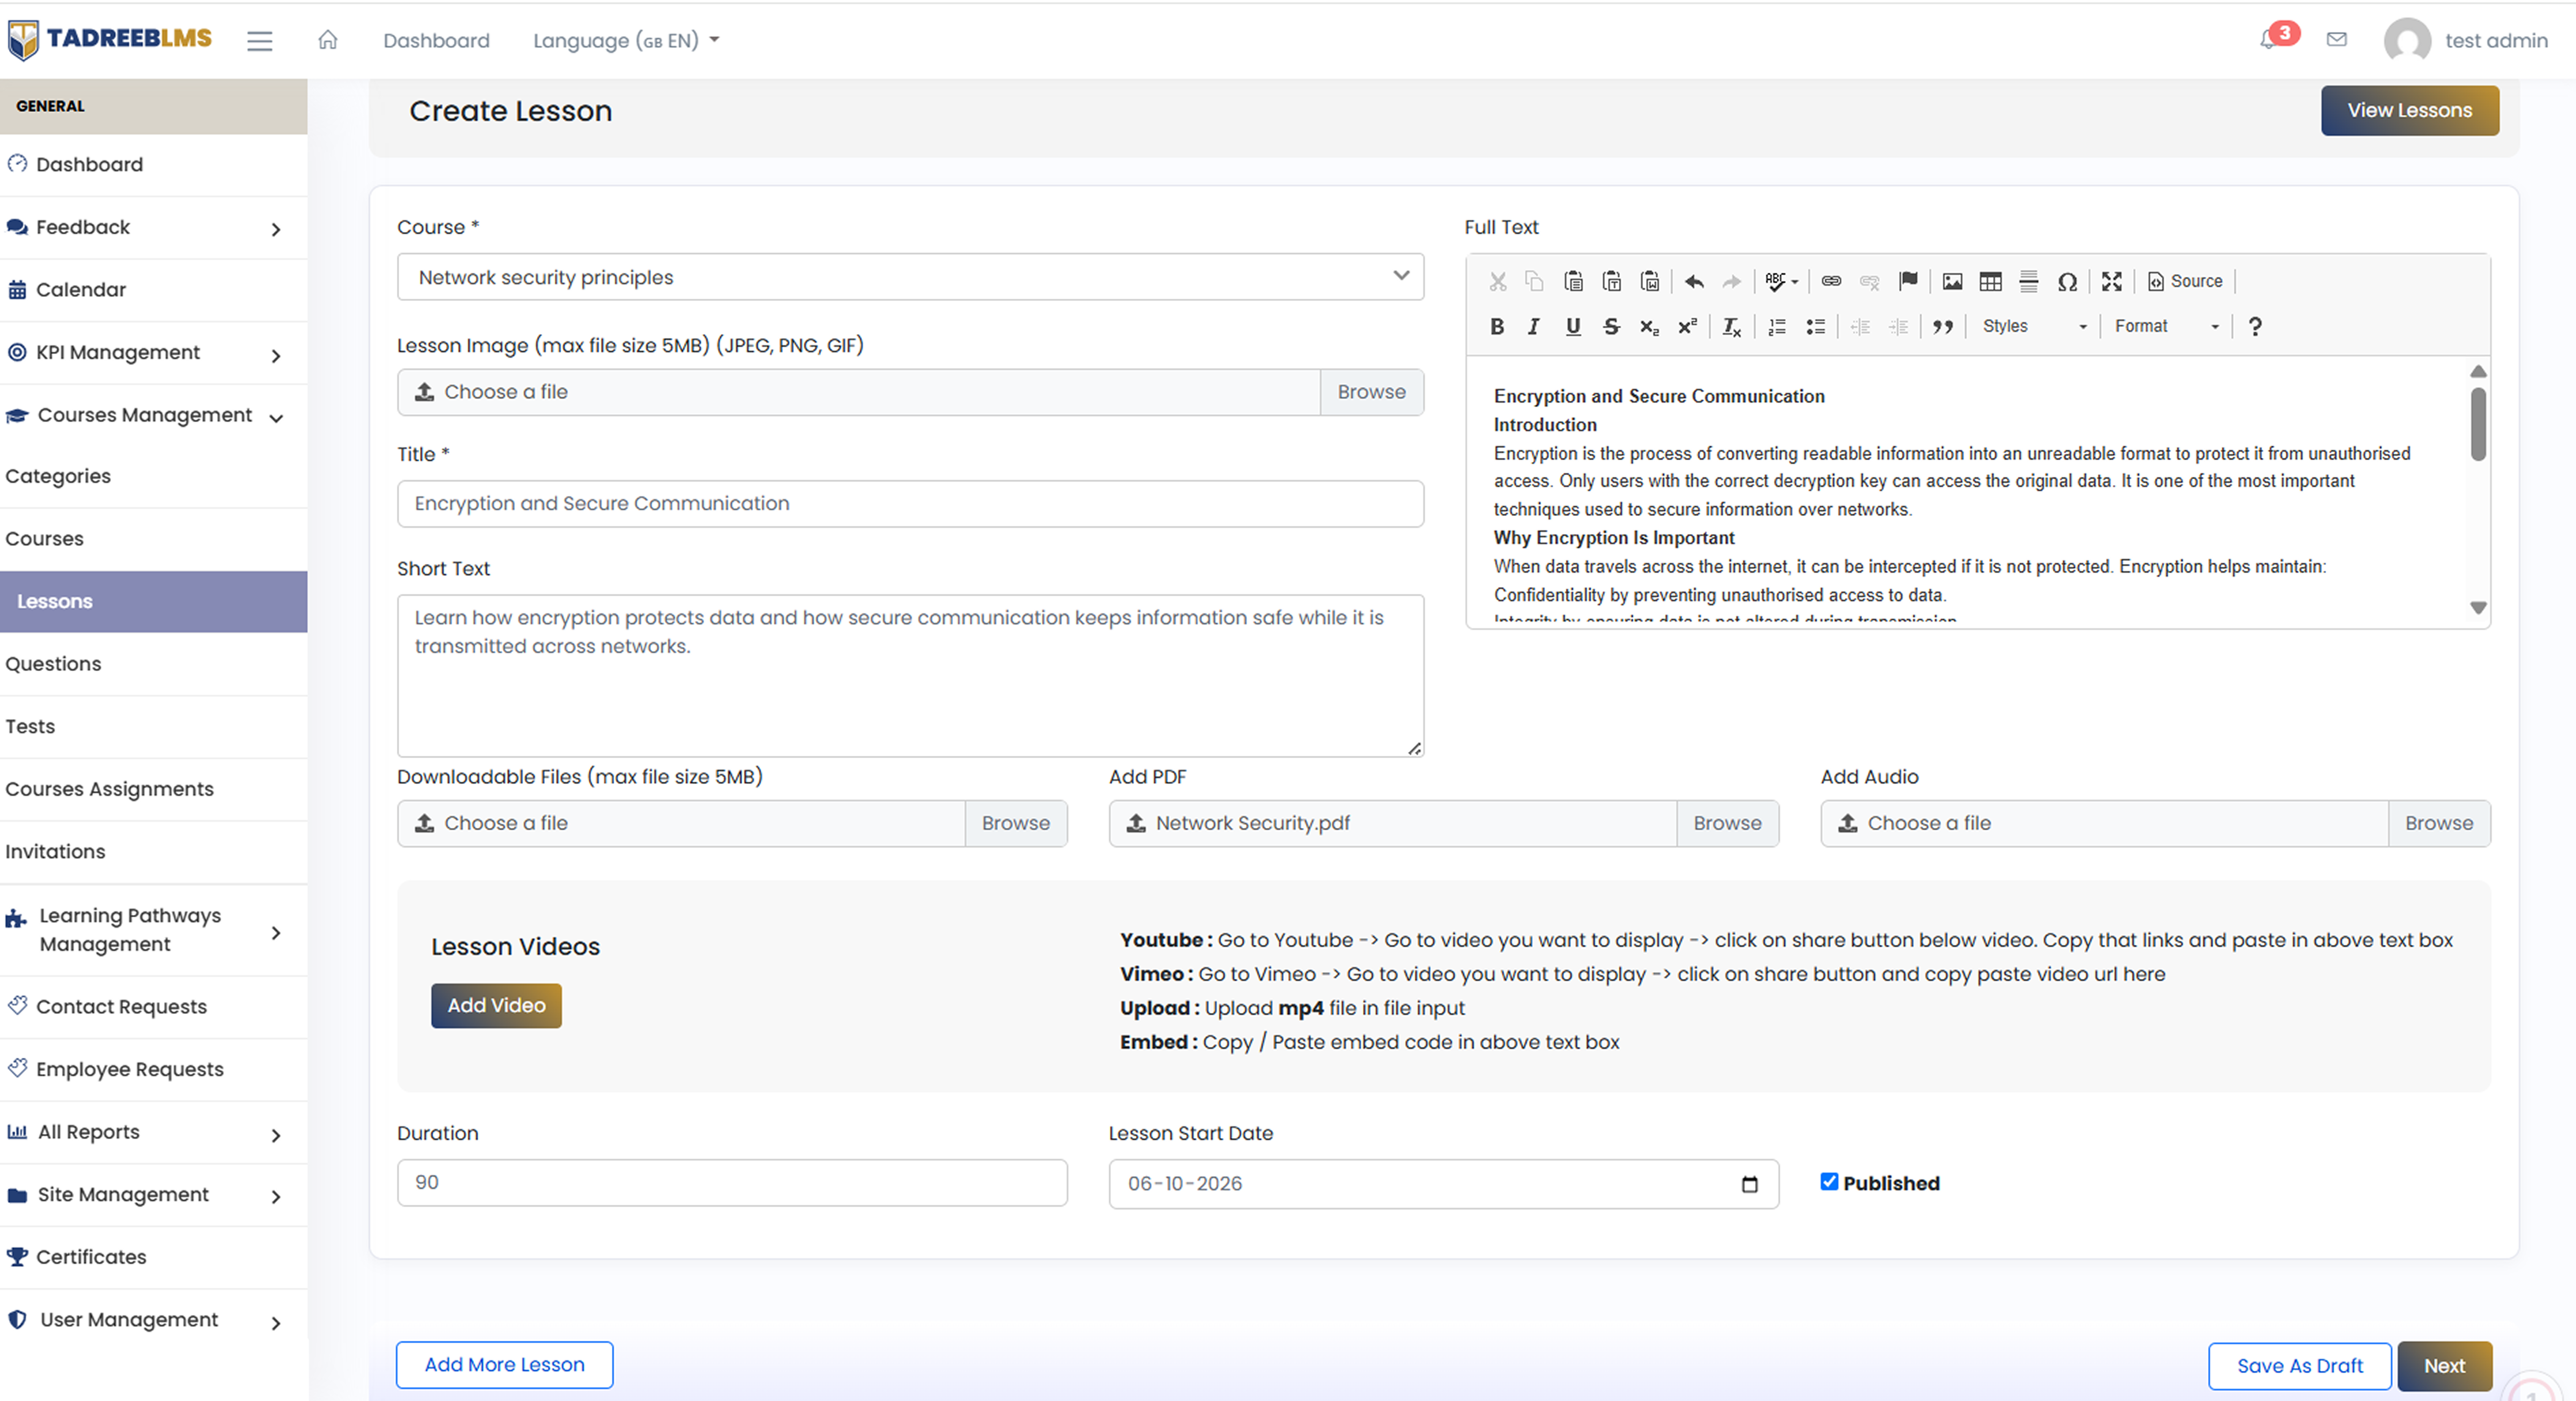
5.3.1 Add Lesson
Create a lesson to organise and share learning materials with your trainees, such as text, images, videos or any downloadable resources.
📋 Before you start: Have your lesson content ready, including the title, description, and any files, PDFs, or videos you want to include.
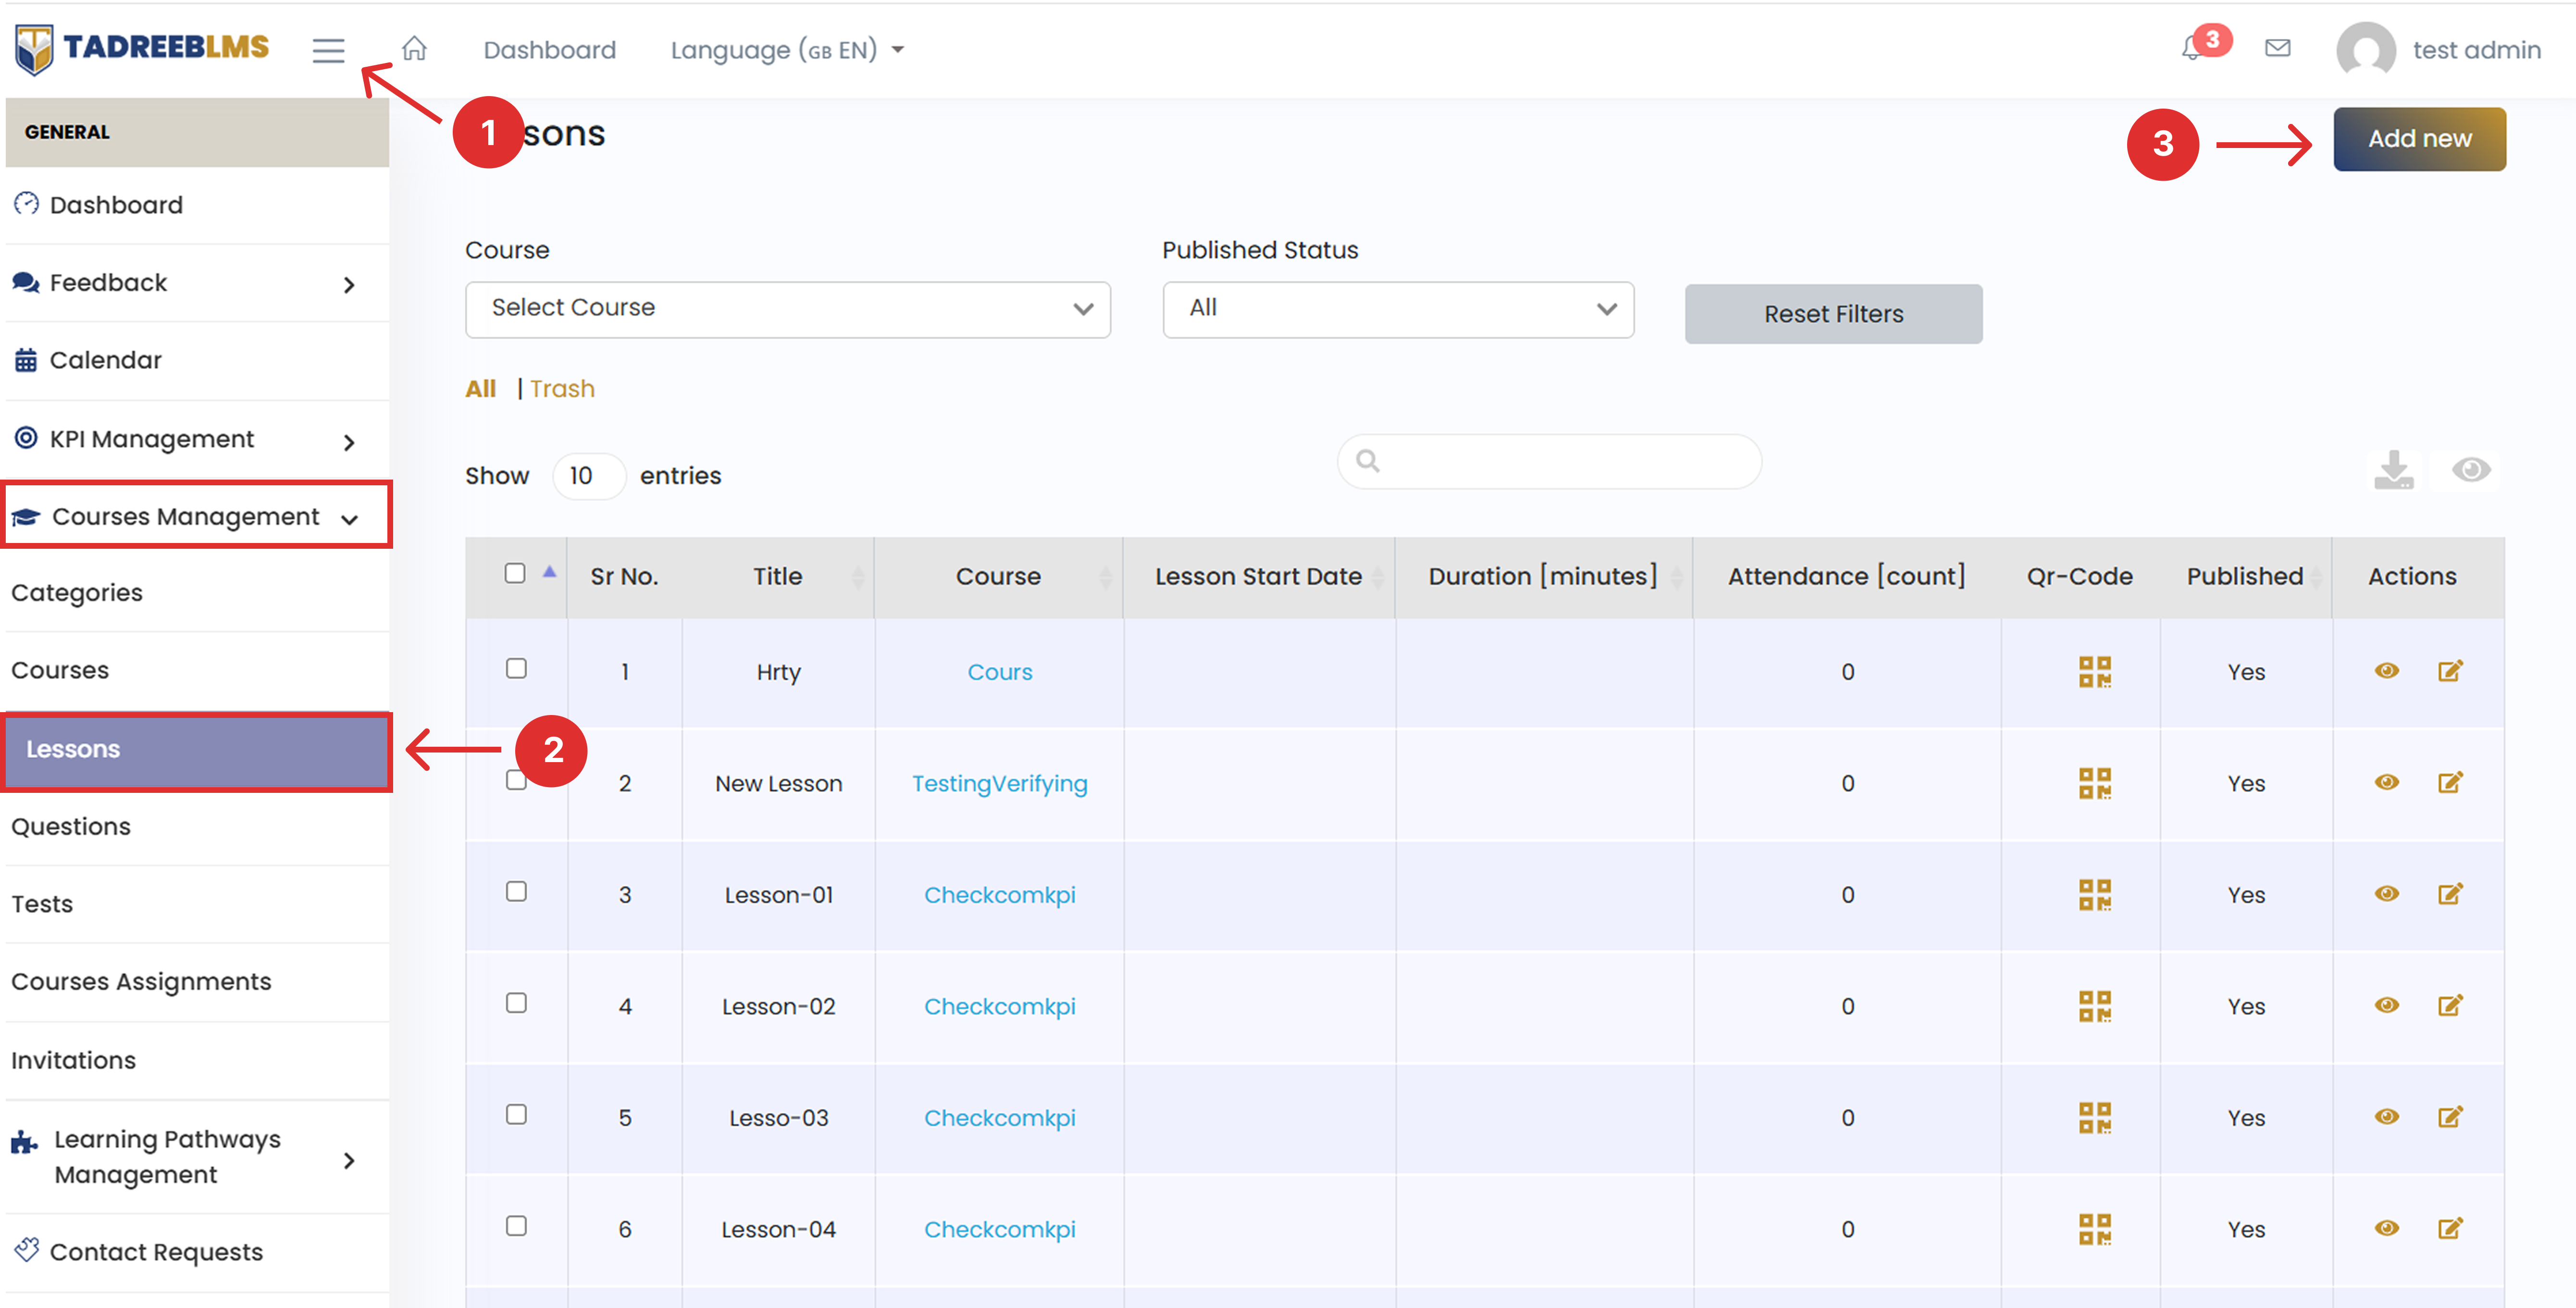
To add a new lesson:
- Click the menu icon (☰) at the top left to open the sidebar menu.
- In the sidebar menu, go to Course Management and select Lessons.
- Click the Add New button in the top right corner of the page.
- Fill in the lesson details:
- Select the Course this lesson belongs to
- Upload a Lesson Image (JPEG, PNG, or GIF, max 5MB)
- Enter a Title for the lesson
- Add a Short Text giving a brief overview of what the lesson covers
- Add the Full Text using the text editor, with the complete lesson content
- Upload any Downloadable Files you'd like trainees to access (max 5MB)
- Upload a PDF if you have supporting reading material
- Upload an Audio file, if applicable
- Add a Lesson Video by clicking Add Video, and choose how you'd like to add it:
- YouTube: Copy the video's share link from YouTube and paste it in
- Vimeo: Copy the video's share link from Vimeo and paste it in
- Upload: Upload an mp4 file directly
- Embed: Paste the embed code for the video
- Enter the Duration of the lesson, in minutes
- Set the Lesson Start Date
- Check Published if you want the lesson to go live immediately
- Click Add More Lesson if you want to create another lesson right after this one, Save As Draft to save your progress without publishing, or Next to add Assessment Questions to the lesson.
5.4 Questions
The Questions page lists all the questions created across your courses. These include quiz questions shown after each lesson, as well as final assessment questions shown once a learner completes the entire course. From here, you can filter questions by course, view learners' answers, and quickly edit or delete a question.
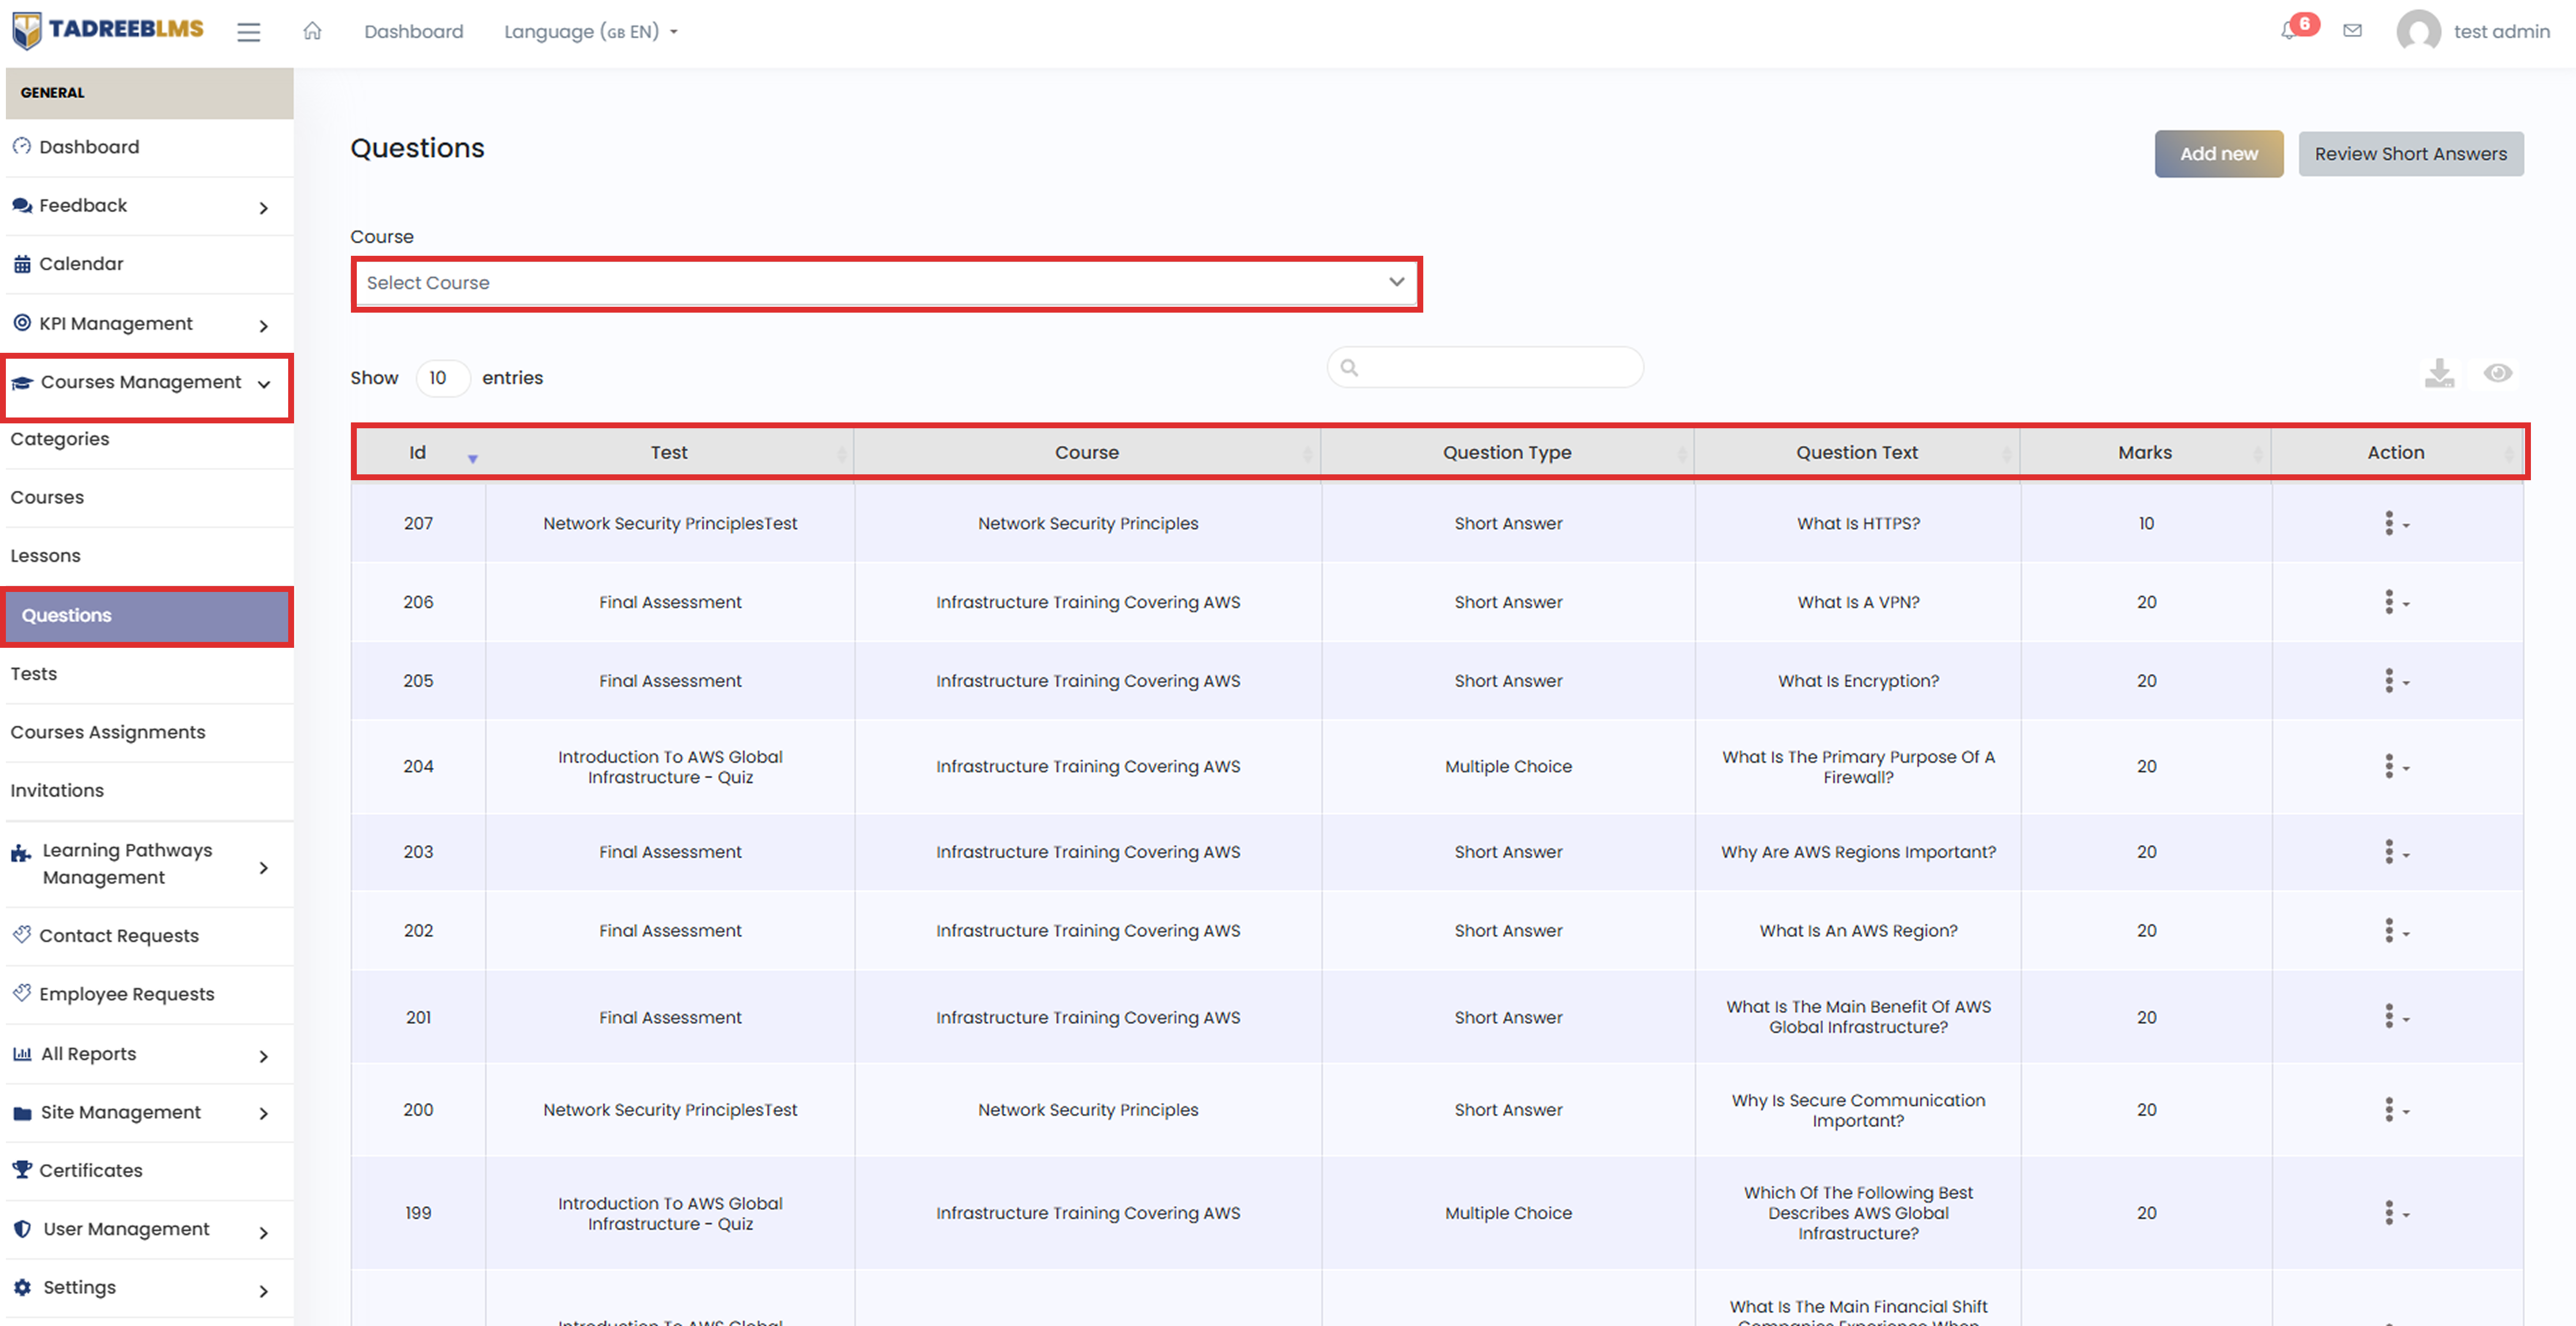
Table Headings
The table below describes the column information.
| Heading | Description |
|---|---|
| Id | The unique system-generated number assigned to each question |
| Test | The lesson quiz or final assessment to which the question belongs |
| Course | The course this question is linked to |
| Question Type | Question format, such as short answer or multiple choice |
| Question Text | The actual question shown to the learner |
| Marks | The marks assigned to the question |
| Action | Options to Edit or Delete the question |
💡 Tip: Use the Search bar to find a question by its text.
📌 Note: Use the download icon above the table to export the question list, and the eye icon to choose which columns are visible in the table.
5.4.1 Add Question
Add questions to evaluate learners' progress. You can create a quiz question that appears after a learner completes a lesson, while final assessment questions appear once the learner completes the entire course.
📋 Before you start: Select the course you want to add the question to. Then decide whether the question belongs to a lesson quiz or the final assessment, and have the question, correct answer, and marks ready.
To add a question:
- Click the menu icon (☰) at the top left to open the sidebar menu.
- In the sidebar menu, go to Course Management and select Questions.
- Select the course from the dropdown menu to which the question needs to be added (e.g., Infrastructure Training Covering AWS).
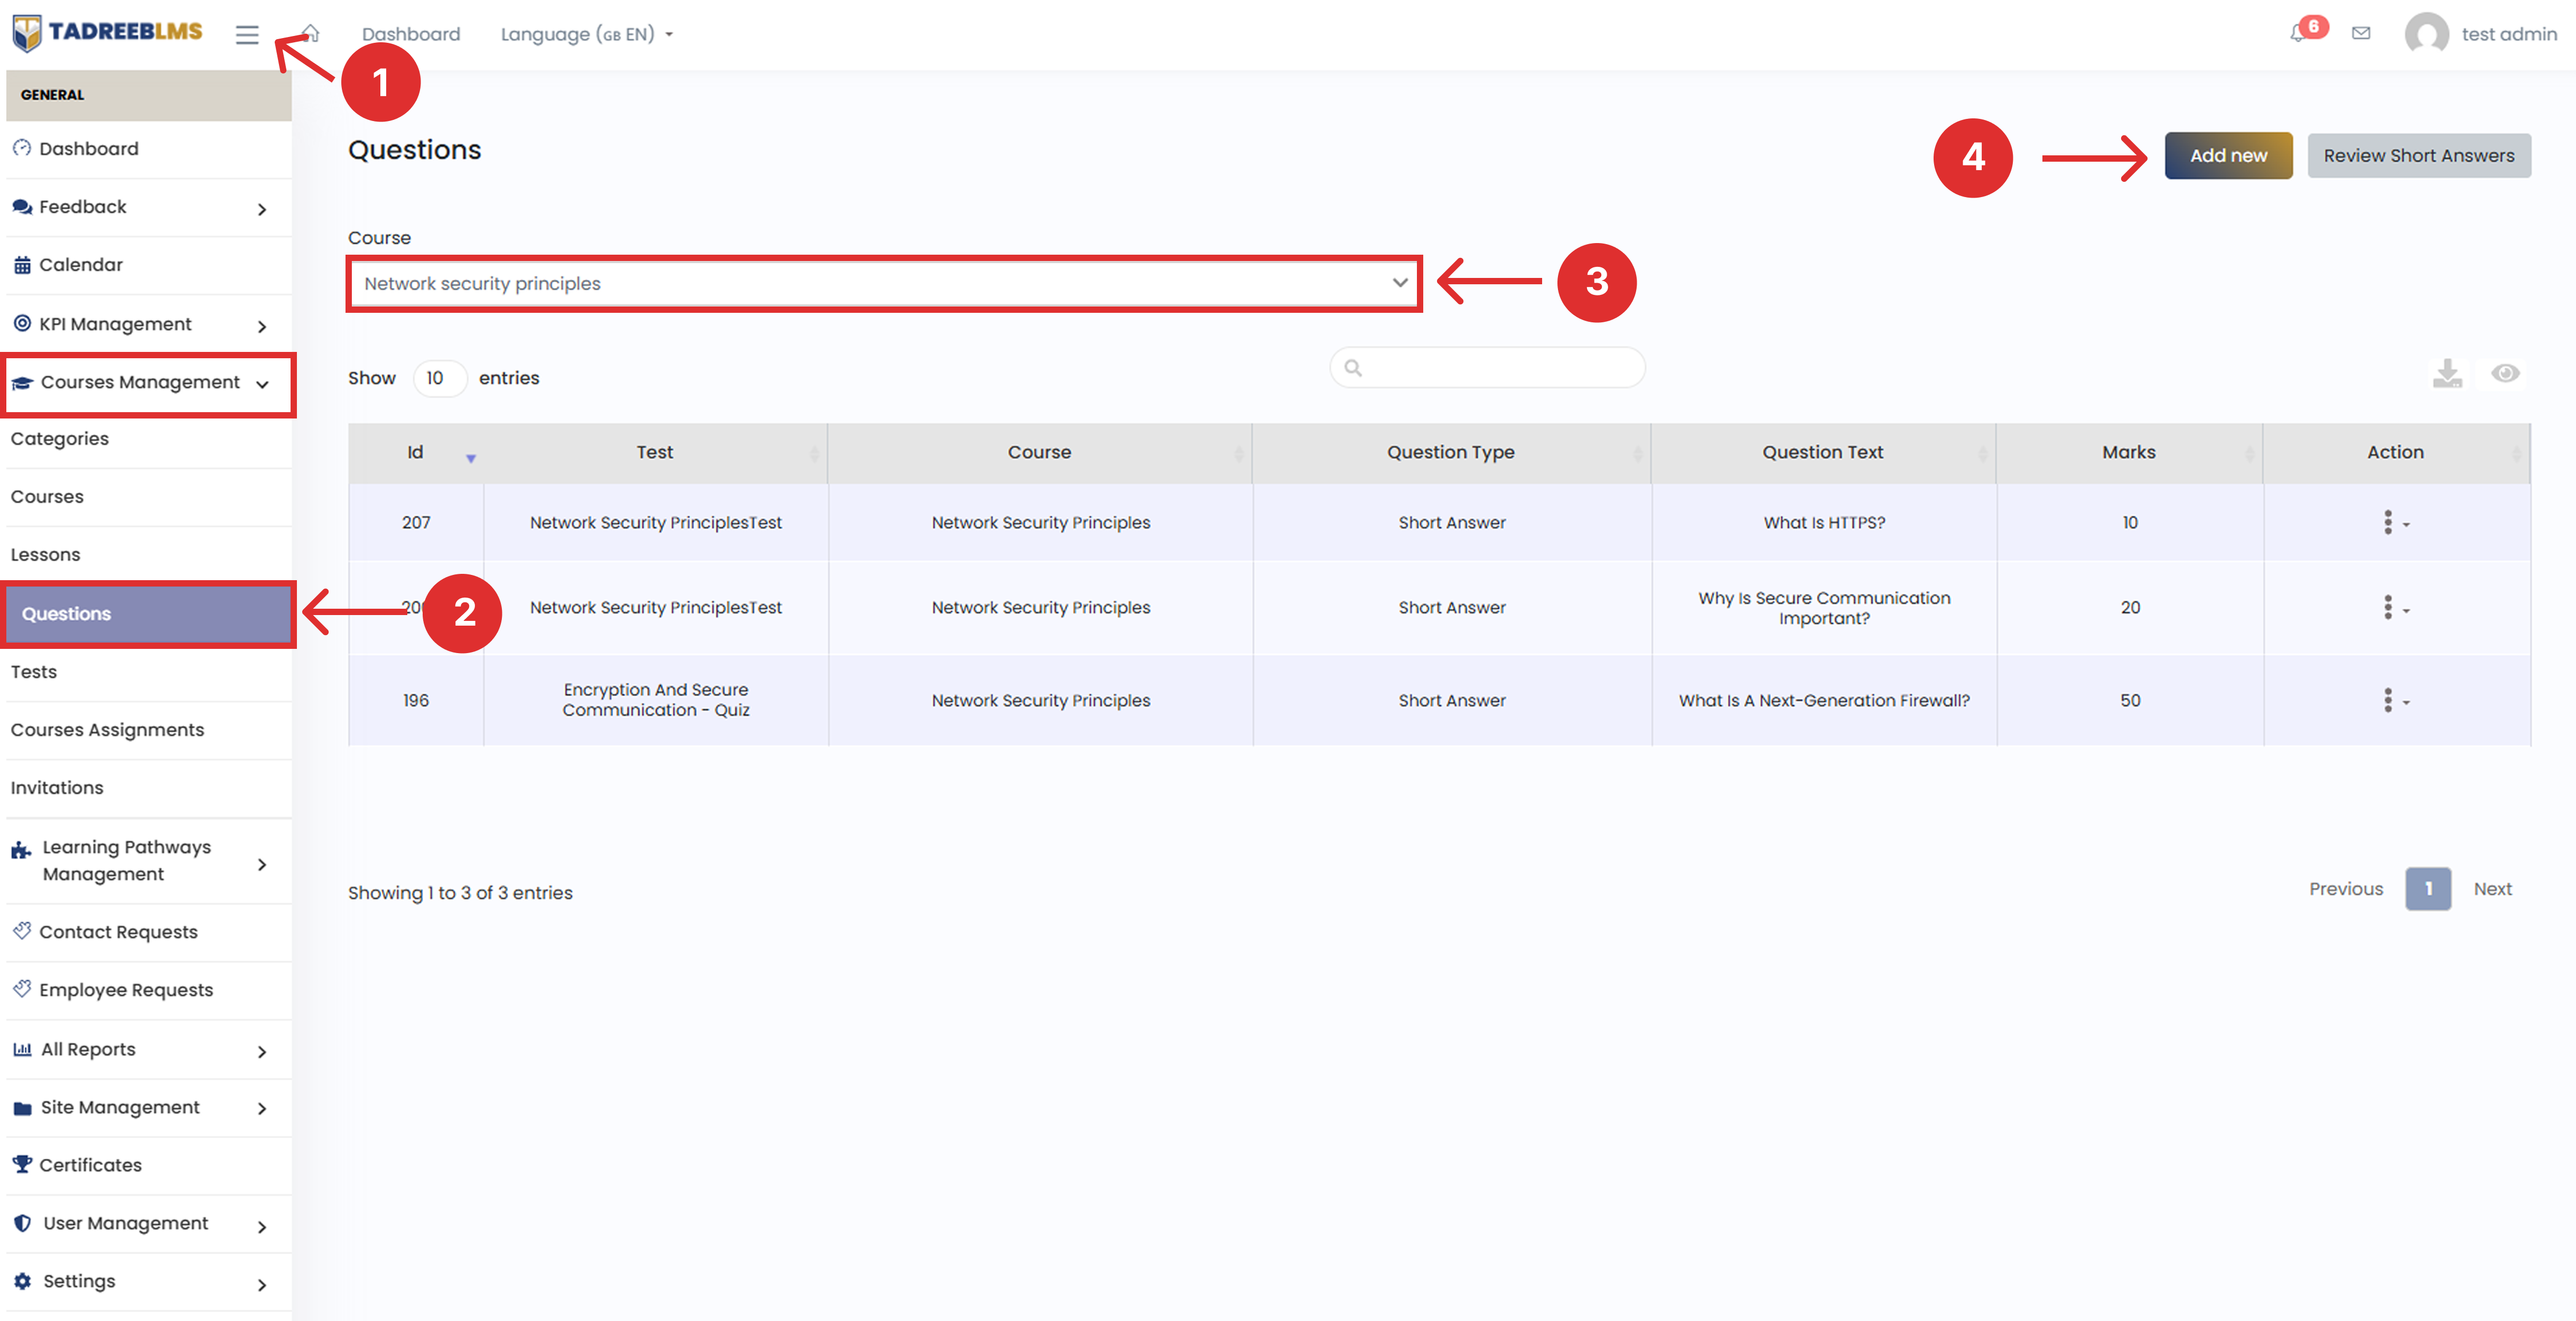
- Click the Add New button.
For a quiz question:
- Under Select Lesson, choose the lesson the question belongs to. Learners will see the quiz after completing that lesson.
- Select the Question Type (for example, Multiple Choice).
- Enter the question in the text editor.
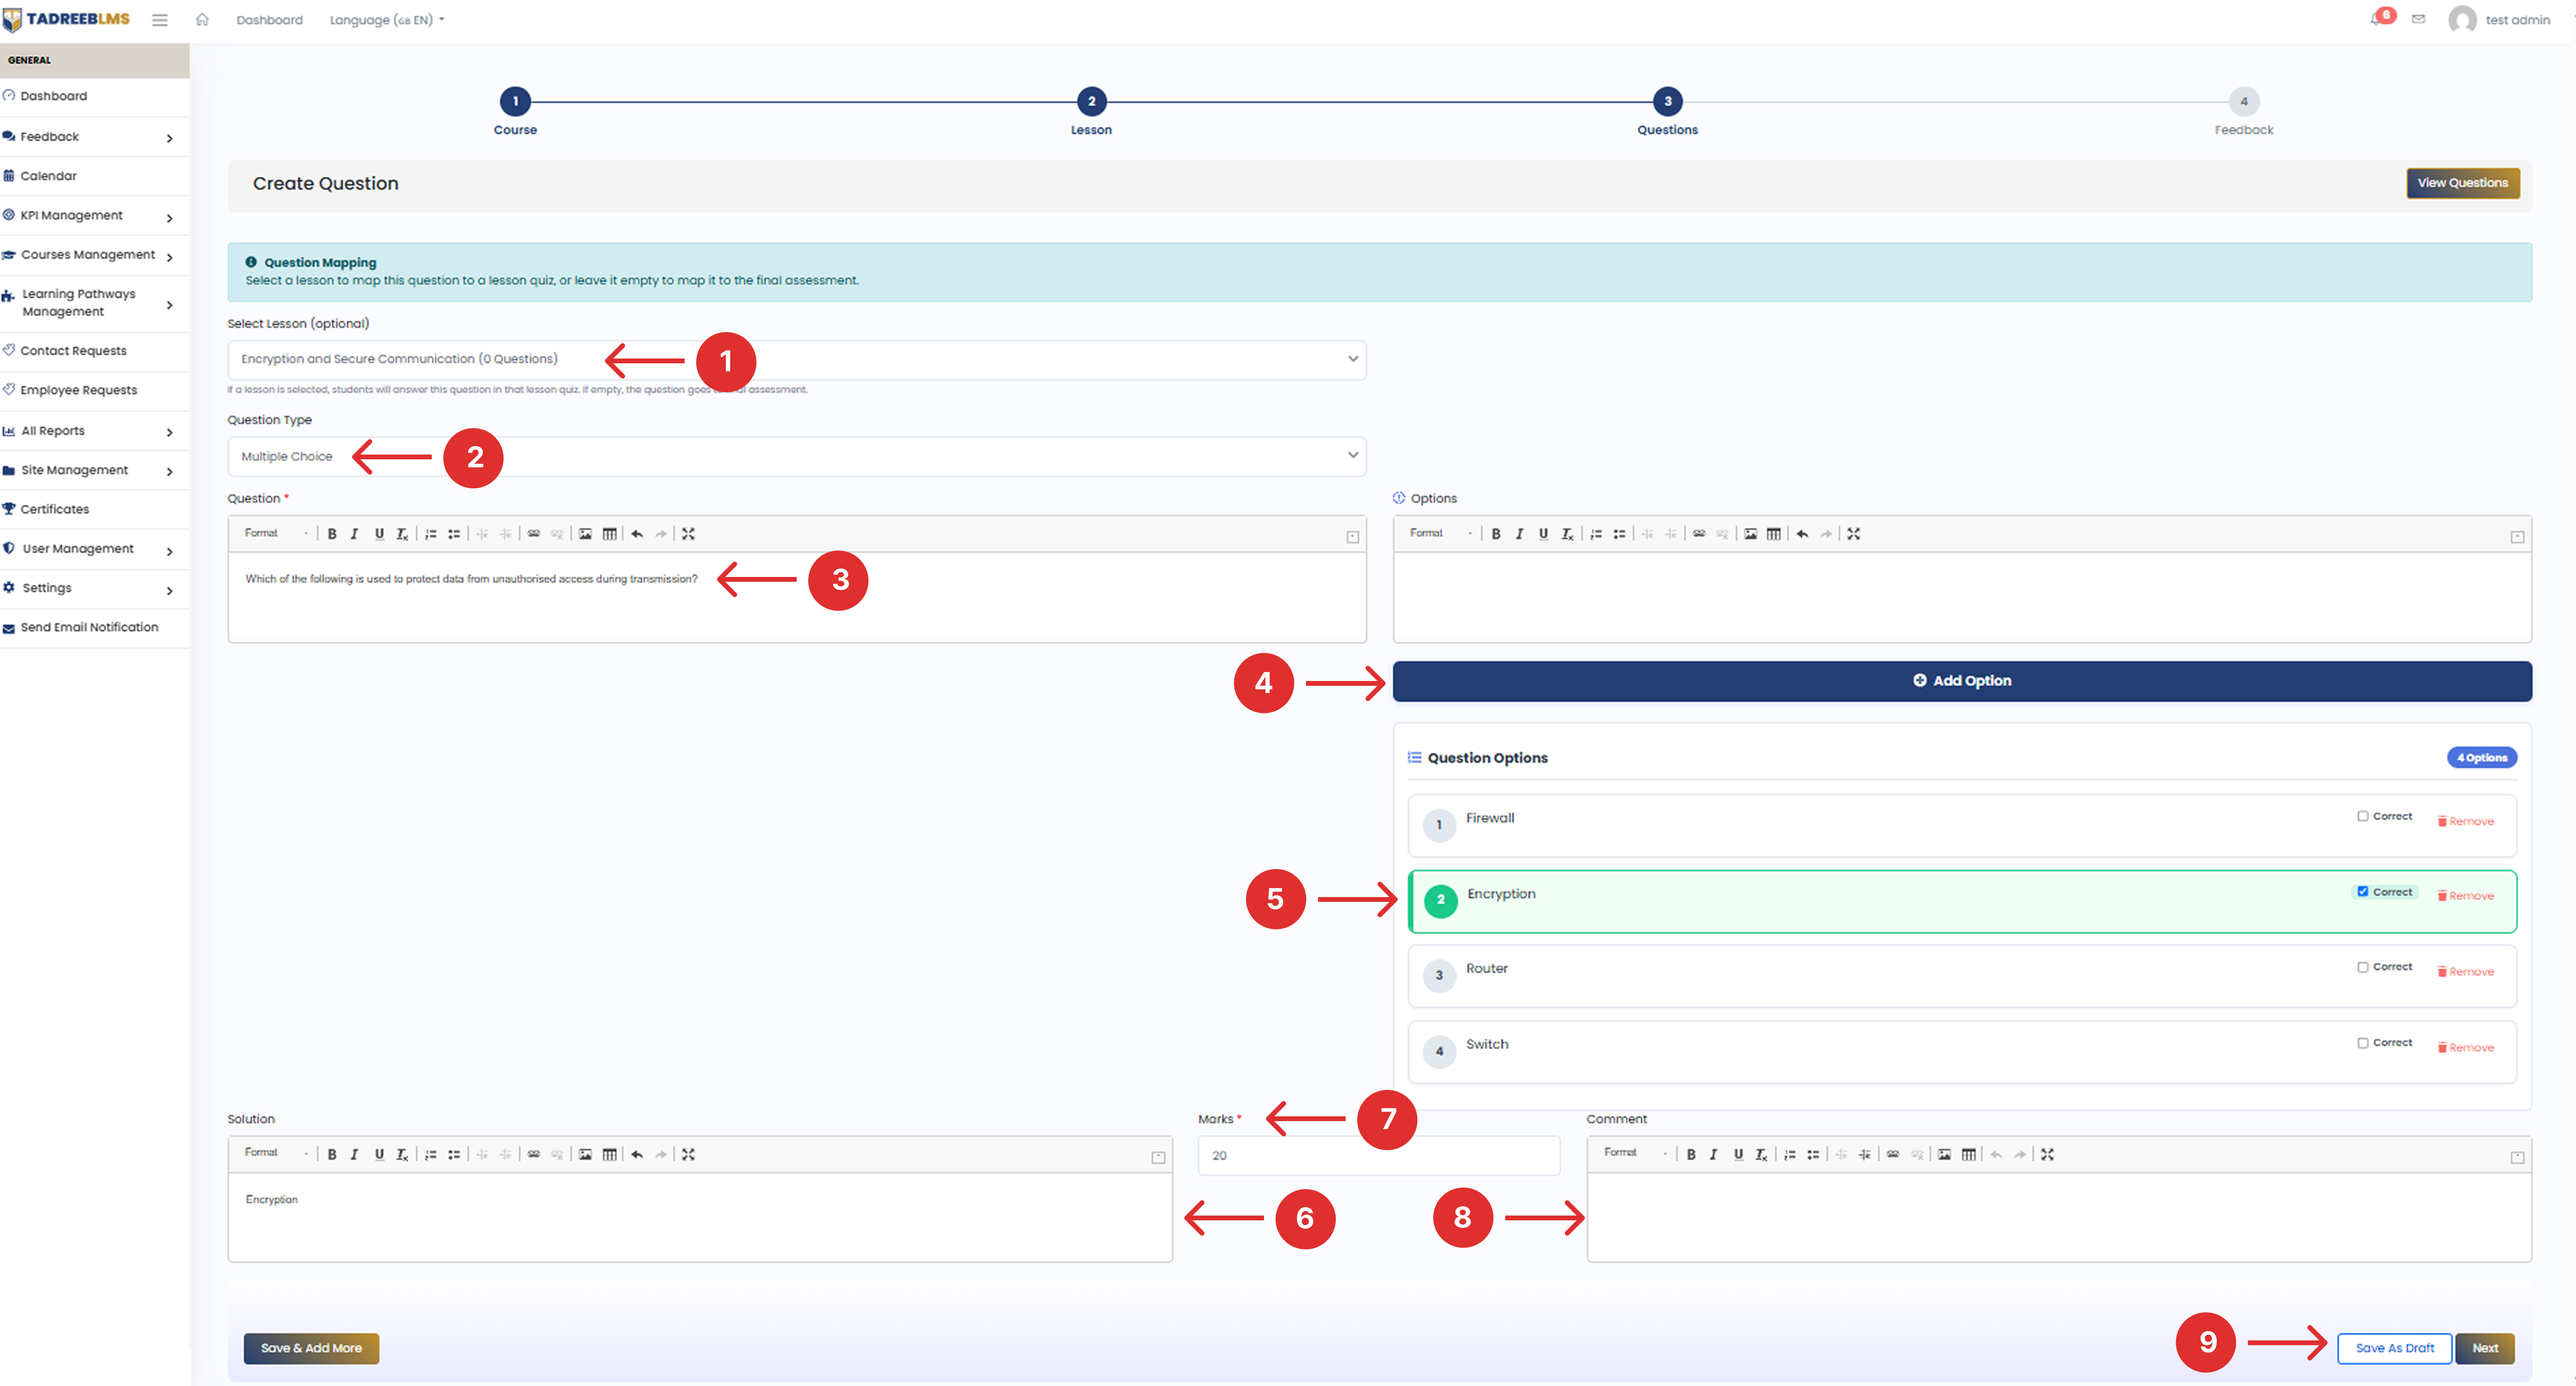
- If the question has multiple options, click Add Option to add each answer choice.
- Select Correct for the right answer (you can select more than one if needed). To delete an option, click Remove.
- Enter the Solution.
- Enter the Marks for the question.
- Add a Comment if you want to include a note for the question.
- Click Next to save the question.
For a final assessment question:
- Under Select Lesson, keep it set to "-- Final Assessment (No Lesson) --". Learners will see the final assessment after completing the course.
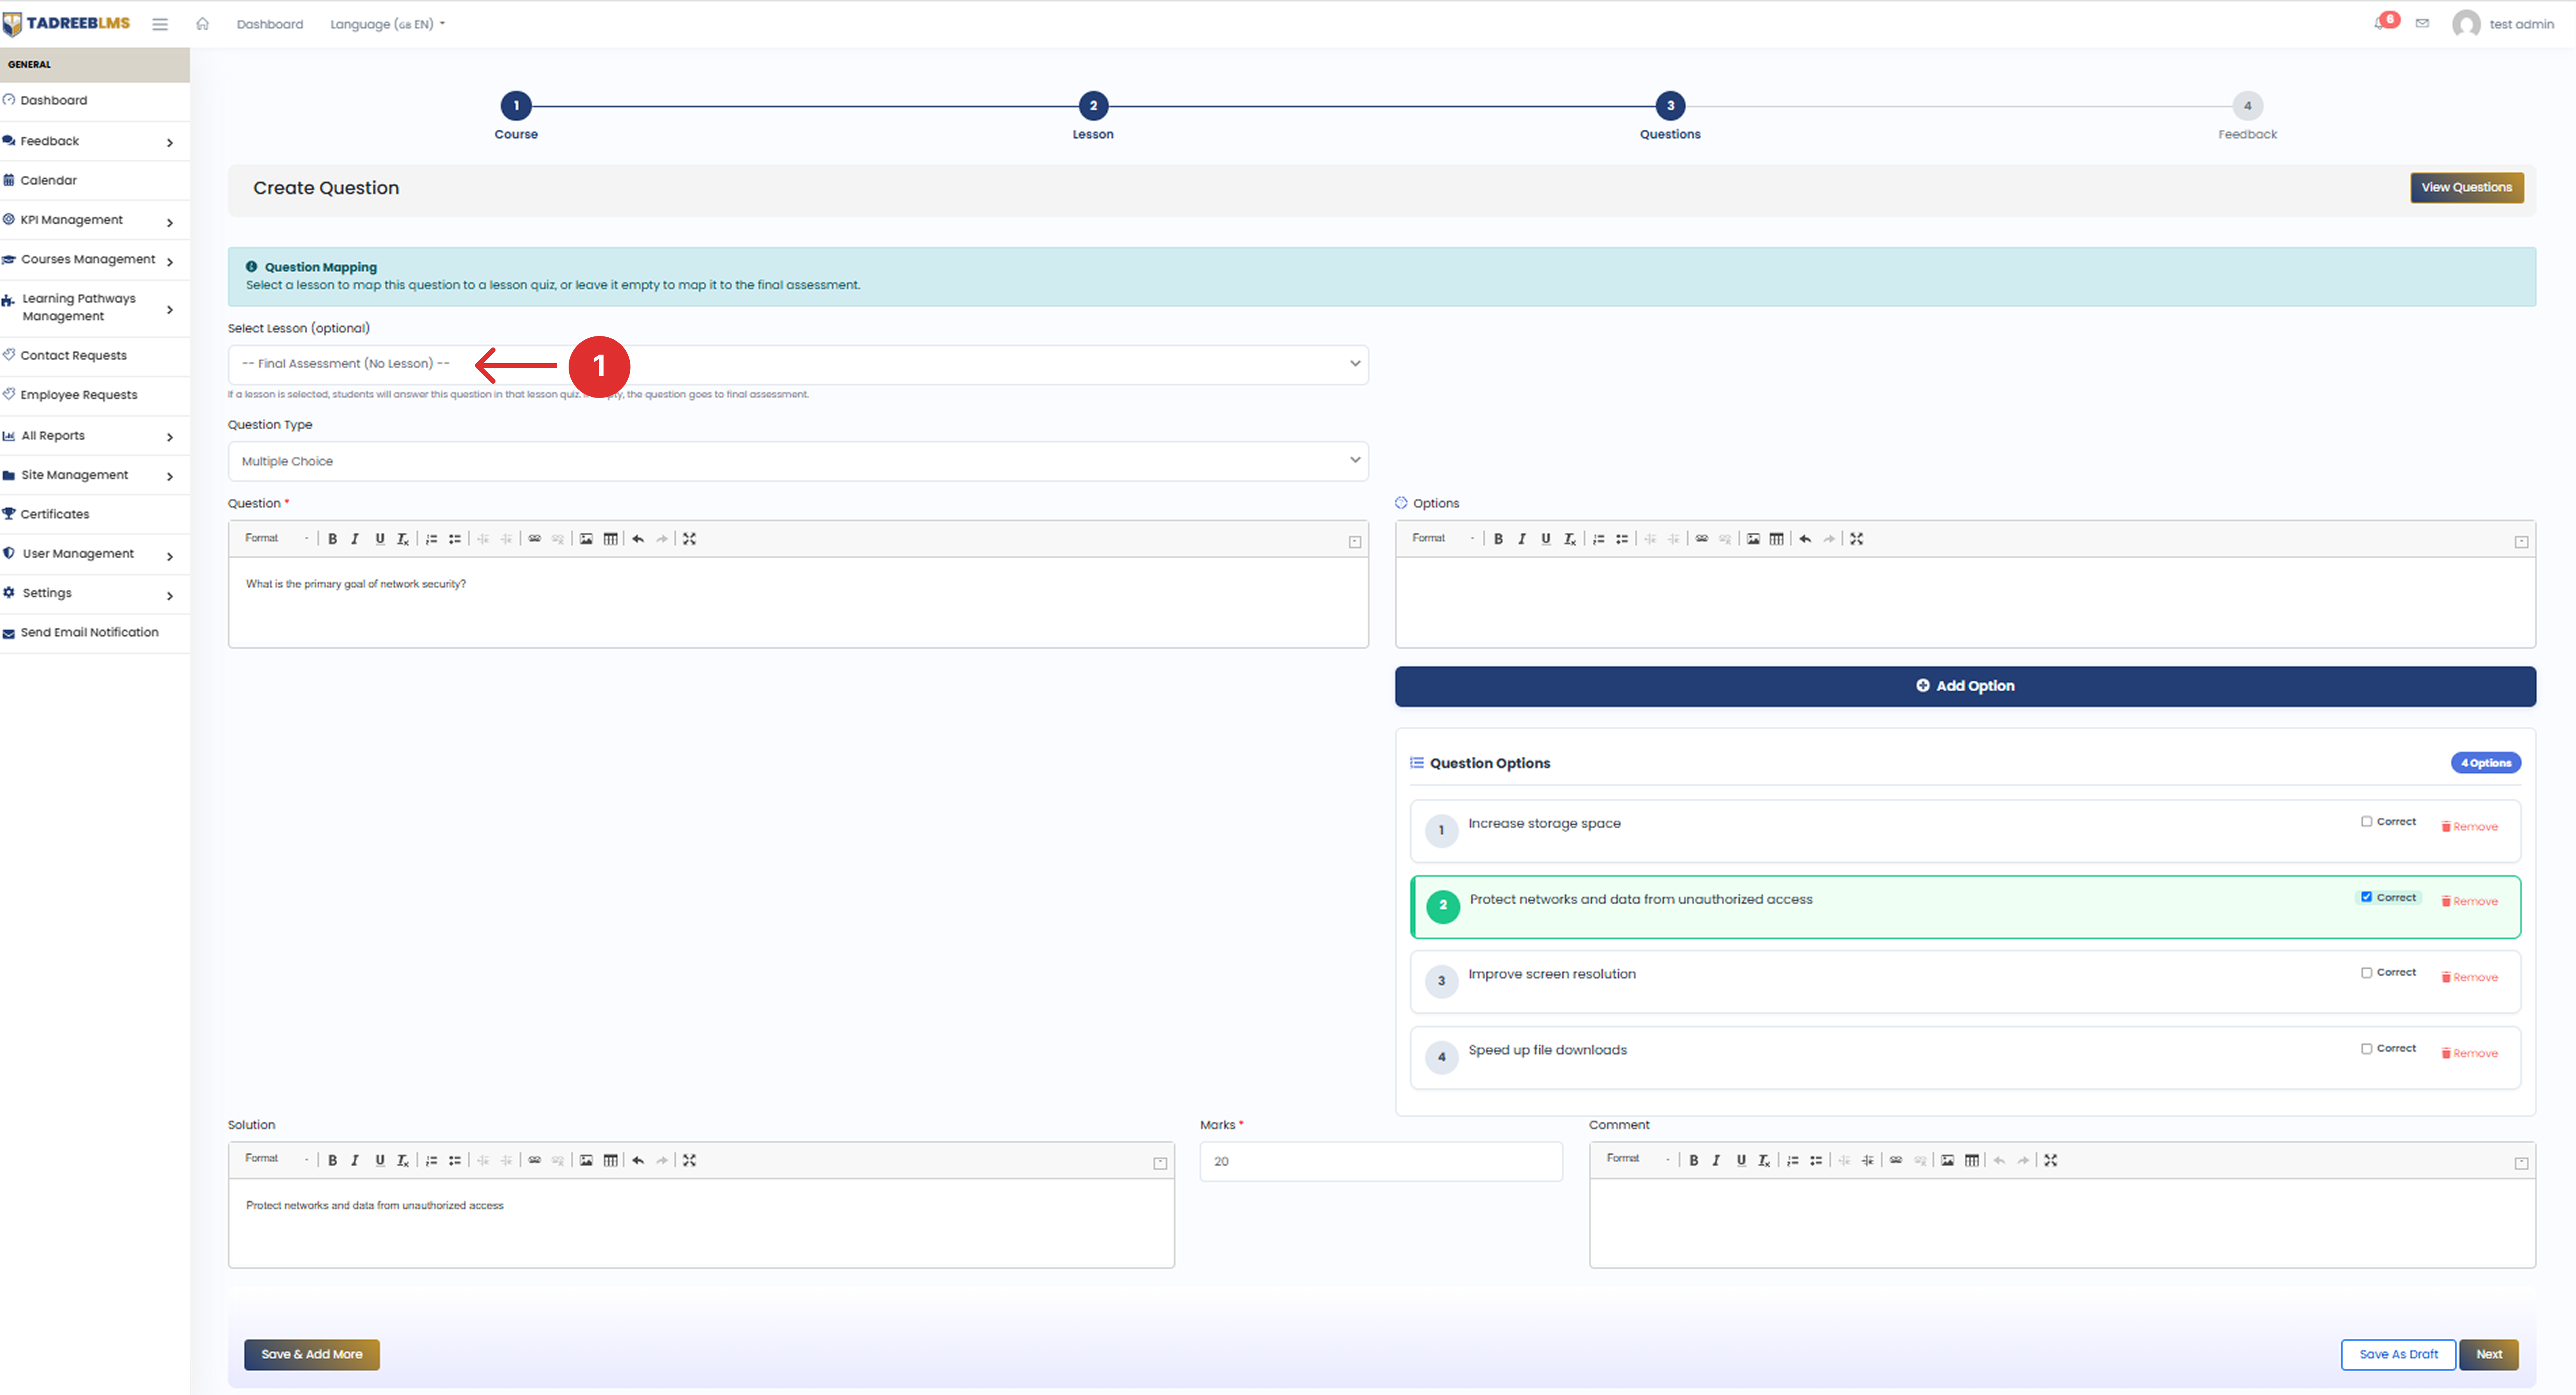
- Repeat Steps 2–8 in the "For a quiz question" section for creating the question.
📌 Note: At any time, click Save & Add More to save the current question and create another, or click Save As Draft to save your progress without publishing.
5.4.2 Review Short Answers
As an administrator, review and evaluate short-answer responses submitted by learners for both lesson quizzes and the final assessment.
To review short answers:
- Click the menu icon (☰) at the top left to open the sidebar menu.
- In the sidebar menu, go to Course Management and select Questions.
- Select the course from the dropdown menu.
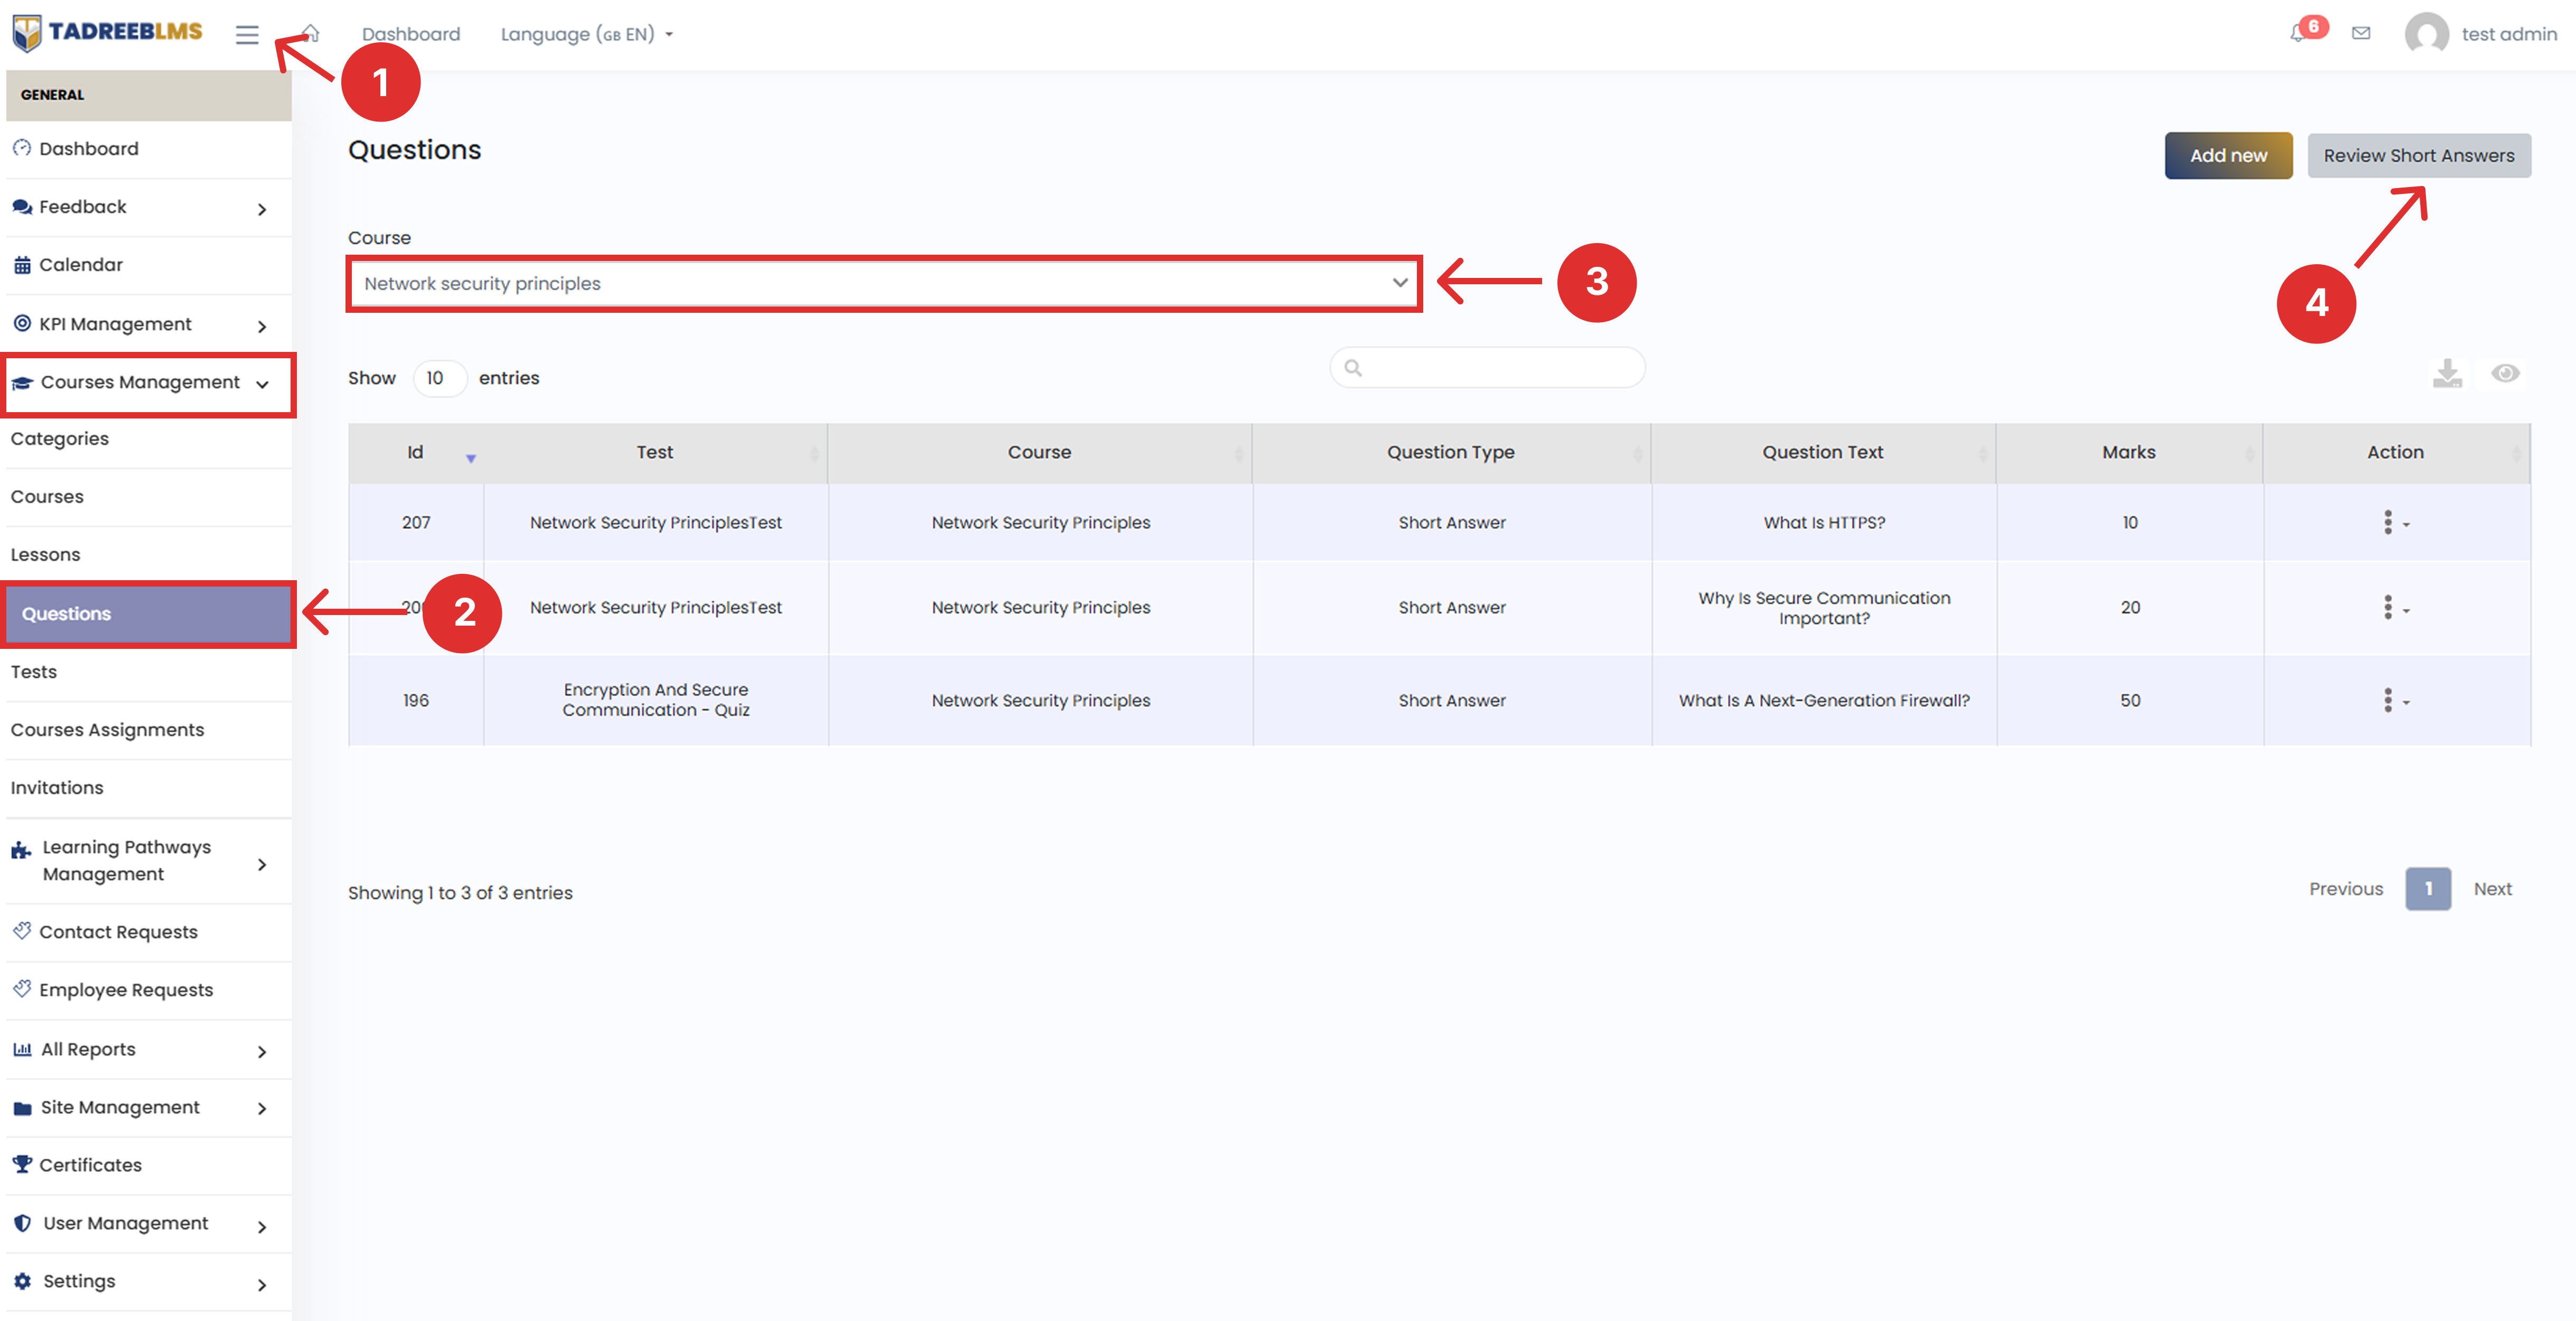
- Click the Review Short Answers button in the top right corner of the page.
The page has two sections: Lesson Quiz Short Answers and Final Assessment Short Answers. Use the Pending and Reviewed tabs to view pending or reviewed answers.
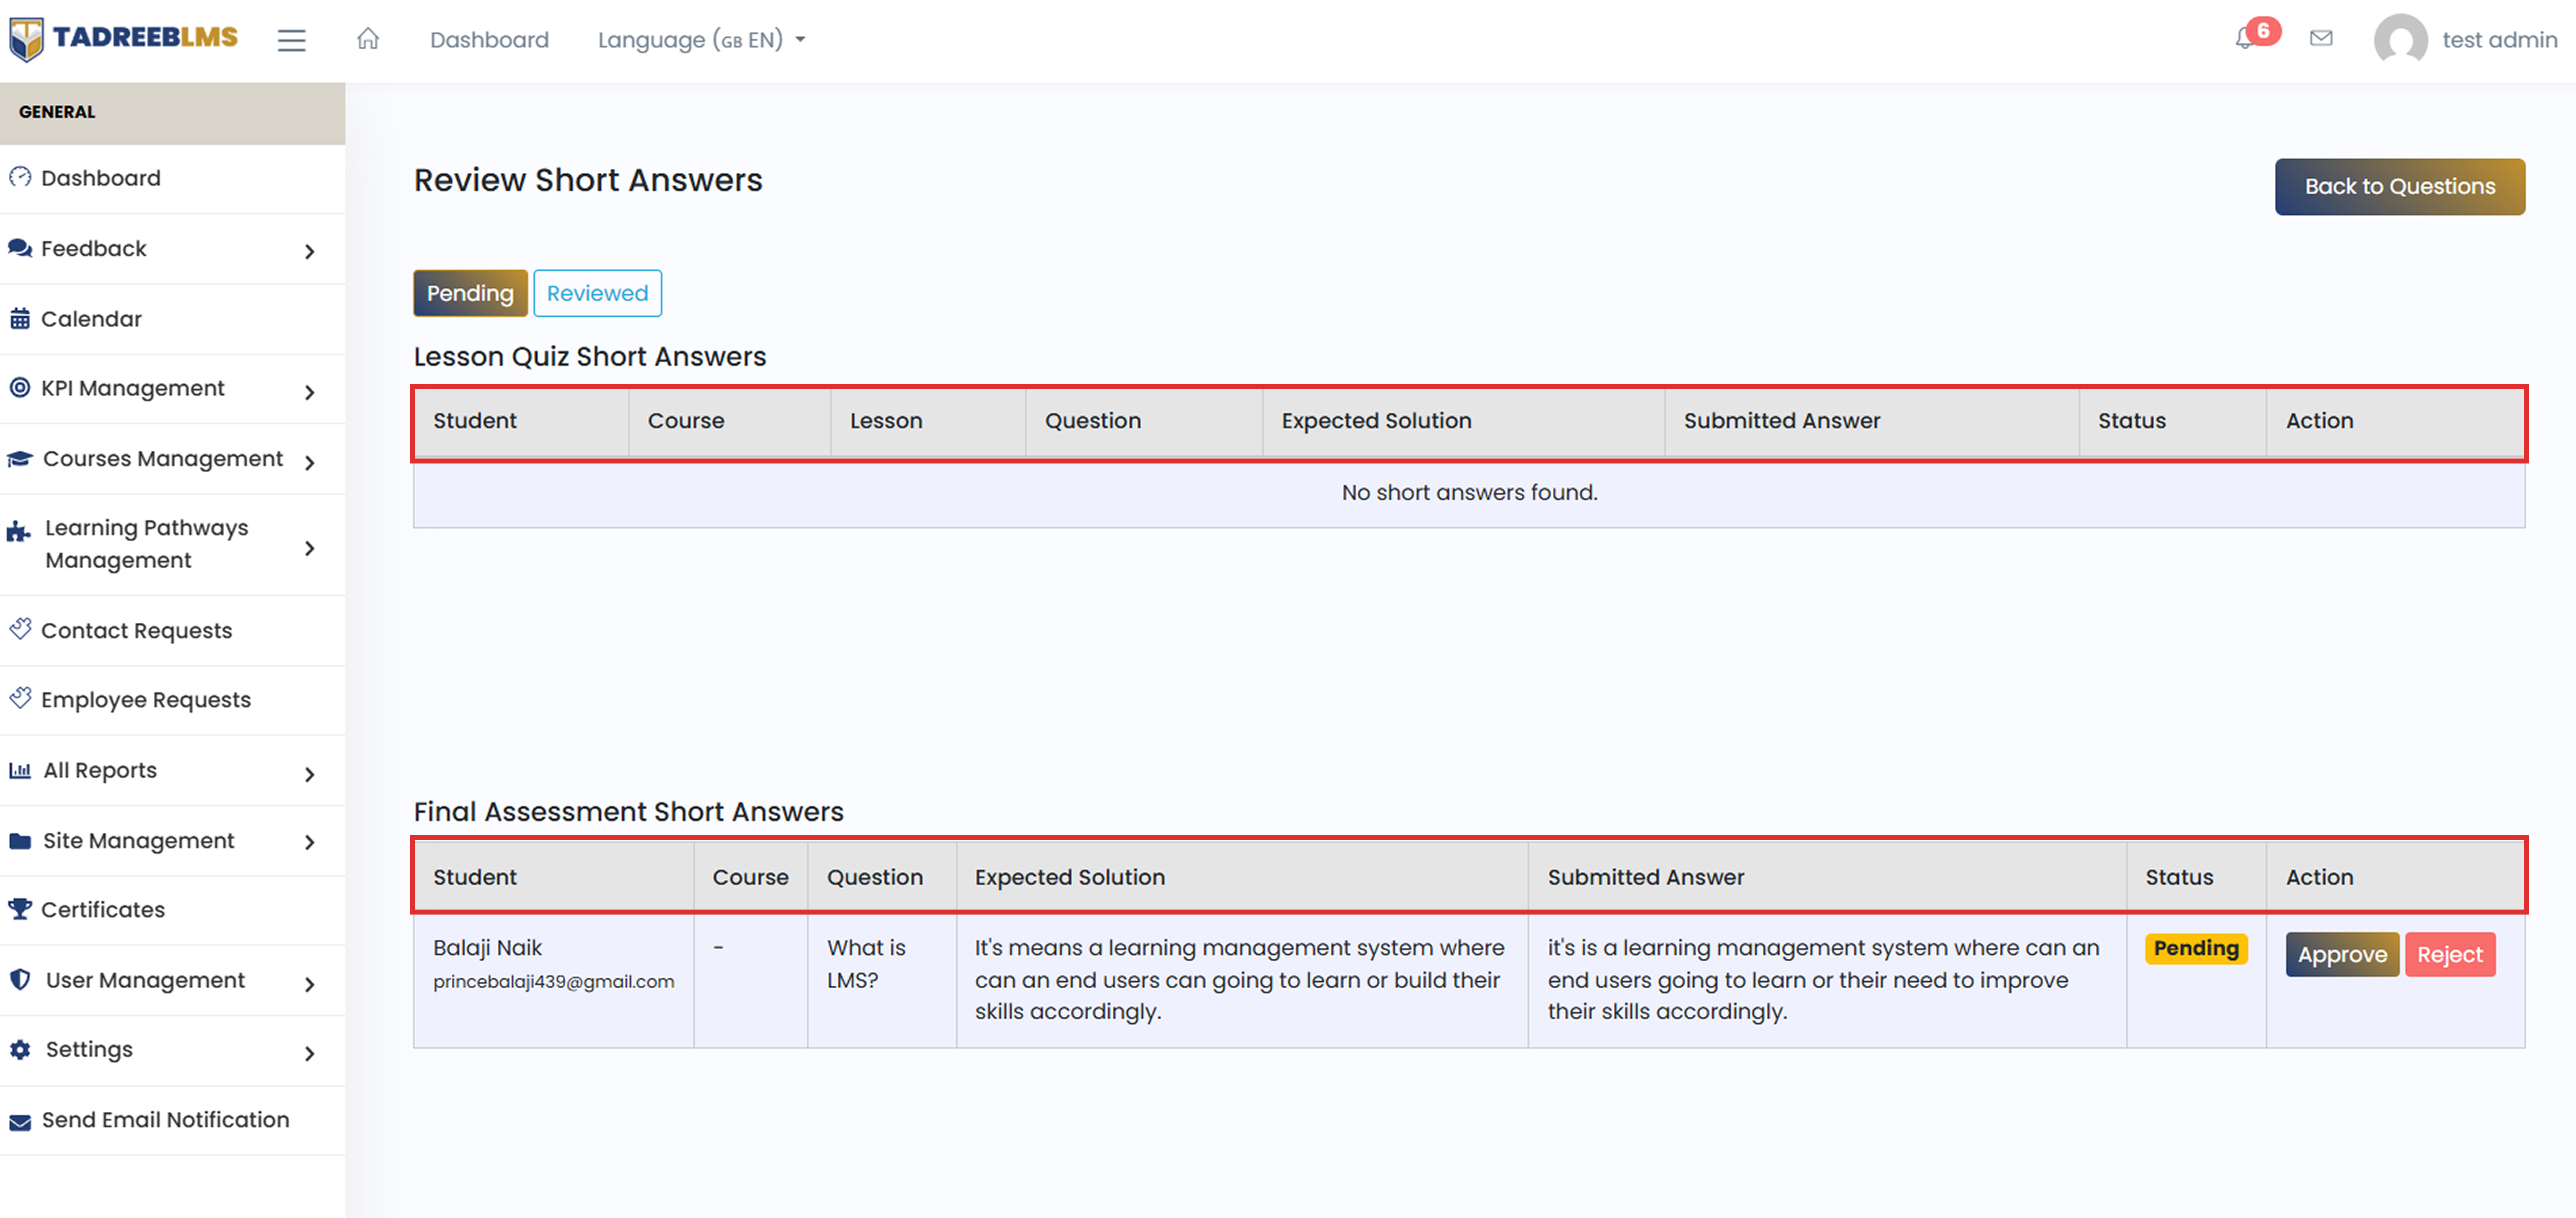
Table Headings
The table below describes the column information.
| Heading | Description |
|---|---|
| Student | The name and email of the learner who submitted the answer |
| Course | The course the question belongs to |
| Lesson | The lesson the quiz question belongs to |
| Question | The question that was asked |
| Expected Solution | The correct answer set by the admin |
| Submitted Answer | The answer submitted by the learner |
| Status | Shows whether the answer is Pending or Reviewed |
| Action | Approve or reject the submitted answer |
📌 Note: Approving or rejecting an answer moves it from the Pending tab to the Reviewed tab.
5.5 Tests
The Tests page shows all the tests created for a course, including lesson quizzes and the final assessment. Use the Course filter to find tests for a specific course. From here, you can see how many questions each test has, check whether the test is published, and take quick actions like viewing, adding a question, or deleting a test.
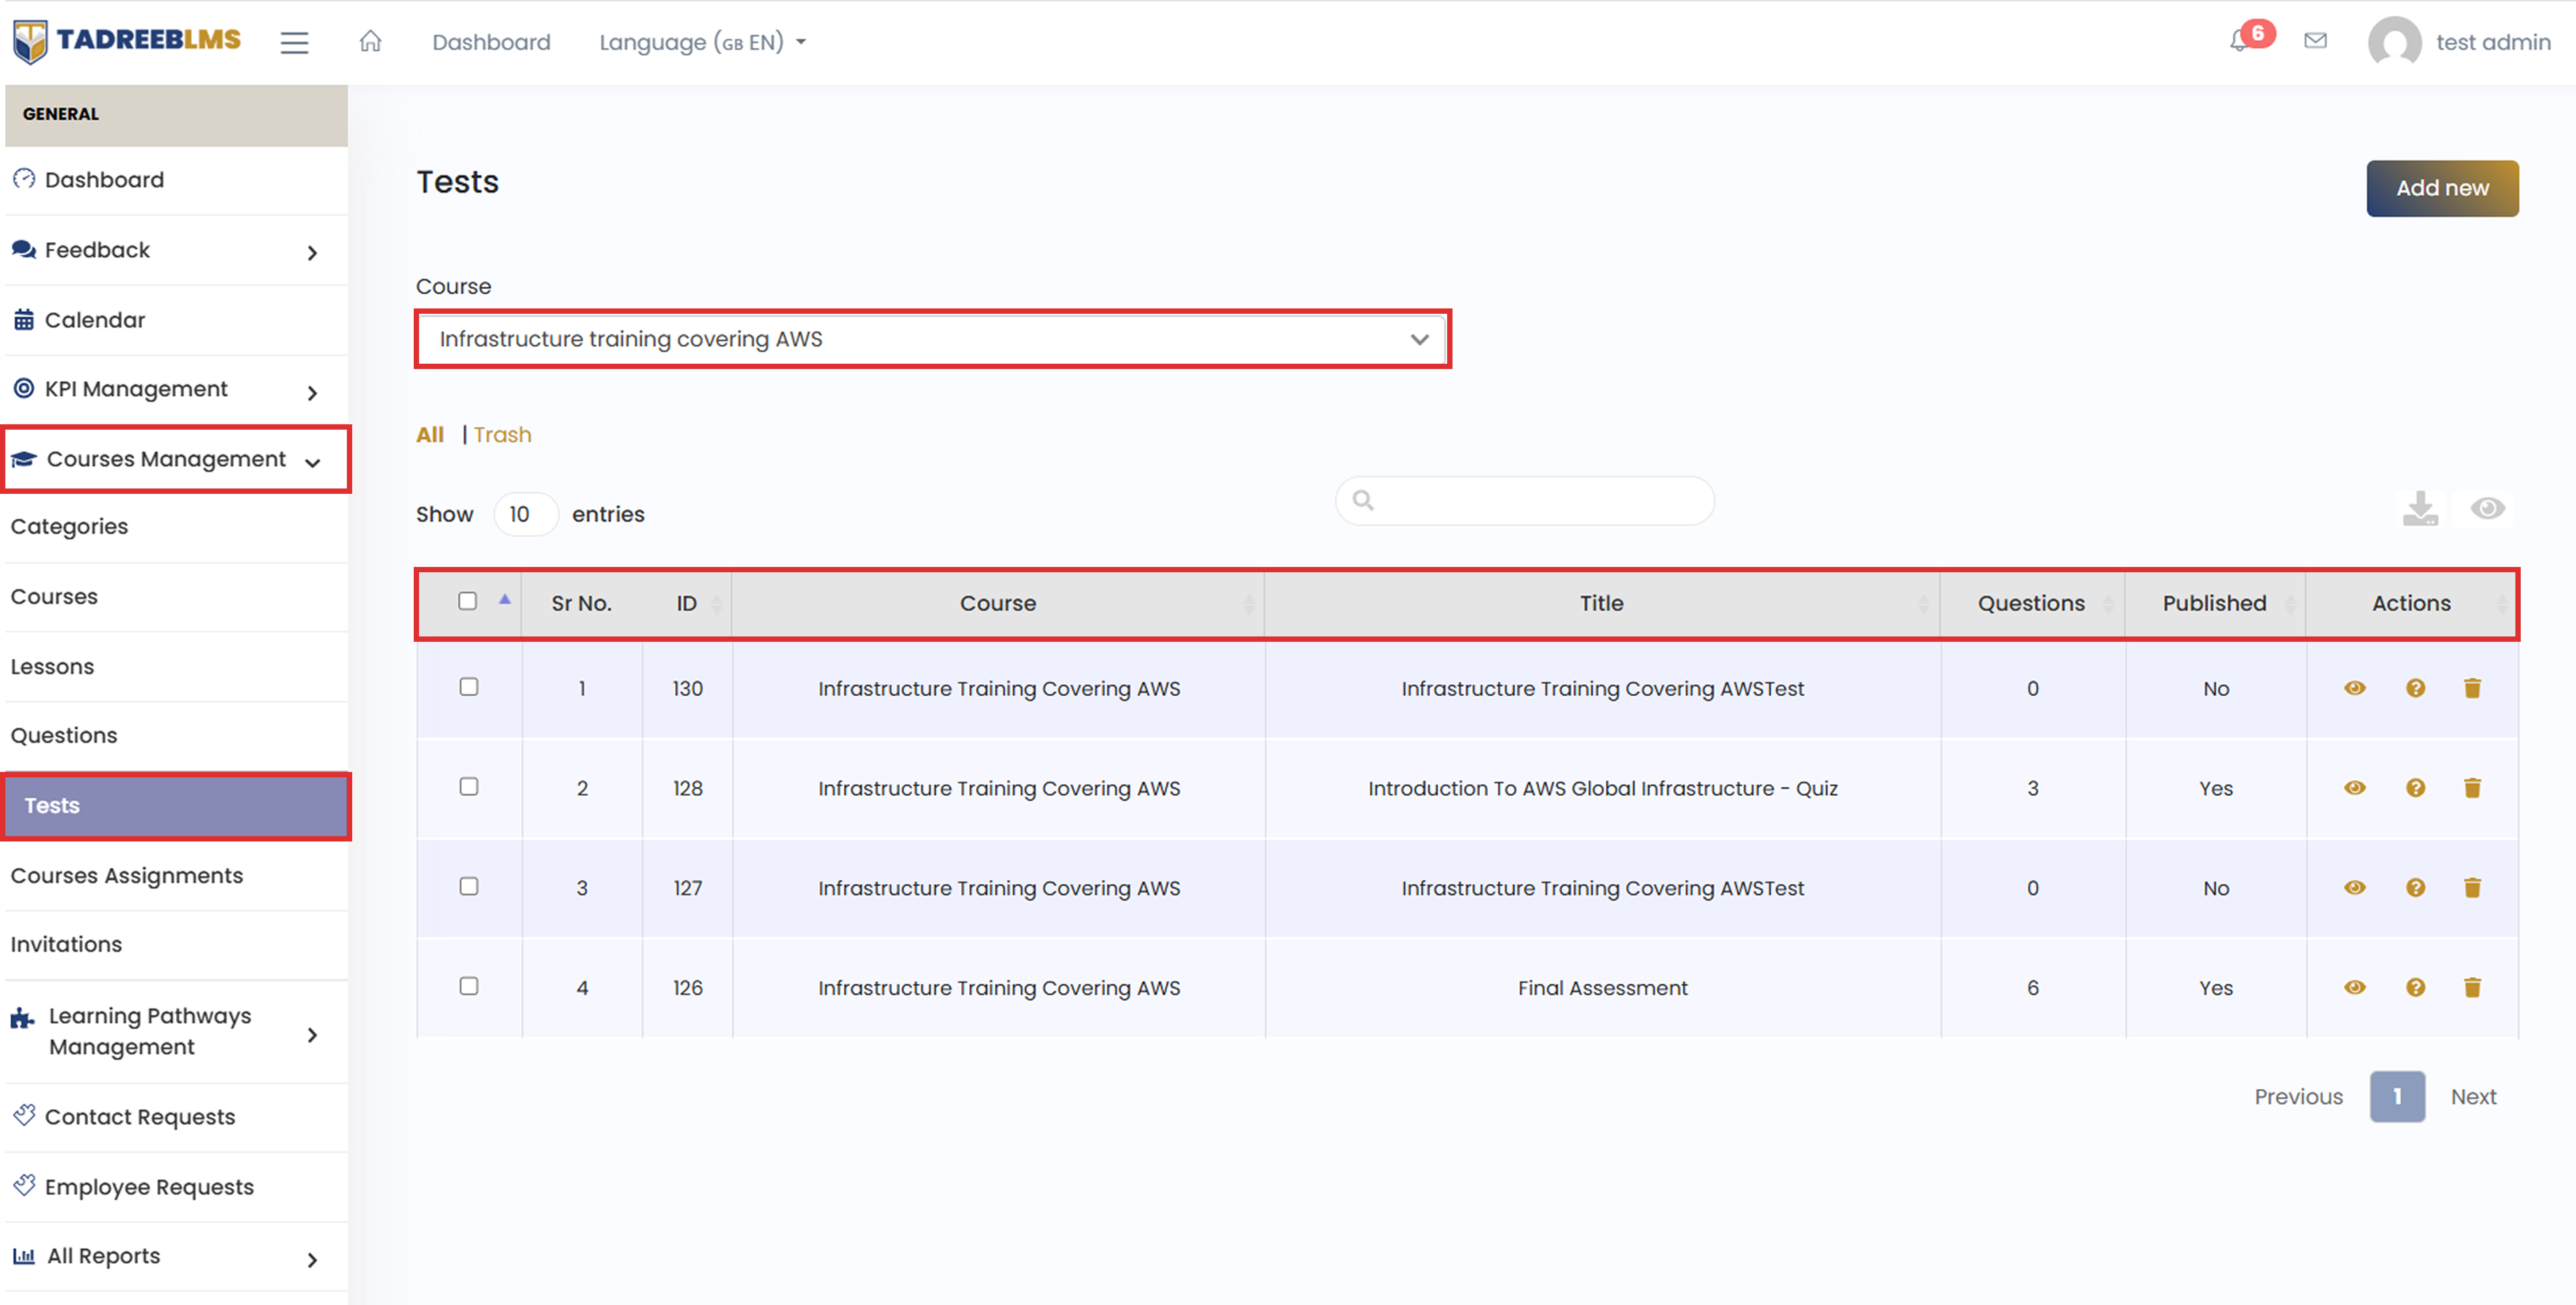
Table Headings
The table below describes the column information.
| Heading | Description |
|---|---|
| ID | The unique system-generated number assigned to each test |
| Course | The course this test belongs to |
| Title | The name of the test — this shows whether it's a lesson quiz (e.g., "Introduction to AWS Global Infrastructure - Quiz") or the course's Final Assessment |
| Questions | The number of questions added to the test |
| Published | Shows whether the test is currently published or not |
| Actions | Options to View, Add Questions, or Delete the test |
📌 Note: An unpublished test appears with "Test" in its name. After it is published, a lesson test appears as "Quiz", and the course-level test appears as "Final Assessment".
5.5.1 Add Test
Clicking Add New on the Tests page opens the Create Question page instead of a separate test form. Tests are created by adding questions to a lesson quiz or the final assessment.
To add a test:
- Click the menu icon (☰) at the top left to open the sidebar menu.
- In the sidebar menu, go to Course Management and select Tests.
- Select the course from the dropdown menu.
- Click the Add New button. This redirects you to the Create Question page.
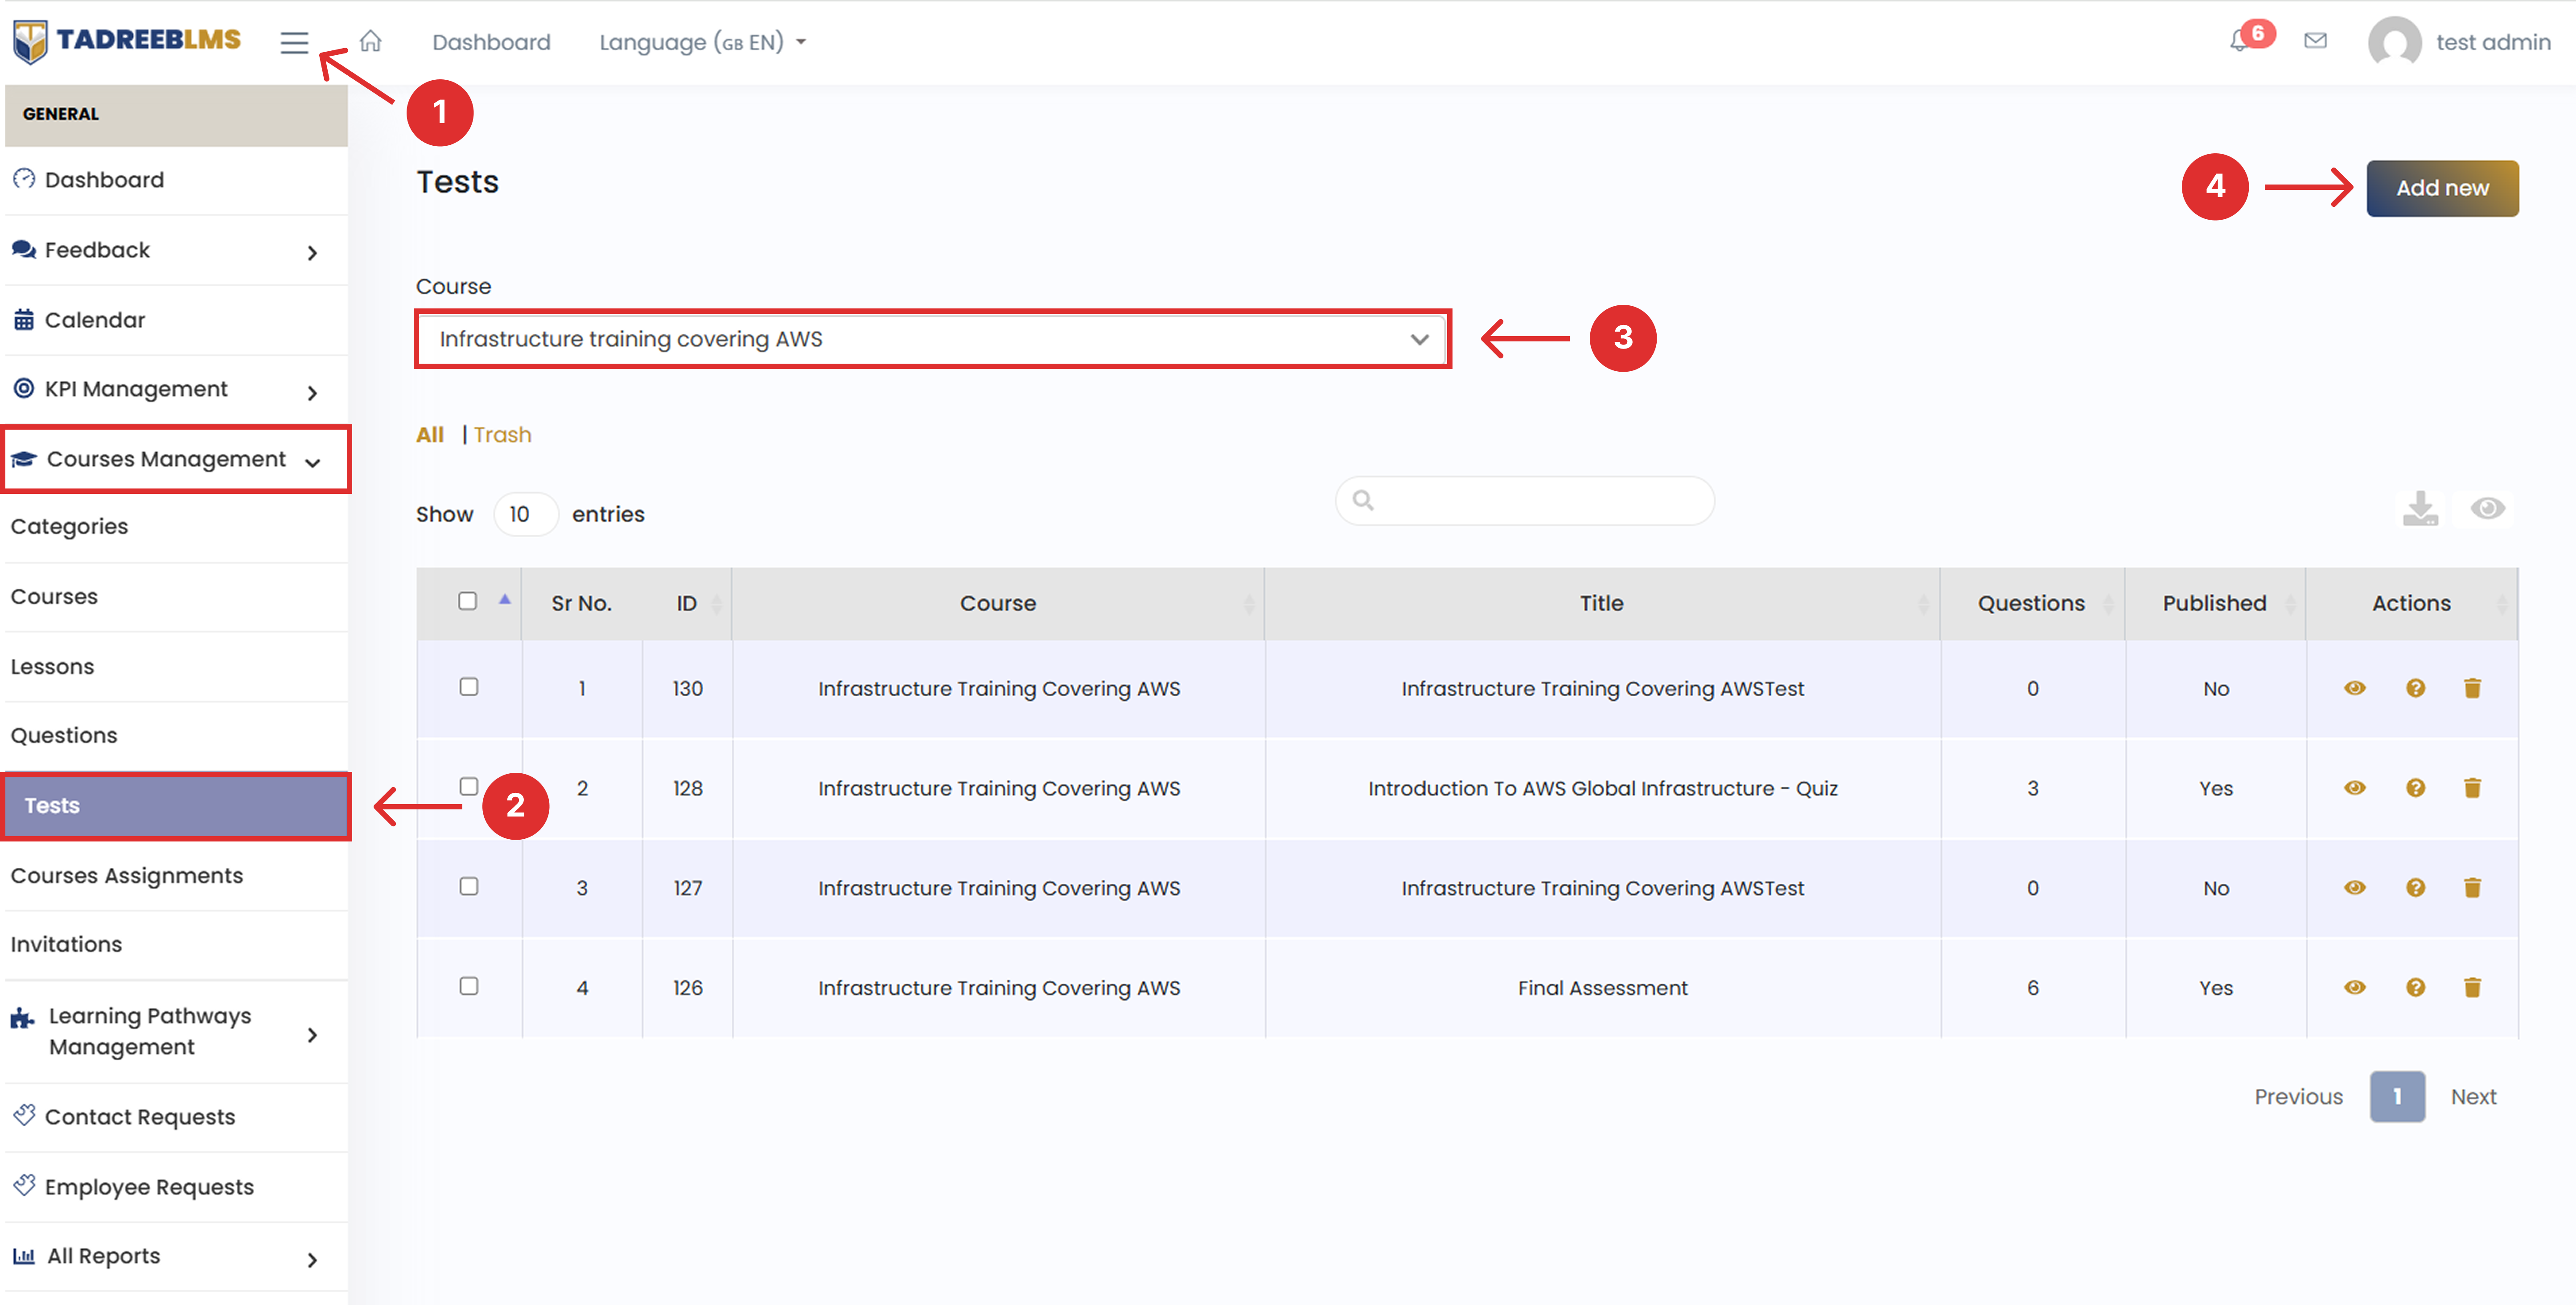
- Follow the same steps as in Section 5.4.1 (Add Question) to create a quiz question (mapped to a lesson) or a final assessment question (mapped to the selected course).
📌 Note: Once you save the question, it automatically appears as a test on the Tests page, either under the lesson quiz or the course's Final Assessment.
5.6 Course Assignments
The Course Assignments page shows which courses are assigned to learners. From here, you can assign a course to an individual learner or a user group, see who assigned it and when, check due dates, and filter assignments by employee email or course. Use Advanced Search to apply the selected filters or Reset to clear them.
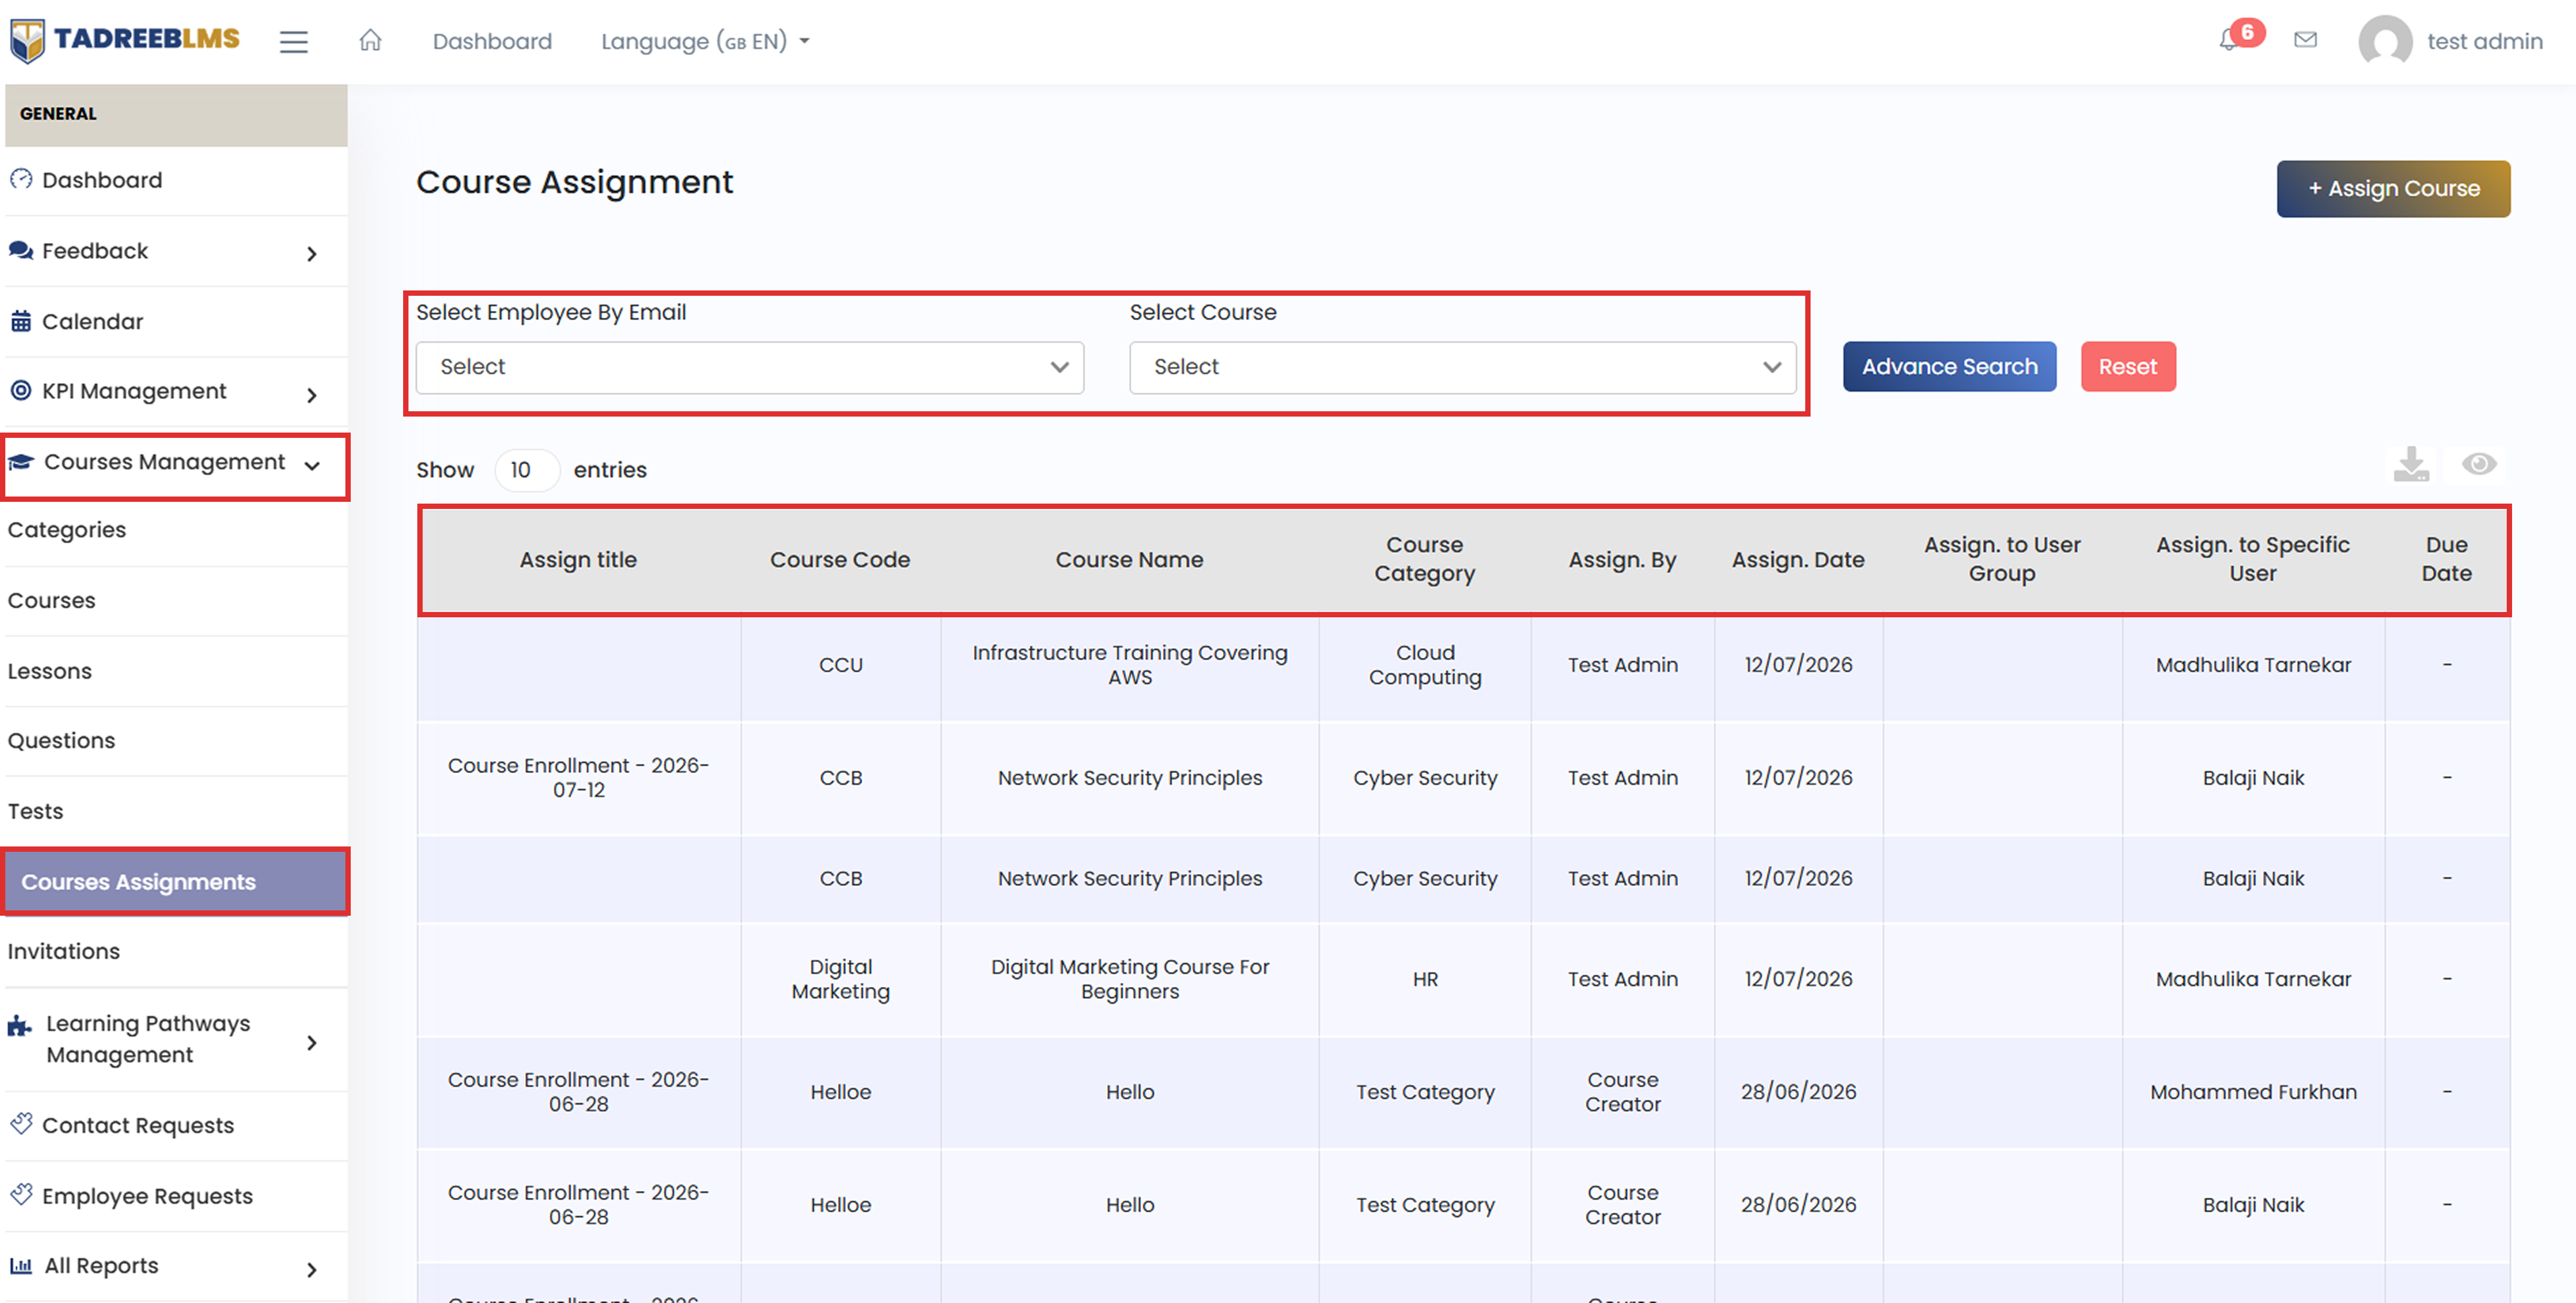
Table Headings
The table below describes the column information.
| Heading | Description |
|---|---|
| Assign title | The title given to the assignment (e.g., "Course Enrollment - 2026-07-12") |
| Course Code | The unique code of the assigned course |
| Course Name | The name of the assigned course |
| Course Category | The category the course belongs to |
| Assign. By | The admin or Instructor who assigned the course |
| Assign. Date | The date the course was assigned |
| Assign to User Group | The user group to which the course was assigned |
| Assign to Specific User | The individual user to whom the course was assigned |
| Due Date | The date by which the course should be completed |
5.6.1 Assign a Course
Assign a course to one or more learners, or to an entire user group, so they can start their training.
📋 Before you start: Know which course you want to assign, and whether you're assigning it to individual learners or a user group.
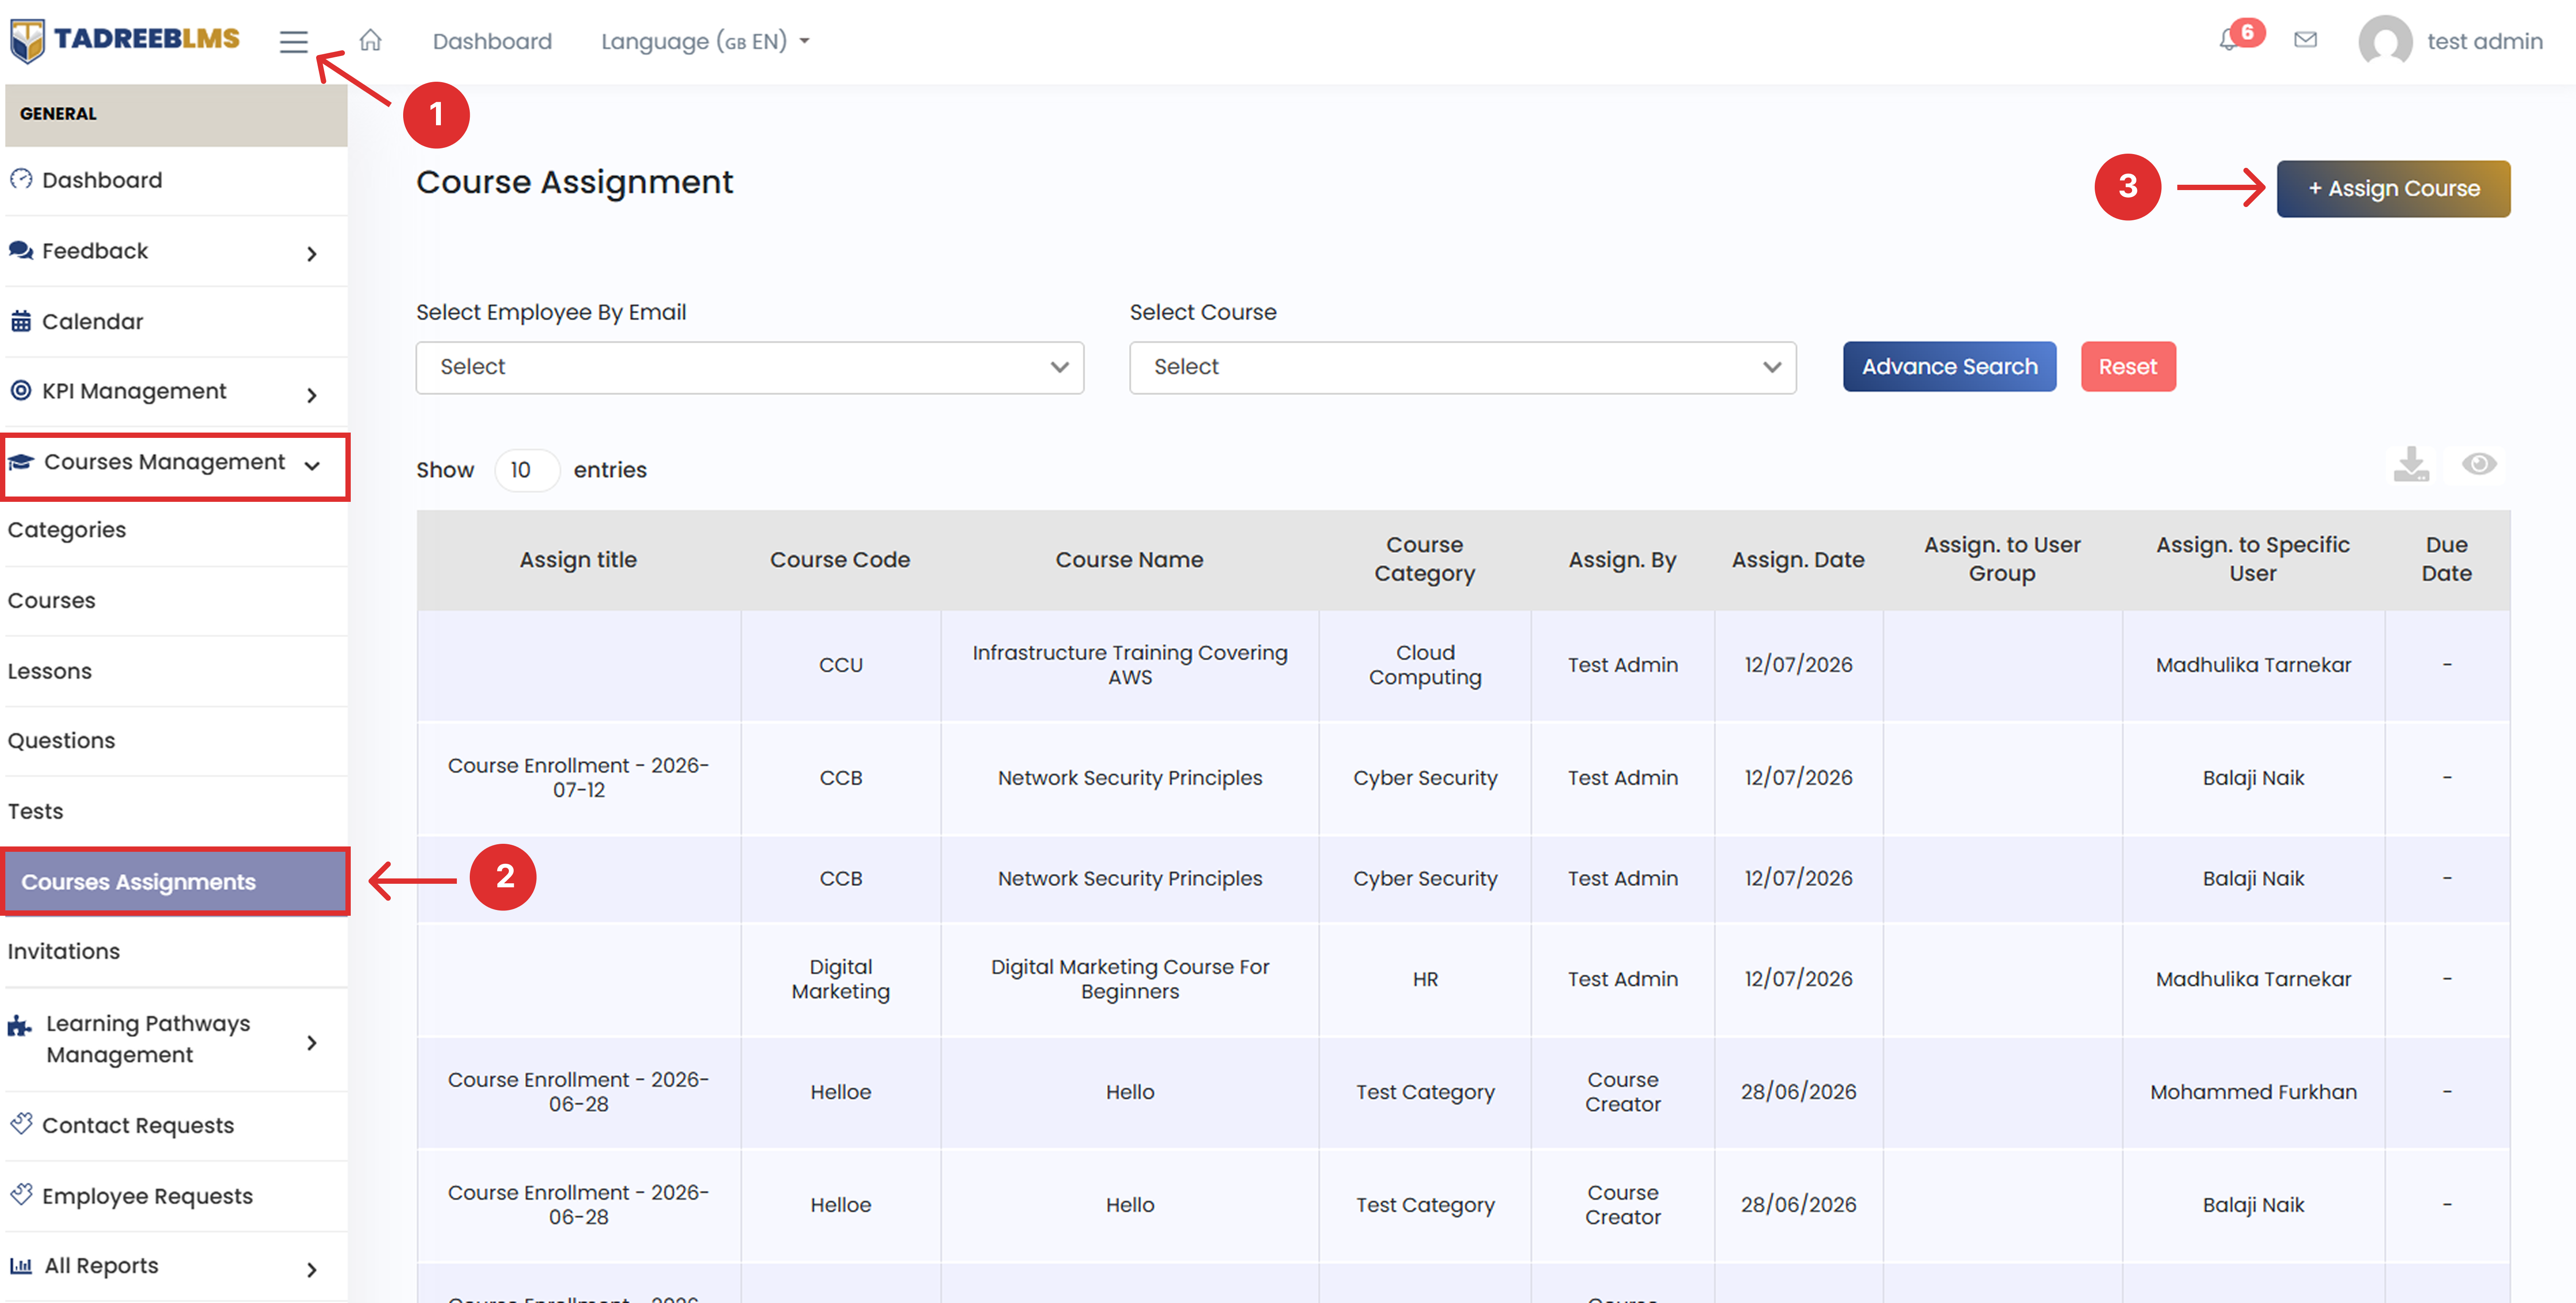
To assign a course:
- Click the menu icon (☰) at the top left to open the sidebar menu.
- In the sidebar menu, go to Course Management and select Course Assignments.
- Click the Assign Course button in the top right corner of the page.
- Under Select Course, choose the course you want to assign (e.g., Basics of Marketing).
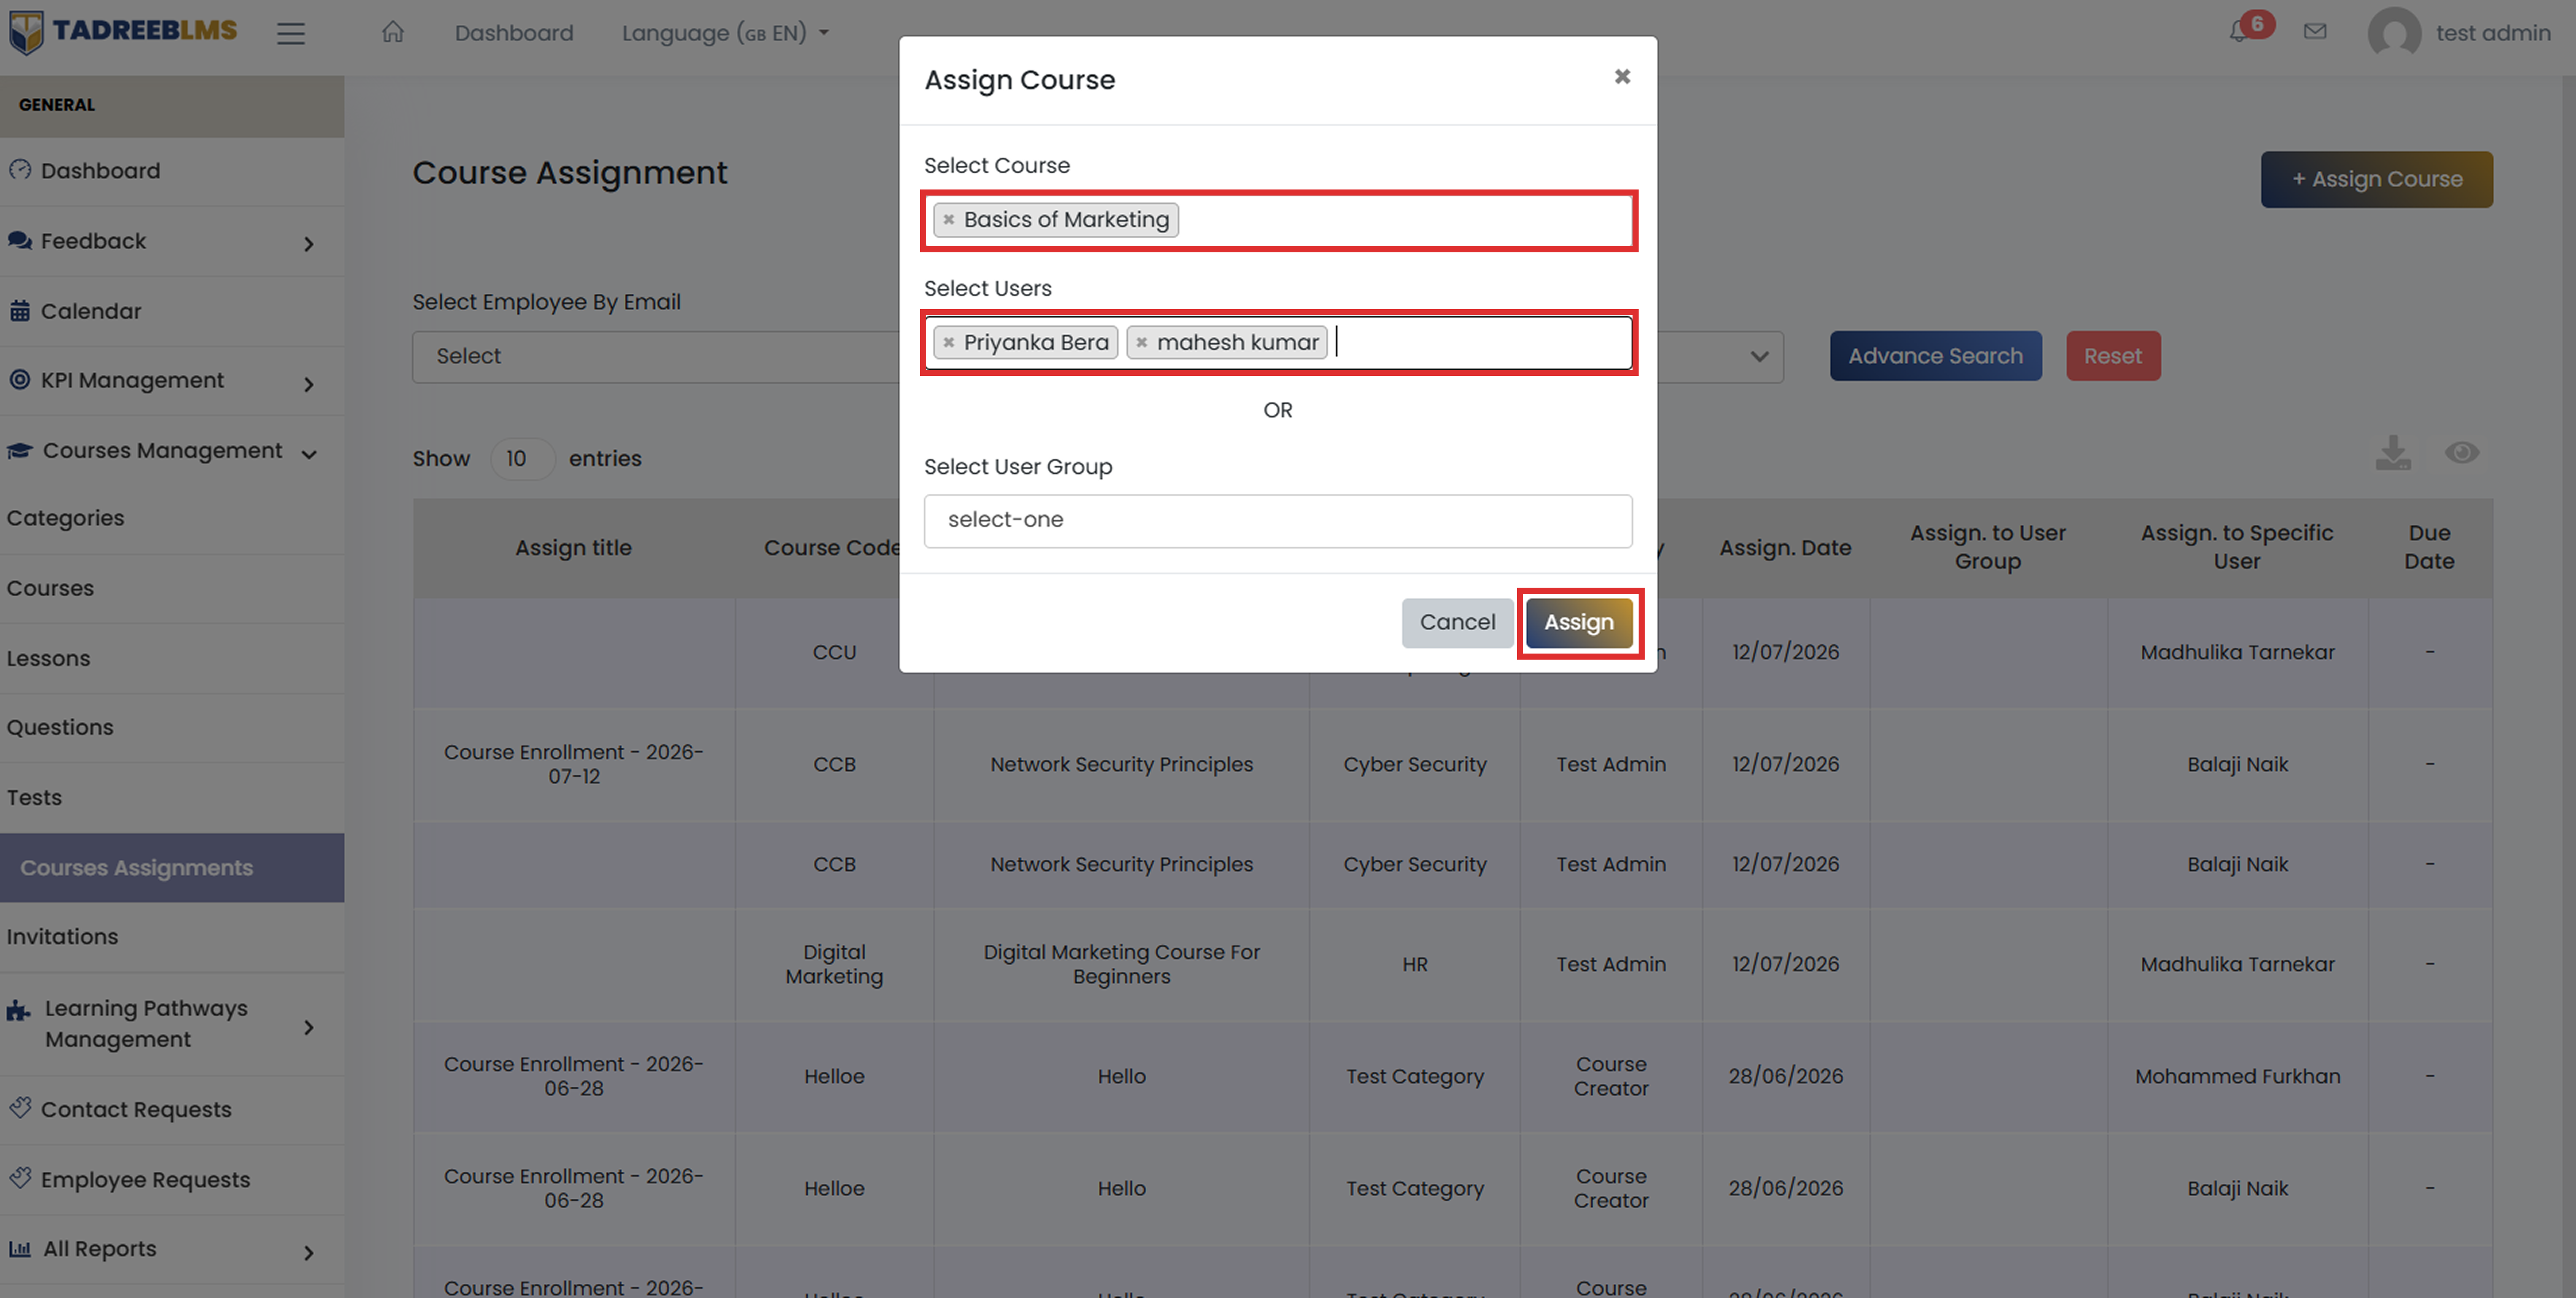
- Choose who to assign the course to:
- Under Select Users, select one or more individual learners (for example, Priyanka Bera).
- OR, under Select User Group, select a user group to assign the course to all members of that group.
- Click Assign to assign the course or Cancel to close the window without saving.
📌 Note: You can assign a course to either individual users or a user group, but not both at the same time.
6. Learning Pathway Assignment
The learning pathway assignment section includes learning pathways and pathway assignment.
6.1 Learning Pathways
Think of a Learning Pathway as a guided roadmap for your learners. Instead of overwhelming them with a random collection of courses, a learning pathway organises courses in a clear, logical sequence, helping learners know which course to begin with, what to take next, and how much further they have to progress.
Learning Pathways ensure learners build a strong basic foundation before moving on to advanced courses. They also group related courses under a clear, descriptive title, such as New Hire Onboarding, so learners instantly understand the pathway's purpose and stay focused on learning toward a specific goal.
To view or manage your pathways, go to Learning Pathways Management → Learning Pathways from the sidebar.
📋 Before you start: Make sure the courses you want to include in a pathway already exist in Courses Management. A pathway simply arranges existing courses in a sequence — it doesn't create new ones.
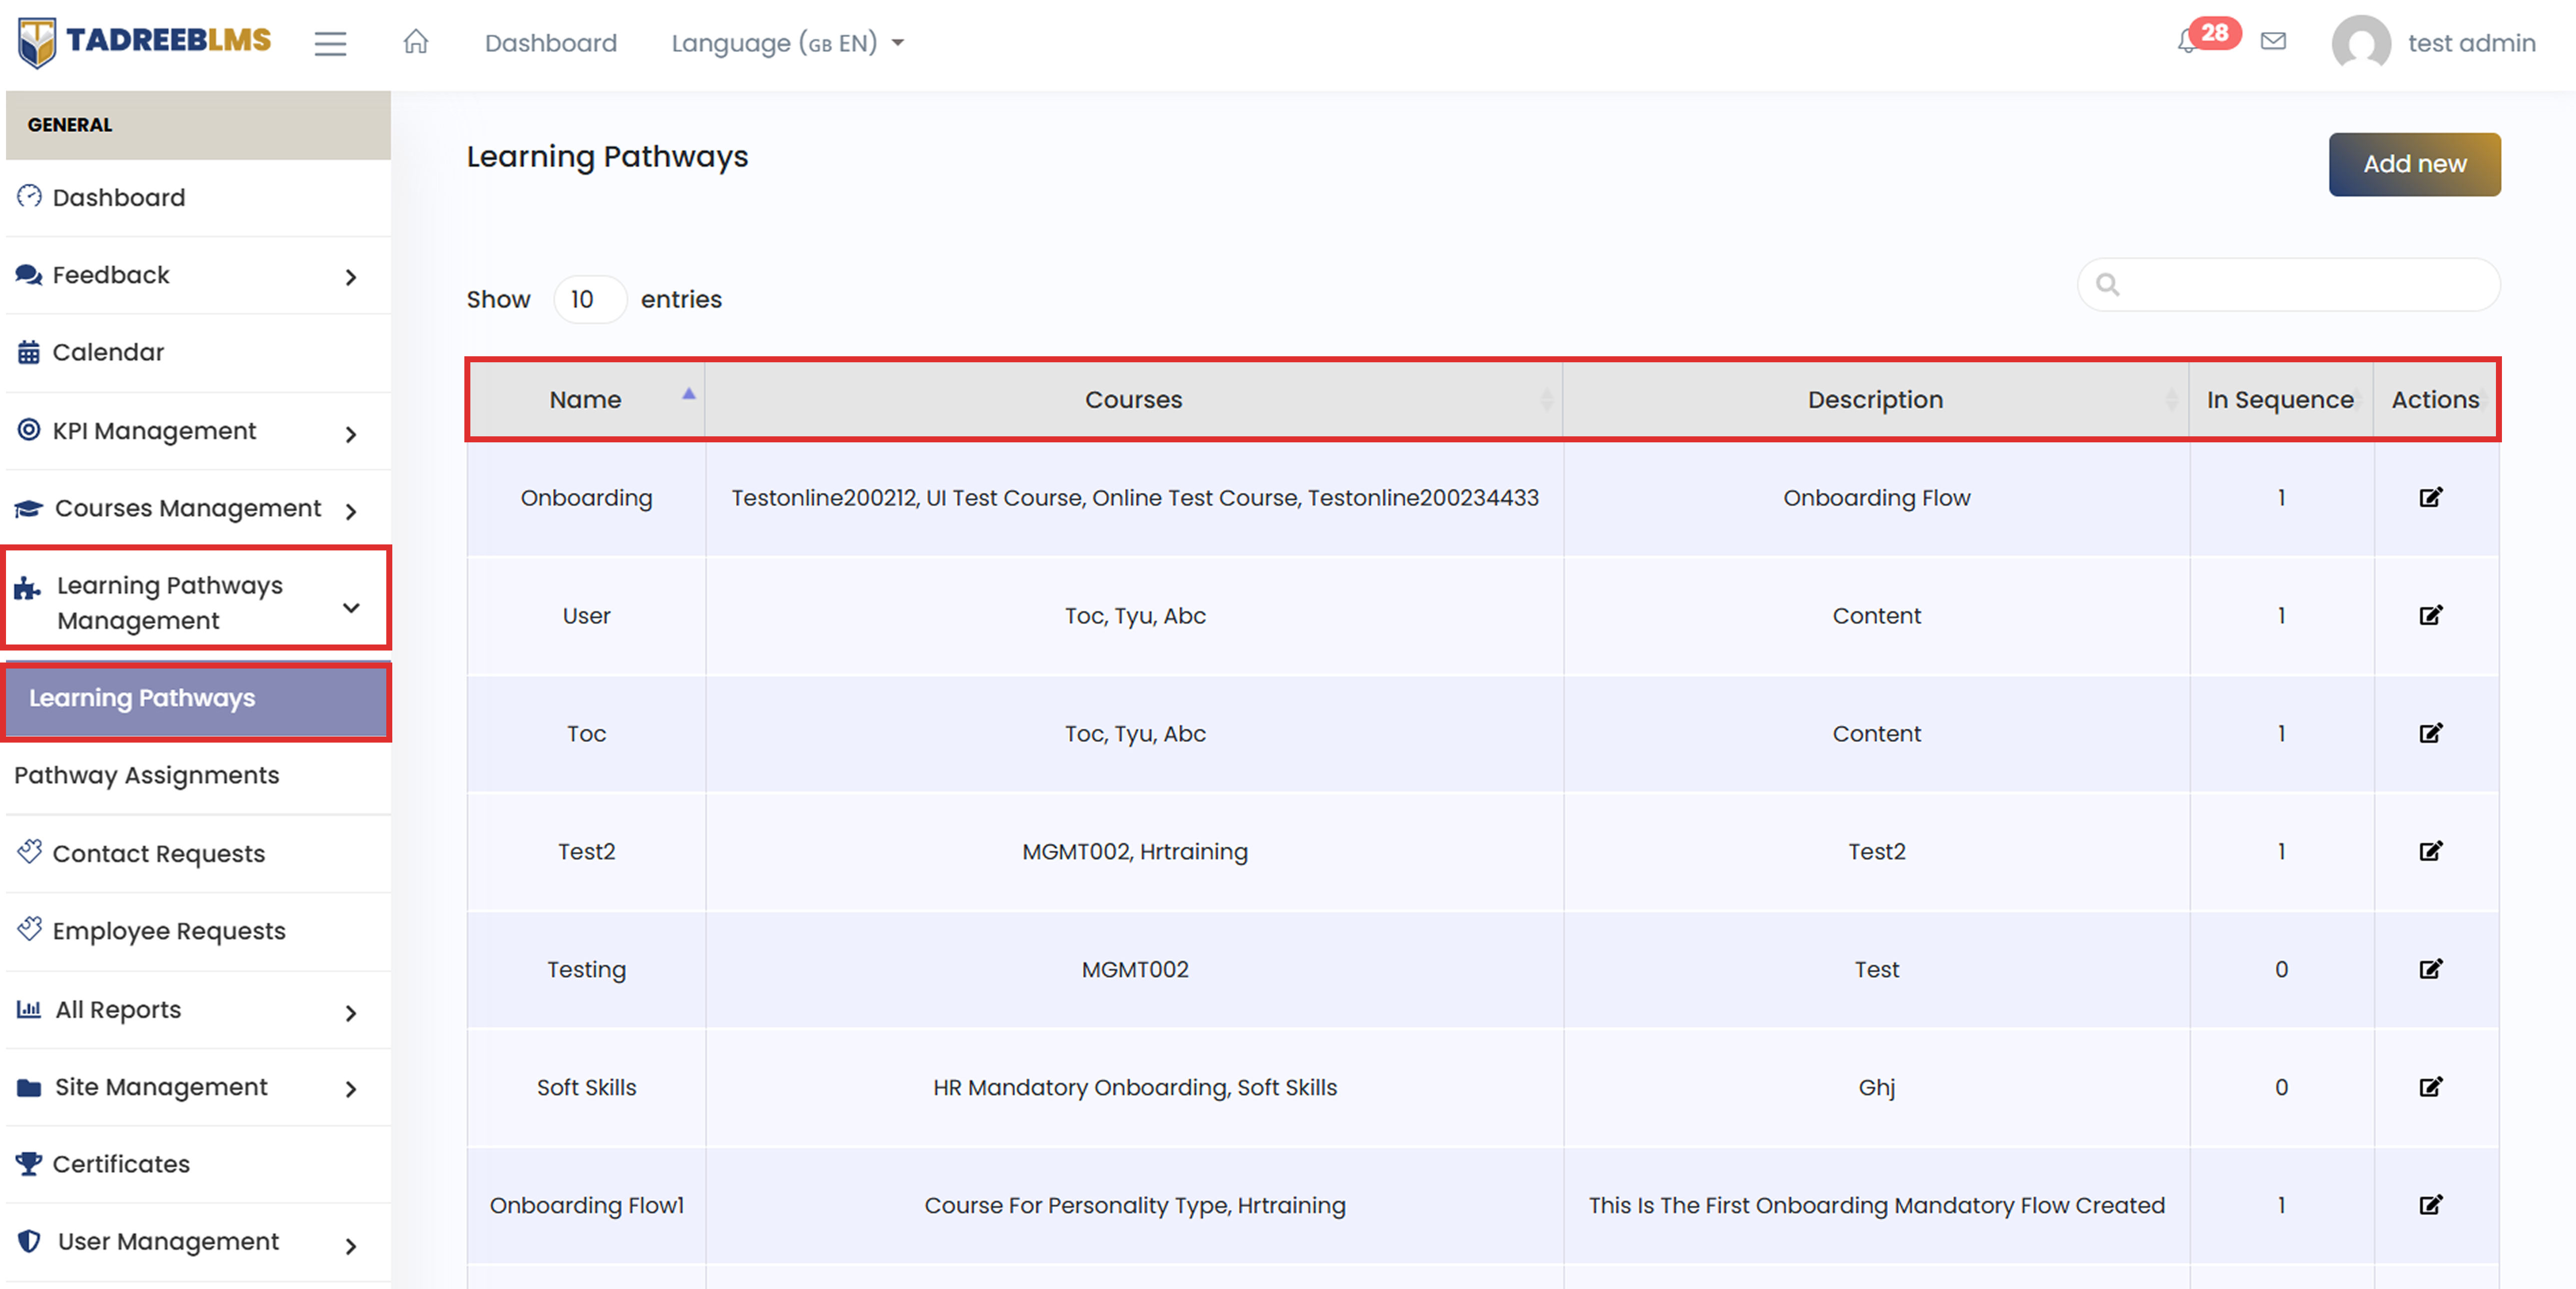
The table below describes the column information:
| Column | Description |
|---|---|
| Name | The pathway name. Choose a name that clearly reflects the courses it contains (for example, Onboarding). |
| Courses | The courses included in the pathway |
| Description | A summary of the pathway's purpose |
| In Sequence | Determines the course order. 1 = learners must complete courses in sequence. 0 = learners can take courses in any order. |
| Actions | Select the Edit icon to modify the pathway name, courses, description, or sequence settings. |
6.1.1 Add New Learning Pathway
Create a new pathway by selecting courses and setting them in the order learners should follow.
To add a new learning pathway:
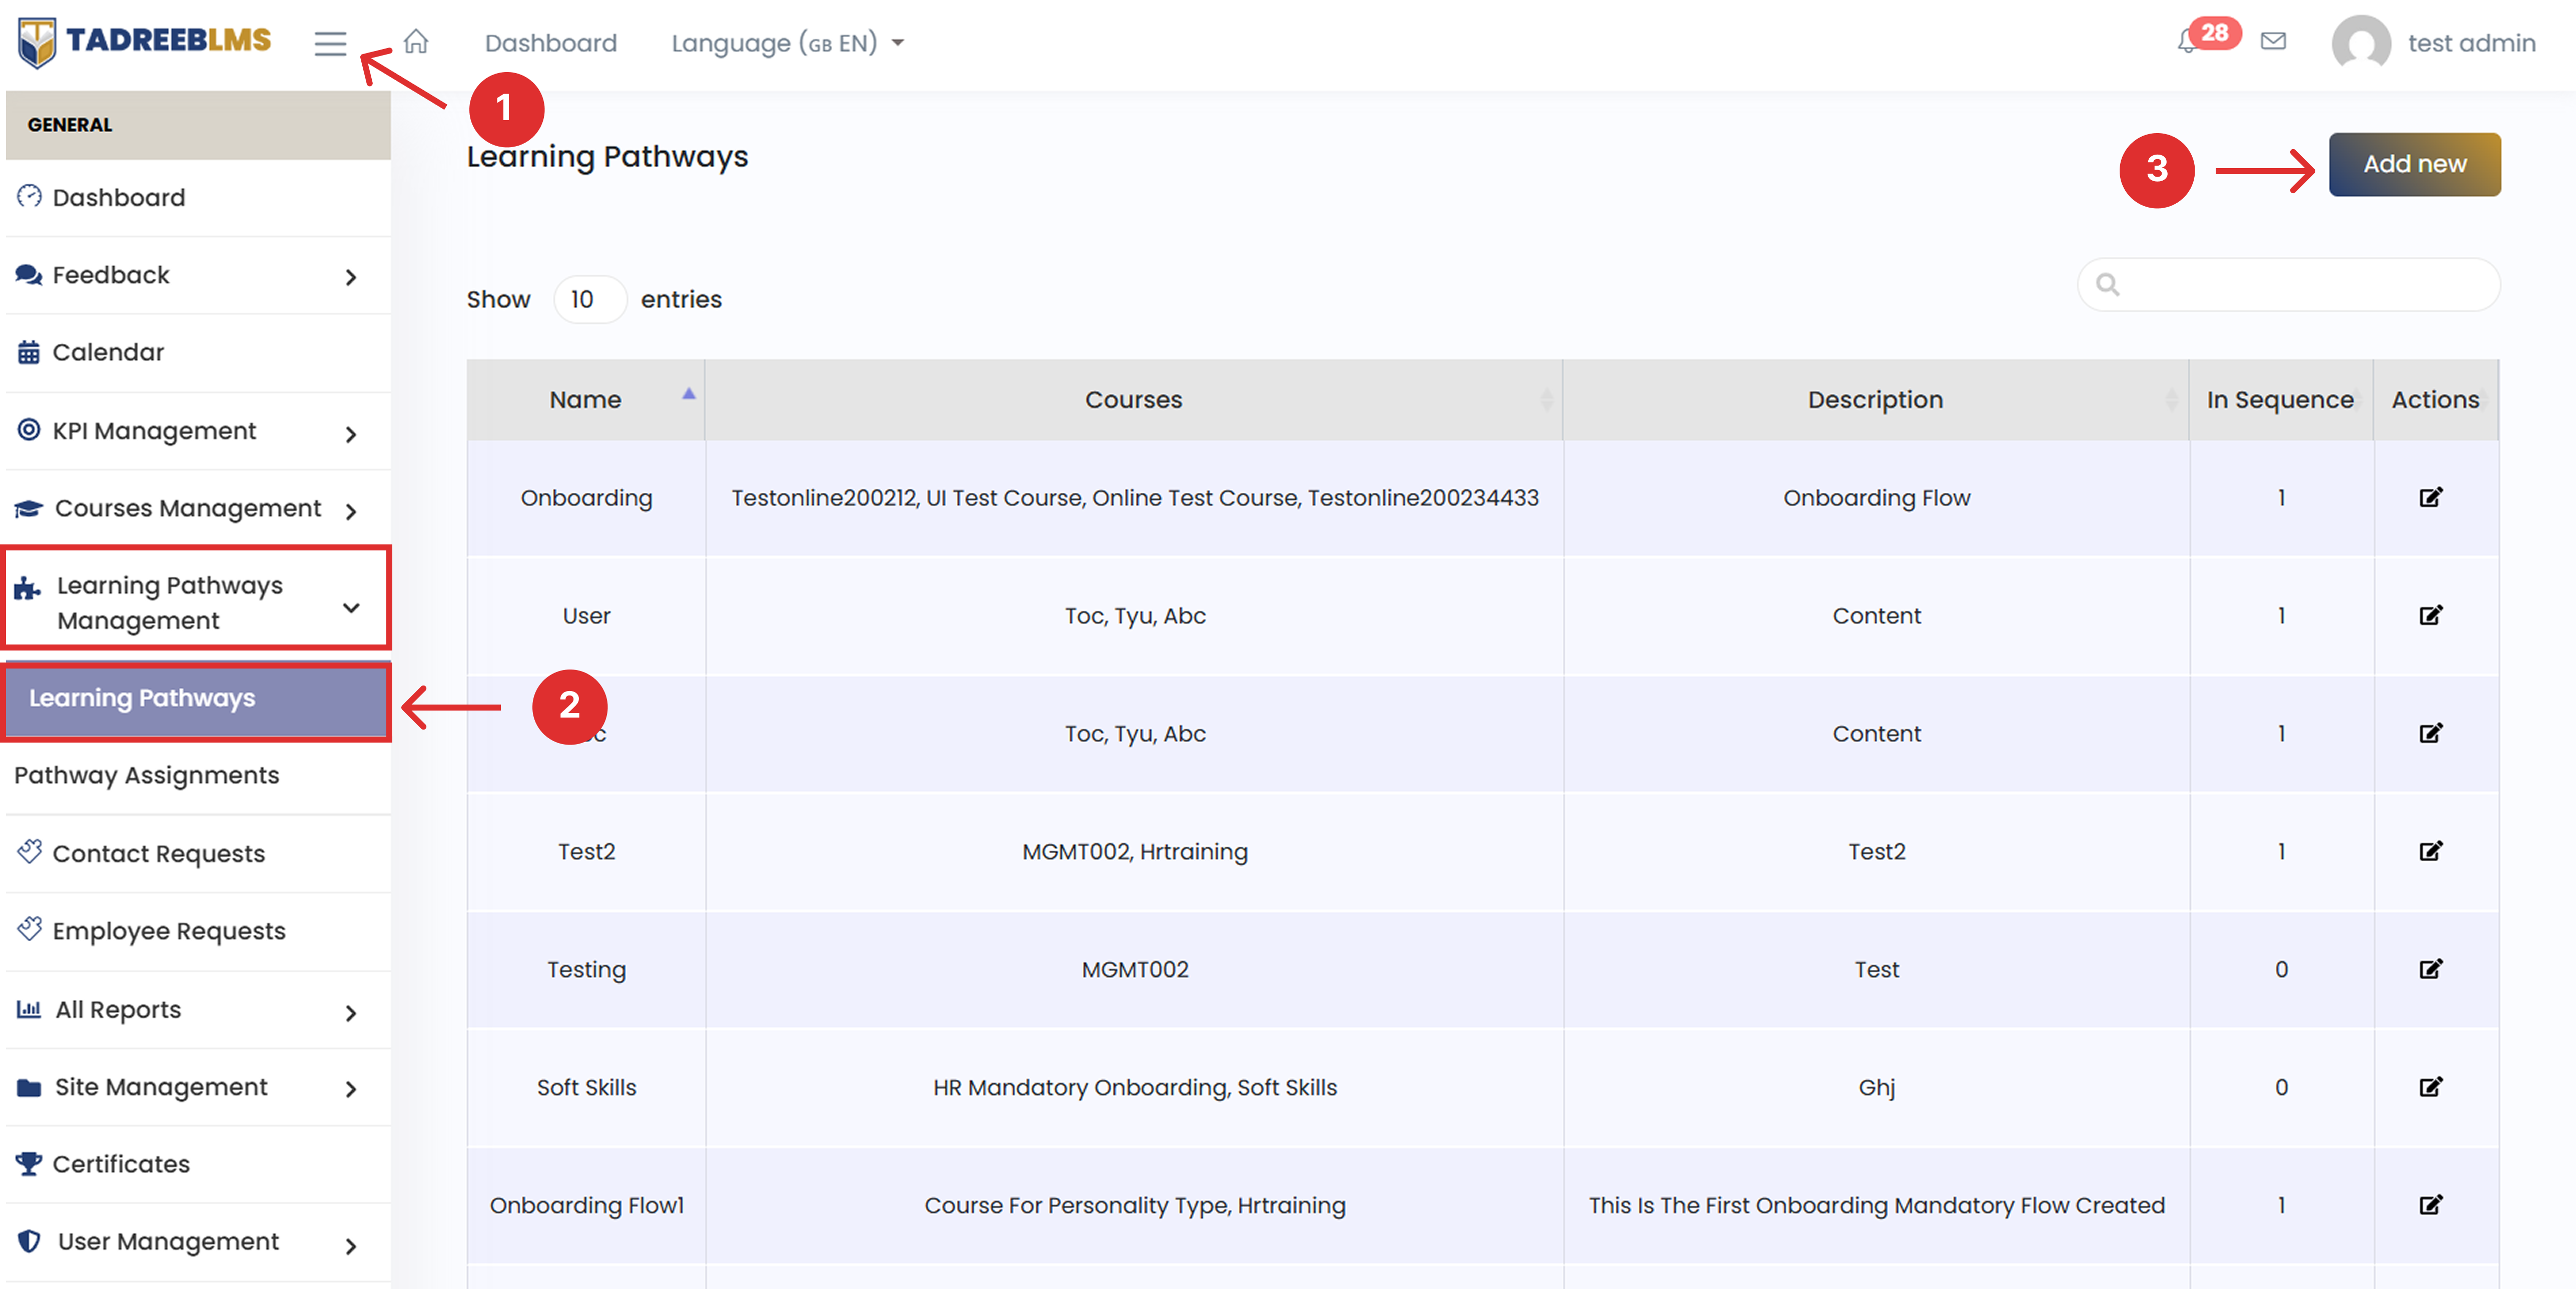
- Click the menu icon (☰) at the top left to open the sidebar menu.
- In the sidebar menu, go to Learning Pathways Management > Learning Pathways.
- Click the Add New button at the top-right corner of the page.
- Enter a Title for the pathway. Choose a name that clearly reflects the courses it contains (for example, Effective Communication).
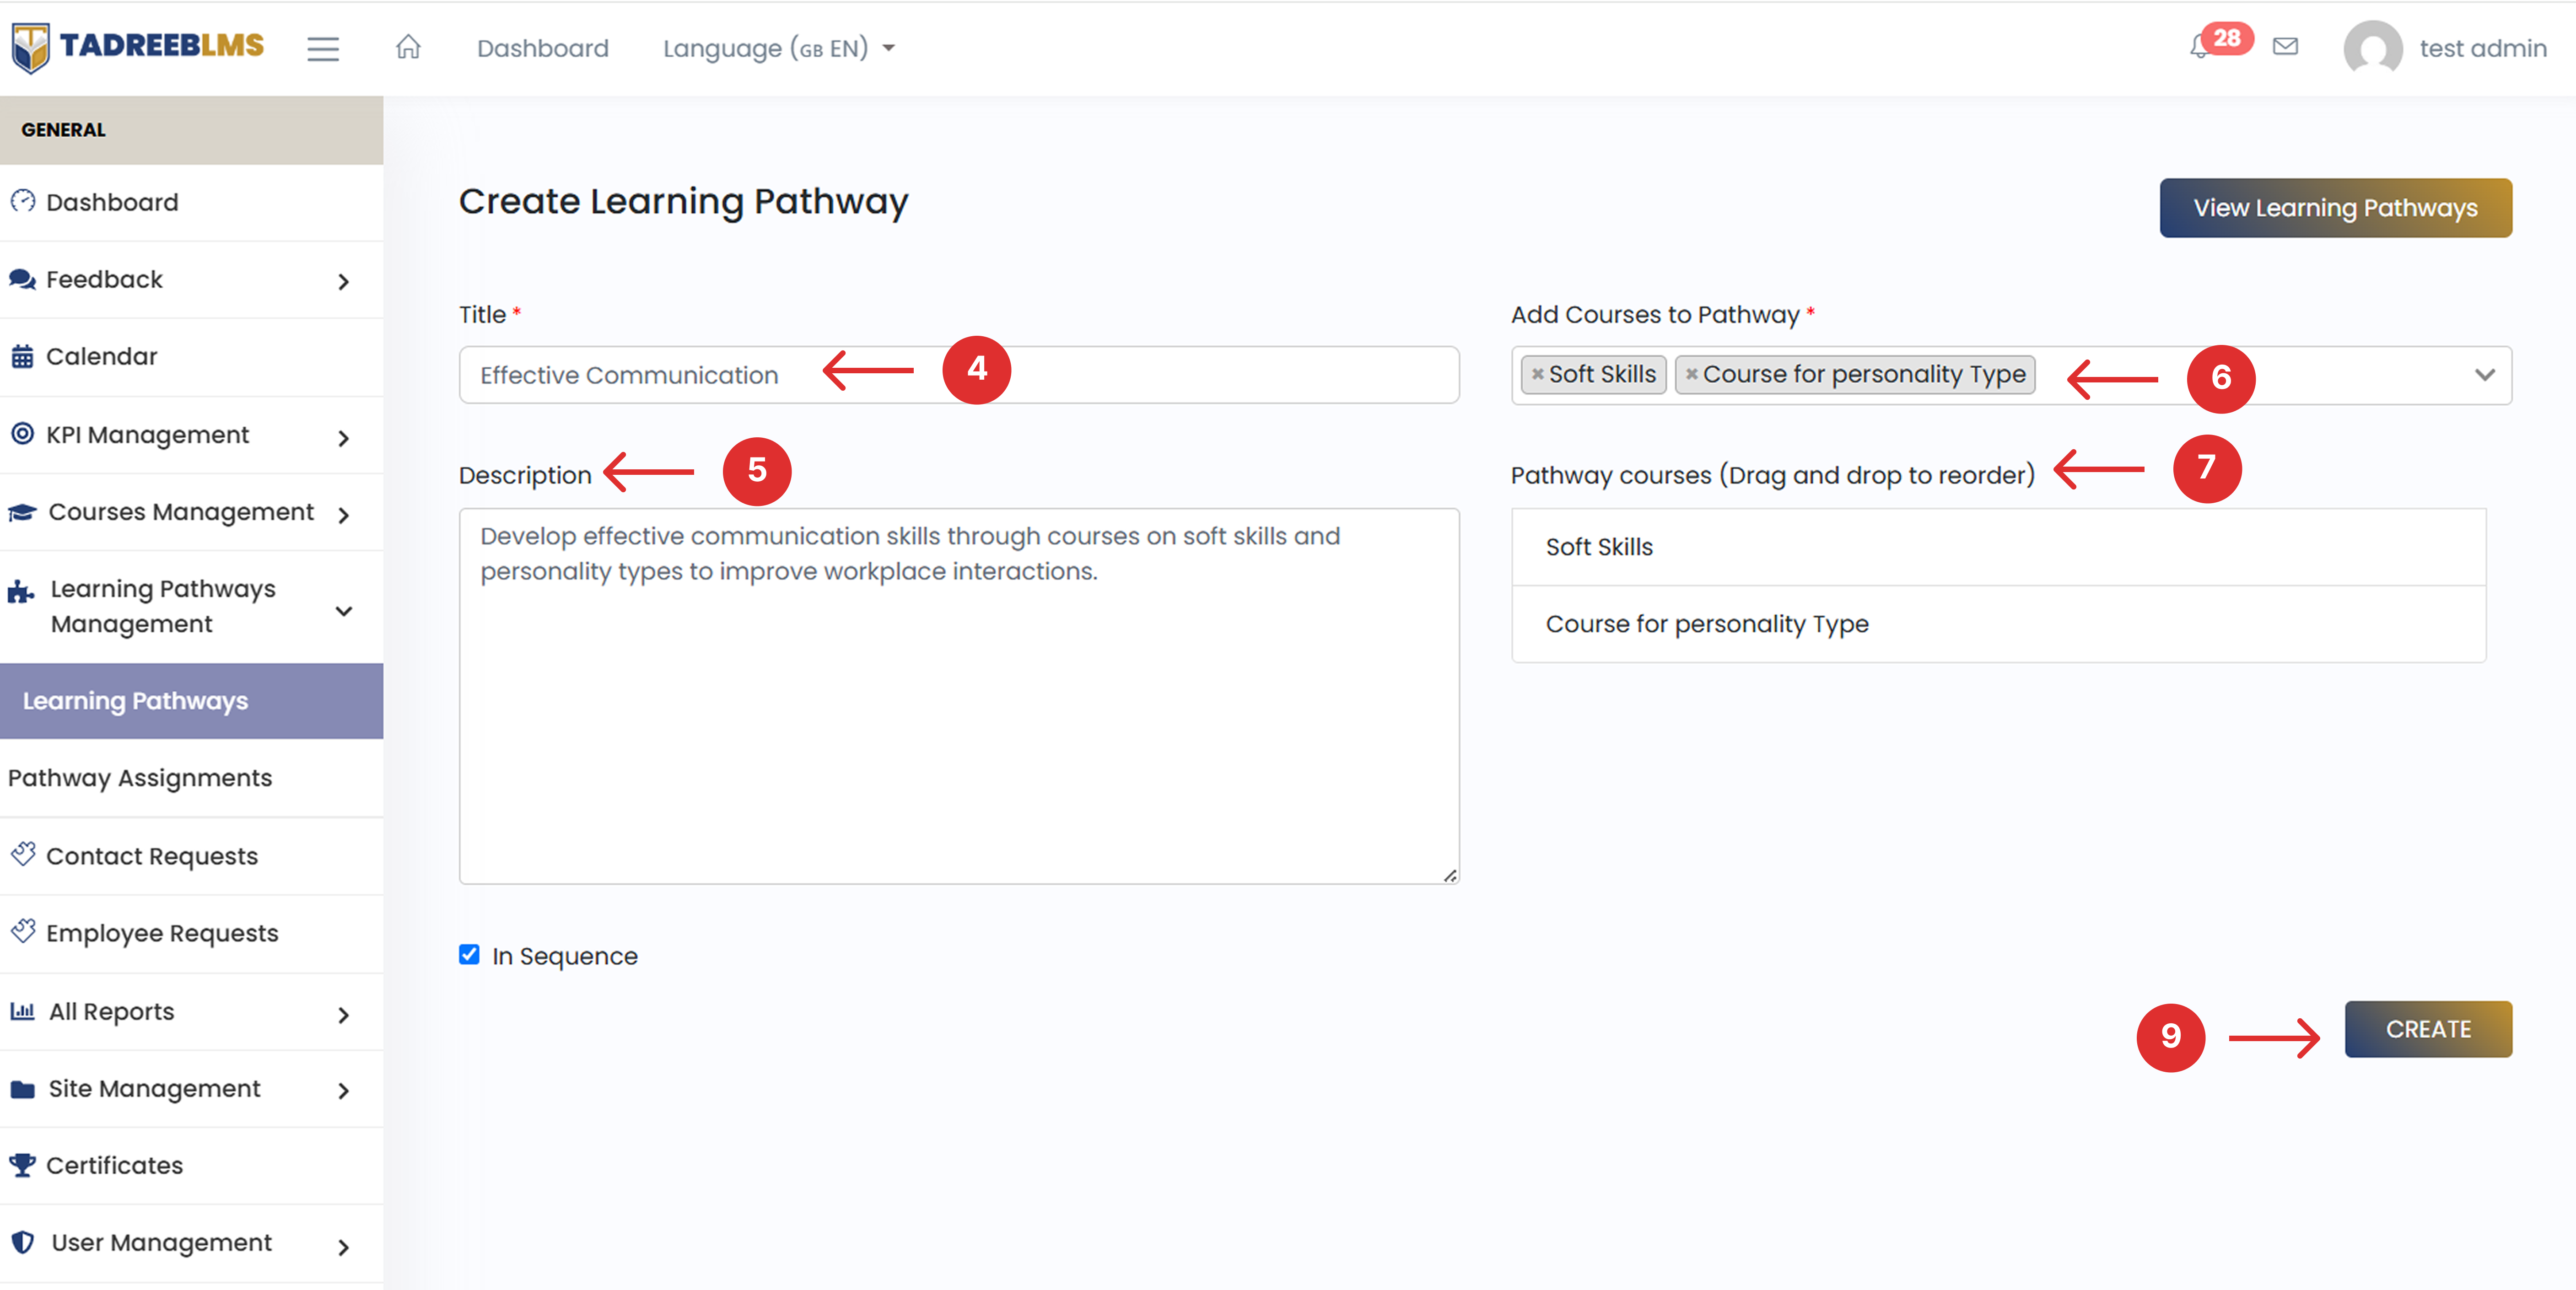
- Enter a Description explaining the purpose of the pathway.
- Under Add Courses to Pathway, select the courses you want to include from the dropdown. The selected courses appear in the Pathway Courses list.
- Drag and drop the courses in the Pathway Courses list to arrange them in the order learners should complete them.
- Select In Sequence if learners must complete the courses in the specified order. Leave it unchecked to allow learners to take the courses in any order.
- Click Create to save the pathway.
📌 Note: Arrange the courses before selecting In Sequence. Once it is selected, the course order is locked and cannot be changed by dragging and dropping.
6.2 Pathway Assignments
Creating a pathway is just the first step. As an admin, you also need to assign it to learners so they can access the courses. The Pathway Assignments page lets you assign pathways to trainees, view existing assignments, and quickly find which pathway is assigned to each trainee.
To view pathway assignments, go to Learning Pathways Management > Pathway Assignments from the sidebar.
- Use Select Employee By Email to view pathway assignments for a specific trainee.
- Use Select Course to view assignments that include a particular course.
- Click Advance Search to apply the selected filters and view the table with matching results.
- Click Reset to clear all filters and view the complete list of pathway assignments.
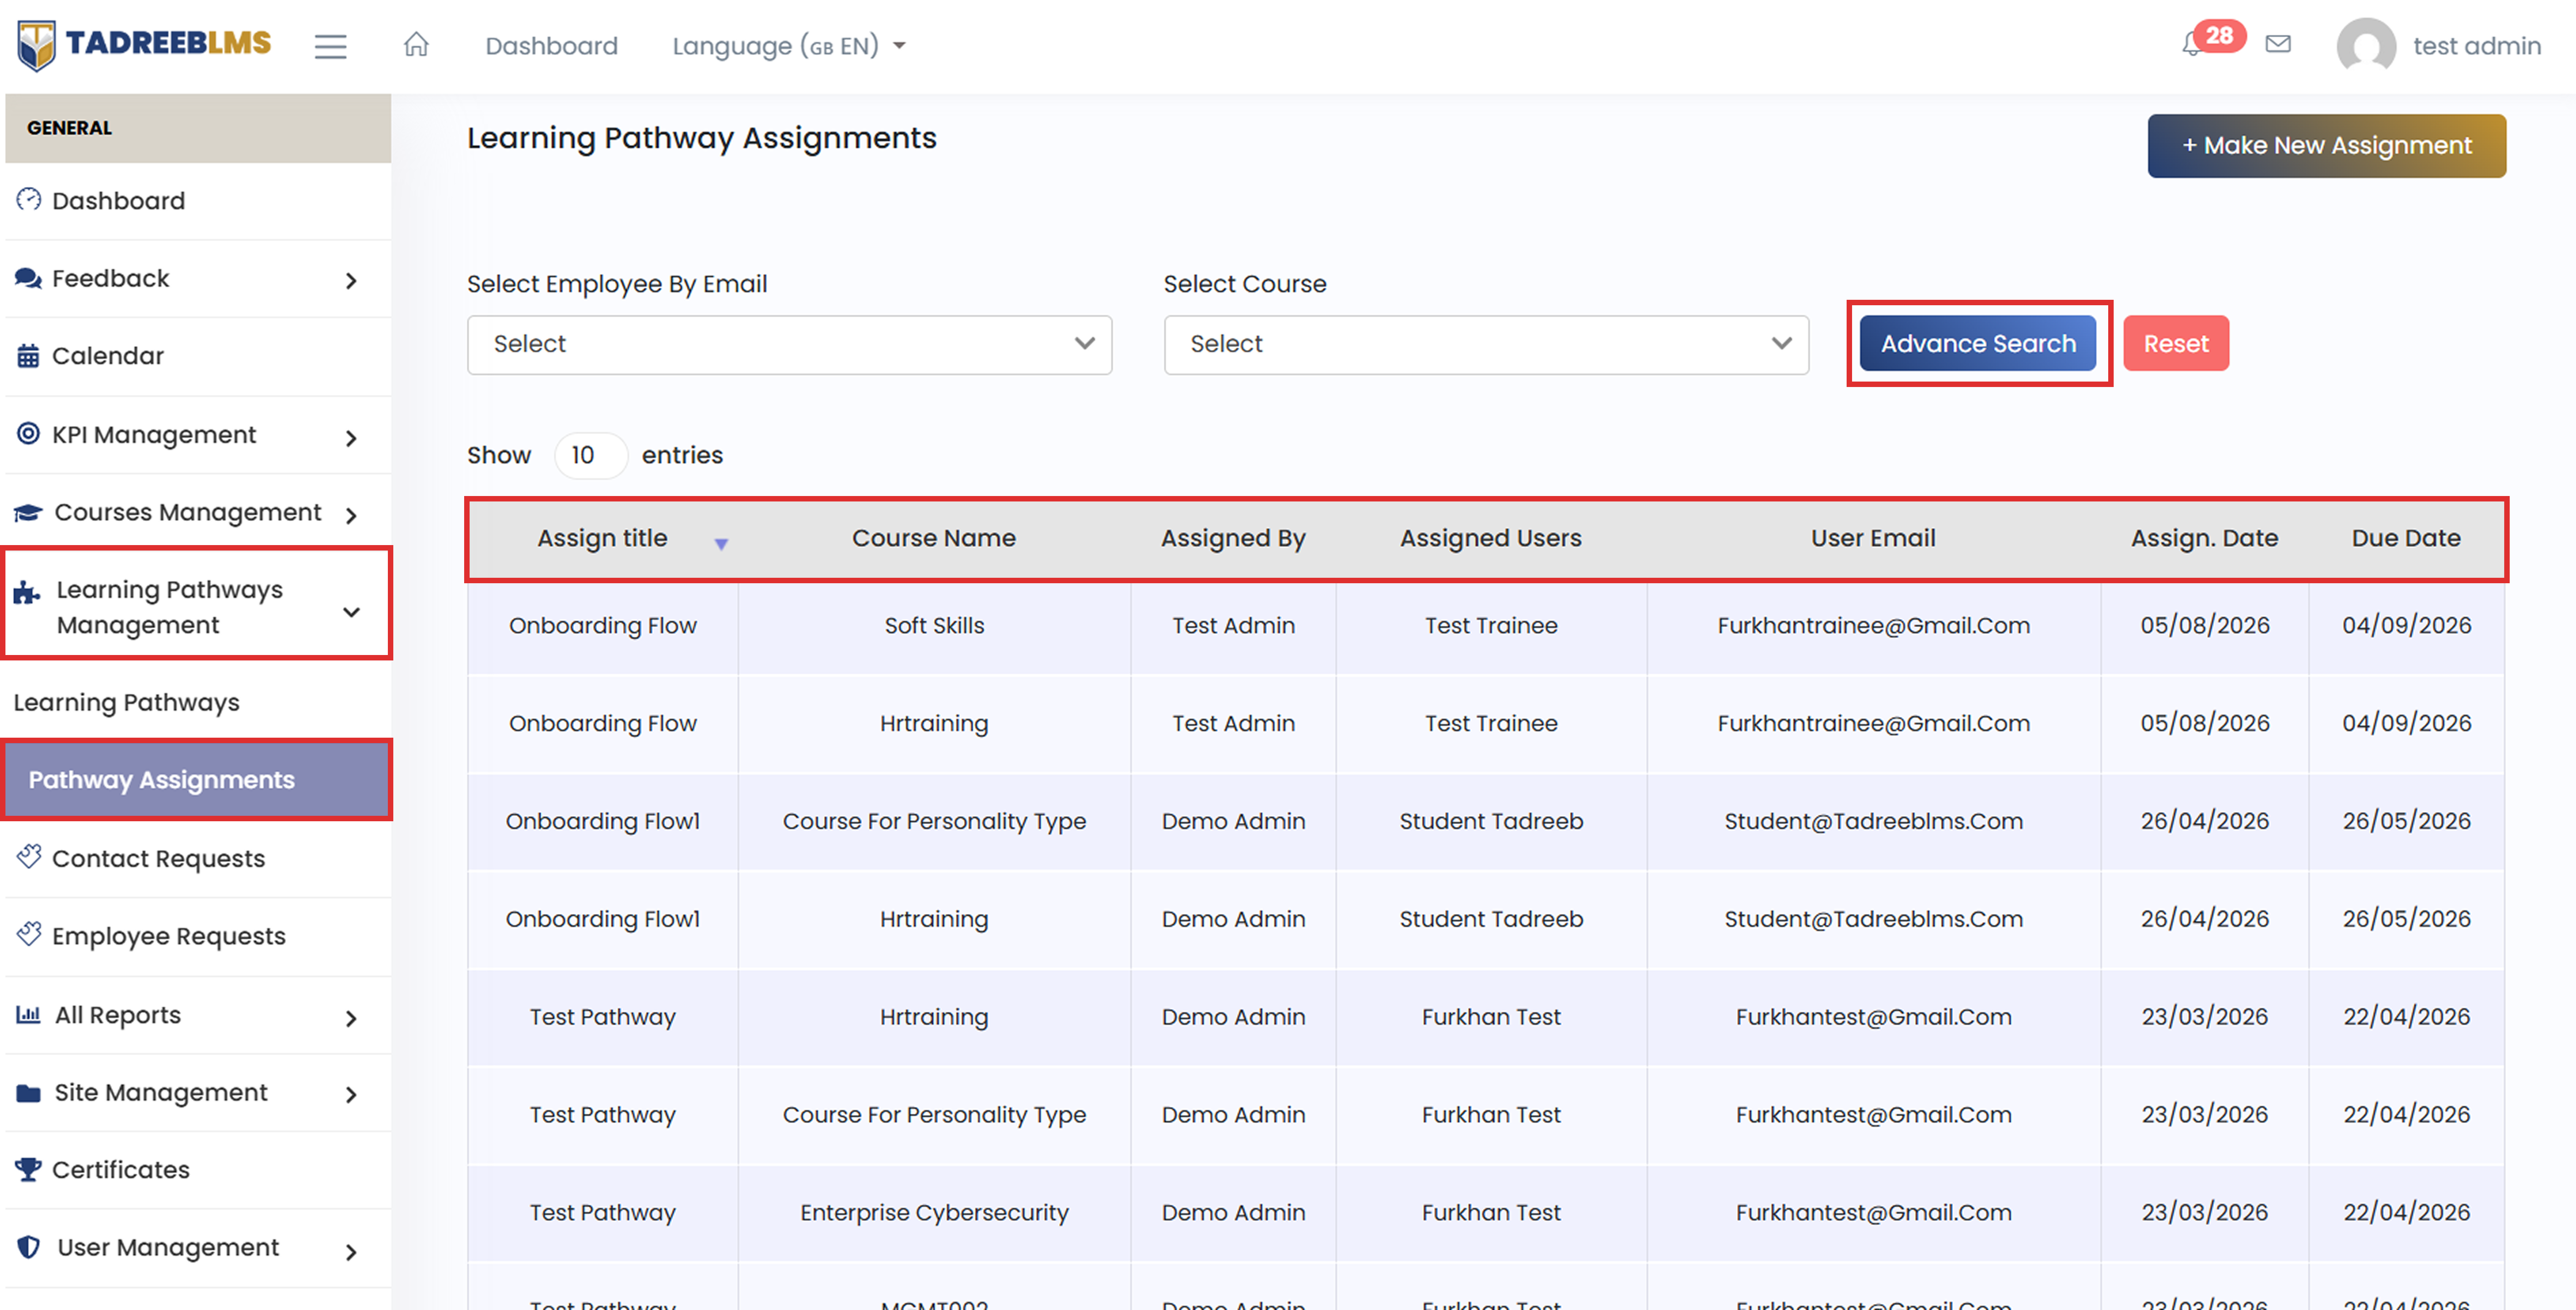
The table below describes the column information:
| Column | Description |
|---|---|
| Assign Title | The name of the assigned learning pathway |
| Course Name | A course included in the assigned pathway |
| Assigned By | The admin who assigned the pathway |
| Assigned Users | The learner who received the pathway |
| User Email | The learner's email address |
| Assign. Date | The date the pathway was assigned |
| Due Date | The deadline to complete the pathway |
6.2.1 Add New Pathway Assignment
Assign a learning pathway to the required trainees. Once assigned, learners can access and begin completing the courses included in the pathway.
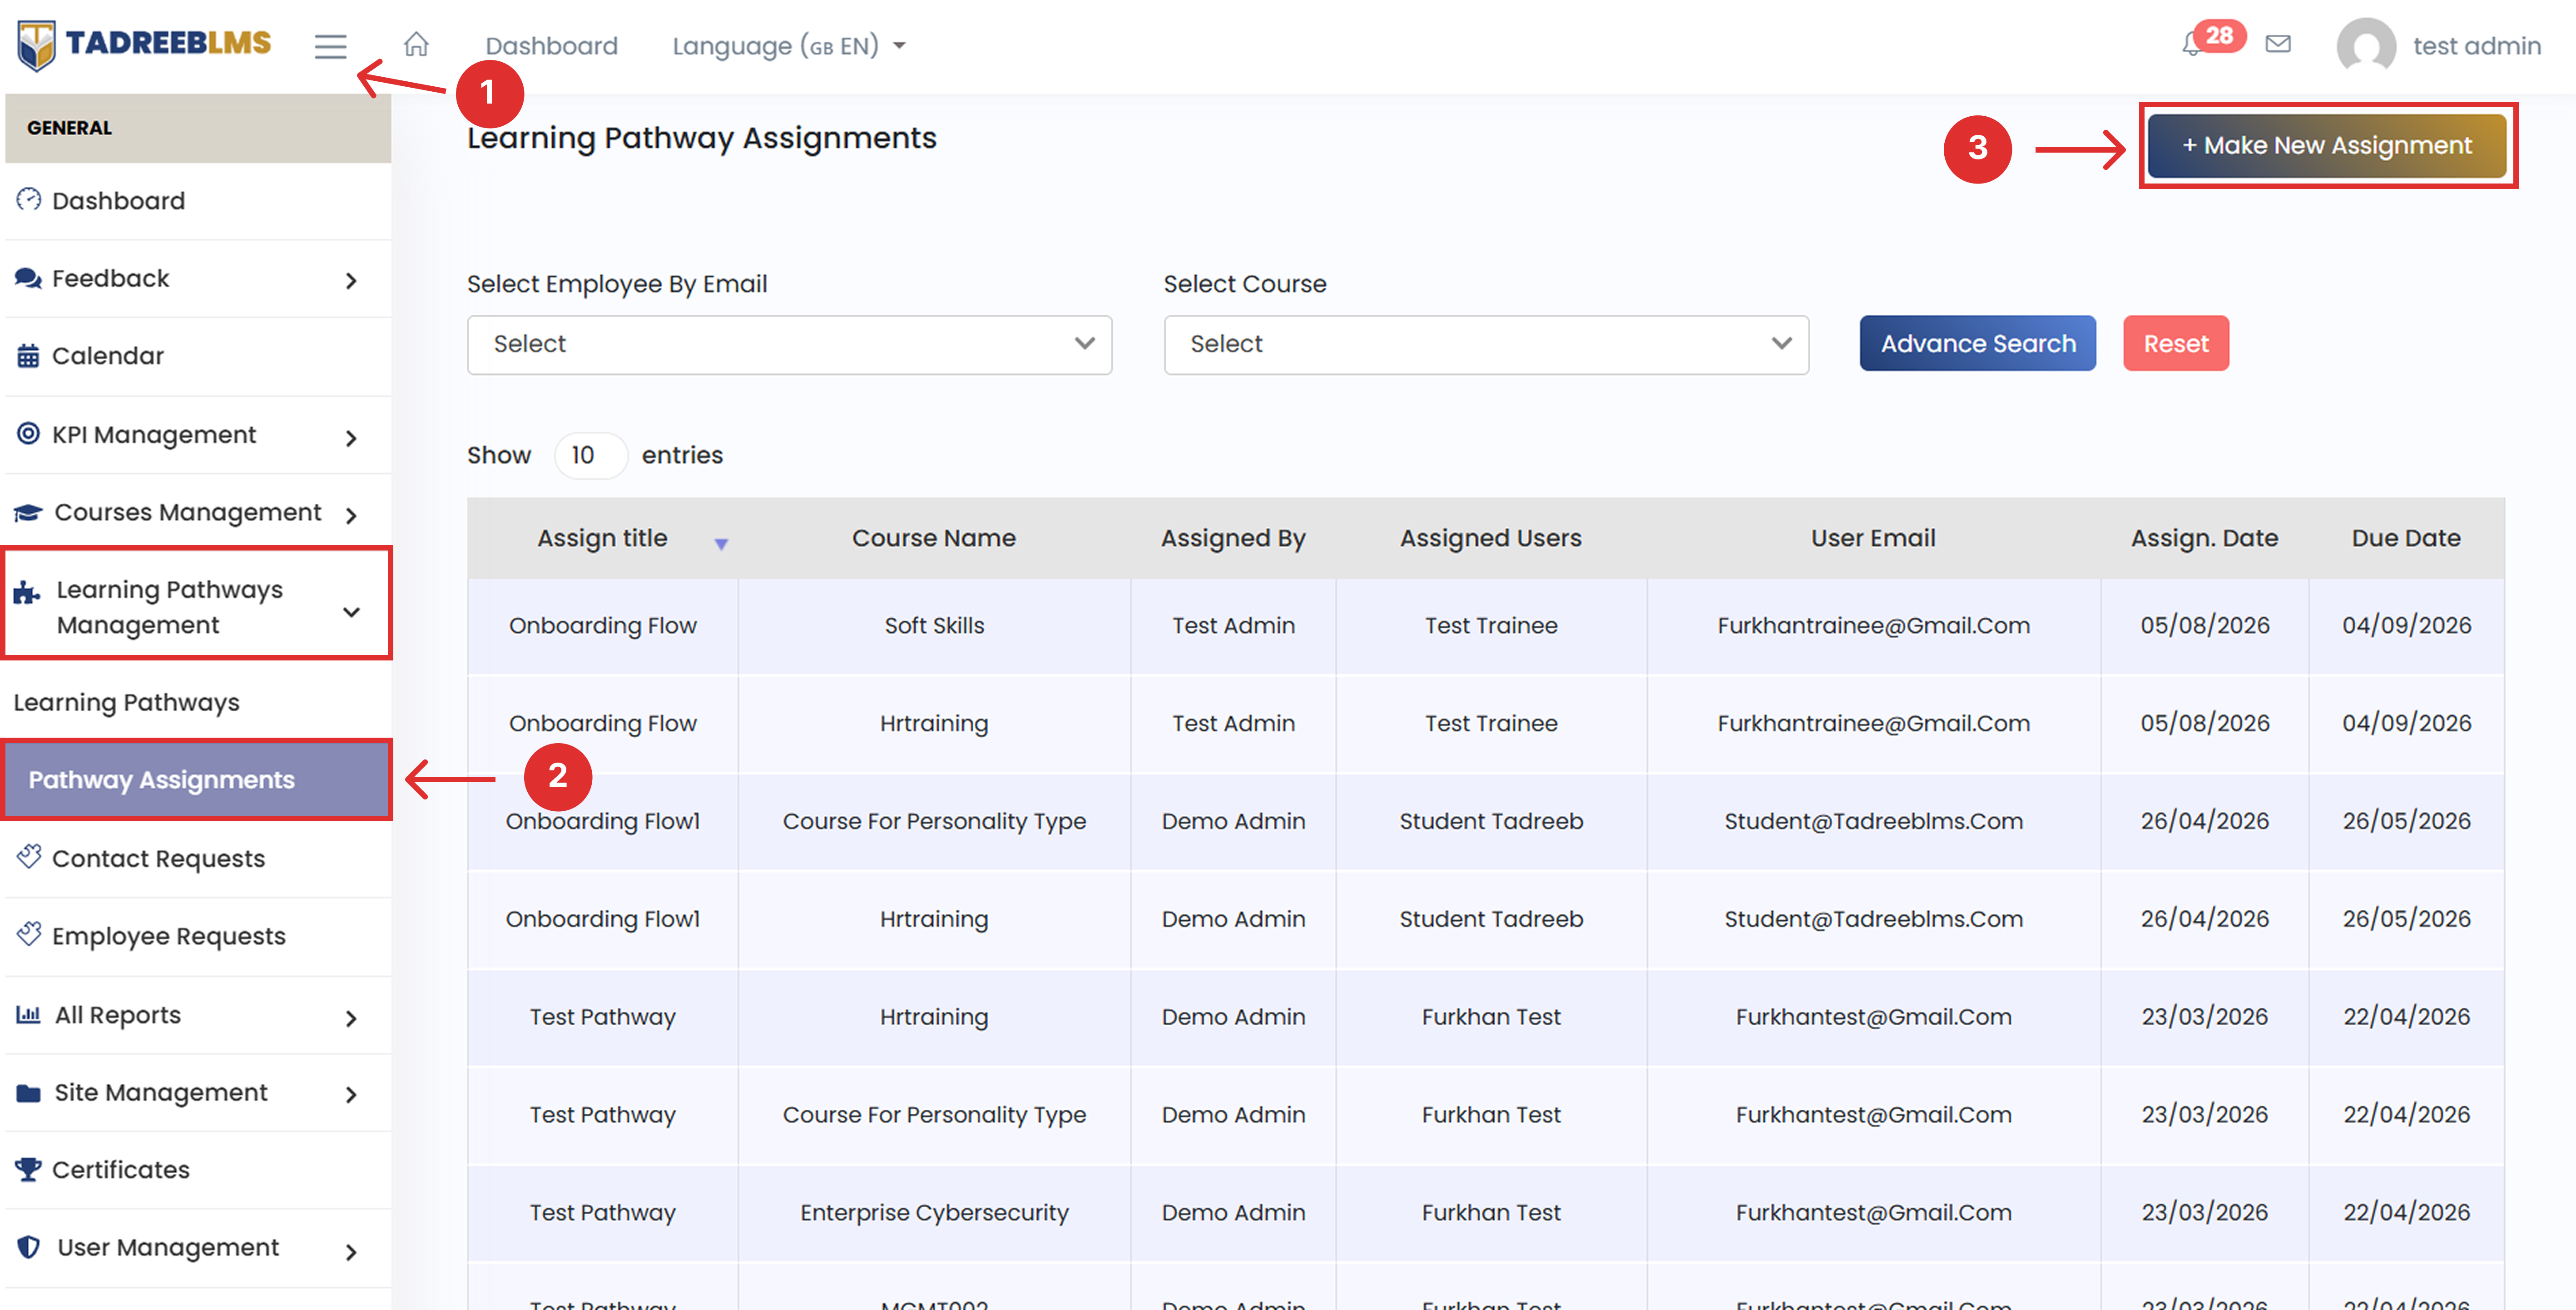
To add a new pathway assignment:
- Click the menu icon (☰) at the top left to open the sidebar menu.
- In the sidebar menu, go to Learning Pathways Management > Pathway Assignments.
- Click the + Make New Assignment button at the top-right corner of the page.
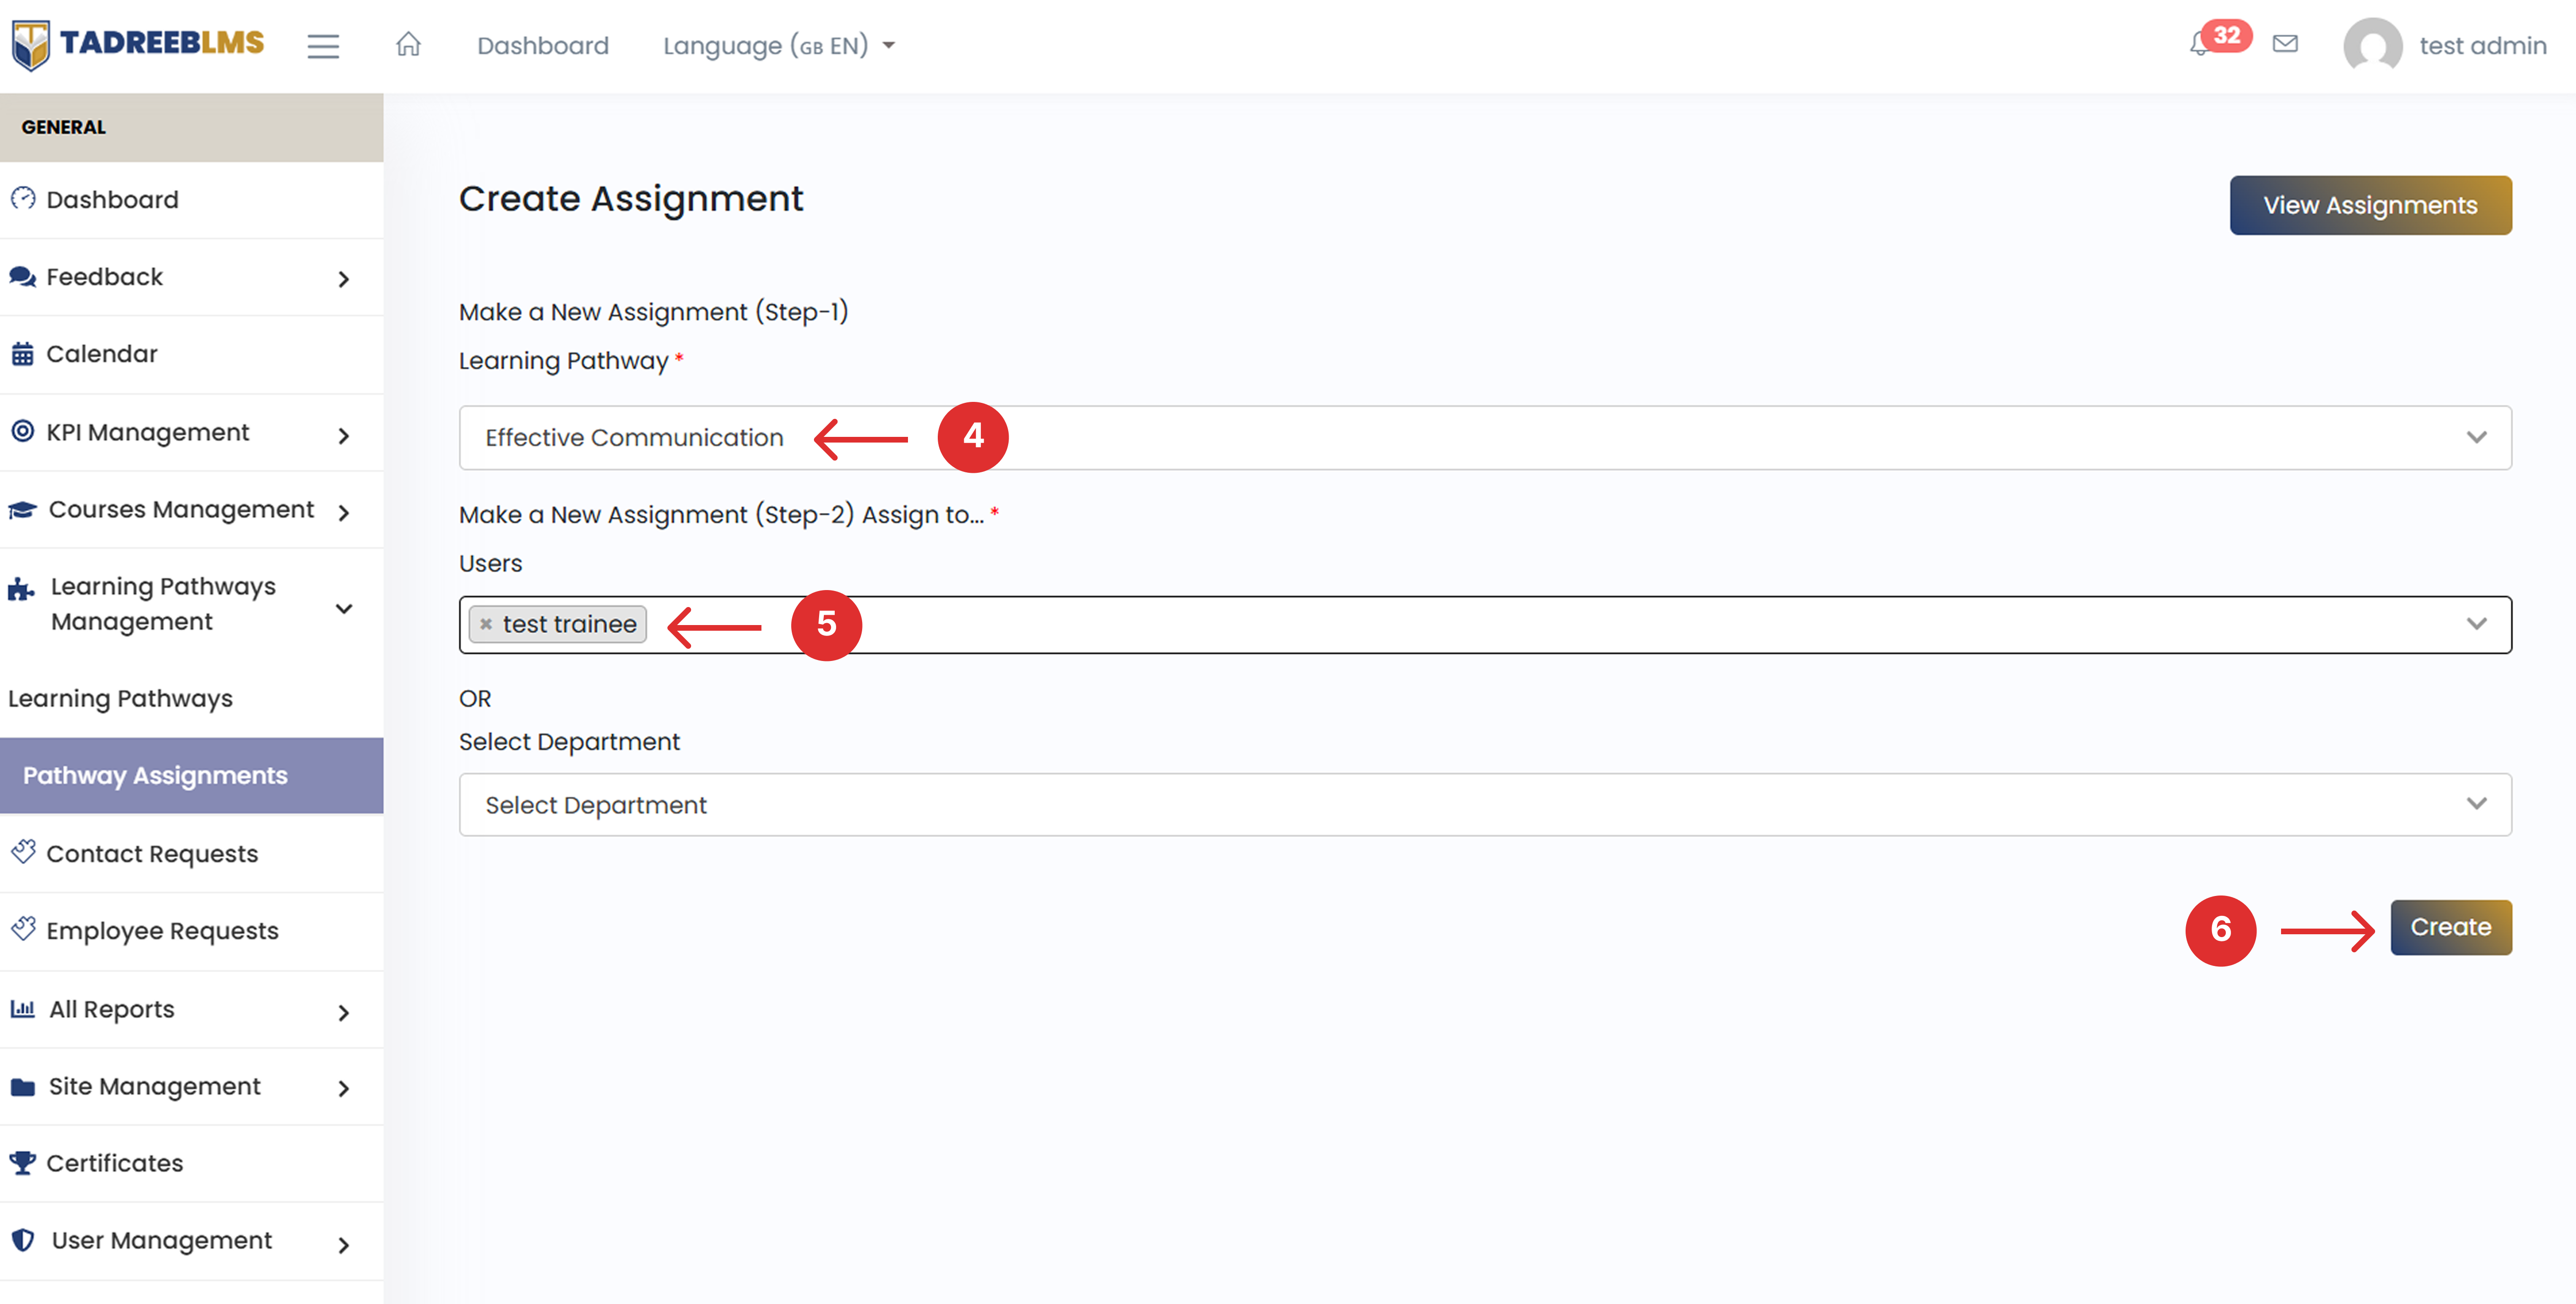
- Under Make a New Assignment (Step-1), select the pathway you want to assign from the Learning Pathway dropdown.
- Under Make a New Assignment (Step-2) Assign to..., select the trainees you want to assign it to from the Users dropdown. You can assign more than one trainee. Alternatively, you can also select User Group.
- Click Create to save the assignment.
📌 Note: Click View Assignments to view all pathway assignments and their assigned trainees.
7. Contact Requests
The Contact Request section displays inbound inquiries submitted through the platform contact form.
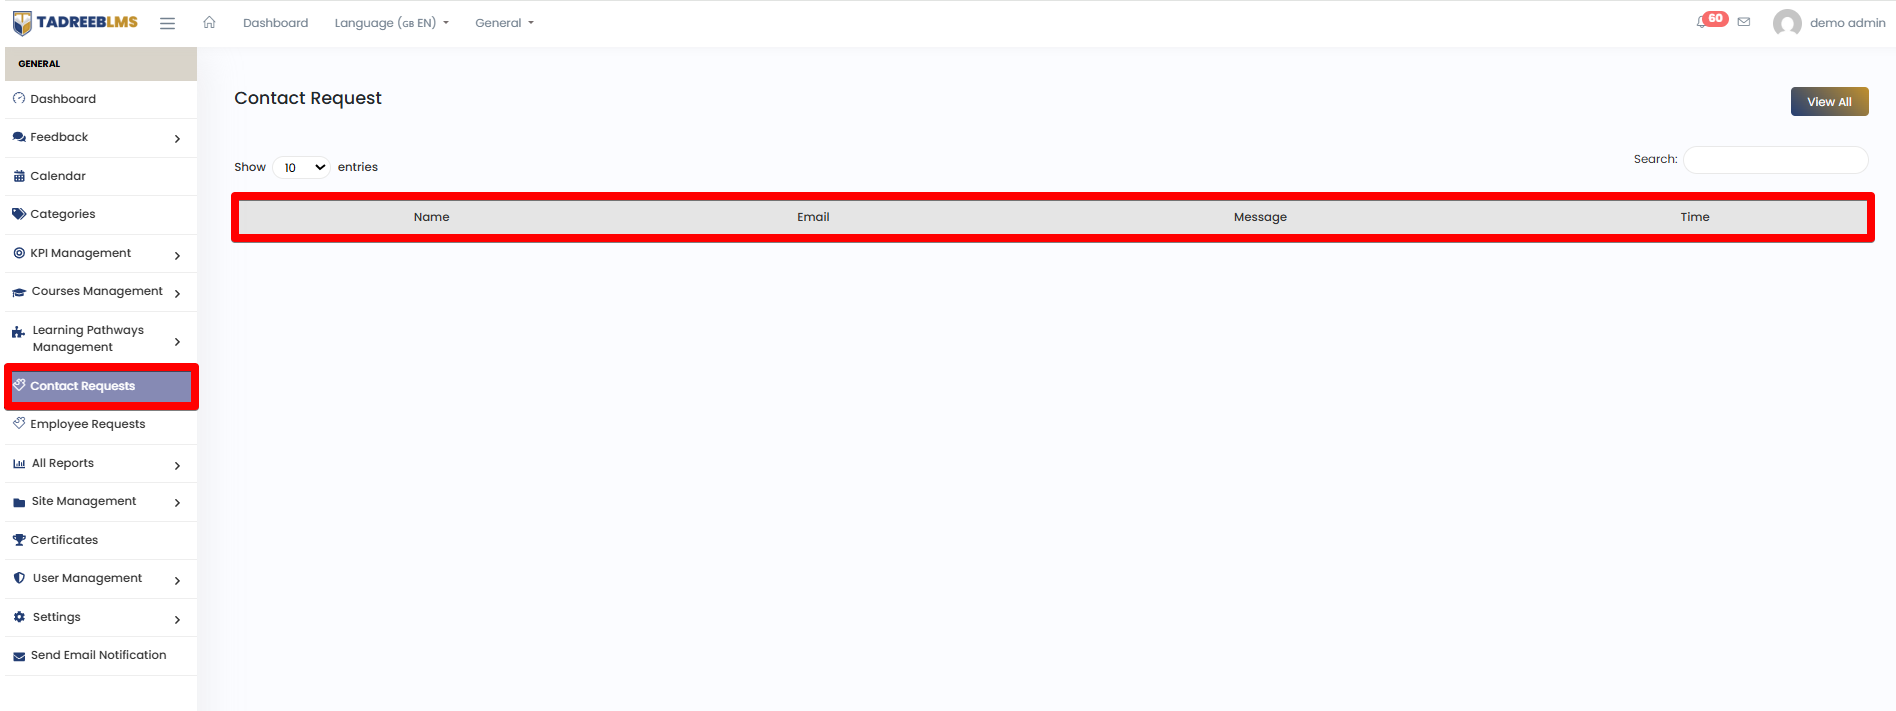
Table Headings
| Heading | Description |
|---|---|
| Name | Name of contact |
| Mail id of contact | |
| Message | Message send by the contact |
| Time | Message recived time |
8. Employees Request
The Employees Request section manages course enrollment requests submitted by employees.
Table Headings
| Heading | Description |
|---|---|
| trainee no | Auto-generated sequential request number |
| User Name | Name of the requesting employee |
| Employee's email address | |
| Course name | Course the employee has requrested |
| Position | Employee's job position |
| Status | Toogle to activate or deactivate the request |
| Created | Date the request was submitted |
| Actions | Delete option to remove the record |
9. All Reports
The All Reports module provides admins with a centralised view of all trainees registered on the platform. It also allows them to track their course completion activity. This section includes reports for trainee profiles, course completion and progress, assessment scores, and quiz status. These reports help admins monitor learner activity, identify gaps, and manage records efficiently. Admins can access all reports from the All Reports section in the sidebar.
9.1 Trainee Info
The Trainee Info report gives admins a complete, searchable list of all trainees registered on the platform. It shows important details such as their profile information and account status. Admins can use it to find trainee details, check account status, and manage records in bulk.
To view the Trainee info, go to All reports > Trainee info from the sidebar.
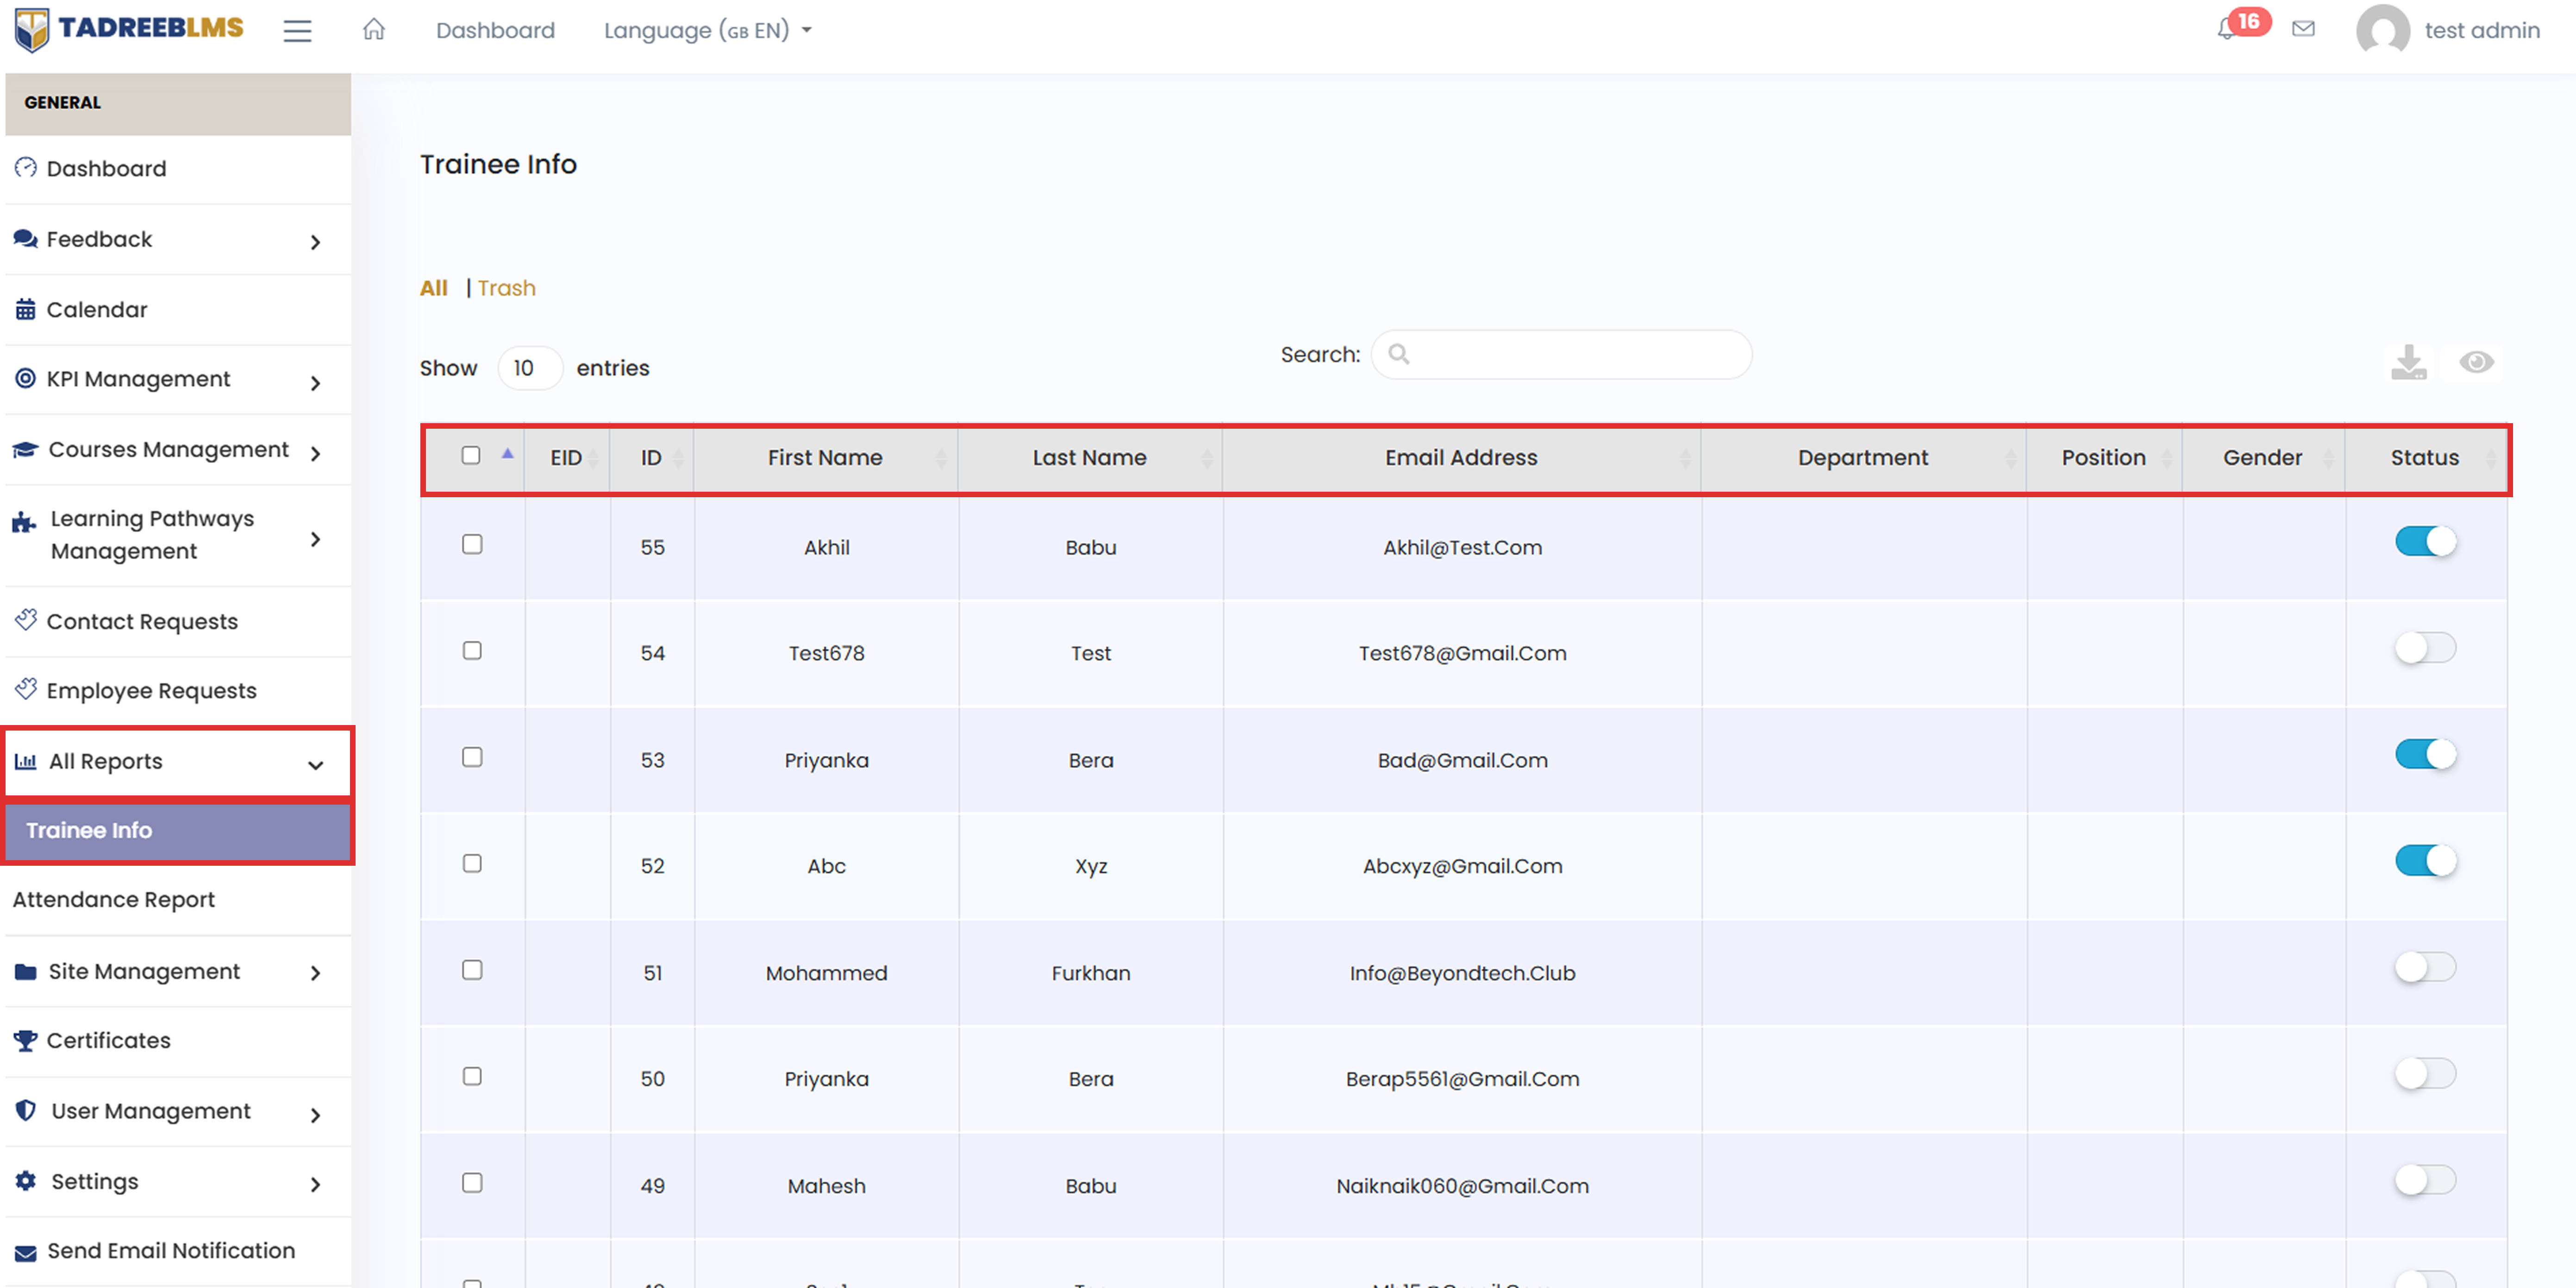
The table below describes the column information:
| Column | Description |
|---|---|
| Checkbox | Selects a trainee for bulk actions |
| EID | Employee ID, if assigned |
| ID | Unique ID for the trainee record |
| First Name | Trainee's first name |
| Last Name | Trainee's last name |
| Email Address | Trainee's registered email |
| Department | Trainee's department, if added |
| Position | Trainee's job position, if added |
| Gender | Trainee's gender, if added |
| Status | Shows whether the account is active (blue) or inactive (grey) |
Each column header includes a sort icon, letting you sort the table by that column in ascending or descending order.
💡 Tip: Use the Search box to quickly find a trainee by name, email, or any other visible field instead of scrolling through the full list.
📌 Note: Choose how many entries to display per page using the Show [ ] entries control. Download the table data using the download icon. Toggle column visibility using the eye icon.
9.2 Attendance Report
The Attendance Report gives admins a detailed, filterable view of how trainees are progressing through their assigned courses. It includes progress percentage, final assessment scores, quiz status, assignment dates and due dates. It's the go-to report for admins to track course completion.
To access the Attendance Report, go to All reports > Attendance Report from the sidebar.
Filters
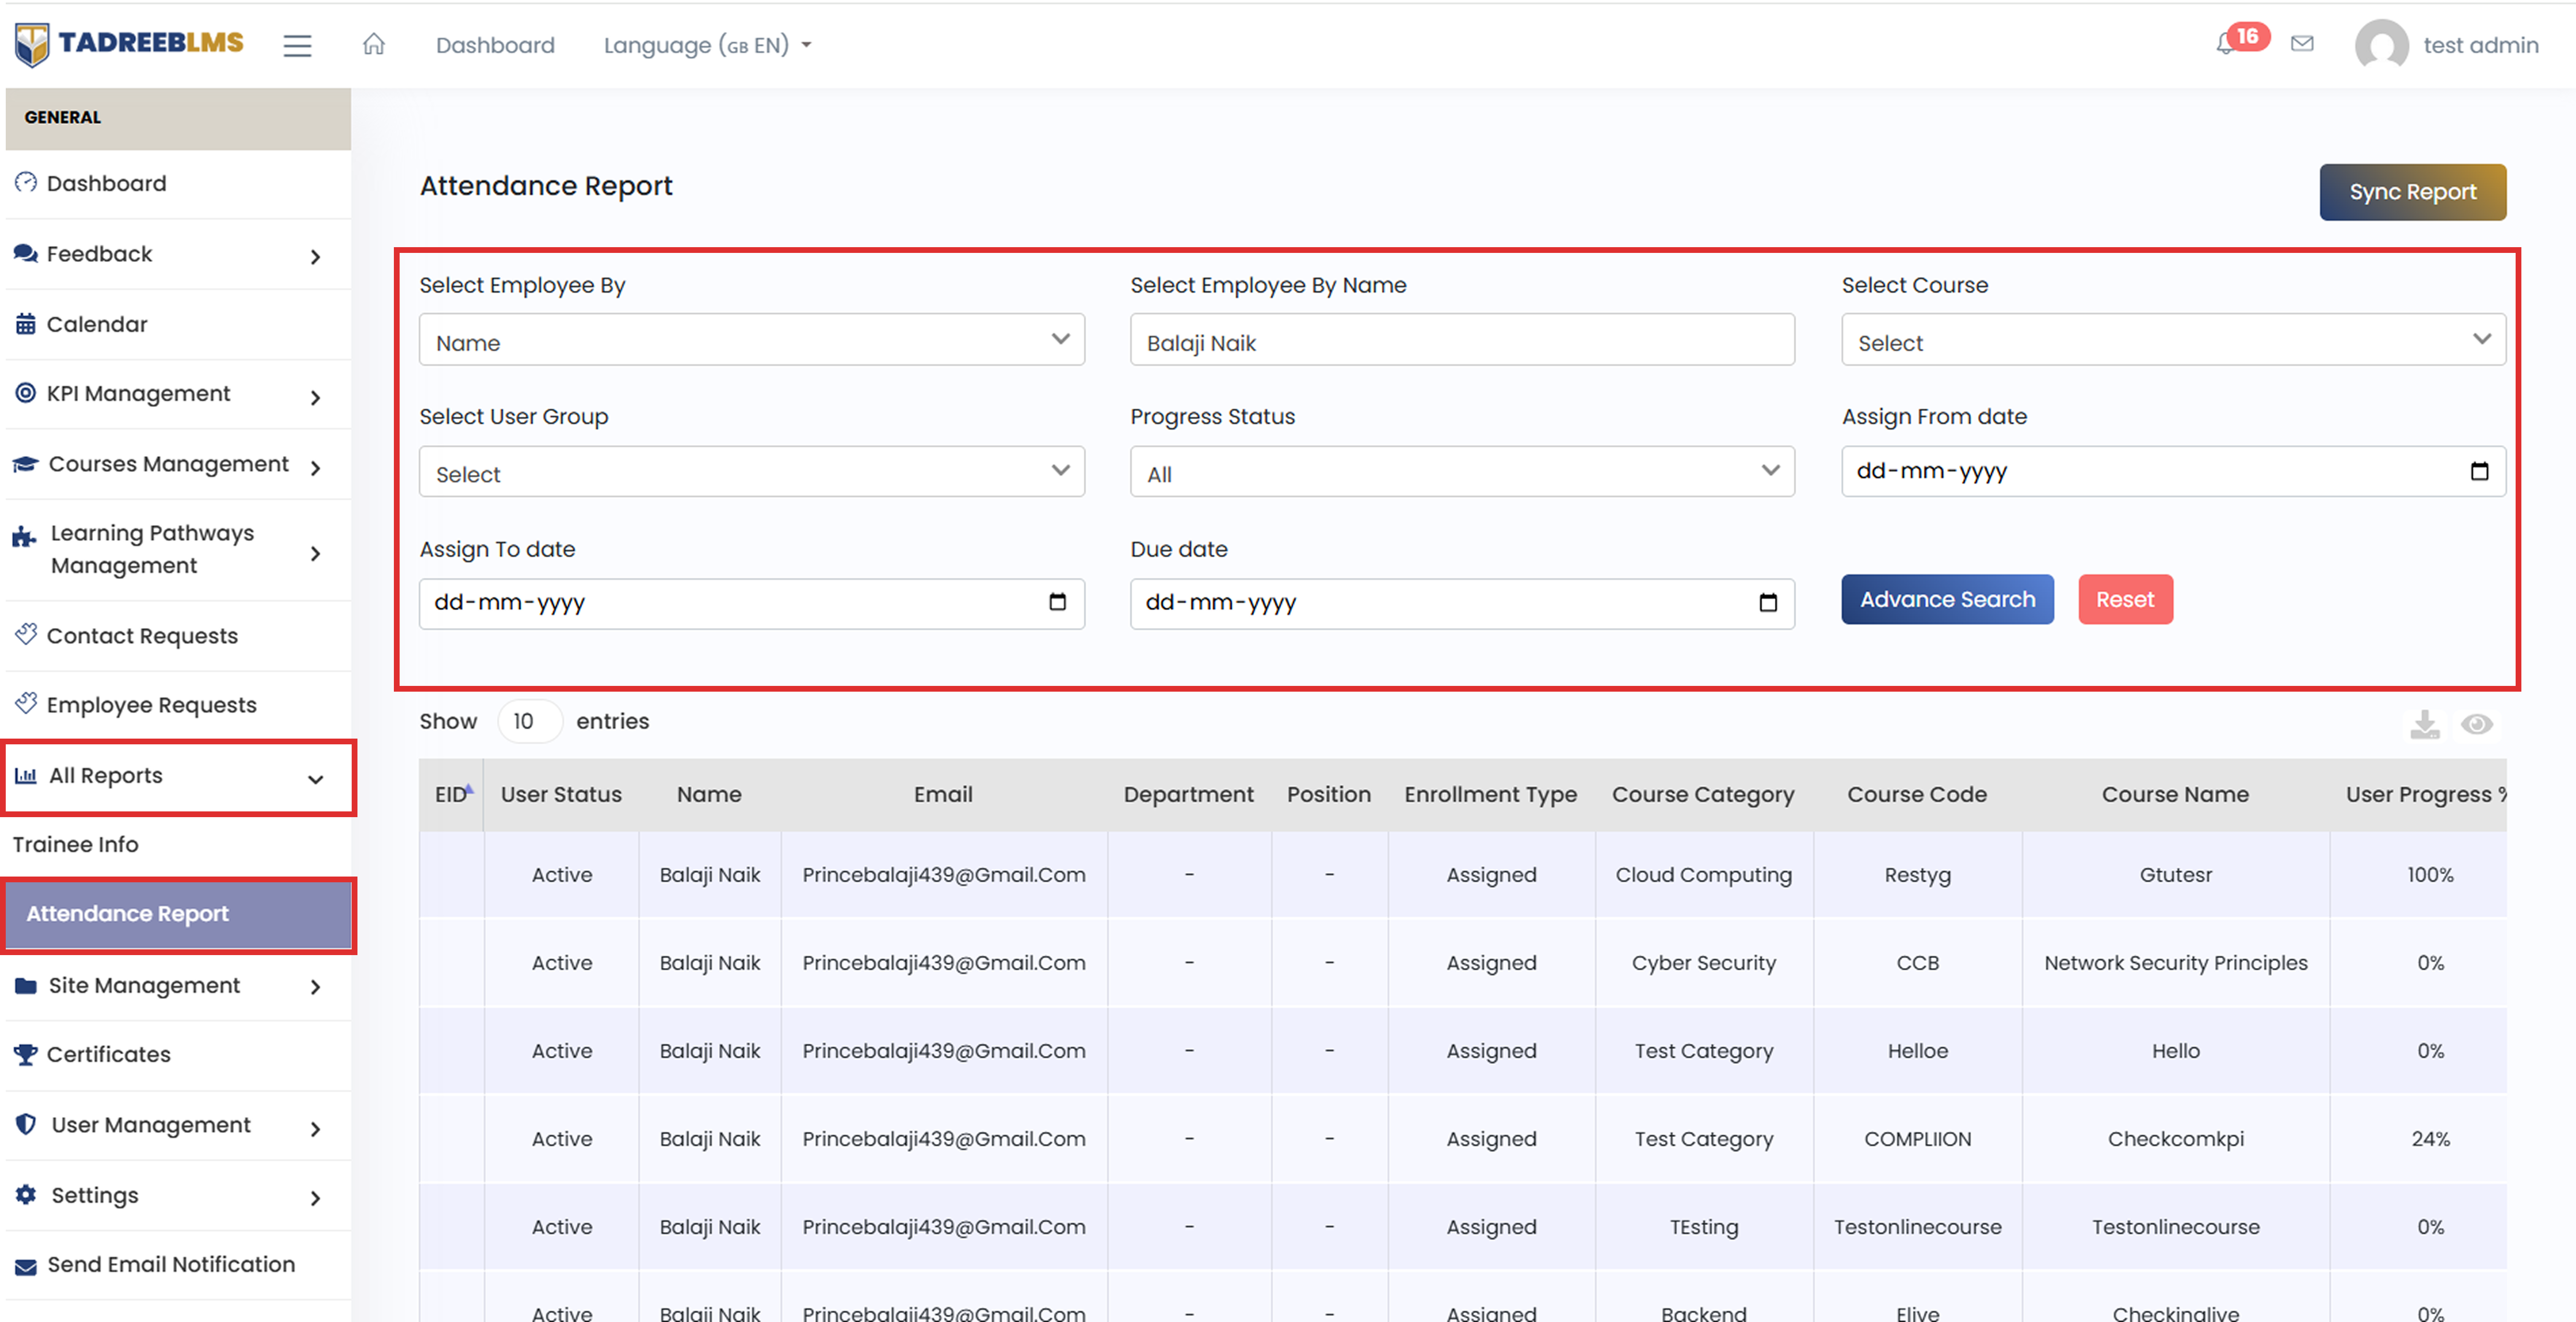
Use the filter fields to narrow down the report to specific trainees, courses, or date ranges:
| Filter | Description |
|---|---|
| Select Employee By | Choose how to search for a trainee— e.g., by Name |
| Select Employee By Name | Select the trainee's name |
| Select Course | Filter the report by a specific course |
| Select User Group | Filter the report by a specific user group |
| Progress Status | Filter by progress status (default: All) |
| Assign From date | Show records assigned from this date onward |
| Assign To date | Show records assigned up to this date |
| Due date | Filter by the due date of the assignment |
📌 Note: Once you've set your filters, click Advance Search to apply them, or click Reset to clear all filters and return to the default view.
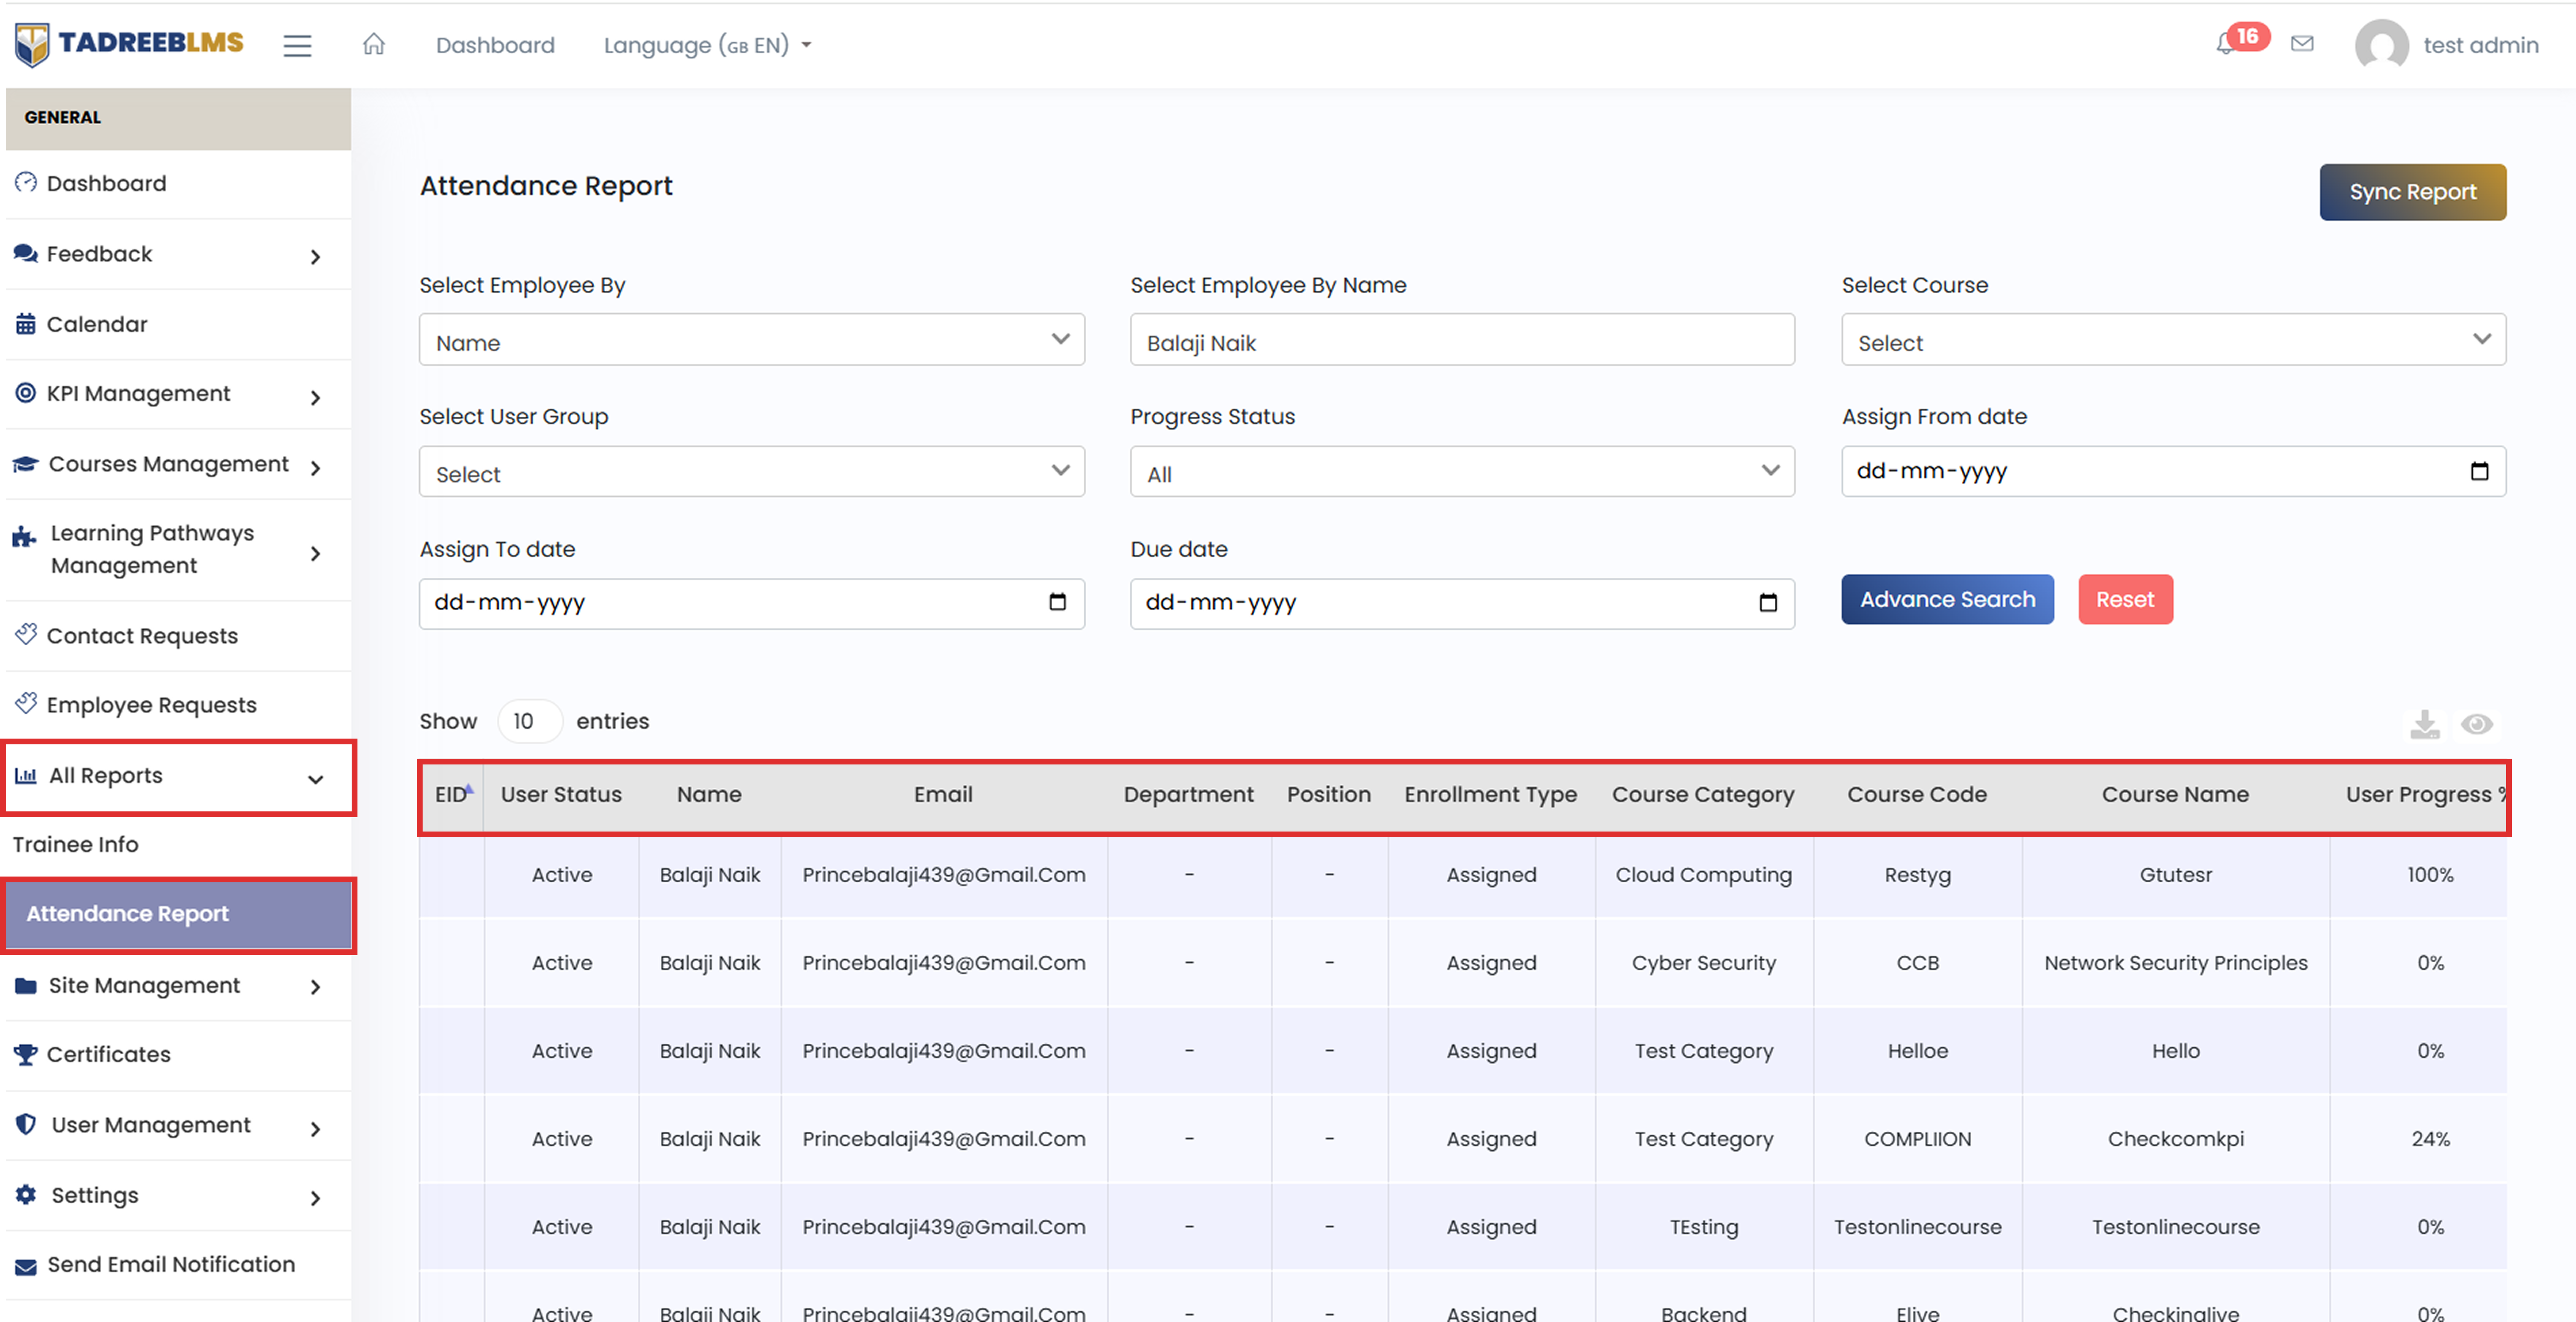
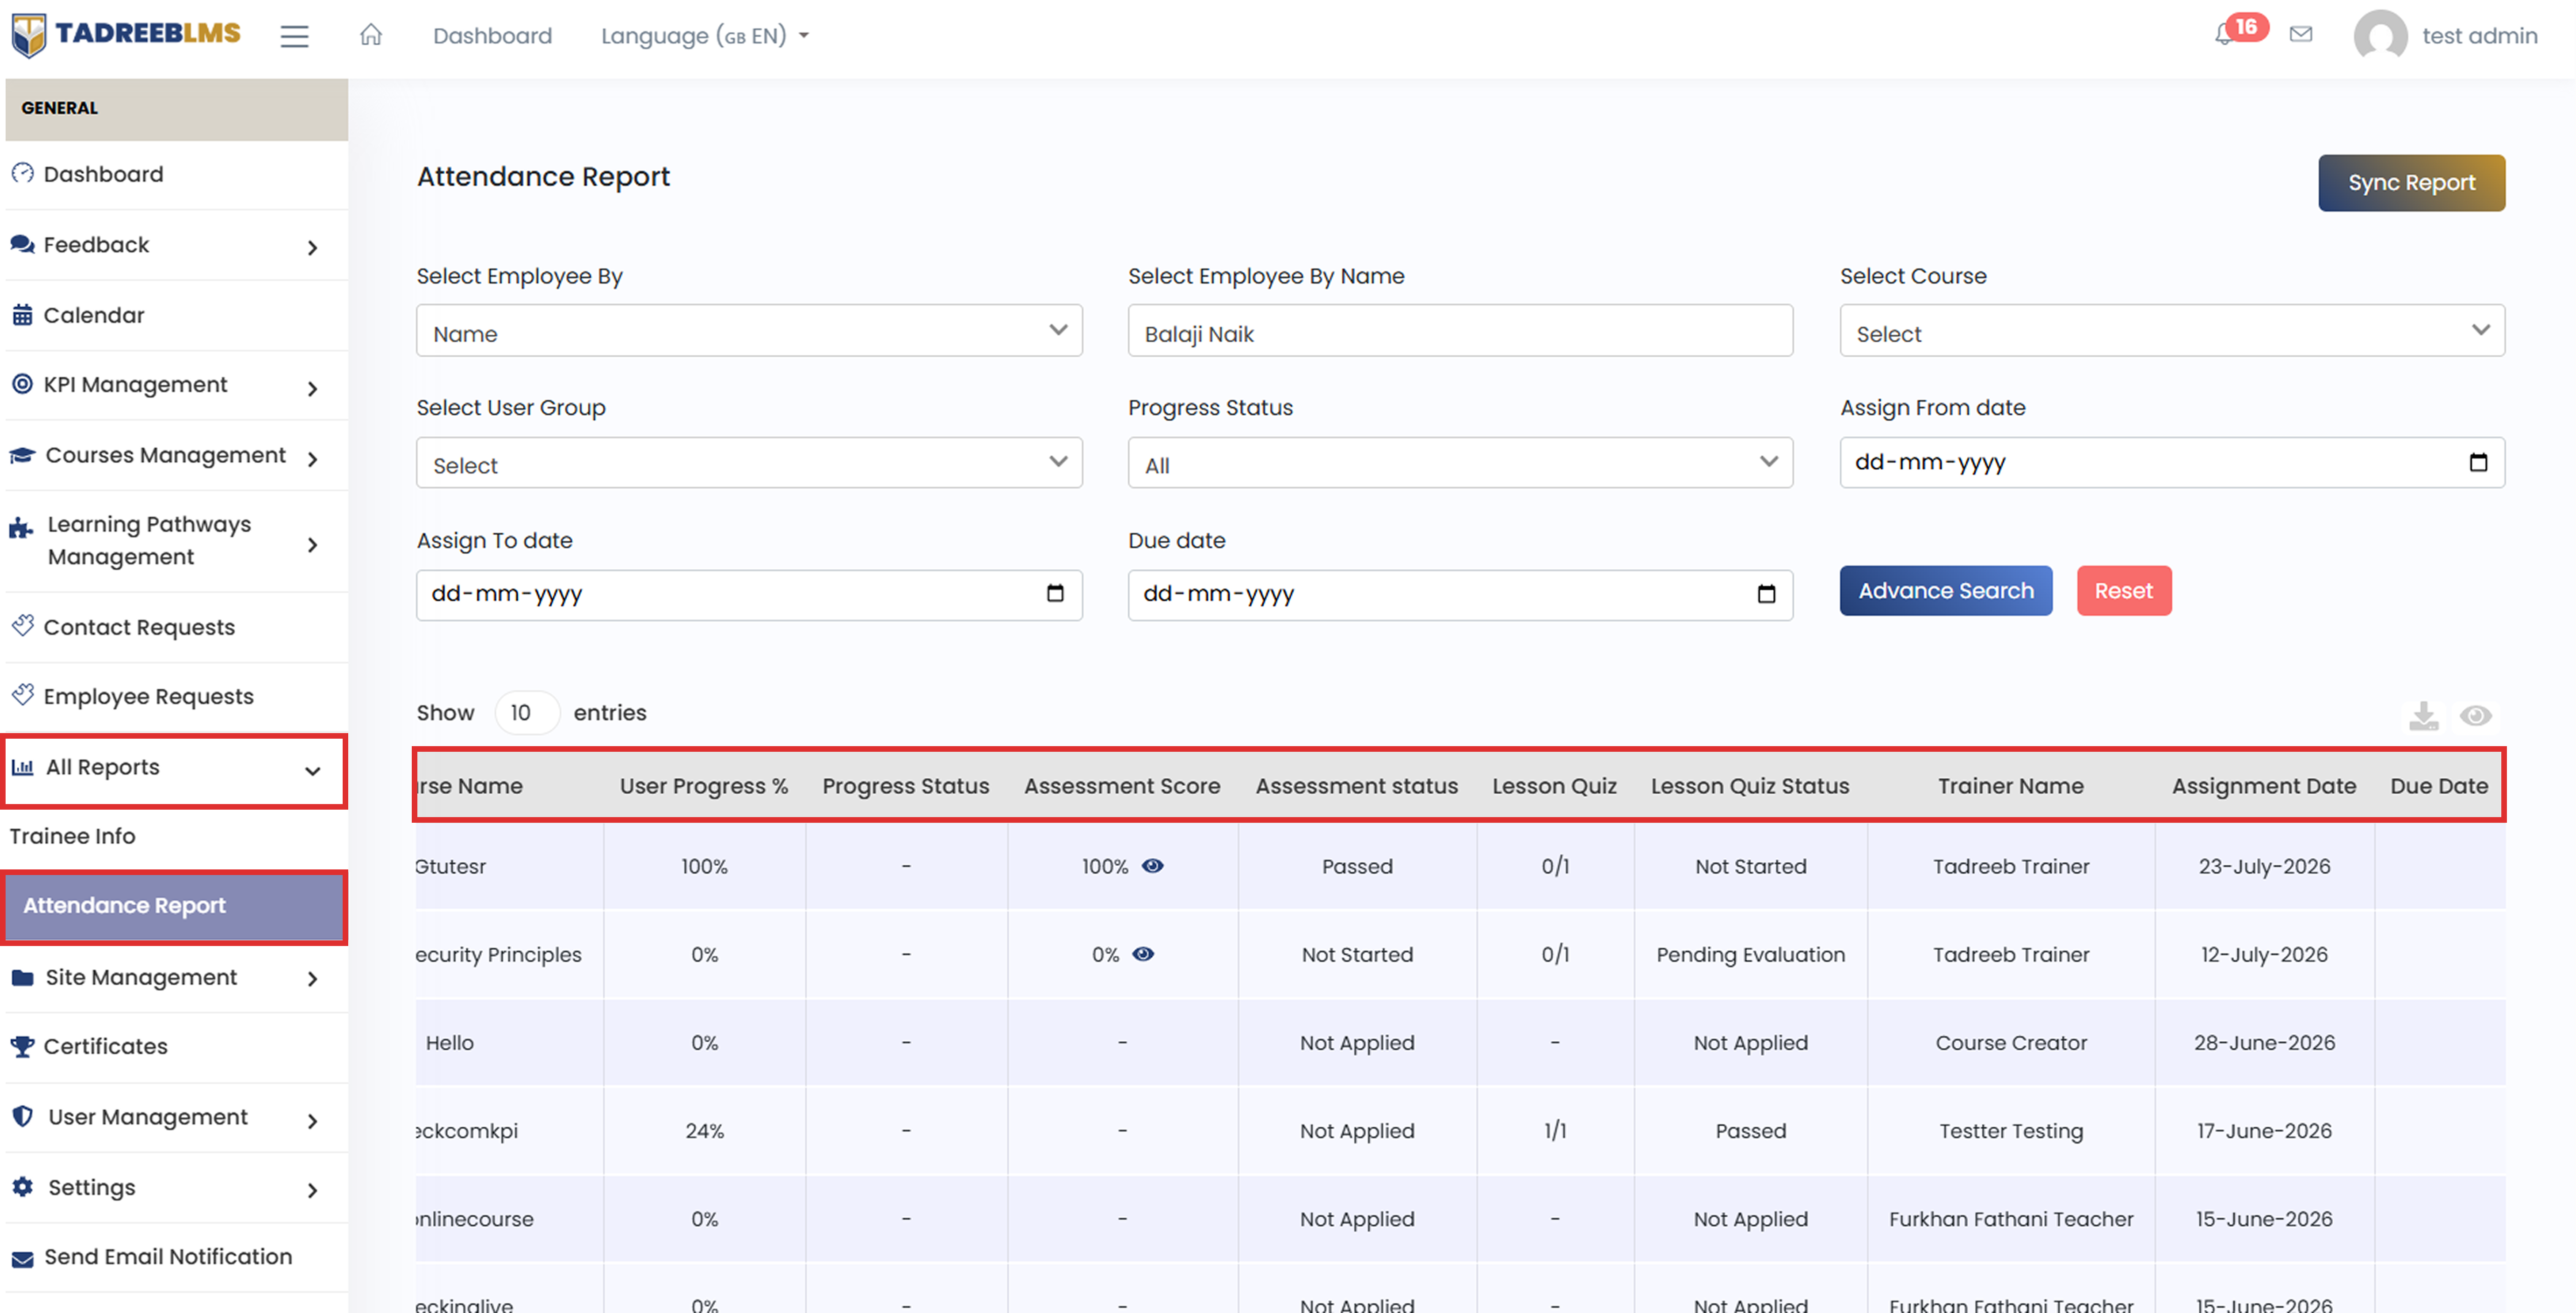
The table below describes the column information:
| Column | Description |
|---|---|
| EID | Trainee's employee ID, if assigned |
| User Status | Shows whether the account is Active or Inactive |
| Name | Trainee's full name |
| Trainee's registered email address | |
| Department | Trainee's department, if specified |
| Position | Trainee's job position, if specified |
| Enrollment Type | Shows how the trainee was enrolled in the course |
| Course Category | Category of the course |
| Course Code | Unique code assigned to the course |
| Course Name | Name of the course |
| User Progress % | Trainee's course completion percentage |
| Progress Status | Current progress status of the trainee |
| Assessment Score | Trainee's assessment score, if applicable |
| Assessment Status | Shows the assessment status |
| Lesson Quiz | Trainee's quiz score, shown as a fraction |
| Lesson Quiz Status | Current status of the lesson quiz |
| Trainer Name | Name of the trainer or course creator |
| Assignment Date | Date the course was assigned |
| Due Date | Date the course is due to be completed |
📌 Note: At the top right of the page, click Sync Report to refresh the report data with the latest progress and completion updates.
10. Site Management
The site management section provides administrators with the tools to configure, manage, and publish all content that appears on the platform's public facing and internal pages. It allows administrators to manage platform content, subscriptions, and user communication.
10.1 Employees Request
Manage employee course enrollment requests.
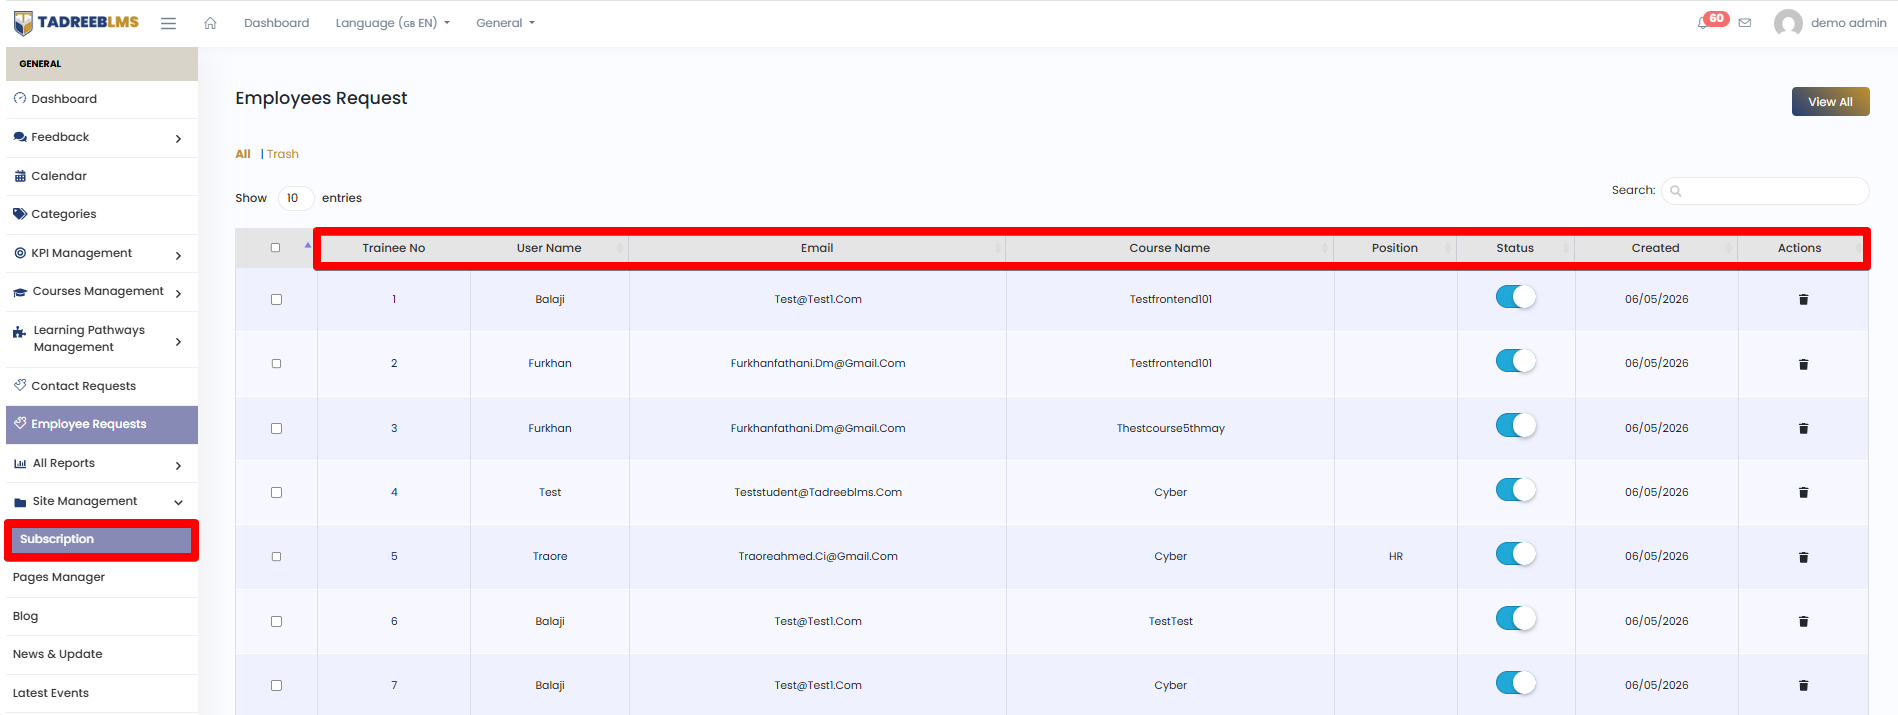
Table Headings
| Heading | Description |
|---|---|
| Trainee no | Auto-generated sequential request number |
| User name | Name of the requesting employee |
| Employee's email address | |
| Course name | course the employee has requested |
| Position | Employee's job position |
| Status | Toogle to activate or deactivate the request |
| Created | Date the request was submitted |
| Actions | Delete option to remove the record |
10.2 Pages Manager
Create and manage static content pages.
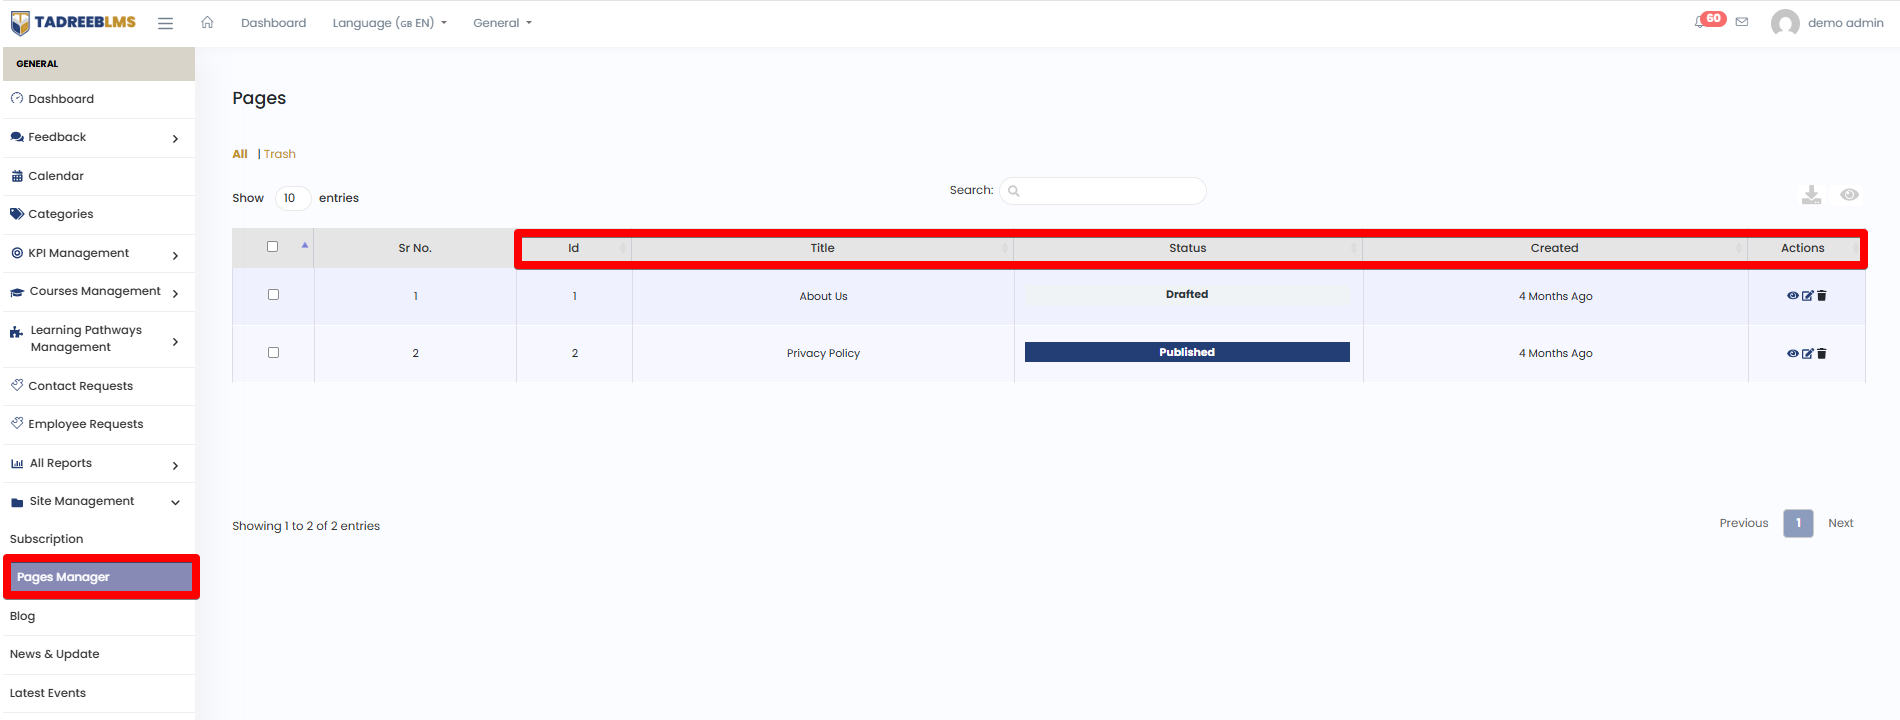
Table Headings
| Heading | Description |
|---|---|
| ID | Sytem generated page id |
| Title | Name of the page |
| Status | Publication state - Drafted or Published |
| Created | Time elapsed since the page was created |
| Actions | View, edit, or delete the page |
| Download | Download pages list as CSV or PDF |
10.3 Blog
Create and publish blog posts.
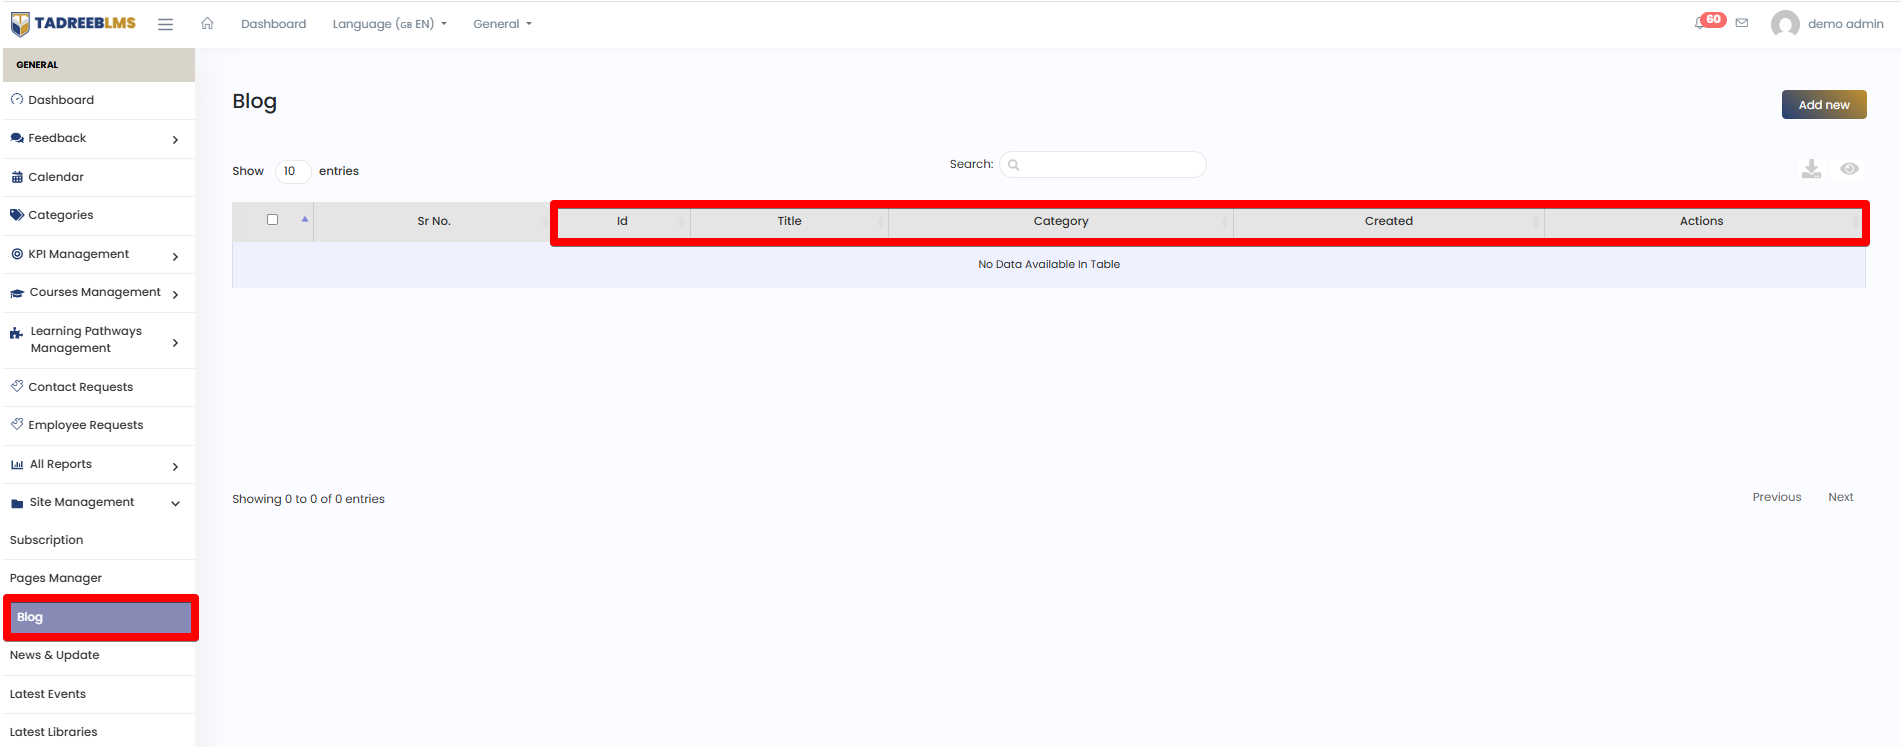
Table Headings
| Heading | Description |
|---|---|
| ID | System generated blog id |
| Title | Name of the blog |
| Category | Classifying blog to category |
| Created | Date the blog was submitted |
| Actions | View, edit, or delete the blog |
| Download | Download blog list as CSV or PDF |
10.3.1 Create New Blog
To create a question:
- Open the menu.
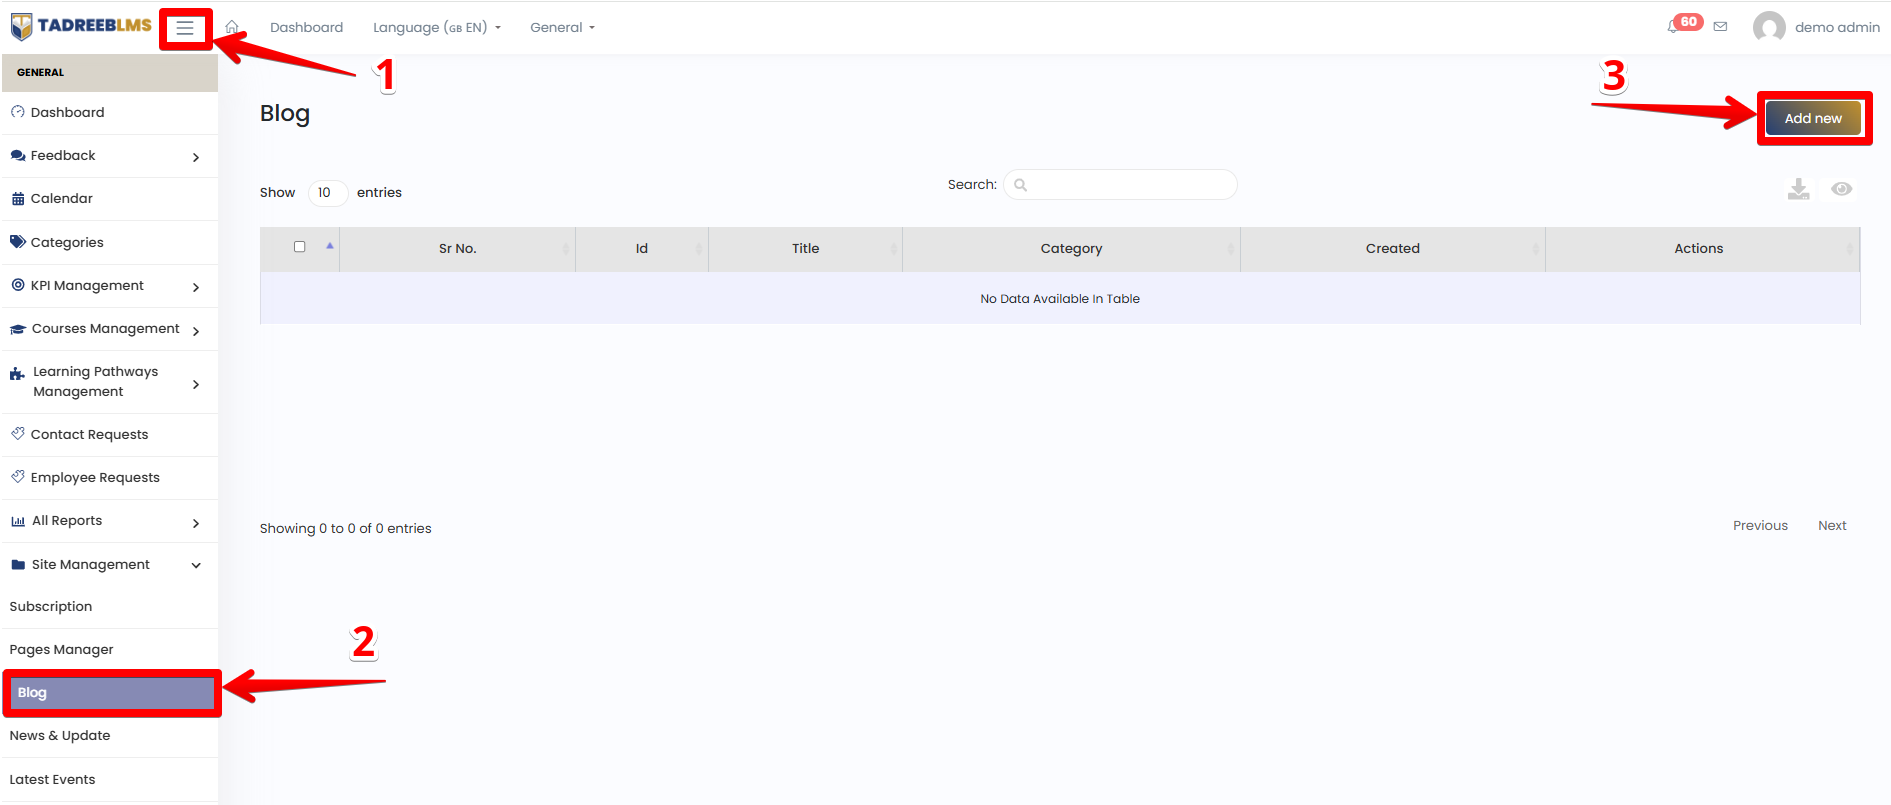
- Select Site Management > Blog.
- Click Add New.
- Enter required details.
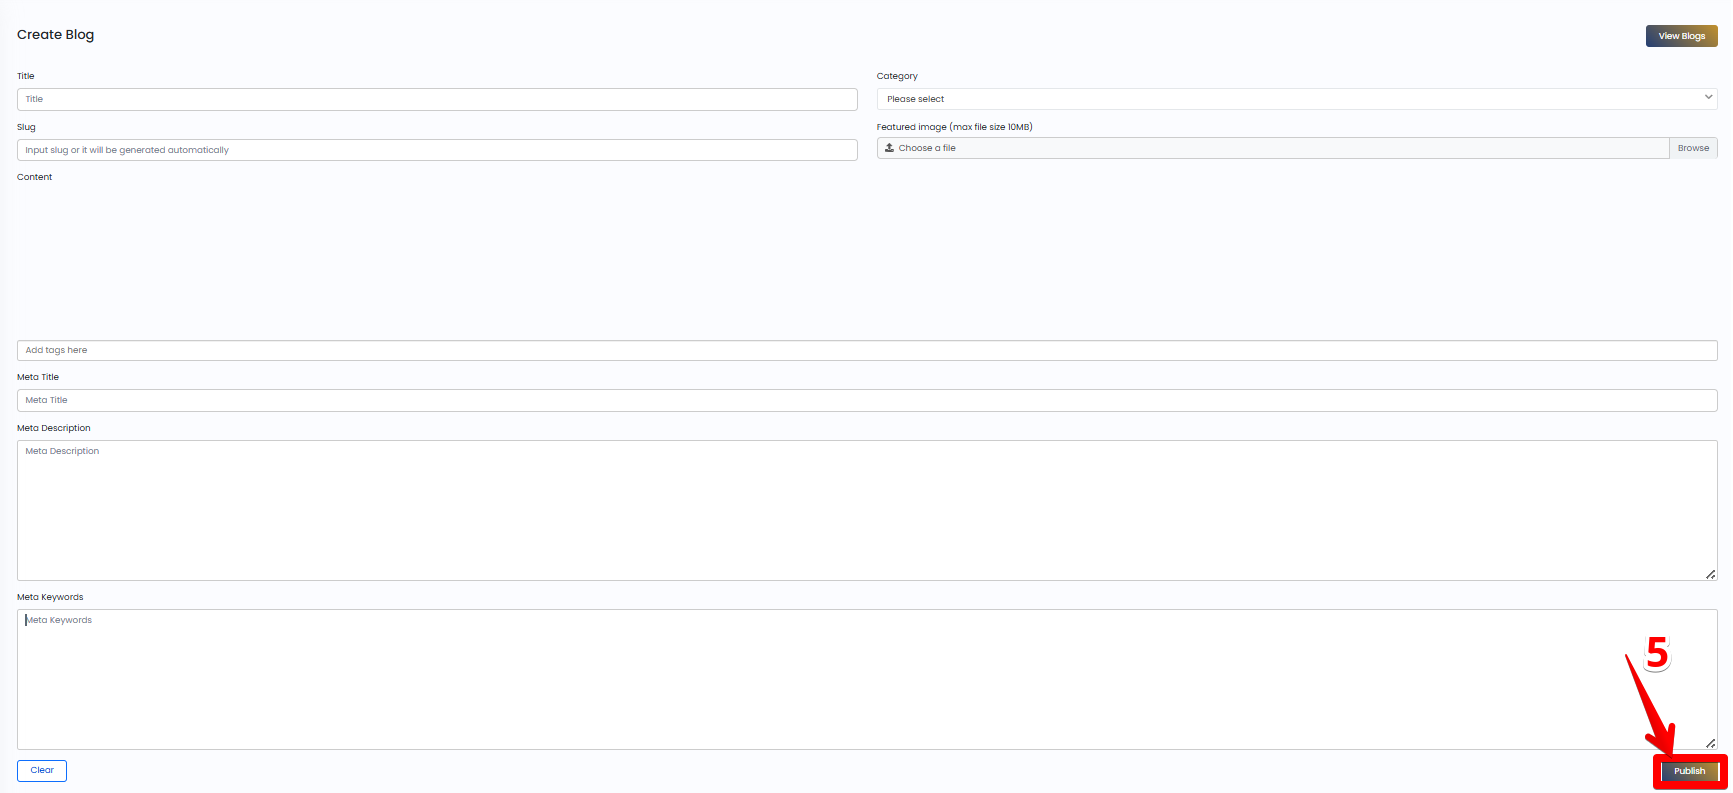
- Click Publish.
10.4 News & Updates
Publish platform news and updates.
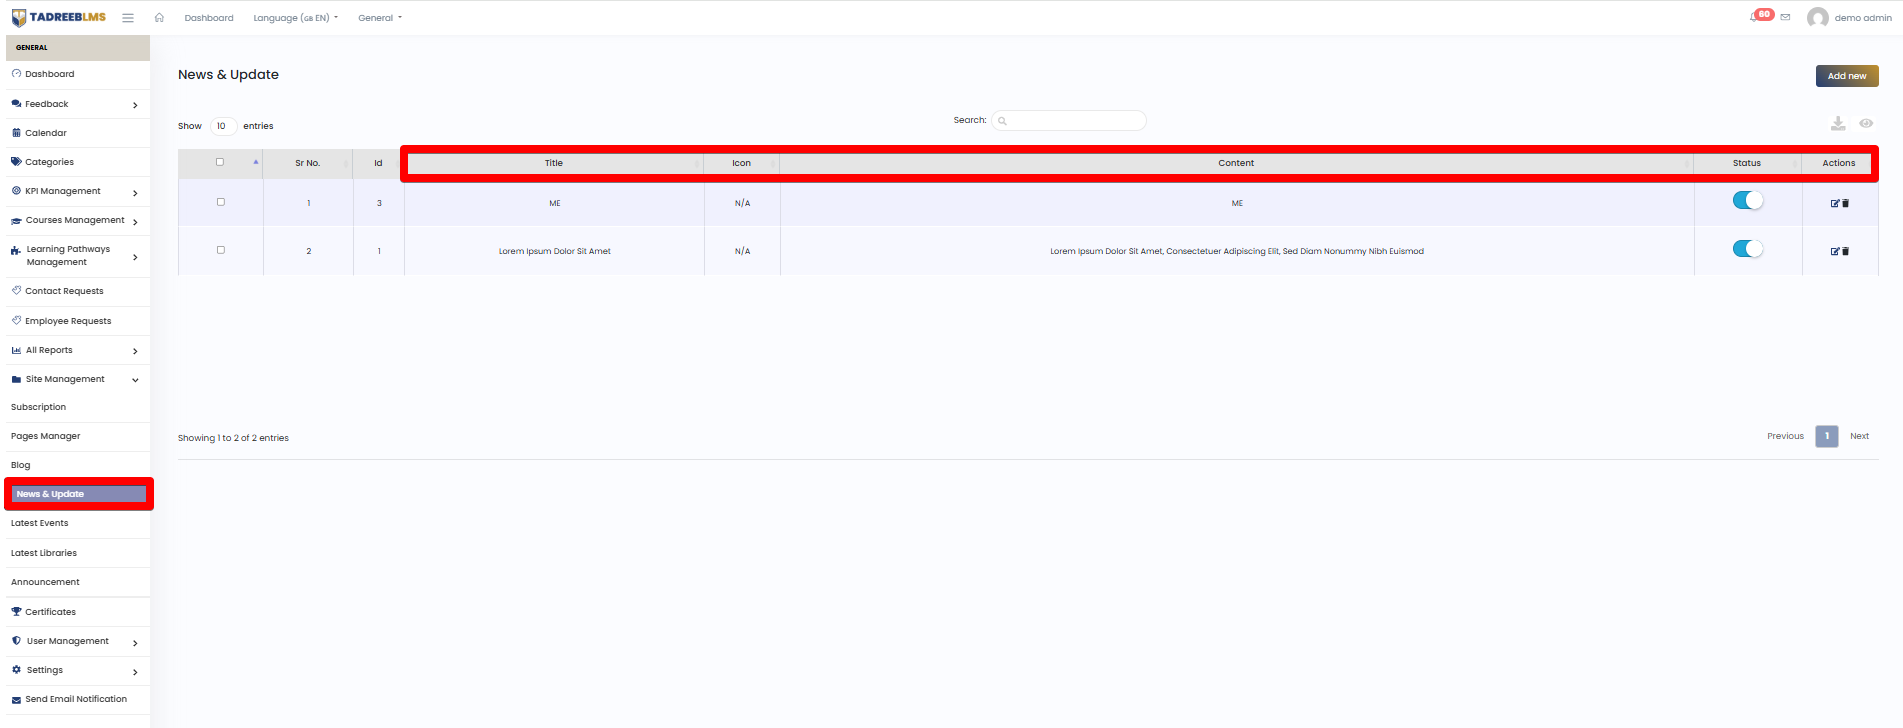
Table Headings
| Heading | Description |
|---|---|
| Title | Headline of the news item |
| Content | Body text of the news item |
| Status | Toogle to publish or unpublish the entry |
| Actions | Edit or delete the record |
| Download | Download News & Update list as CSV or PDF |
10.4.1 Add News
To add news:
- Open the menu.
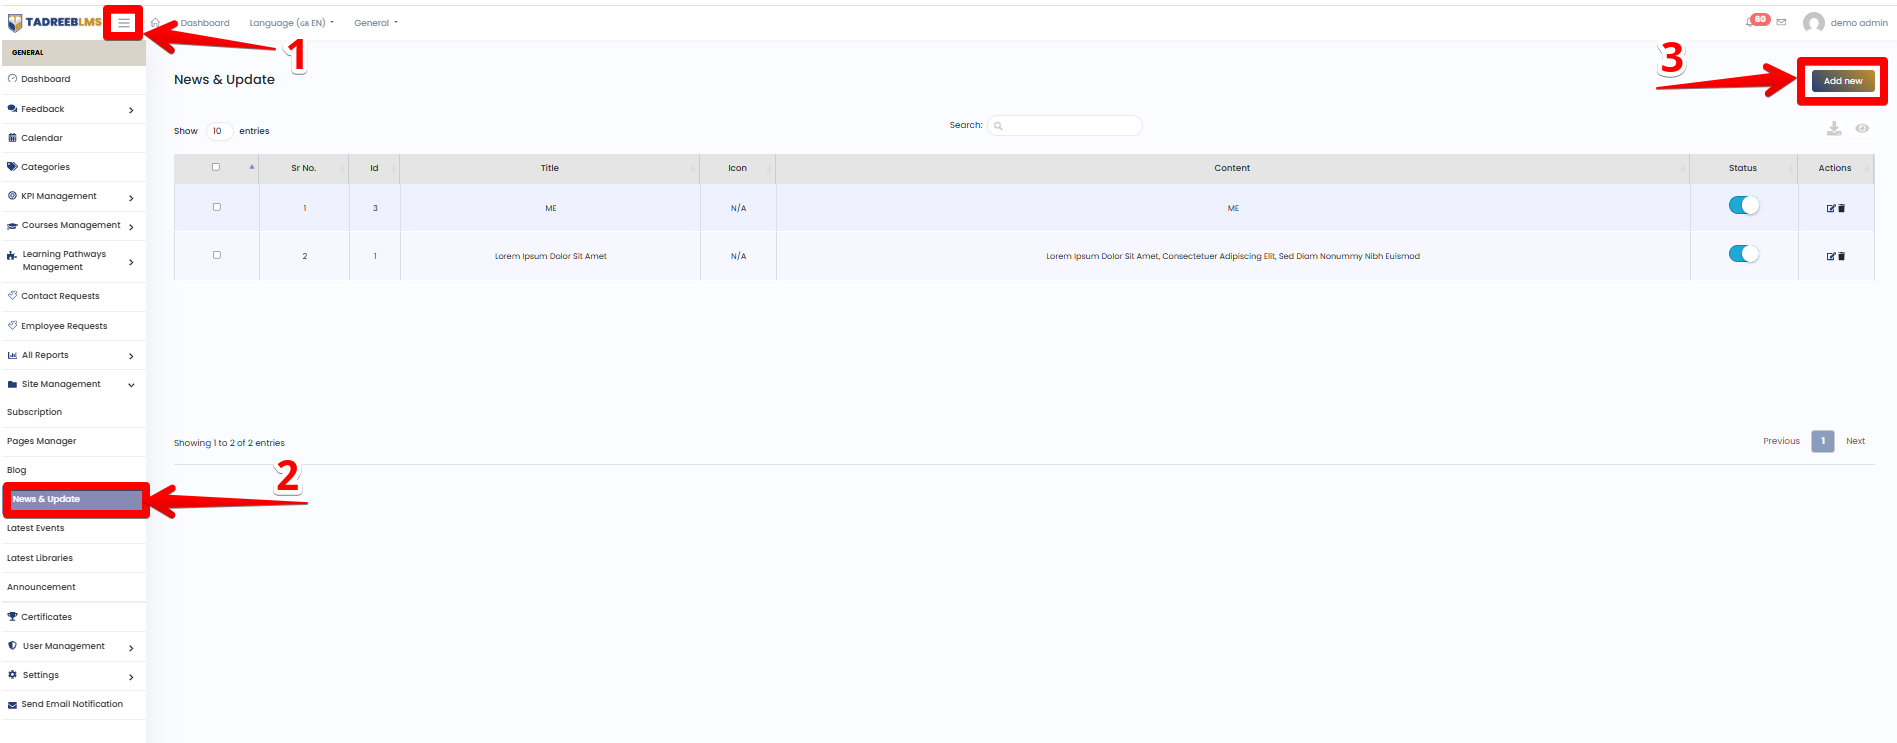
- Select Site Management > News & Updates.
- Click Add New.
- Enter required details.
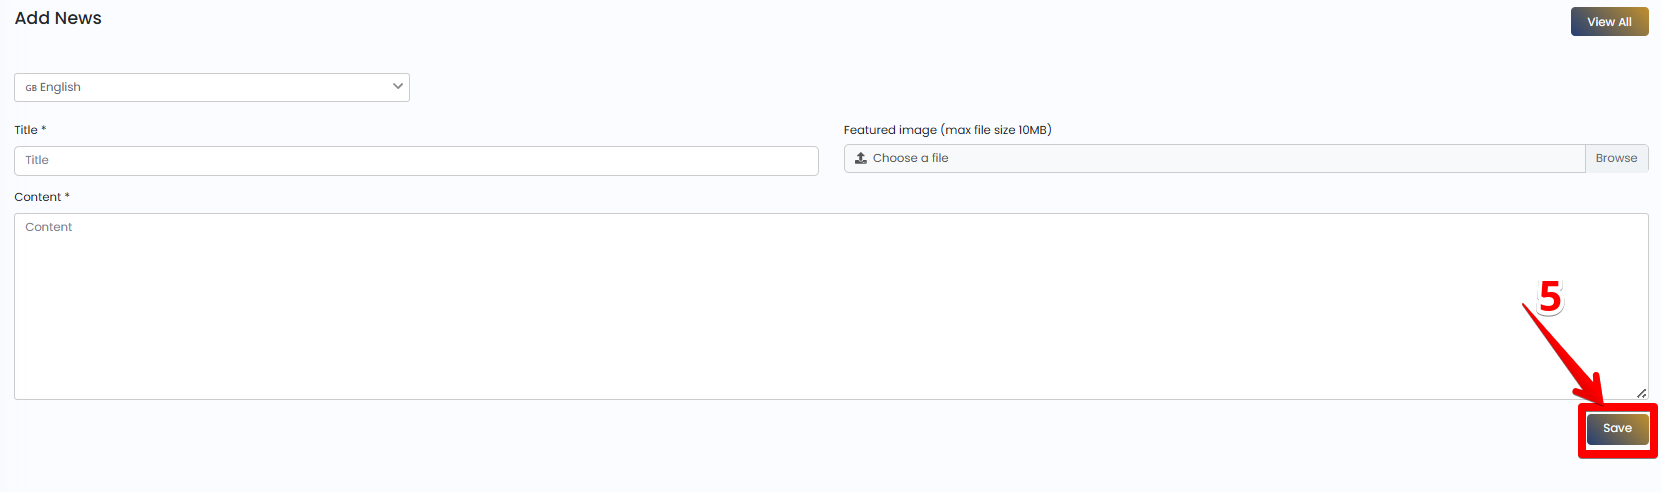
- Click Save.
10.5 Latest Events
Manage platform events.
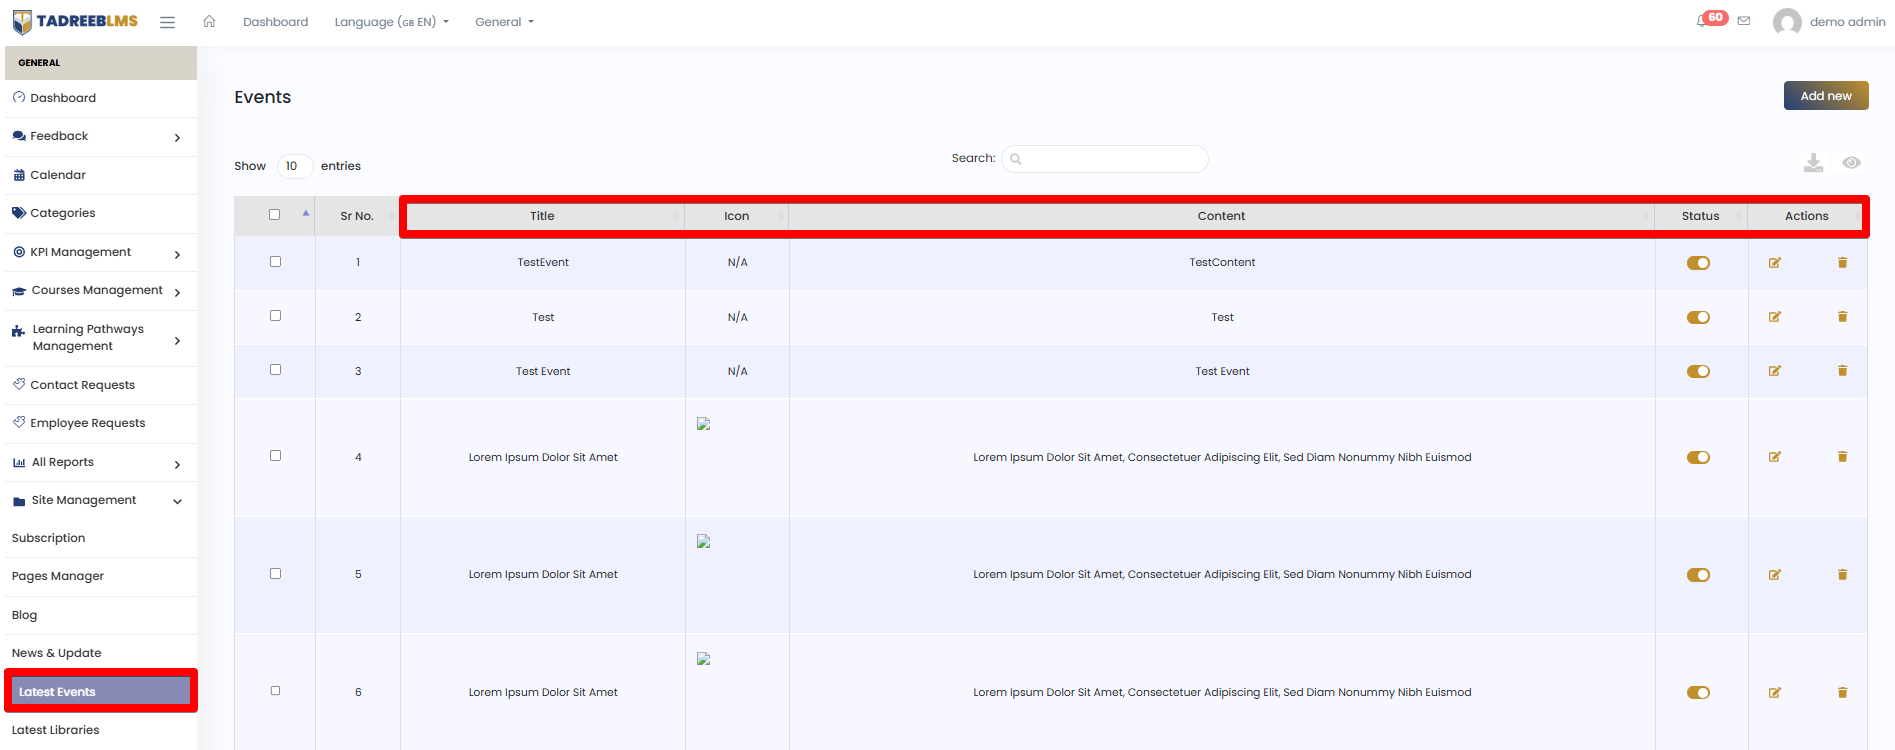
Table Headings
| Heading | Description |
|---|---|
| Title | Name of the event |
| Icon | Associated icon or image |
| Content | Description or body of the event |
| Status | Toogle to activate or deactivate the event |
| Actions | Edit or Delete the record |
| Download | Download Event list as CSV or PDF |
10.5.1 Add Events
To add events:
- Open the menu.
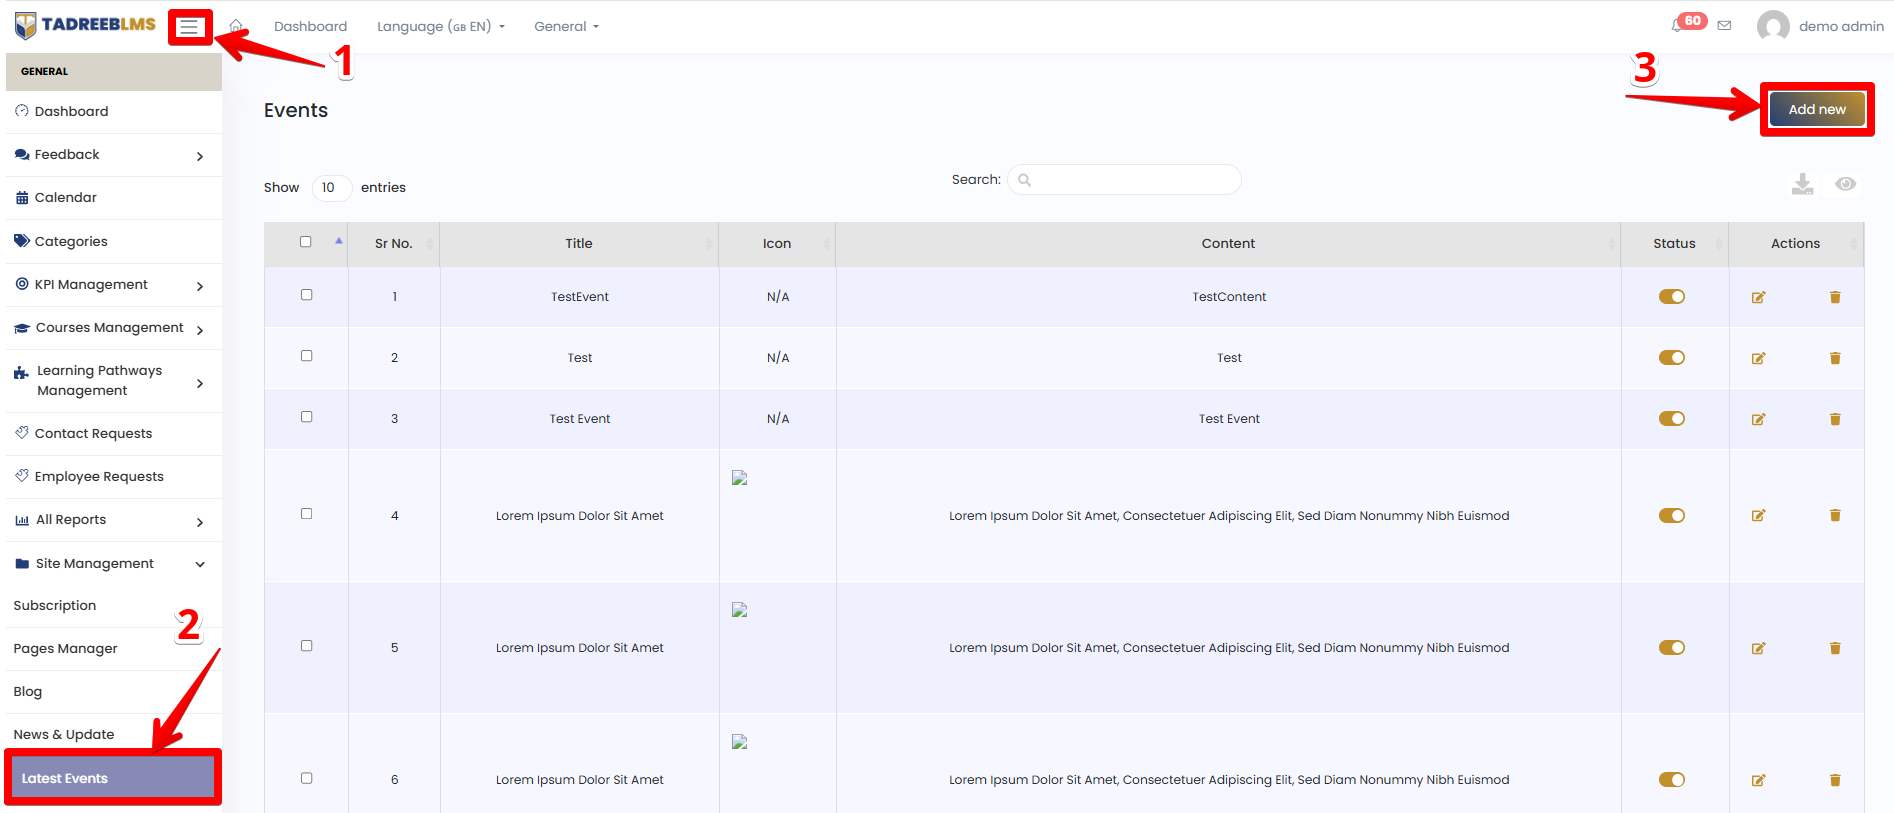
- Select Site Management > Latest Events.
- Click Add New.
- Enter required details.
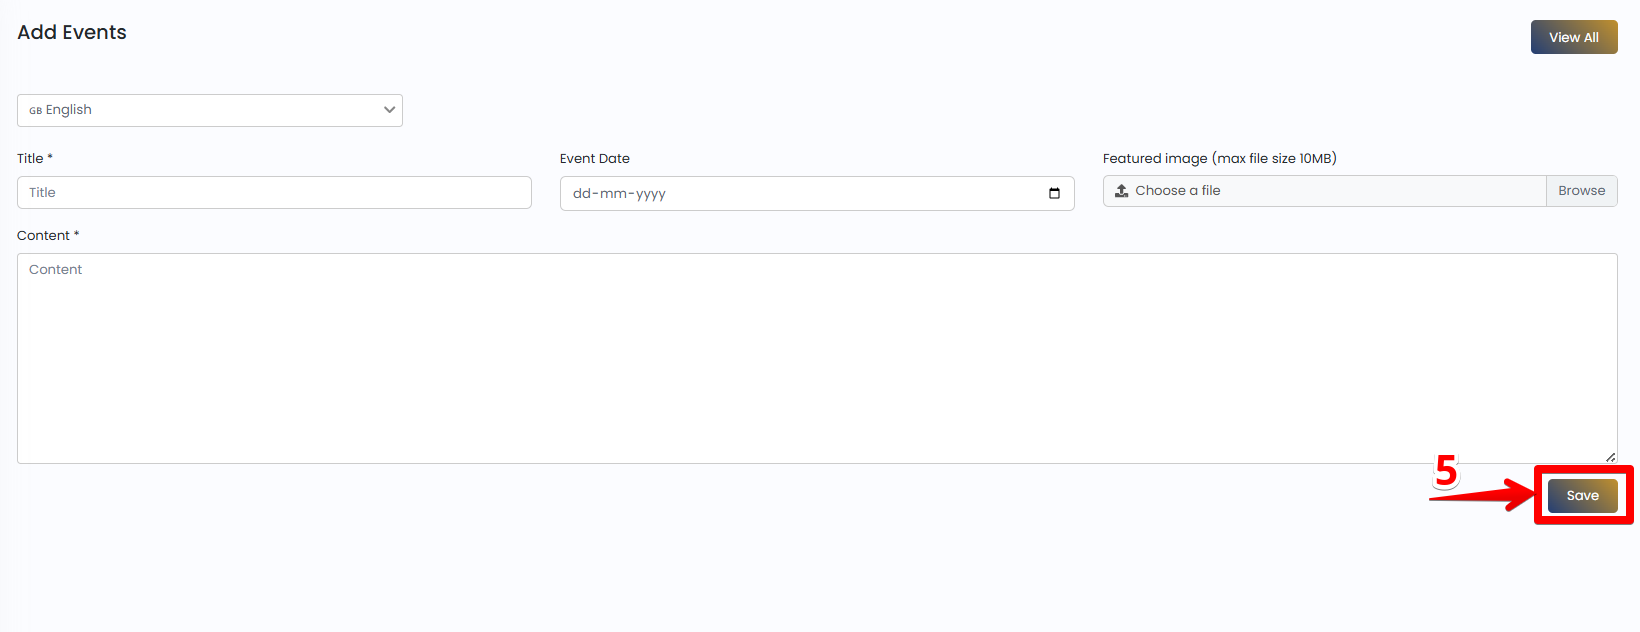
- Click Save.
10.6 Libraries
Manage learning resources.
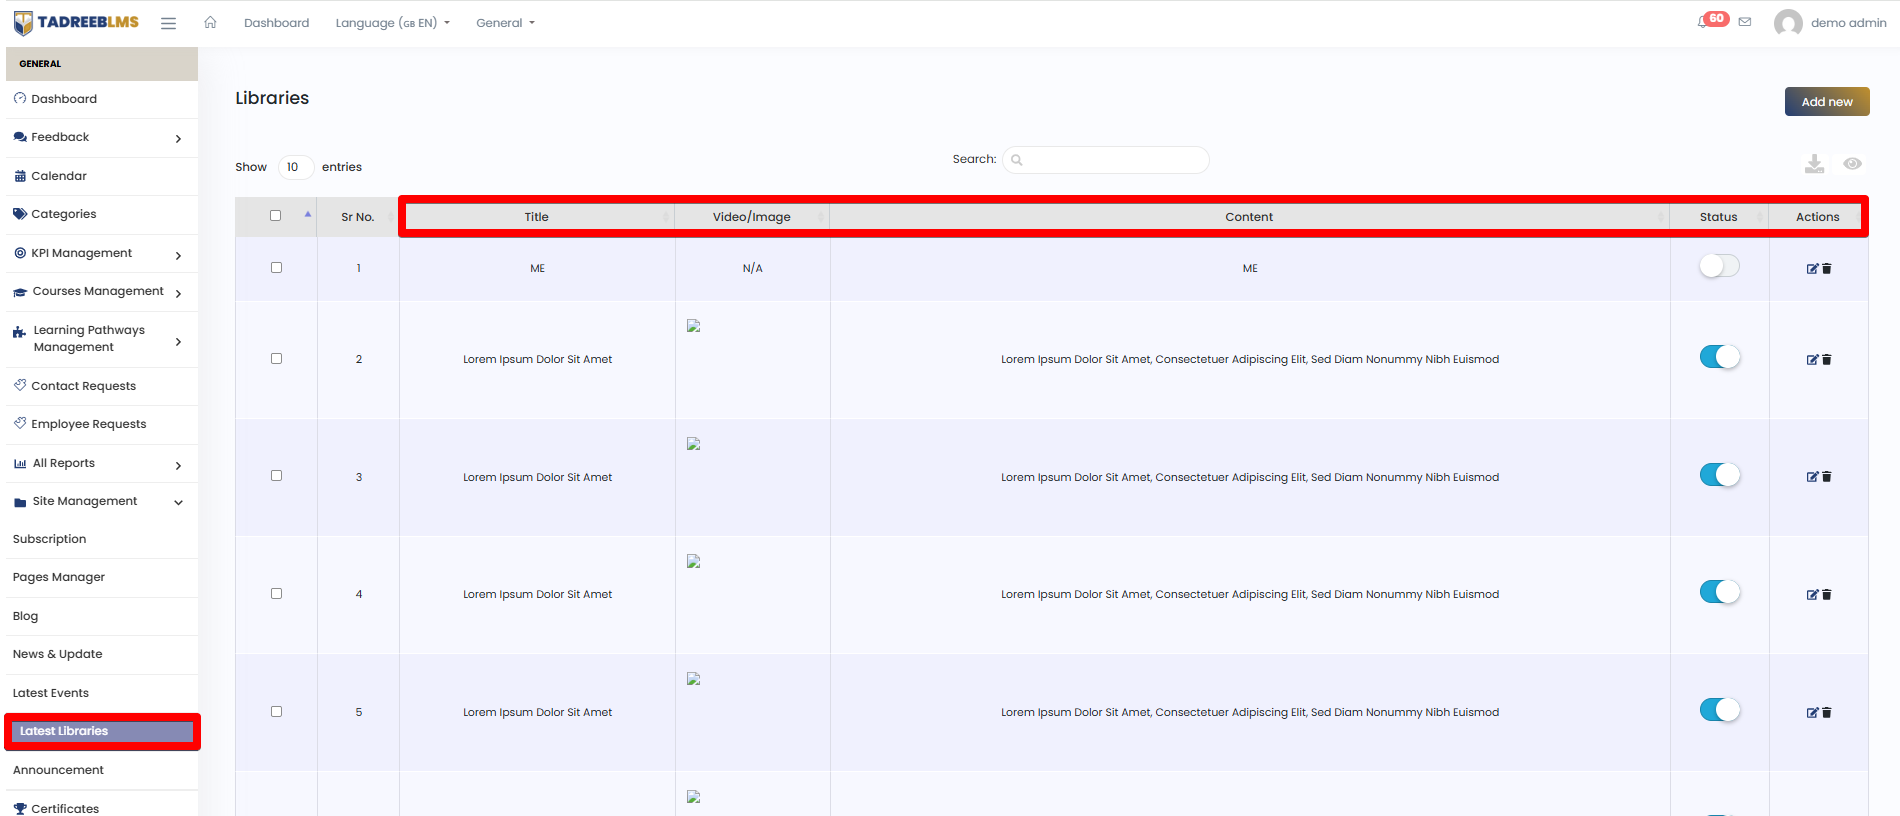
Table Headings
| Heading | Description |
|---|---|
| Title | Name of the resource |
| Video/Image | Attached media file |
| Content | Description or details of the reource |
| Status | Toggle to publish or unpublish the resource |
| Actions | Edit or Delete the record |
| Download | Download libraries list as CSV or PDF |
10.6.1 Add Library
To add library:
- Open the menu.
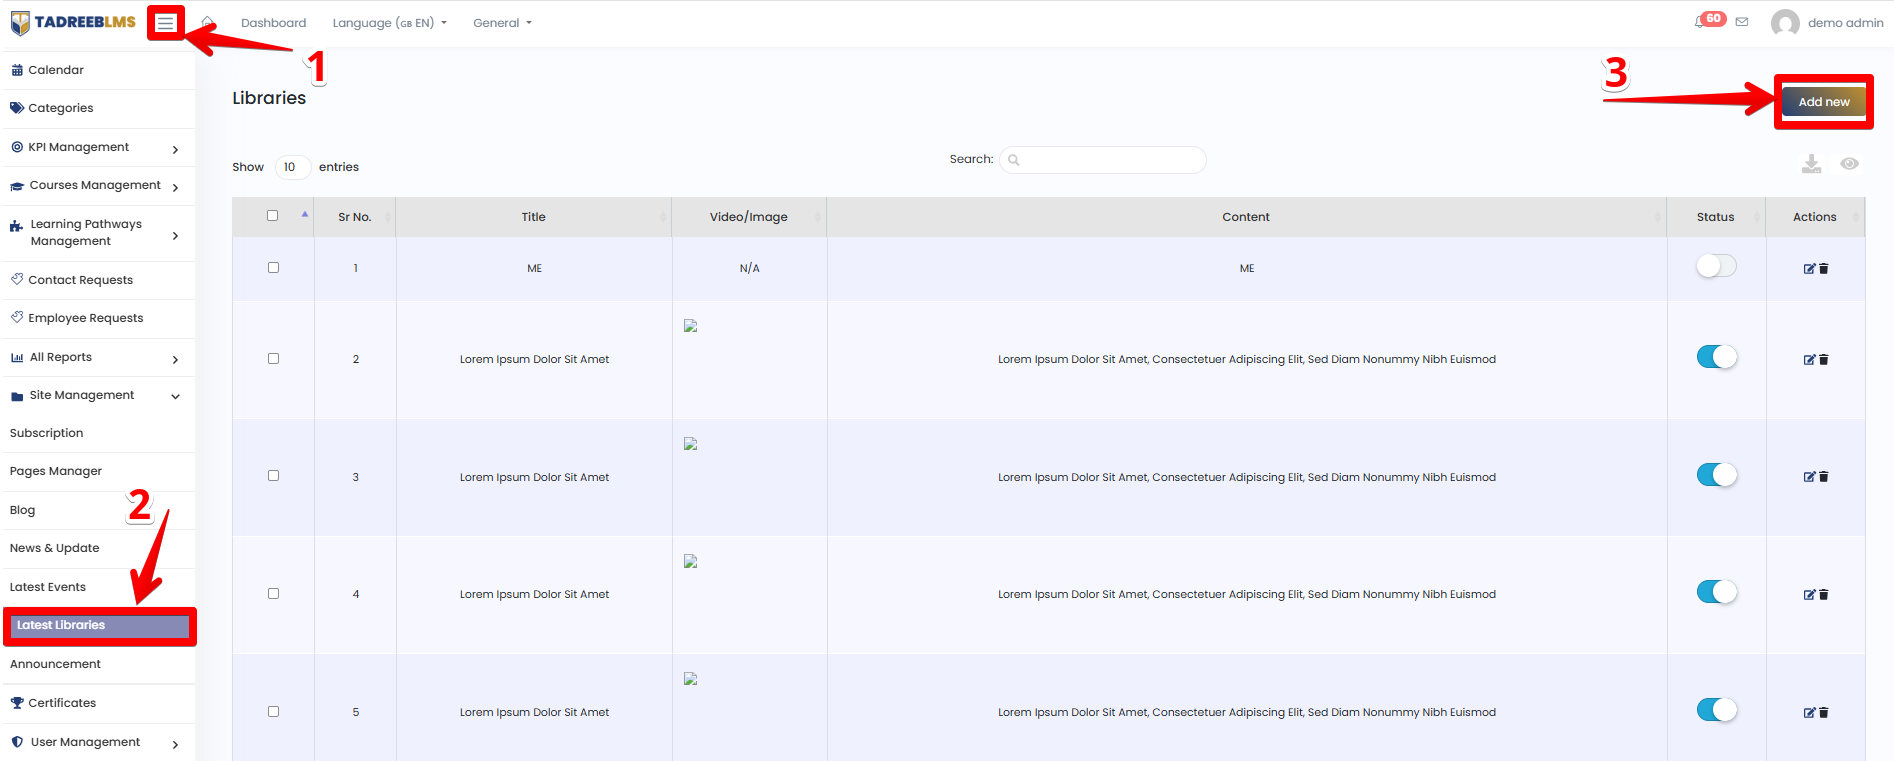
- Select Site Management > Latest Libraries.
- Click Add New.
- Enter required details.
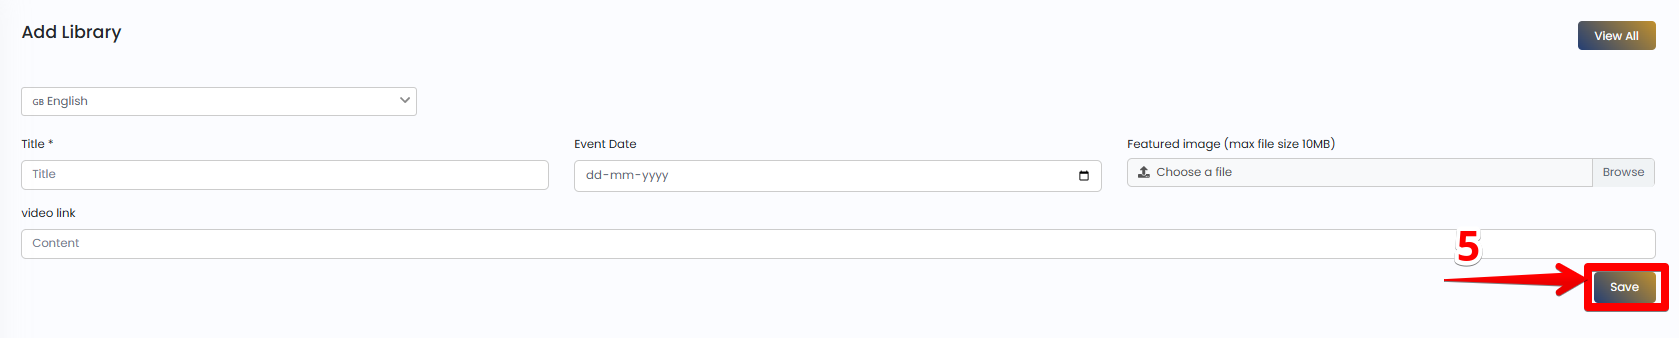
- Click Save.
10.7 Announcement
Create platform announcements.
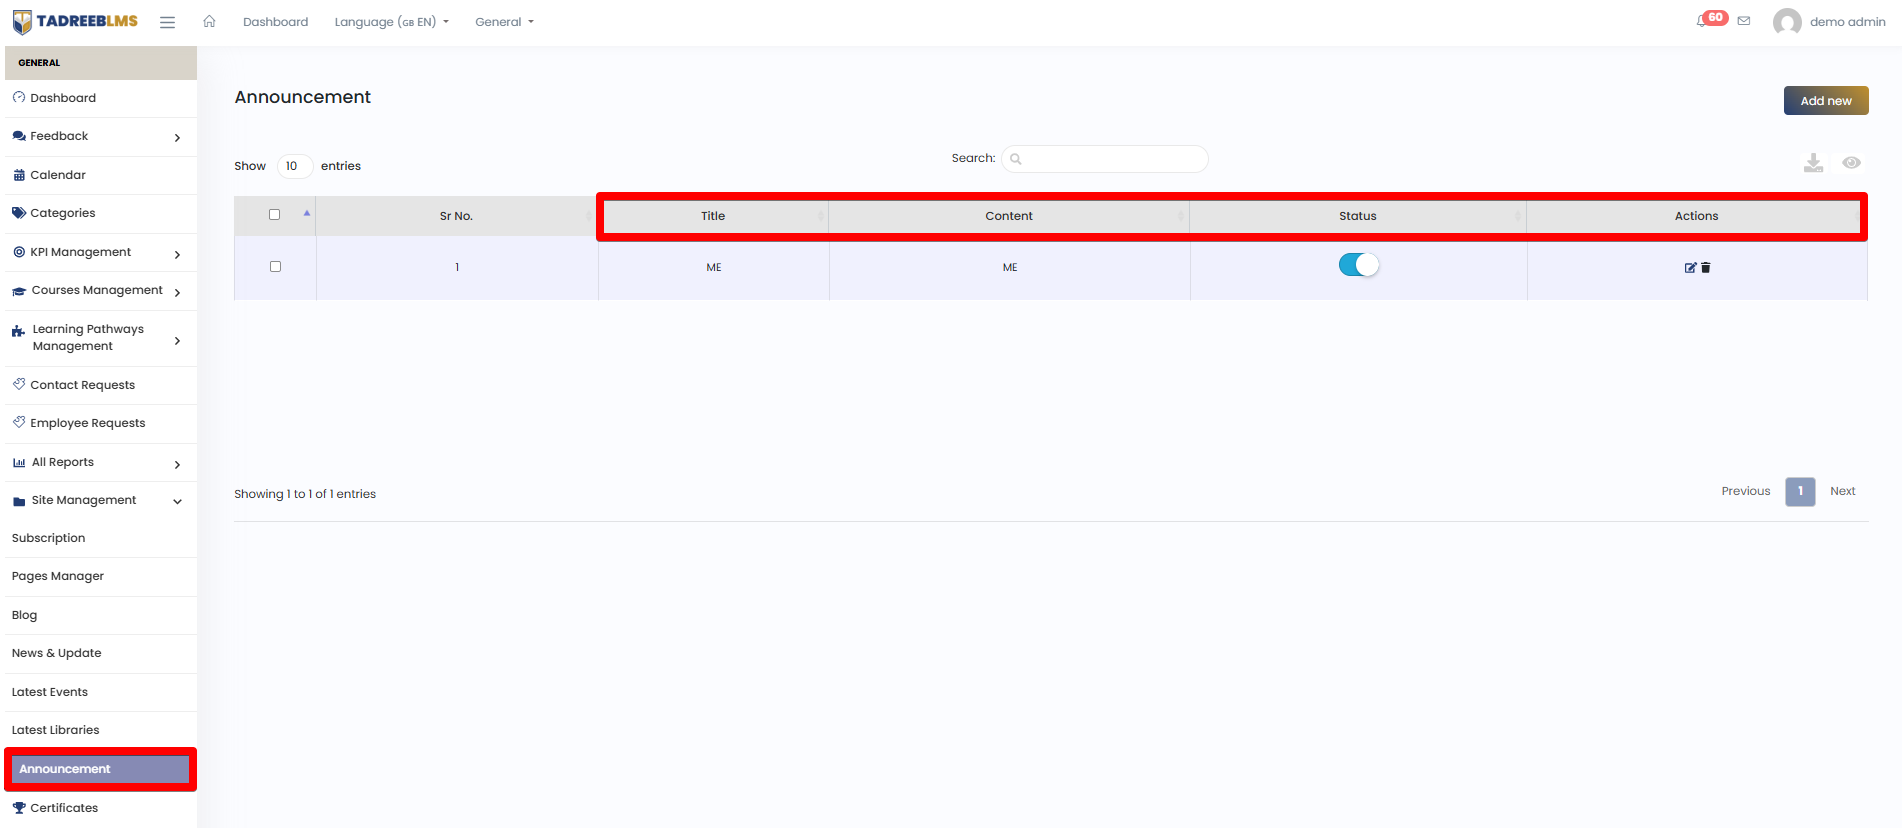
Table Headings
| Heading | Description |
|---|---|
| Title | Headline of the announcement |
| Content | Body text of the announcement |
| Status | Toggle to publish or unpublish the announcement |
| Actions | Edit or delete the record |
| Download | Download announcement list as CSV or PDF |
10.7.1 Add Announcement
To add announcement:
- Open the menu.
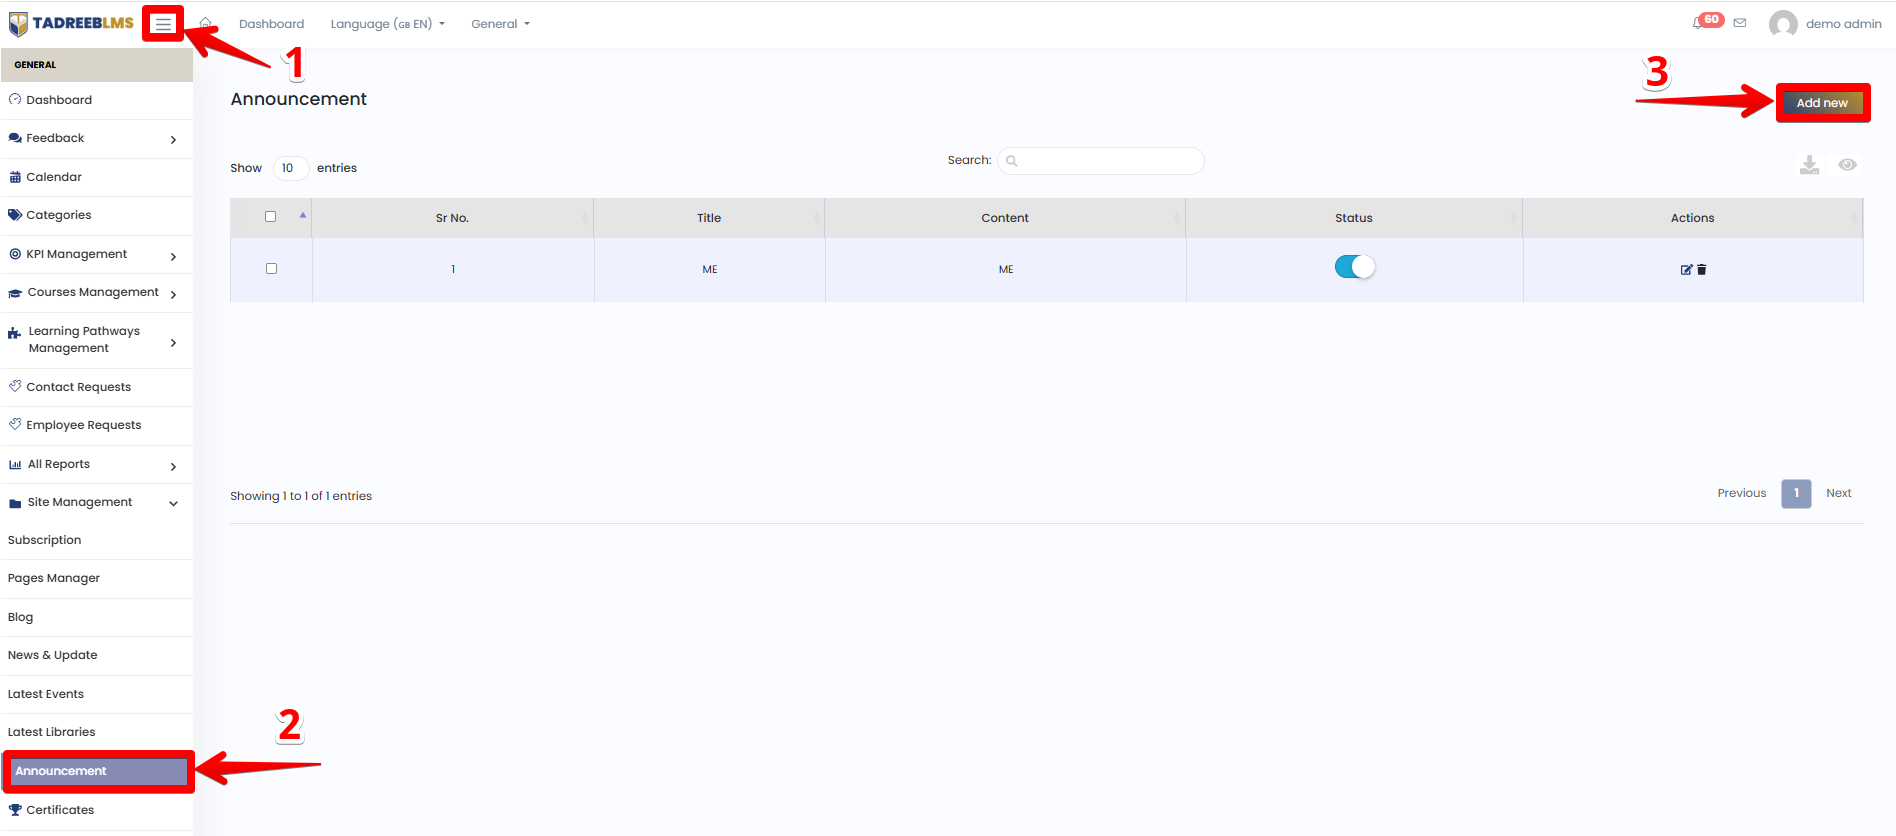
- Select Site Management > Announcement.
- Click Add New.
- Enter required details.
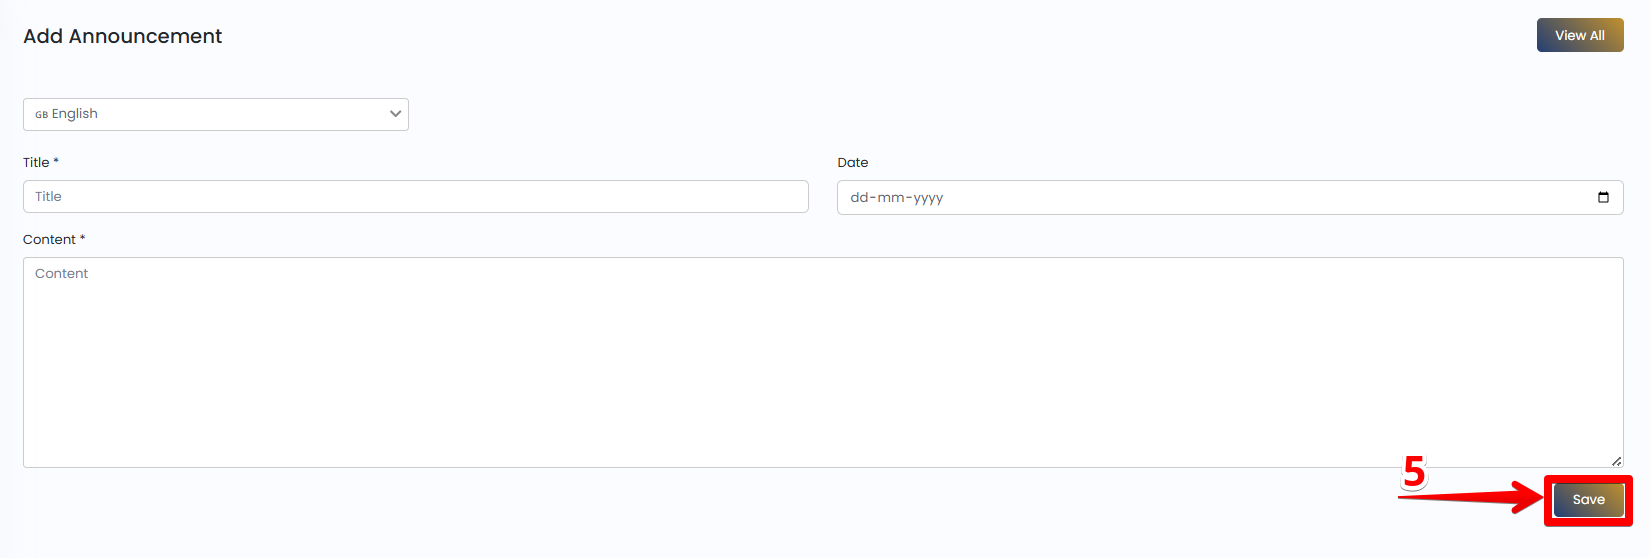
- Click Save.
11. Certificates
Manage and reissue course completion certificates.
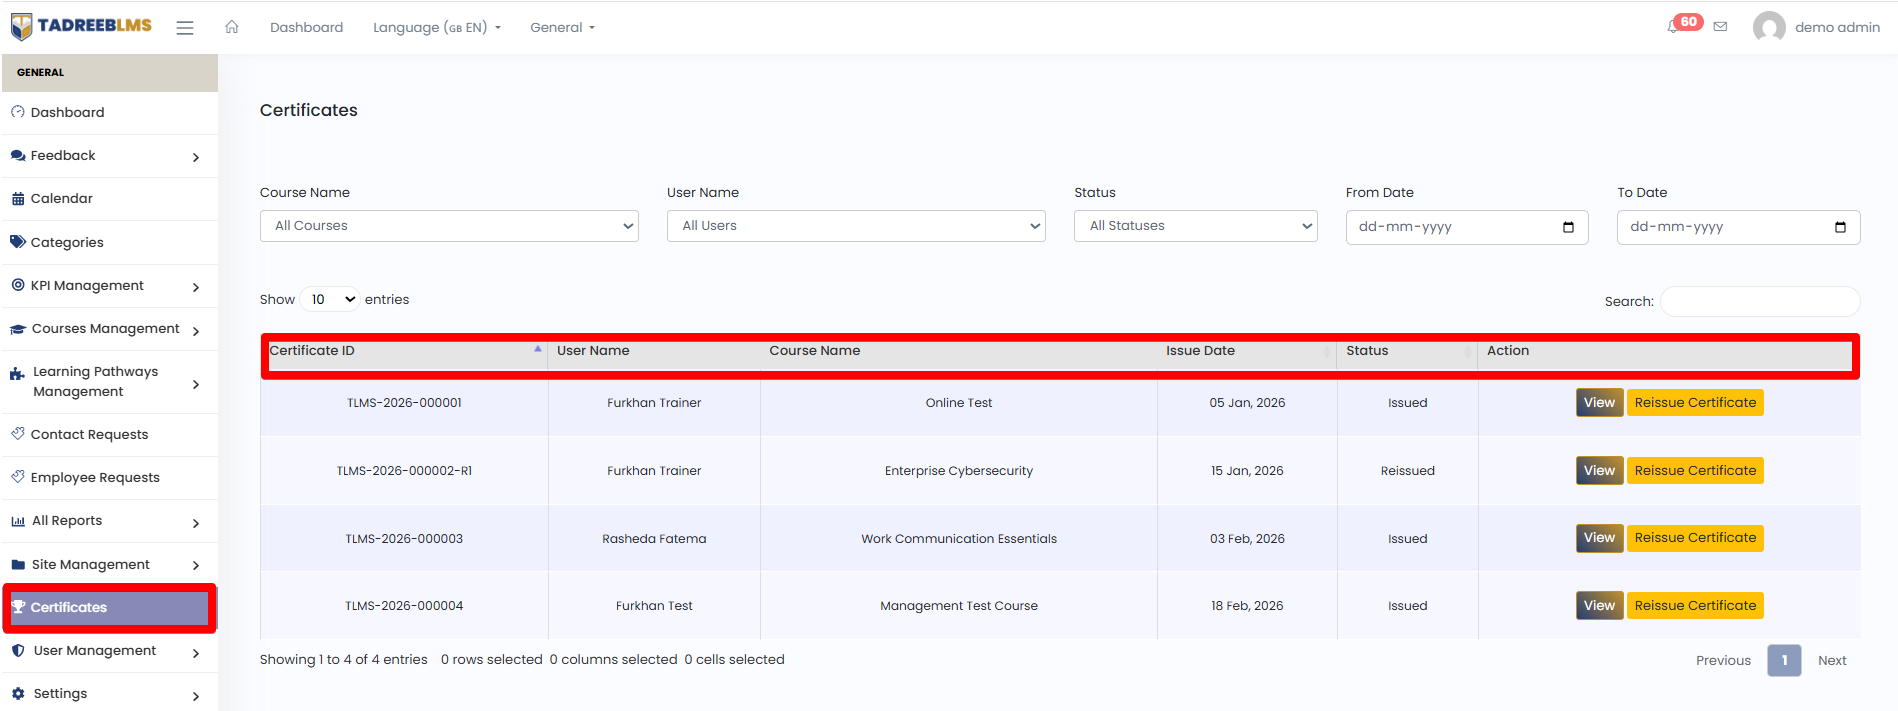
Table Headings
| Heading | Description |
|---|---|
| Certificate ID | Unique system generated certificate identifier |
| User name | Name of the certificate recipent |
| Course name | Course for which the certificate was issiued |
| Issue date | Date the certificate was awarded |
| Status | Issued or Reissued |
| Actions | View to preview or Reissue certificate to regenerate |
Filter Controls:
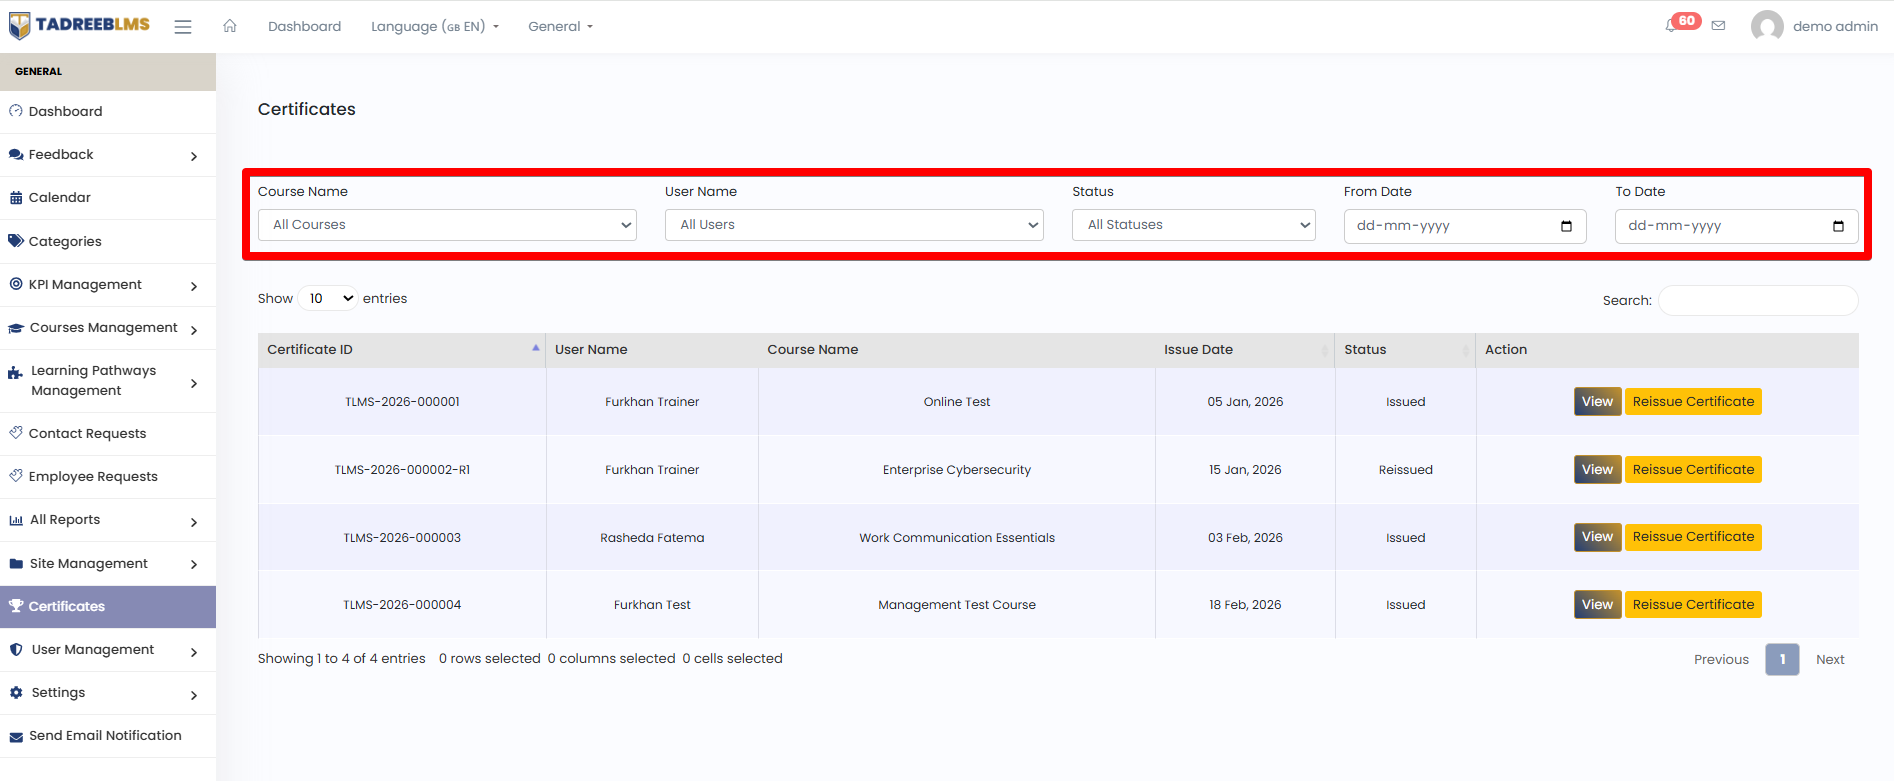
Filter Headings
| Heading | Description |
|---|---|
| Course name | Filter by a specific course |
| User name | Filter by a specific lerner |
| Status | Filter by Issued or Reissued status |
| From date/To date | Filter certificates with a date range |
| Search bar | Keyword based filtering |
12. User Management
The User Management section lets you manage all users from one place. As an administrator, you can create, view and manage all registered users, assign roles, set permissions, and keep user information organised, all from one place.
12.1 All Users
The All Users page provides a complete list of all users registered on your TadreebLMS platform. From here, you can search for specific users, check their roles and account status, and take quick actions like viewing, editing or deactivating accounts.
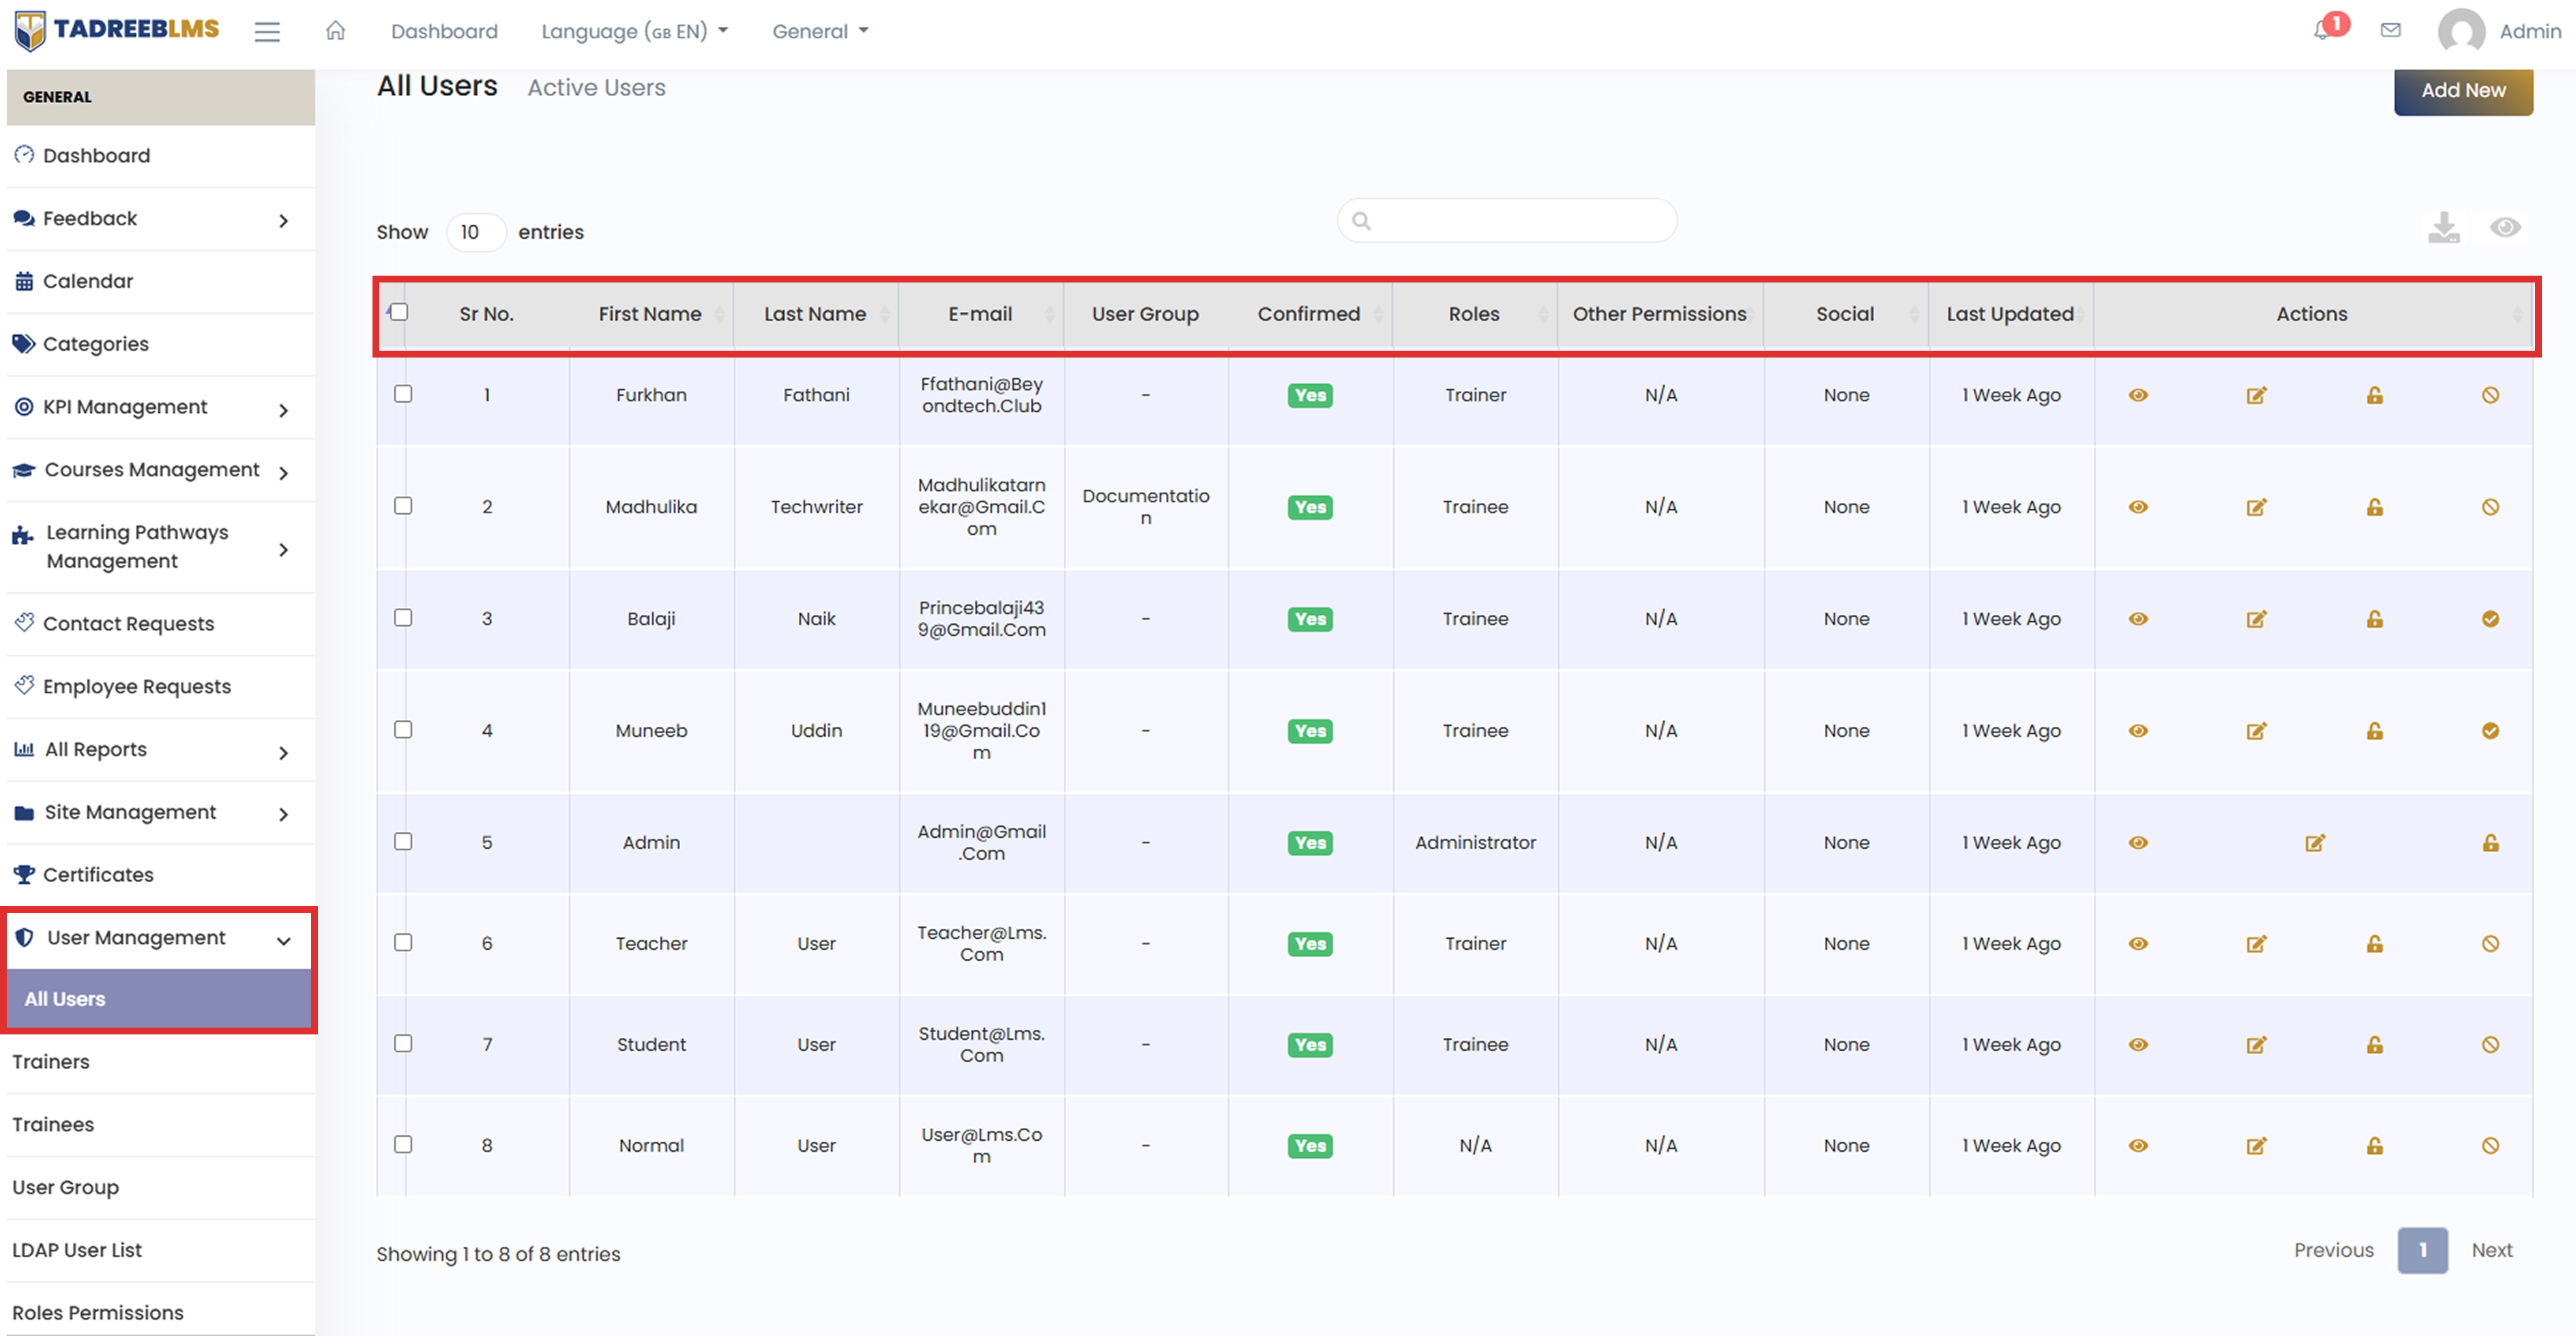
Table Headings
The table below describes the column information:
| Heading | Description |
|---|---|
| User Group | The group this user belongs to |
| Confirmed | Shows whether the user's account has been verified |
| Roles | User's assigned role — Trainer, Trainee, or a Custom role |
| Other Permissions | Any additional permissions granted to the user |
| Social | The social login account linked to this user |
| Last Updated | Shows when the user's record was last updated. |
| Actions | Options to View, Edit or Deactivate the account |
| Download | Export the full user list as a CSV or PDF file |
💡 Tip: Use the Search bar to find a User by name or email quickly.
📌 Note: When you delete Users from the list, they are moved to the Trash tab. You can restore them anytime if needed.
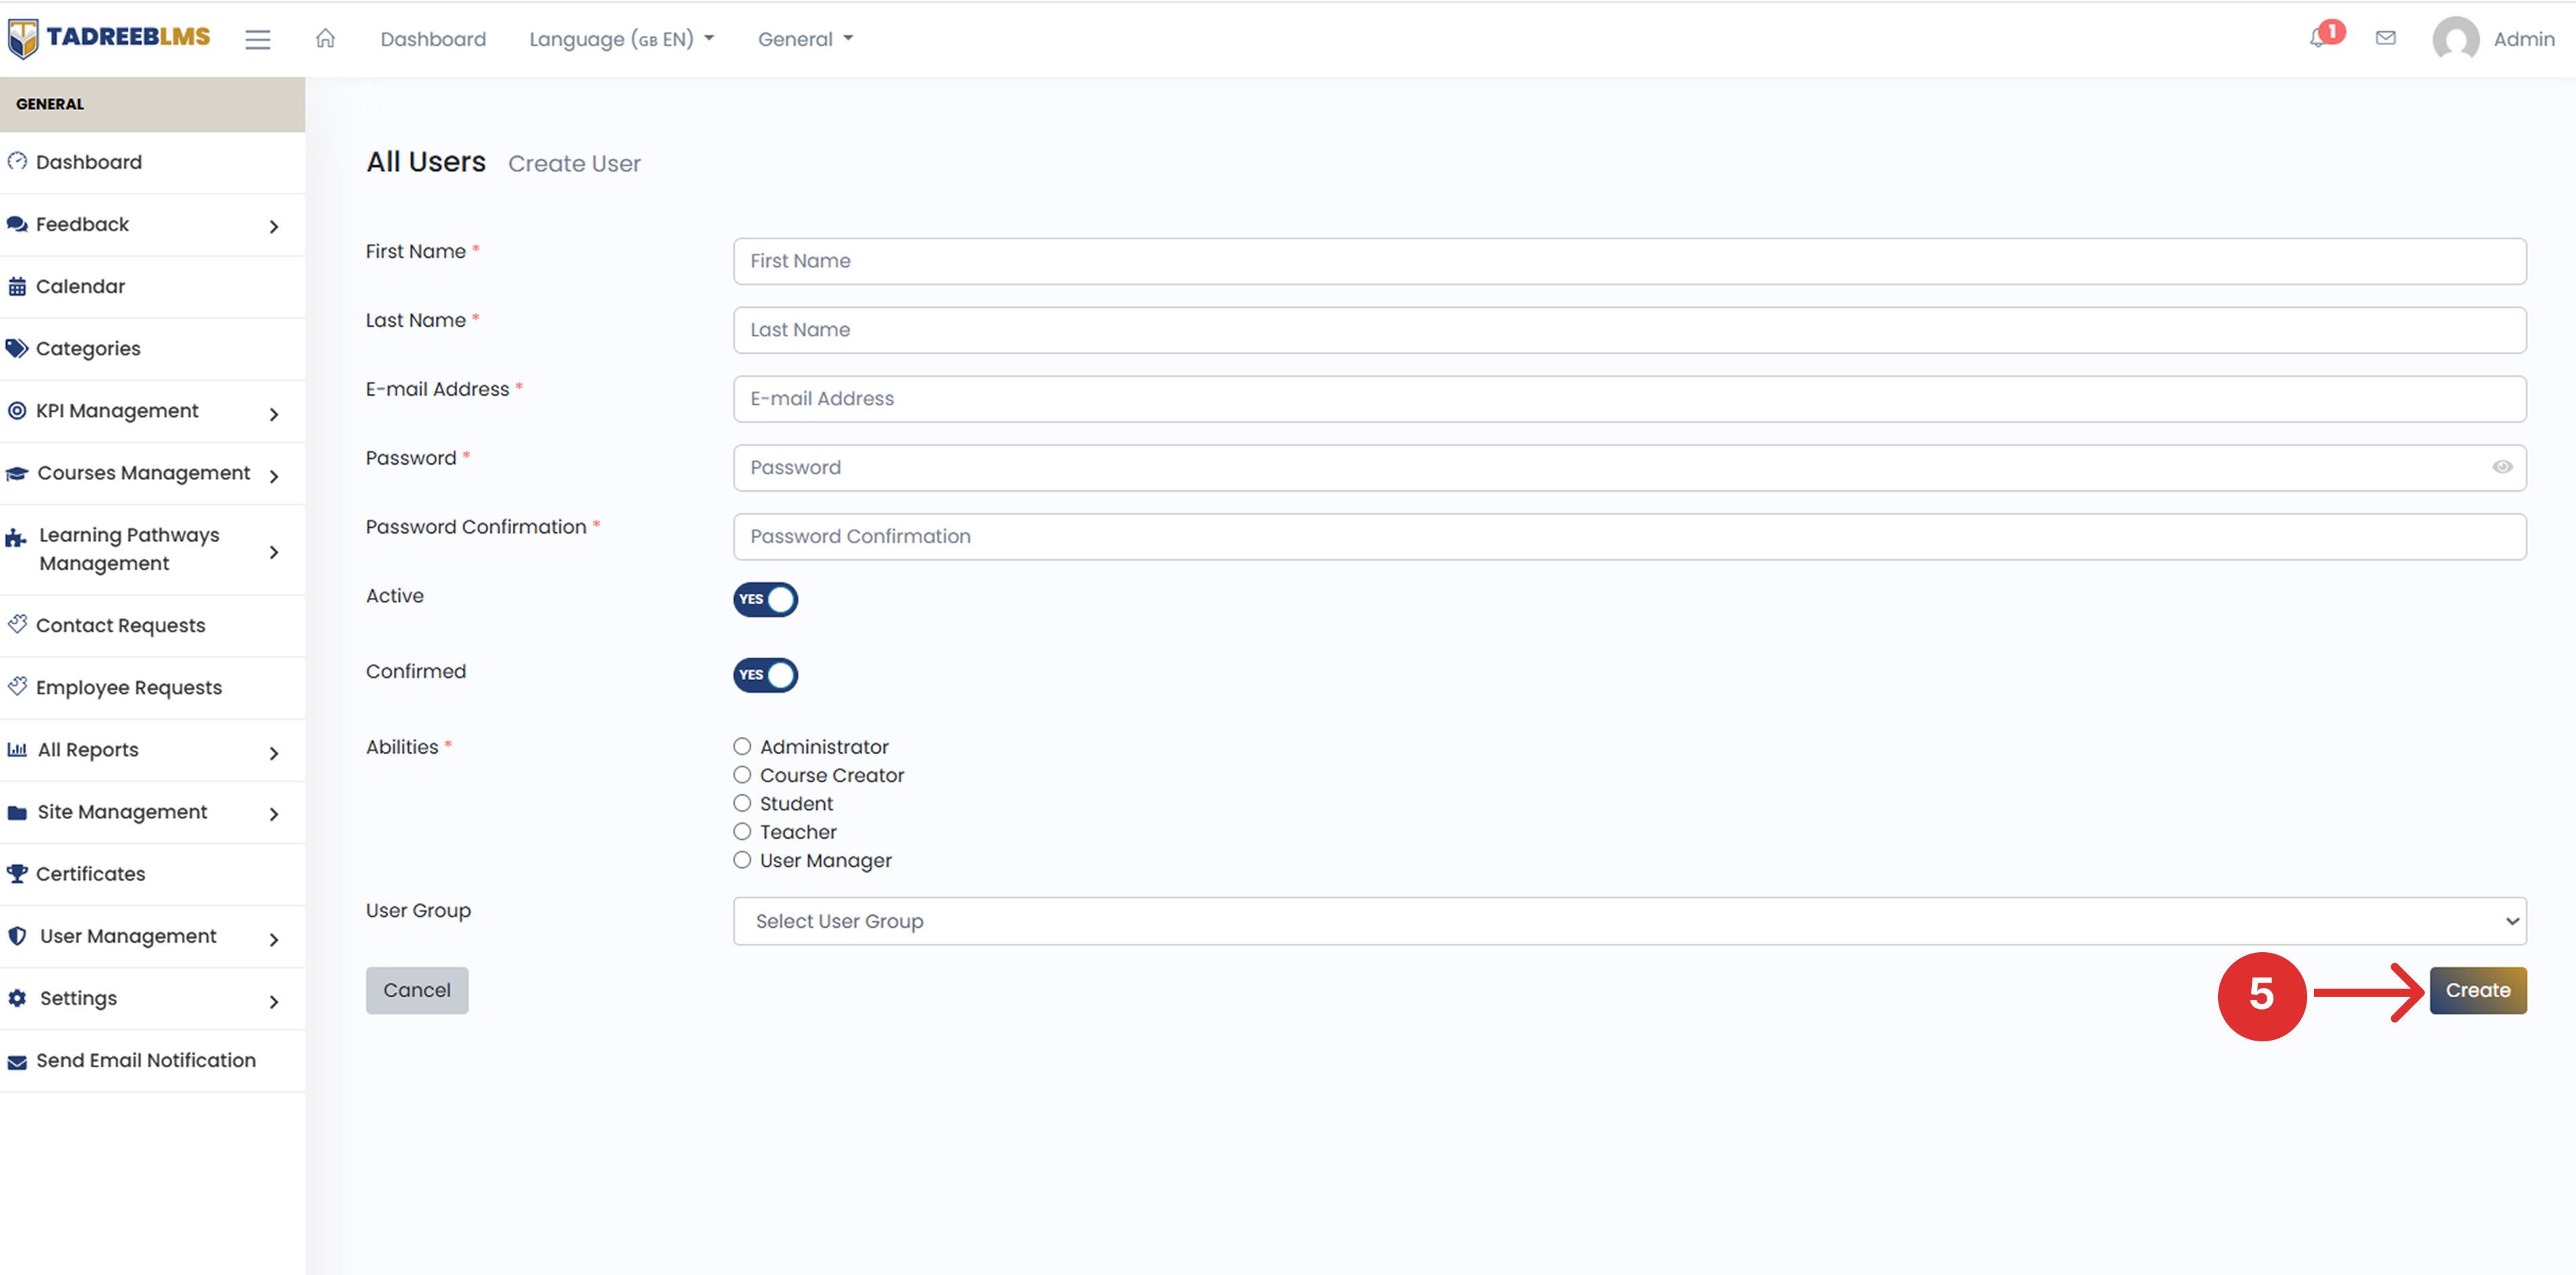
12.1.1 Create New User
Create a user account to add a new user to the platform.
📋 Before you start: Ensure you have the user's name, email address, and intended role ready before creating.
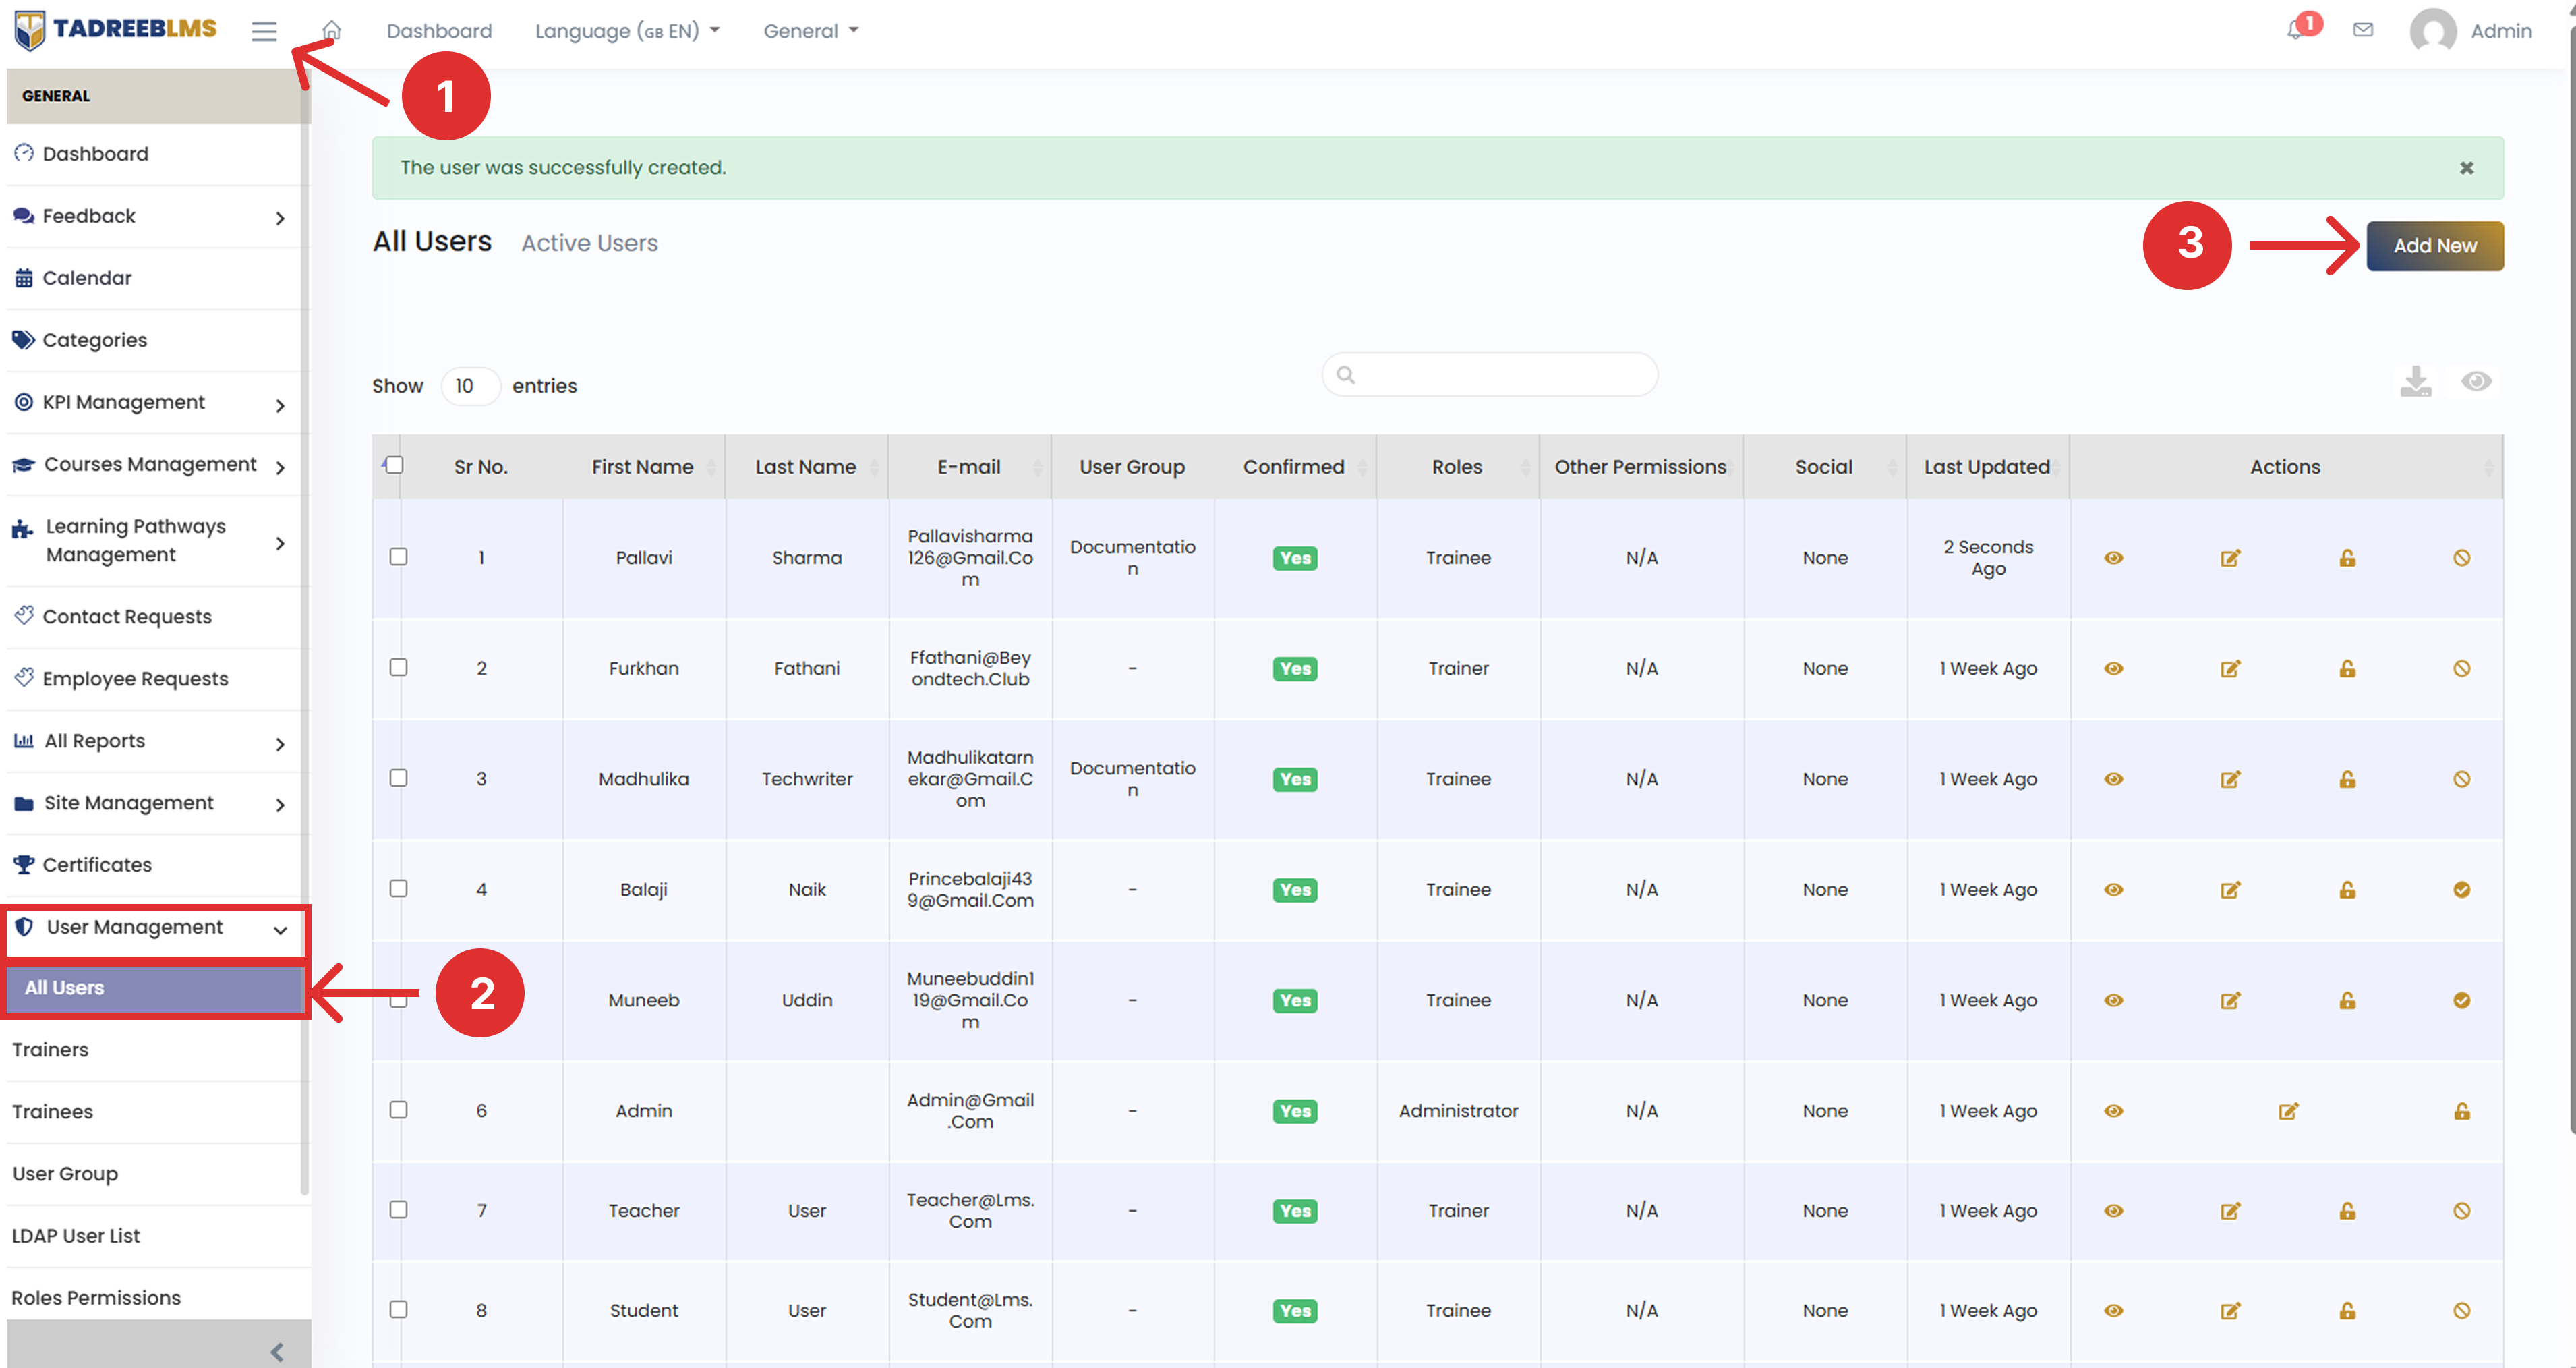
To create a new user:
-
Click the menu icon (☰) at the top left to open the sidebar menu.
-
In the sidebar menu, go to User Management and select All Users.
-
Click the Add New button in the top right corner of the page.
-
Fill in the user's details:
- First Name and Last Name.
- Email Address.
- Password and Password Confirmation.
- Toggle Active and Confirmed as needed.
- Select the user's role (Administrator, HR, Student, Teacher, or Test).
- Assign a User Group if applicable.
-
Click Create to save the new account.
12.2 Trainers
The Trainers page shows a dedicated list of all users assigned as Trainers on Tadreeb LMS platform. This makes it easy to find, manage, update, or remove trainer accounts without searching through the full user list.
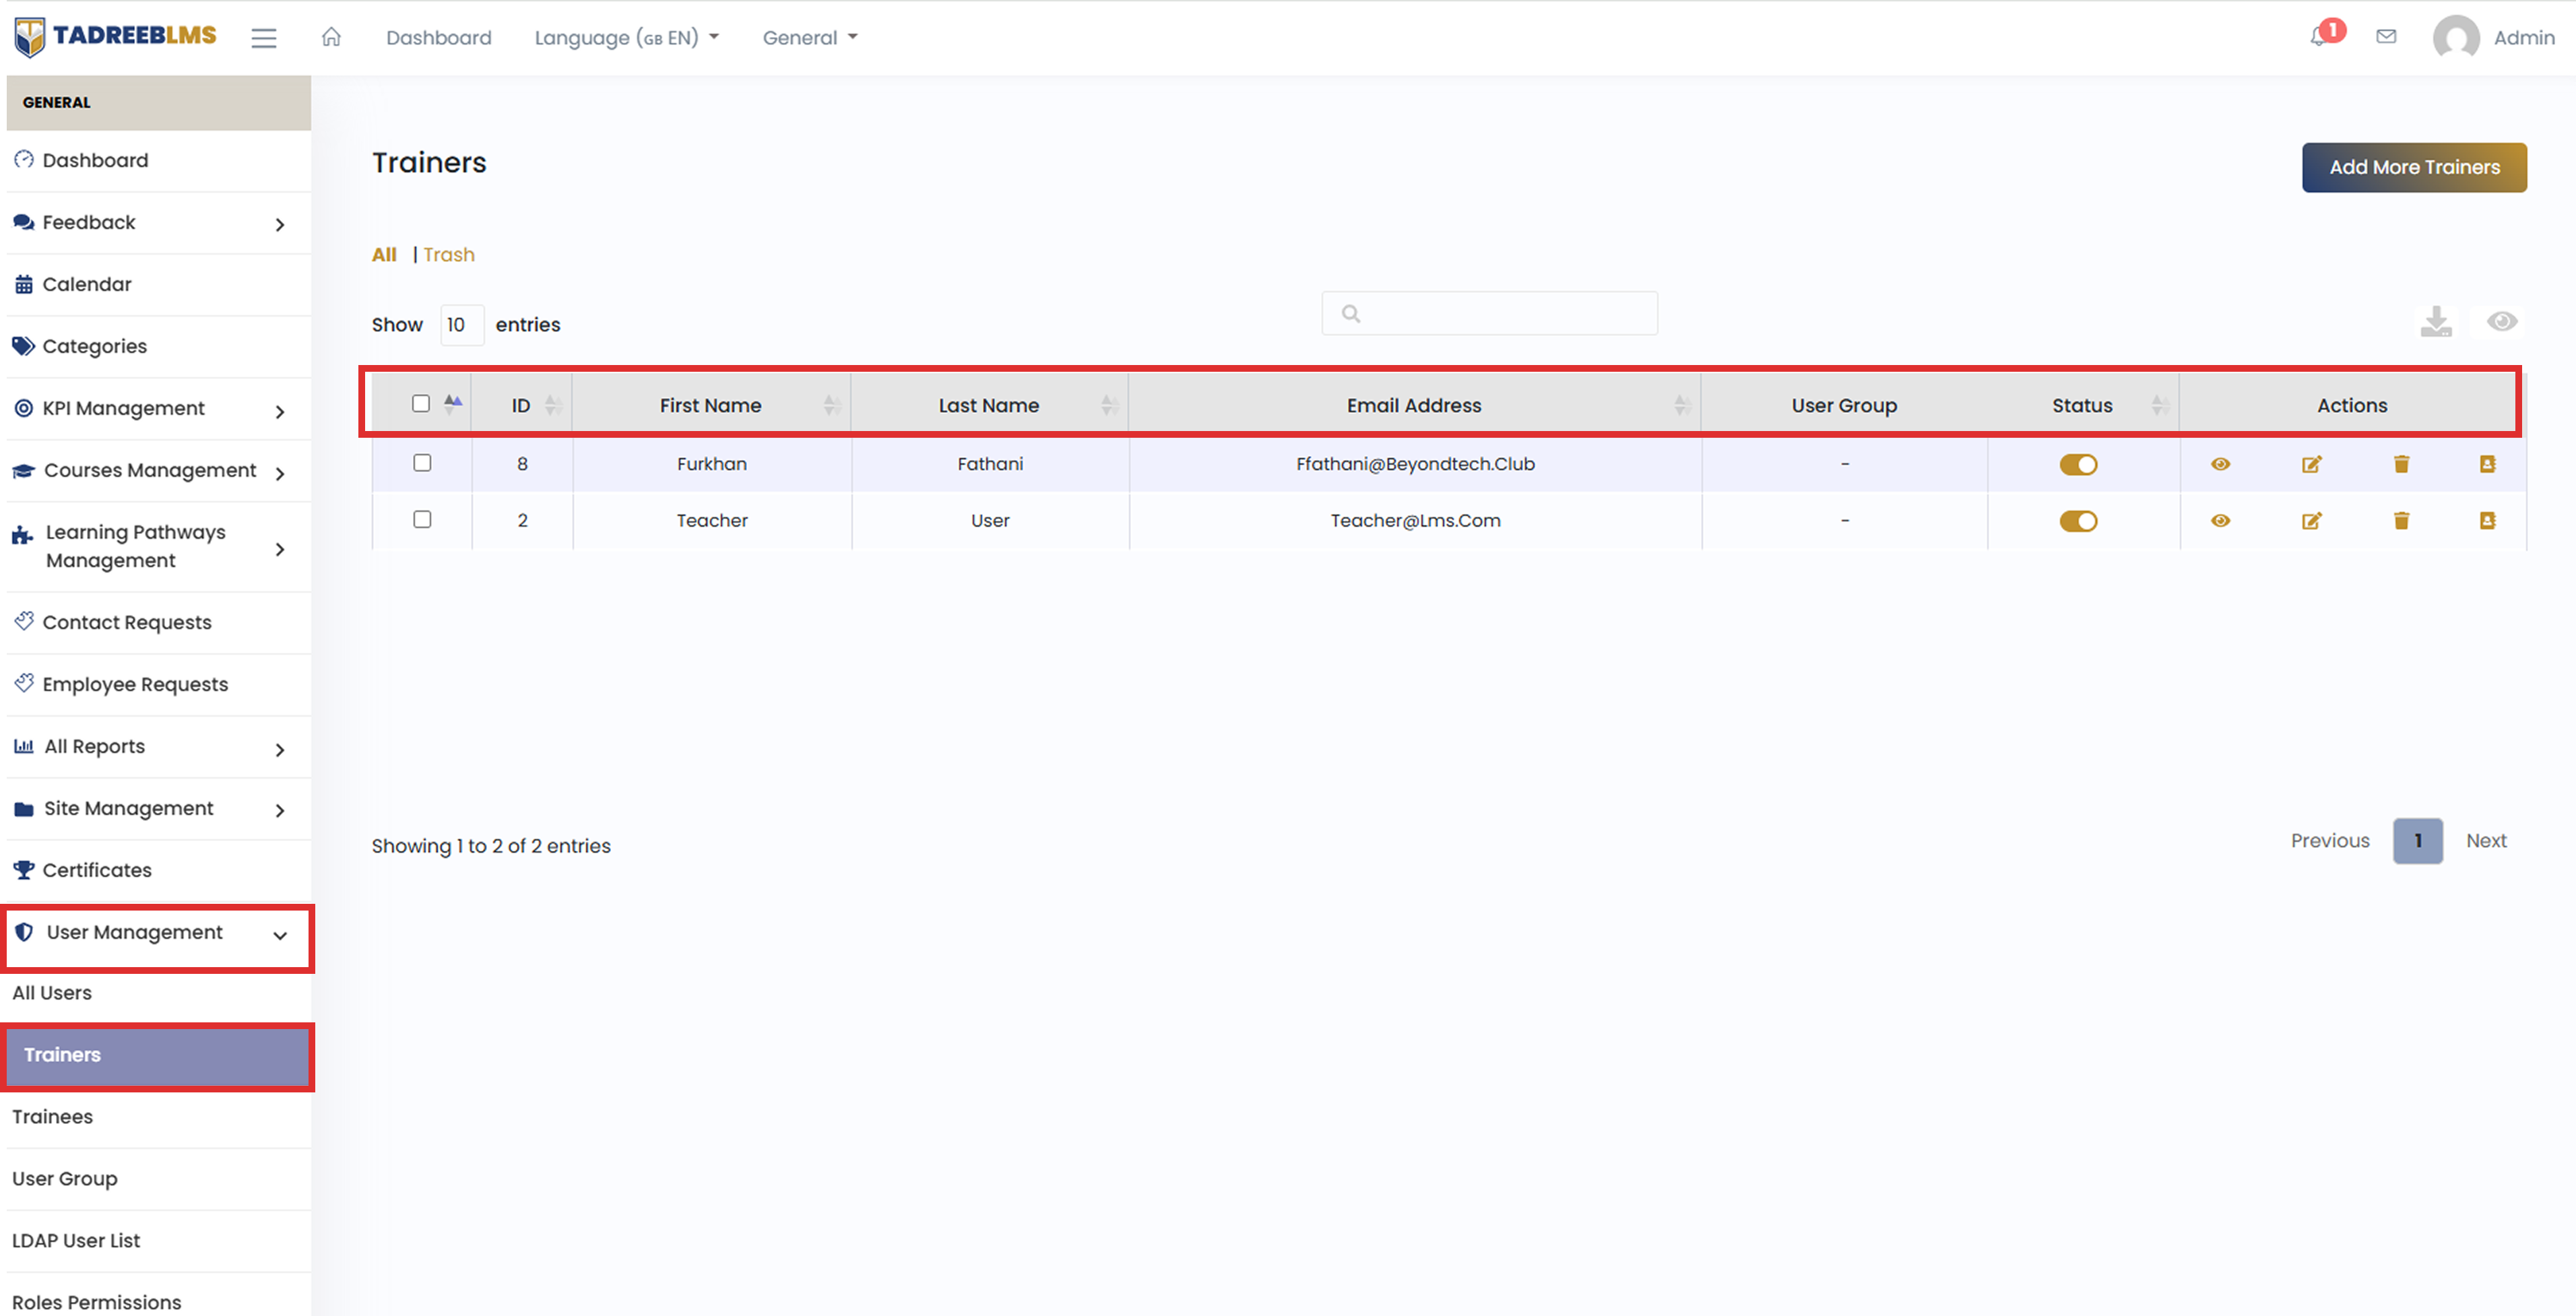
Table Headings
The table below describes the column information:
| Heading | Description |
|---|---|
| ID | A unique system-generated number assigned to each trainer |
| User Group | The group this trainer is assigned to, if any |
| Status | Shows whether the trainer's account is active or inactive |
| Actions | Options to View, Edit, Delete, or Deactivate the trainer's account |
12.2.1 Create New Trainer
Create a trainer account to add a new trainer to the platform.
📋 Before you start: Ensure you have the Trainer's name and email address ready before creating.
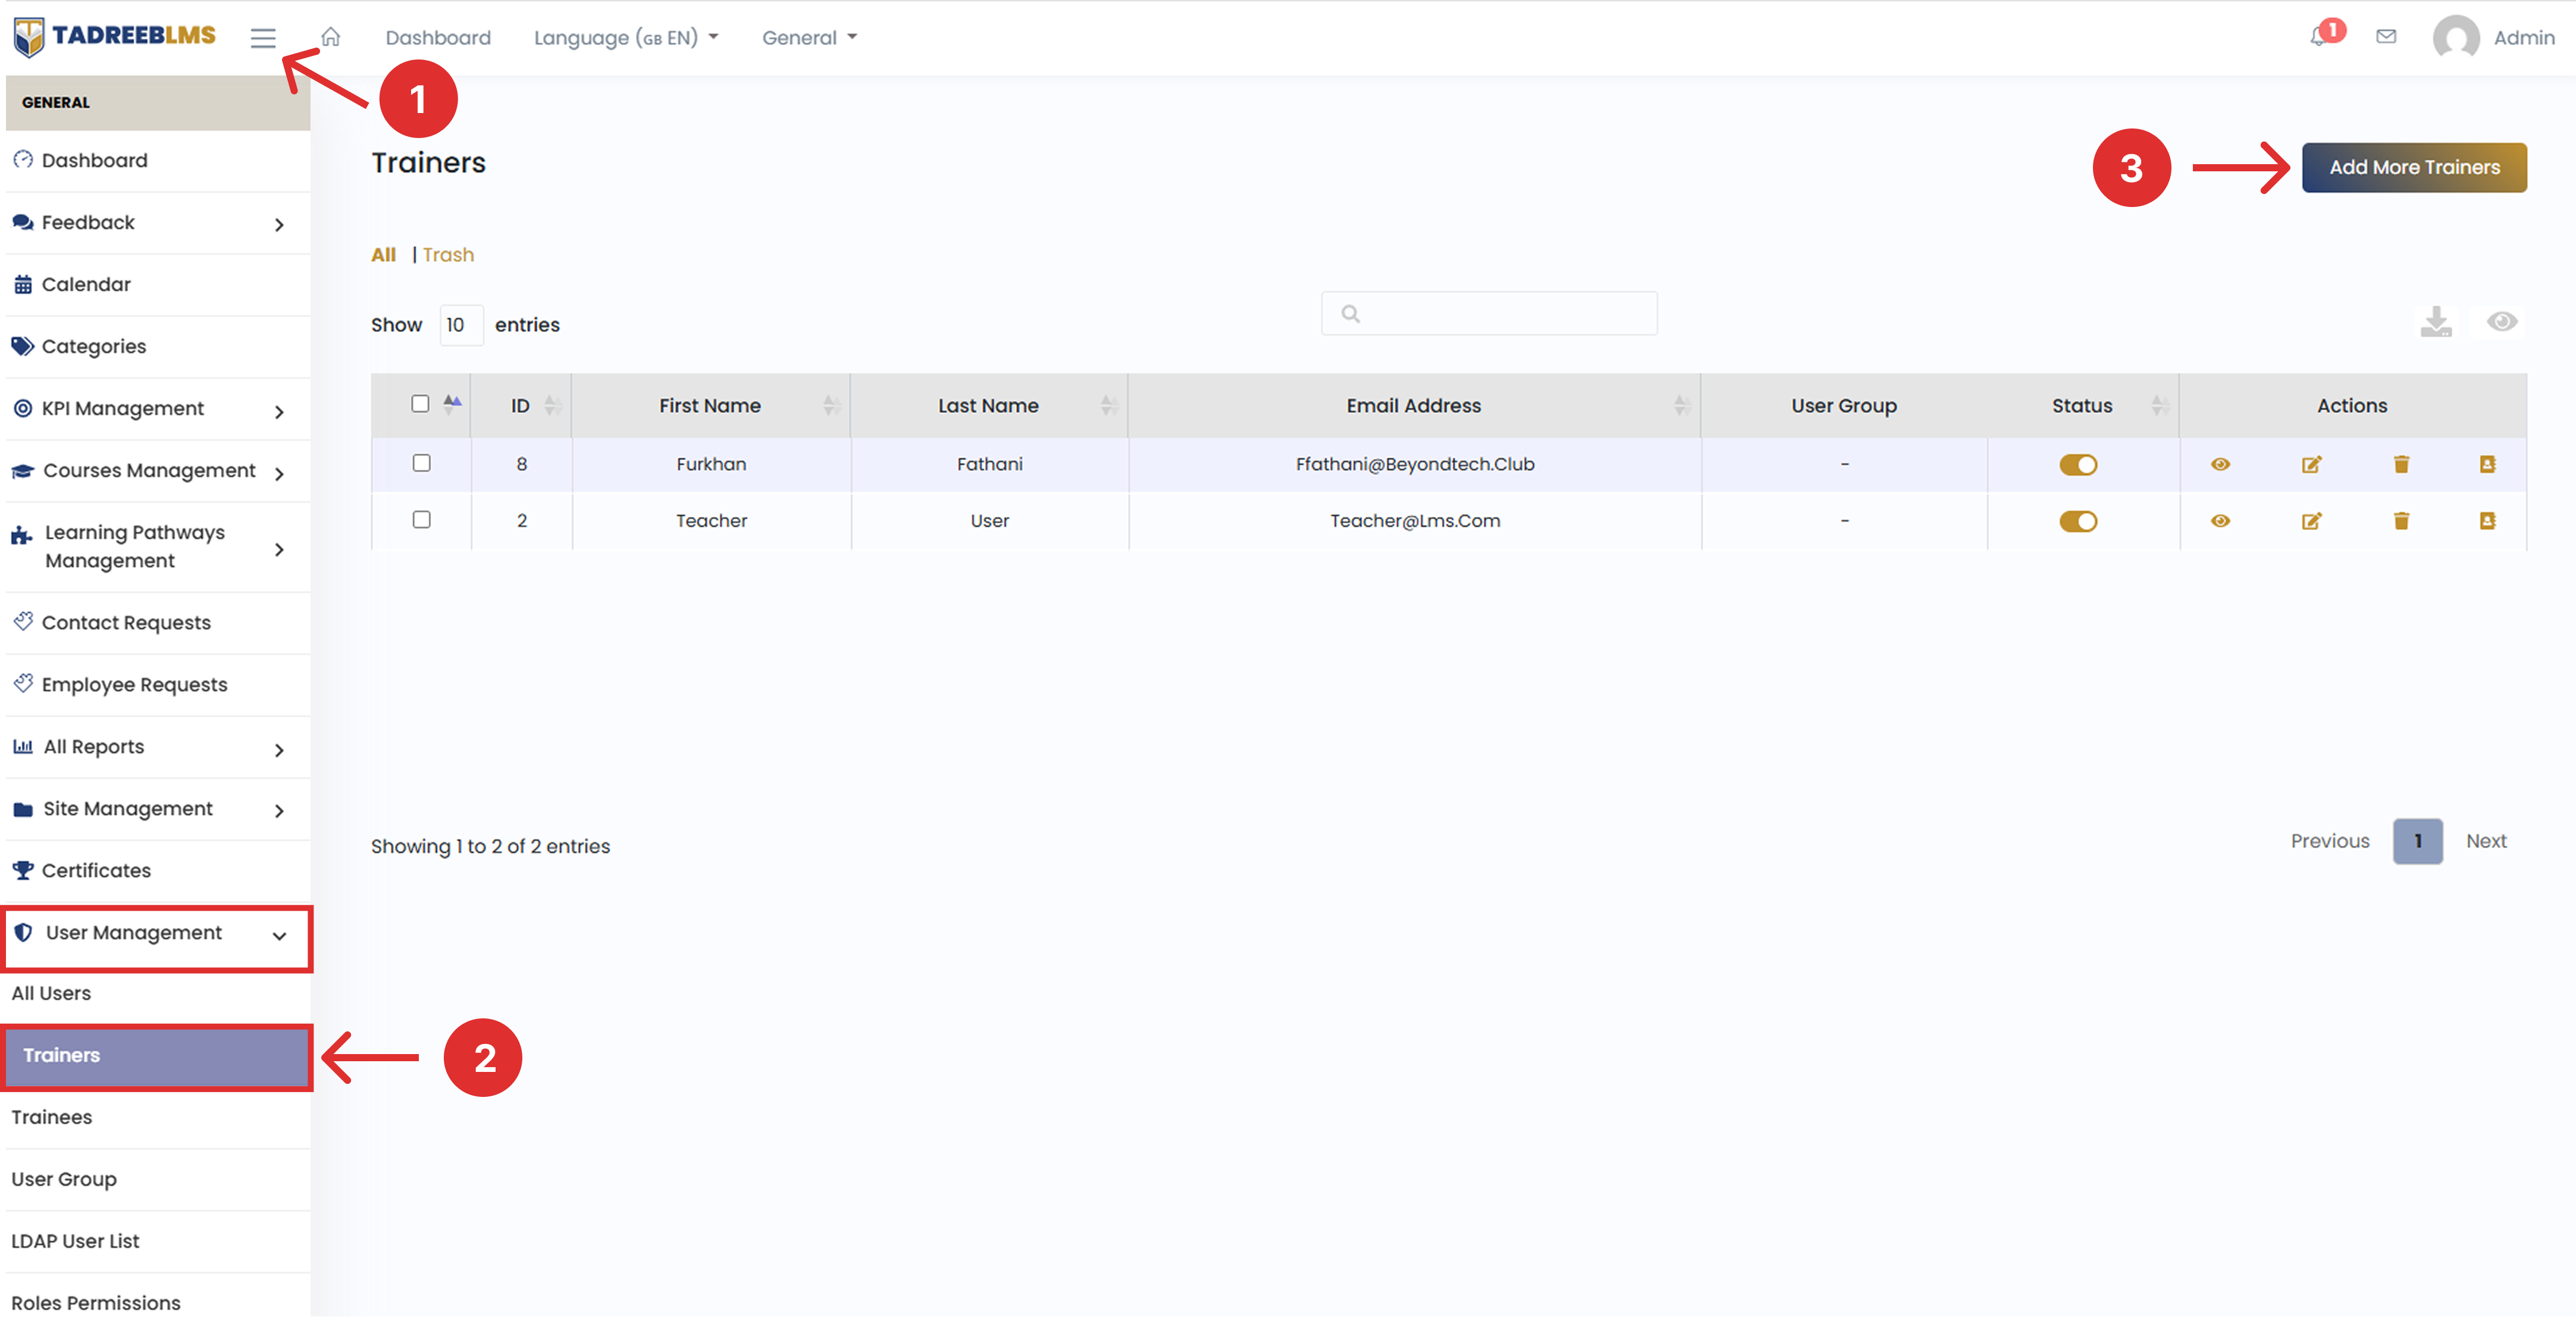
To create a new trainer:
-
Click the menu icon (☰) at the top left to open the sidebar menu.
-
In the sidebar menu, go to User Management and select Trainers.
-
Click the Add New button in the top right corner of the page.
-
Fill in the trainer's details:
- First Name and Last Name.
- Email Address.
- Password and Password Confirmation.
- Toggle Active and Confirmed as needed.
- Select the trainer's role (Administrator, HR, Student, Teacher, or Test).
- Assign a User Group if applicable.
-
Click Create to save the new account.
12.3 Trainees
The Trainees page provides a list of all Trainees (Students) registered on your TadreebLMS platform. From here, you can search for specific trainees, check their roles and account status, and take quick actions like viewing, editing or deactivating accounts.
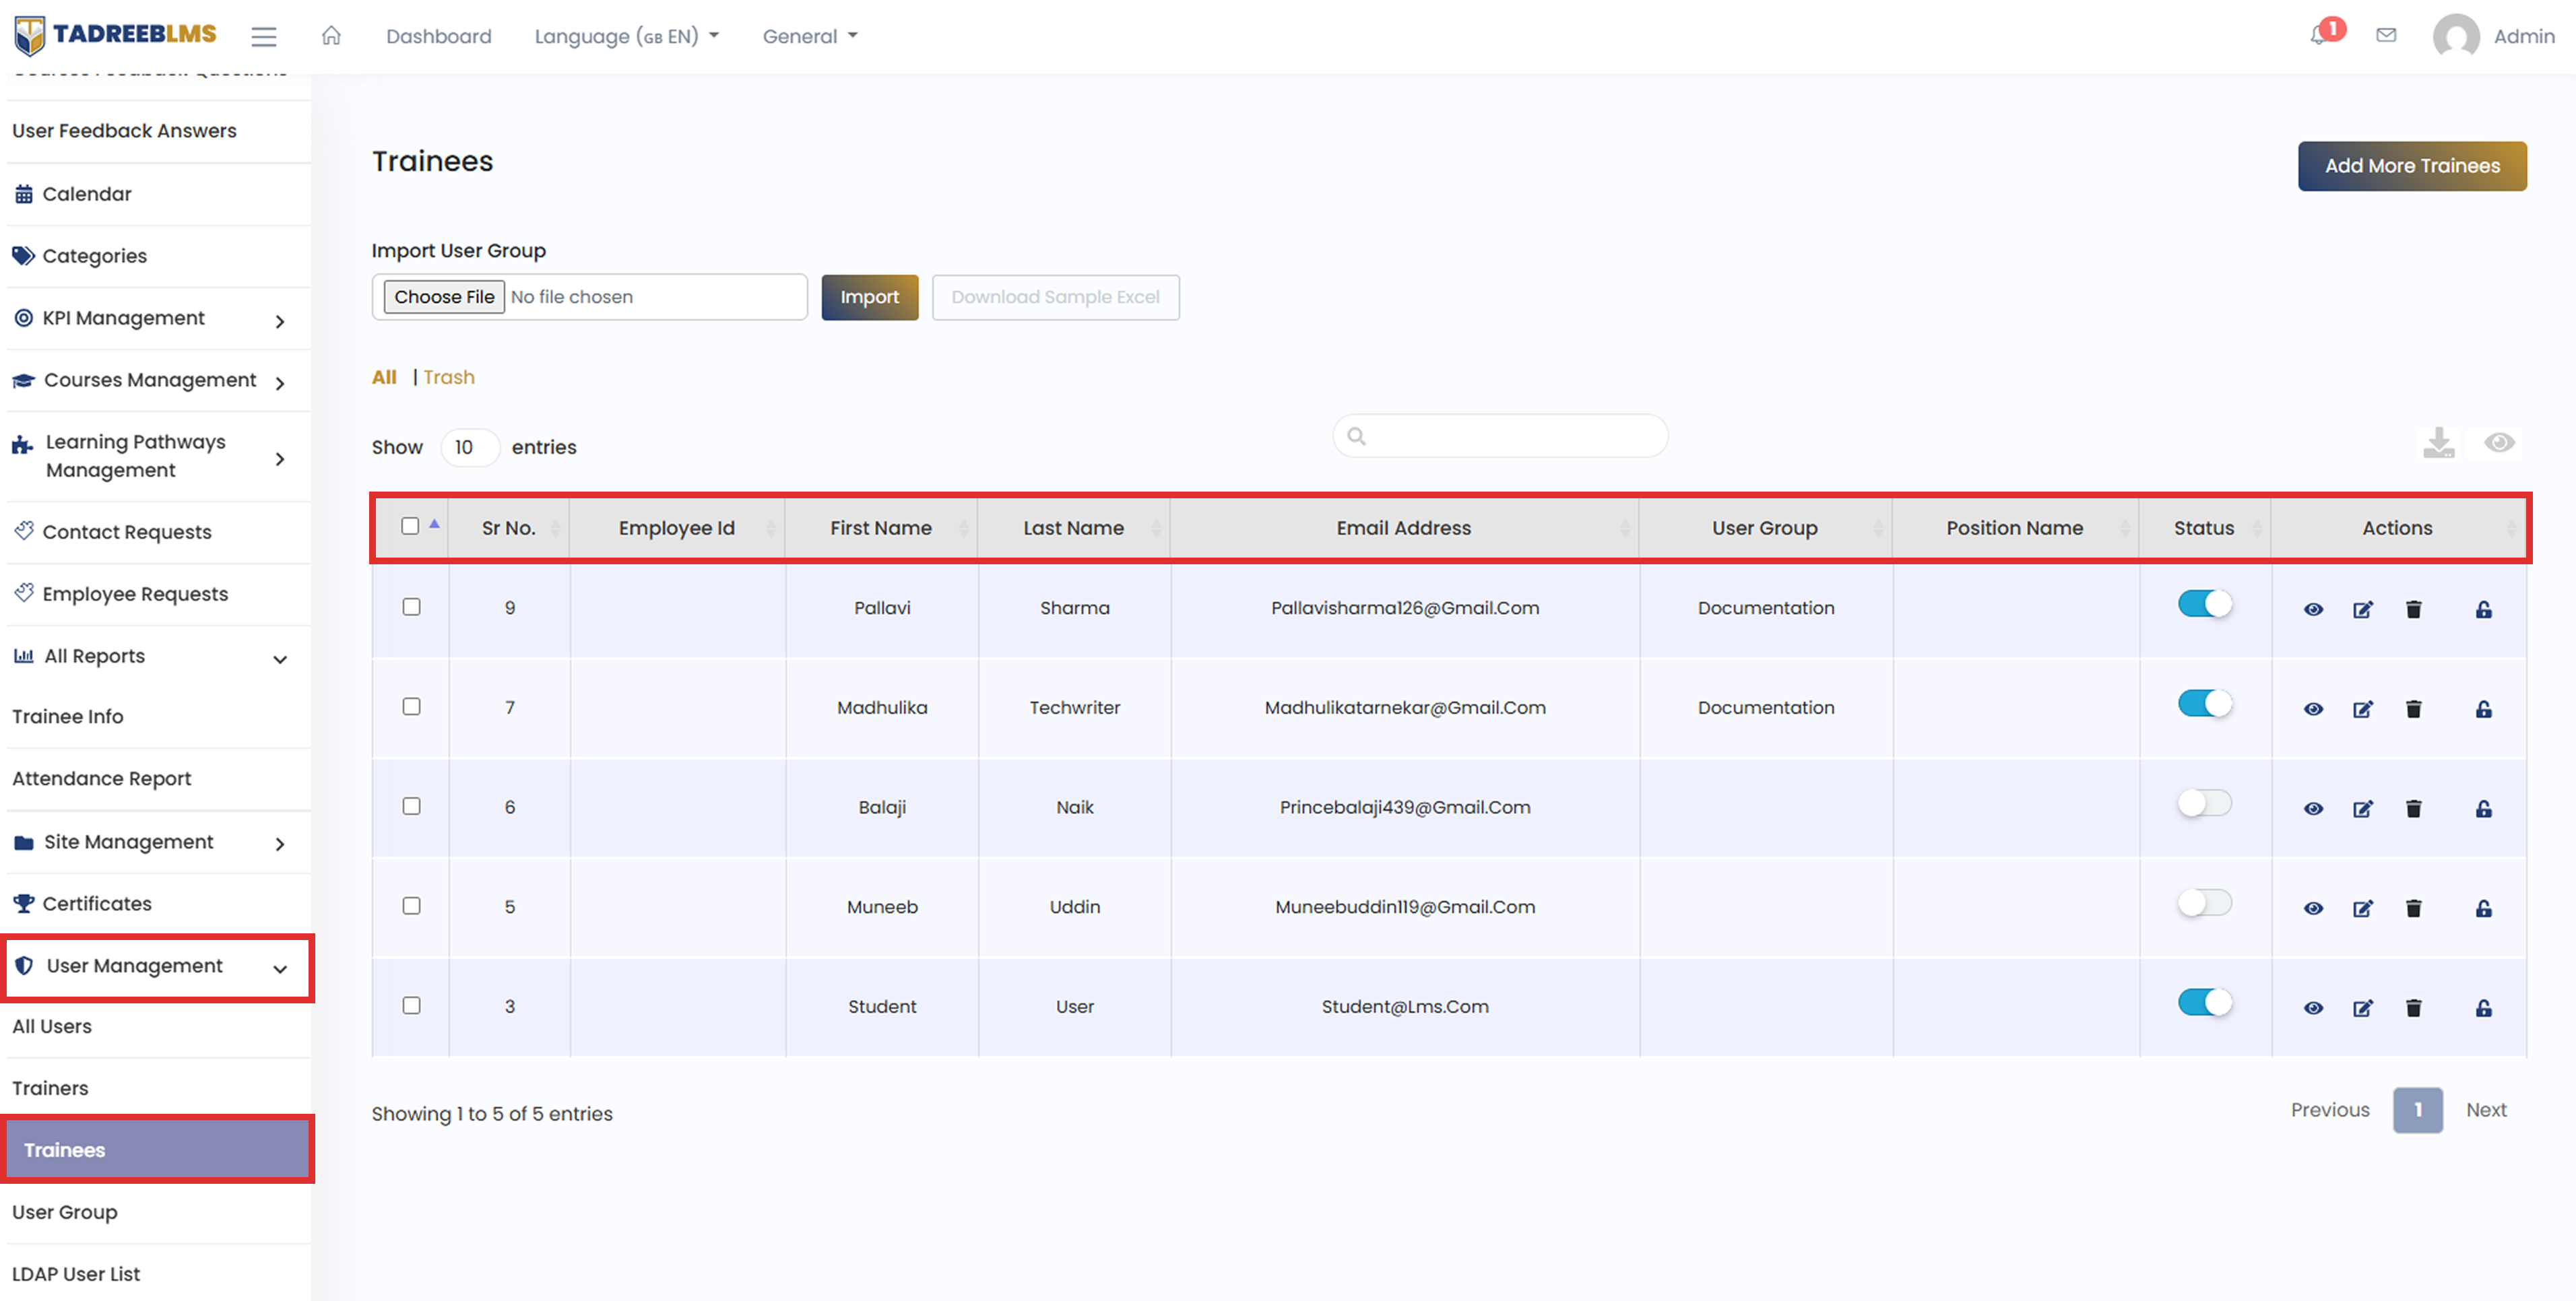
Table Headings
The table below describes the column information:
| Heading | Description |
|---|---|
| Employee ID | A unique system-generated number assigned to each trainee |
| User Group | The group this trainee is assigned to, if any |
| Status | Shows whether the trainer's account is active or inactive |
| Actions | Options to View, Edit, Delete, or Deactivate the trainee's account |
12.3.1 Create New Trainee
Create a trainee account to add a new trainee to the platform.
📋 Before you start: Ensure you have the Trainee's name and email address ready before creating.
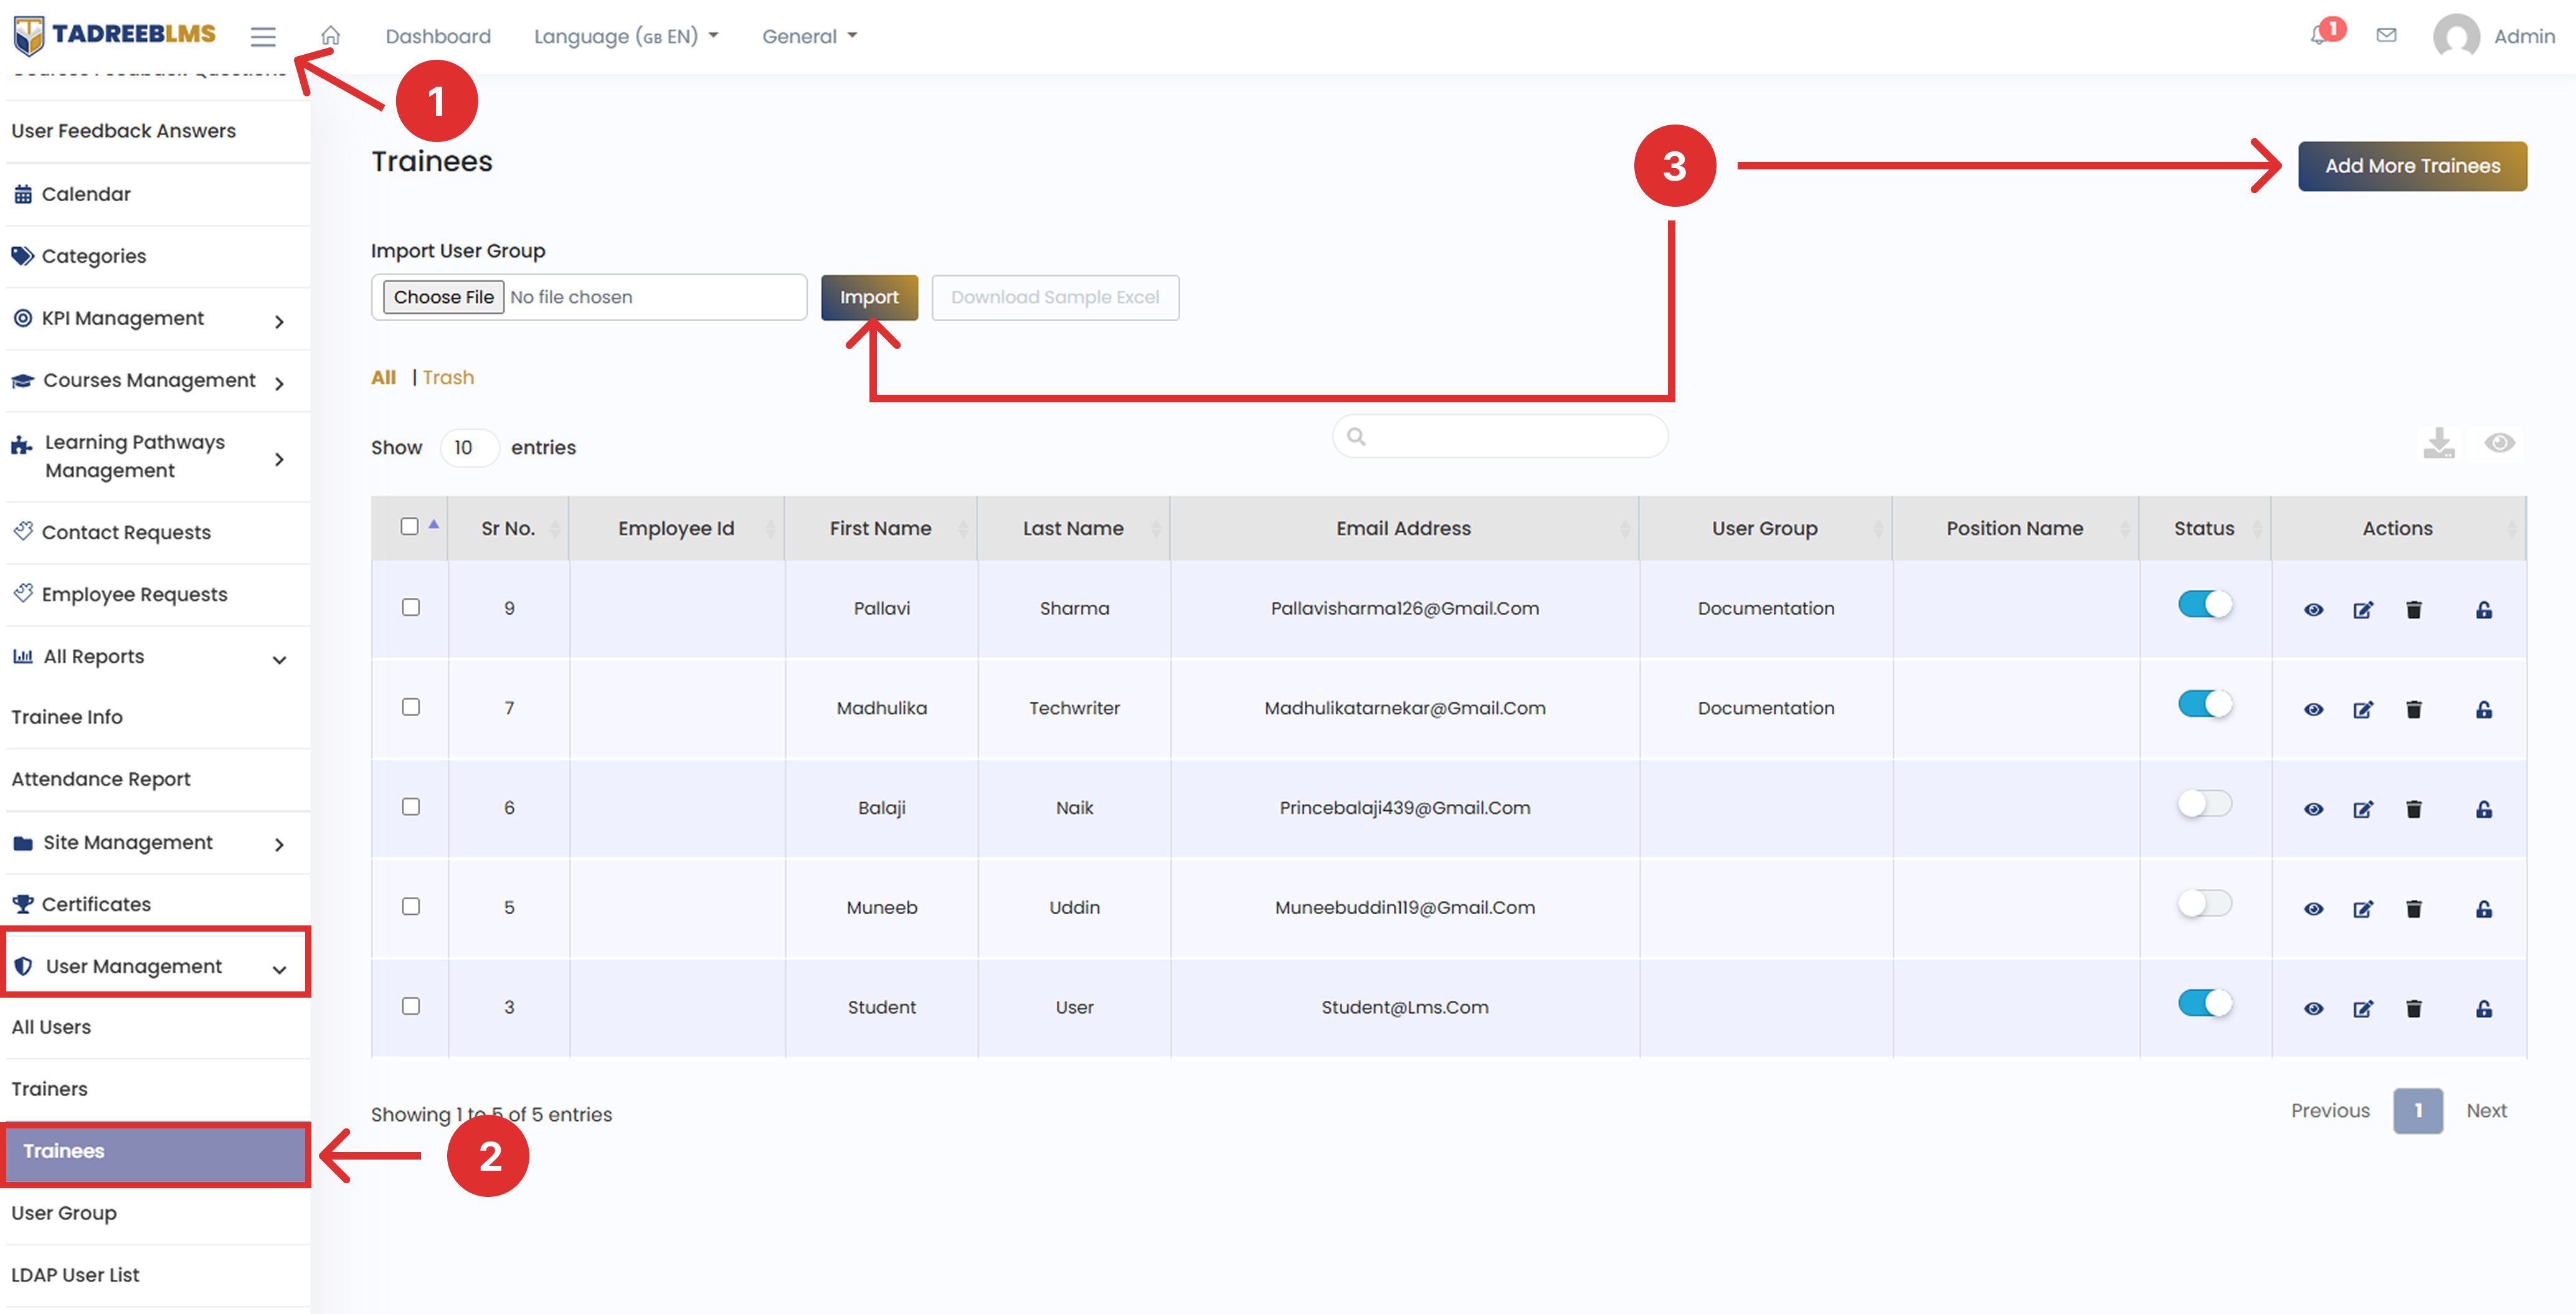
To create a new trainee:
-
Click the menu icon (☰) at the top left to open the sidebar menu.
-
In the sidebar menu, go to User Management and select Trainees.
-
Click the Add New button in the top right corner of the page. Alternatively, you can use the Import button to upload an Excel or CSV file and add trainees in bulk.
-
Fill in the trainee's details:
- First Name and Last Name.
- Email Address.
- Password and Password Confirmation.
- Toggle Active and Confirmed as needed.
- Select the trainee's role (Administrator, HR, Student, Teacher, or Test).
- Assign a User Group if applicable.
-
Click Create to save the new account.
12.4 User Group
The User Group page helps you organise users into groups based on their roles or departments, such as Engineering, HR, QA, or Documentation. This makes it easier to manage users as a group rather than handling each user individually. You can also take quick actions like viewing, editing or deleting user groups.
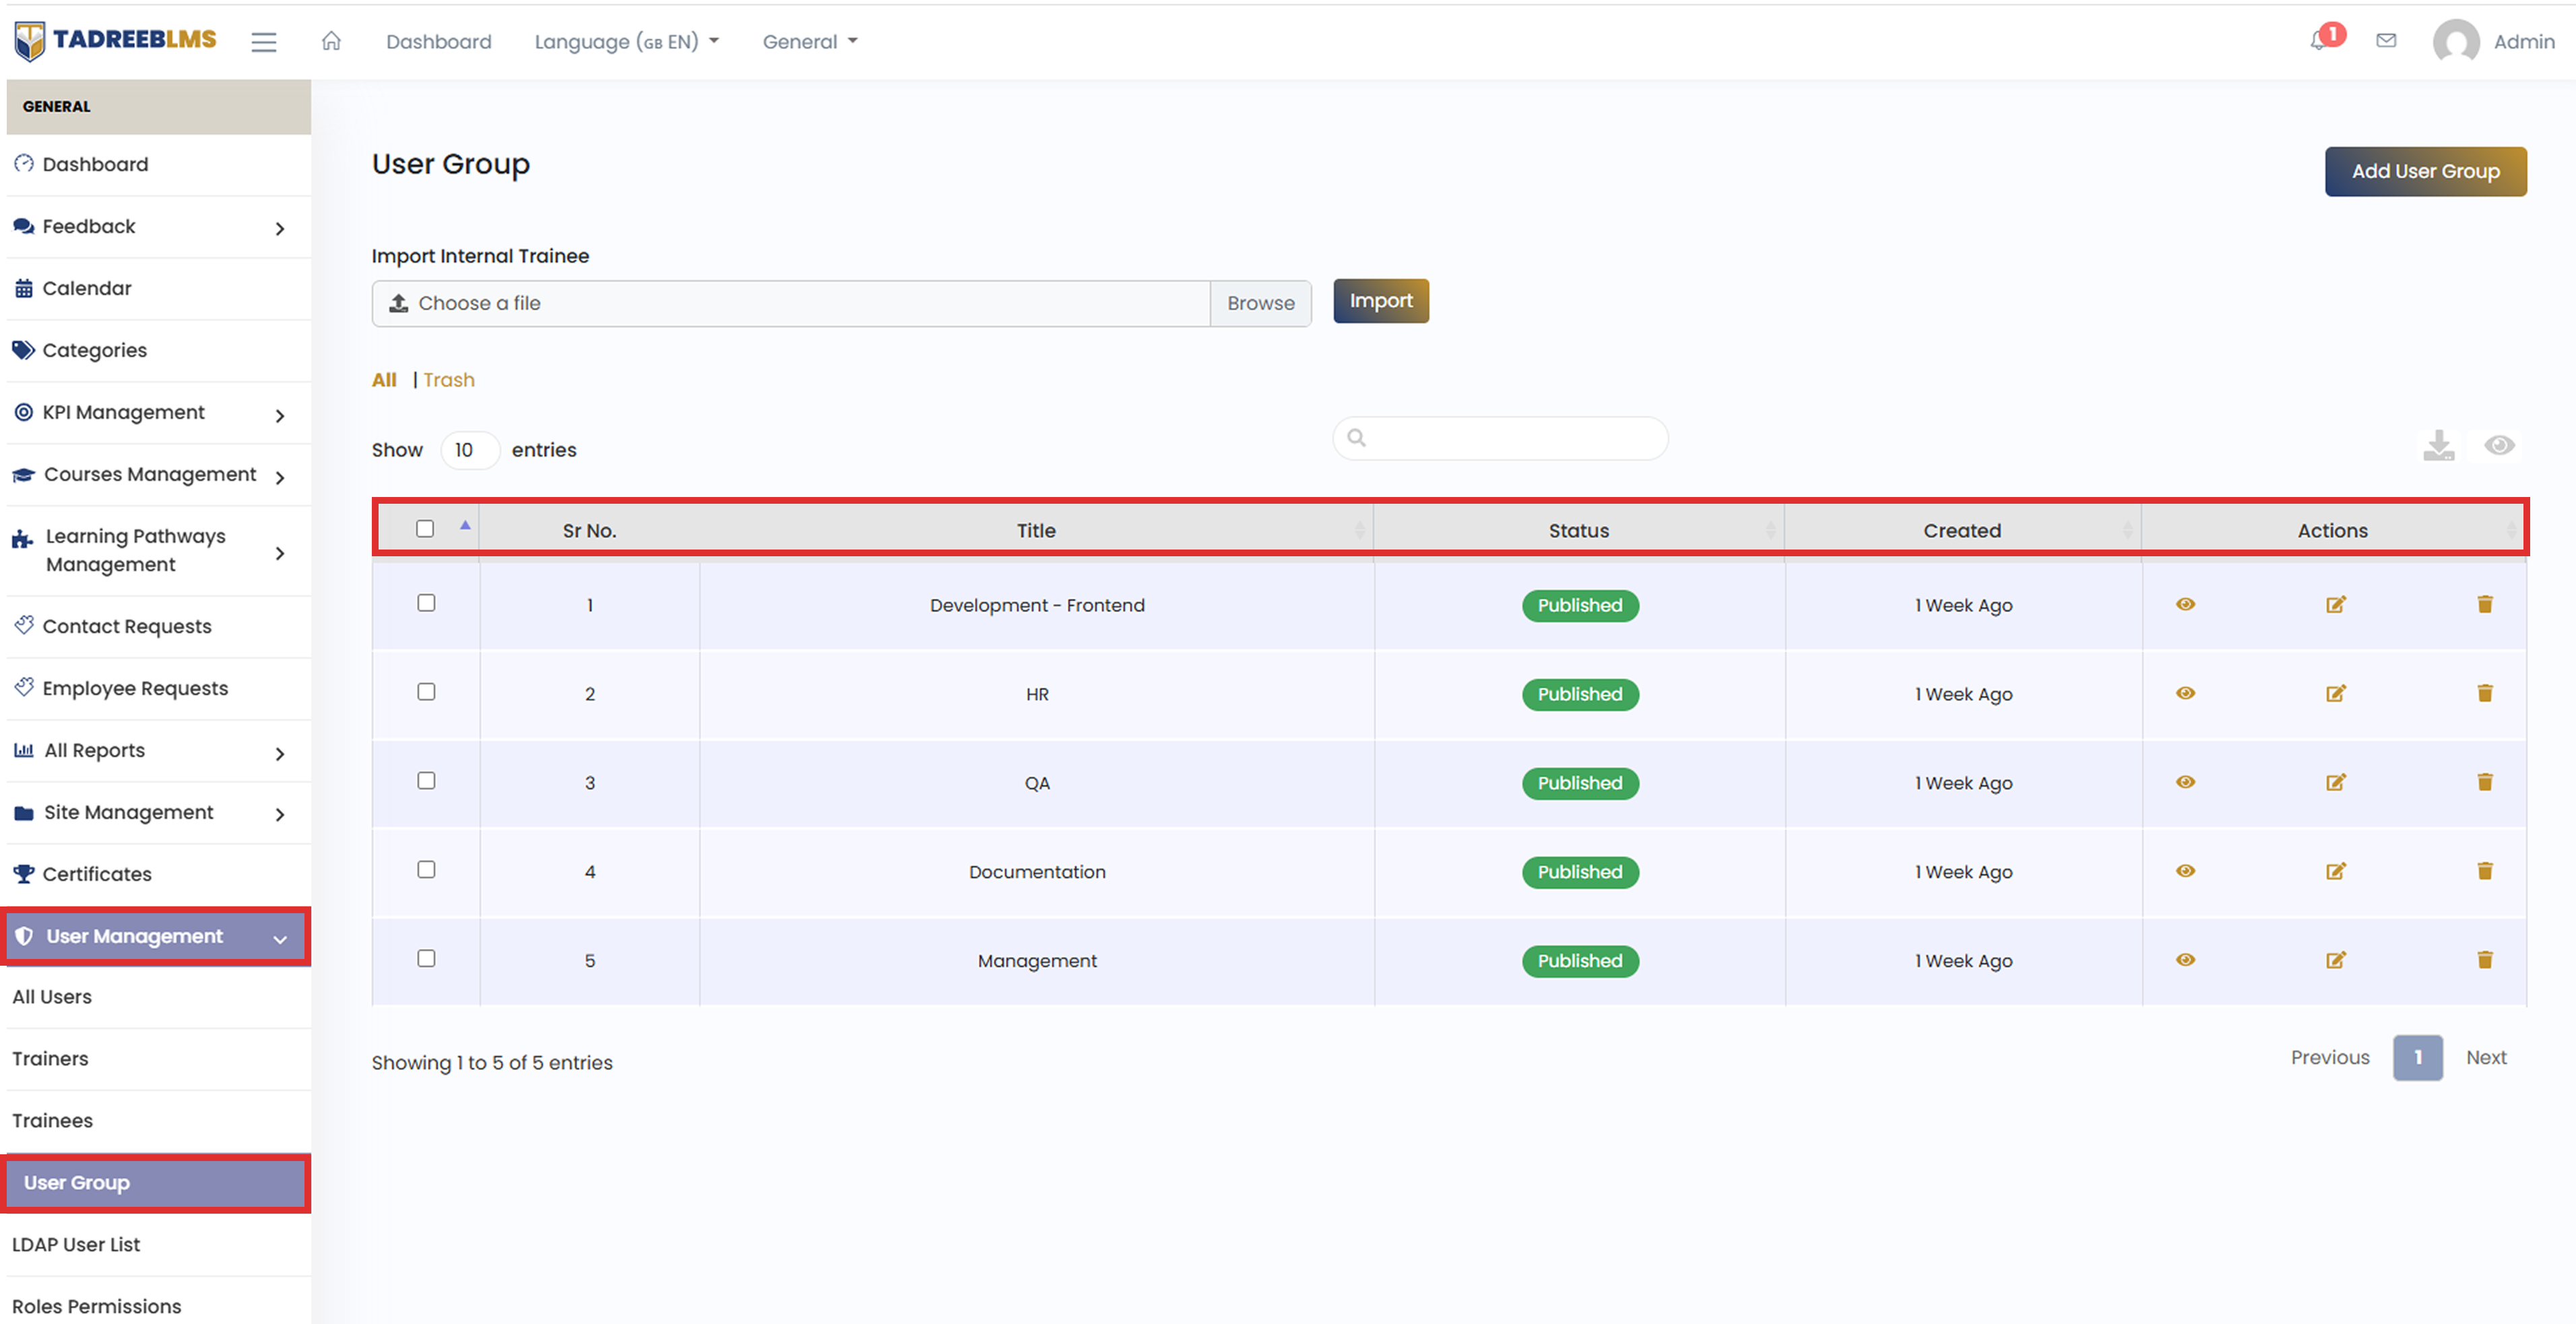
Table Headings
The table below describes the column information:
| Heading | Description |
|---|---|
| Title | The name of the user group (e.g., HR, QA, Management) |
| Status | Shows whether the group is currently published or unpublished |
| Created | Shows when the user group was created |
| Actions | Options to View, Edit, or Delete the group |
12.4.1 Create New User Group
Create a new user group to organise and group users on the platform based on their roles.
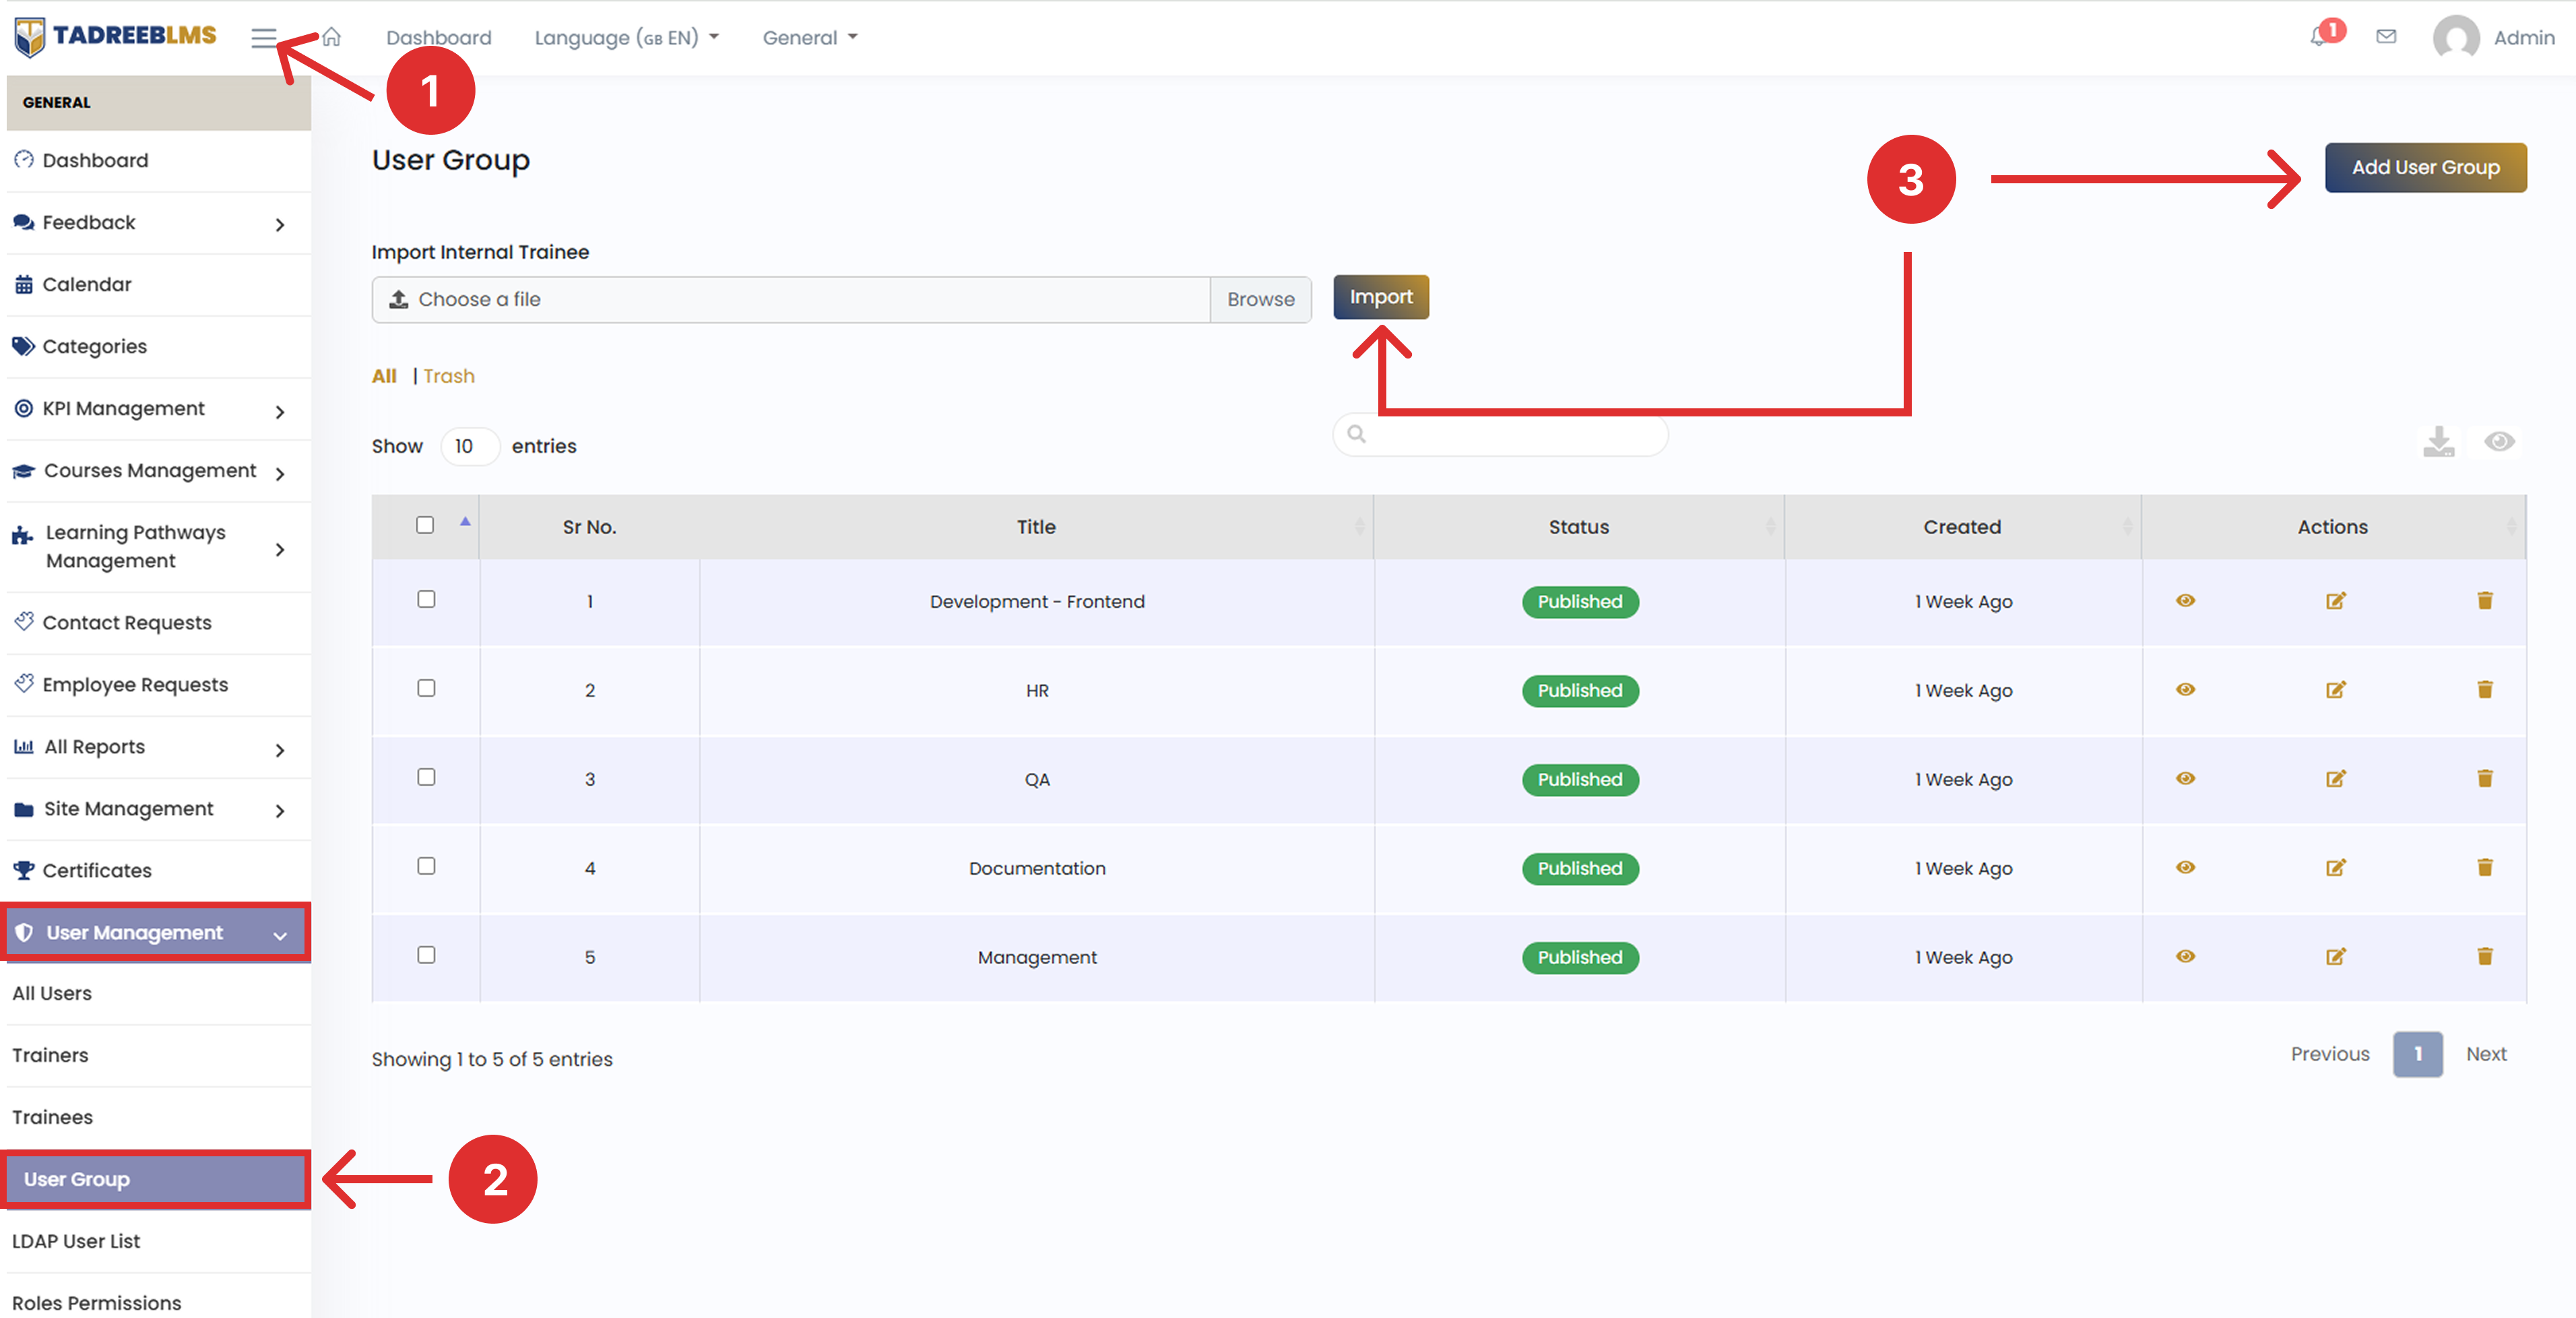
To create a new user group:
- Click the menu icon (☰) at the top left to open the sidebar menu.
- In the sidebar menu, go to User Management and select User Group.
- Click the Add New button in the top right corner of the page. Alternatively, you can use the Import button to upload an Excel or CSV file and add User groups in bulk.
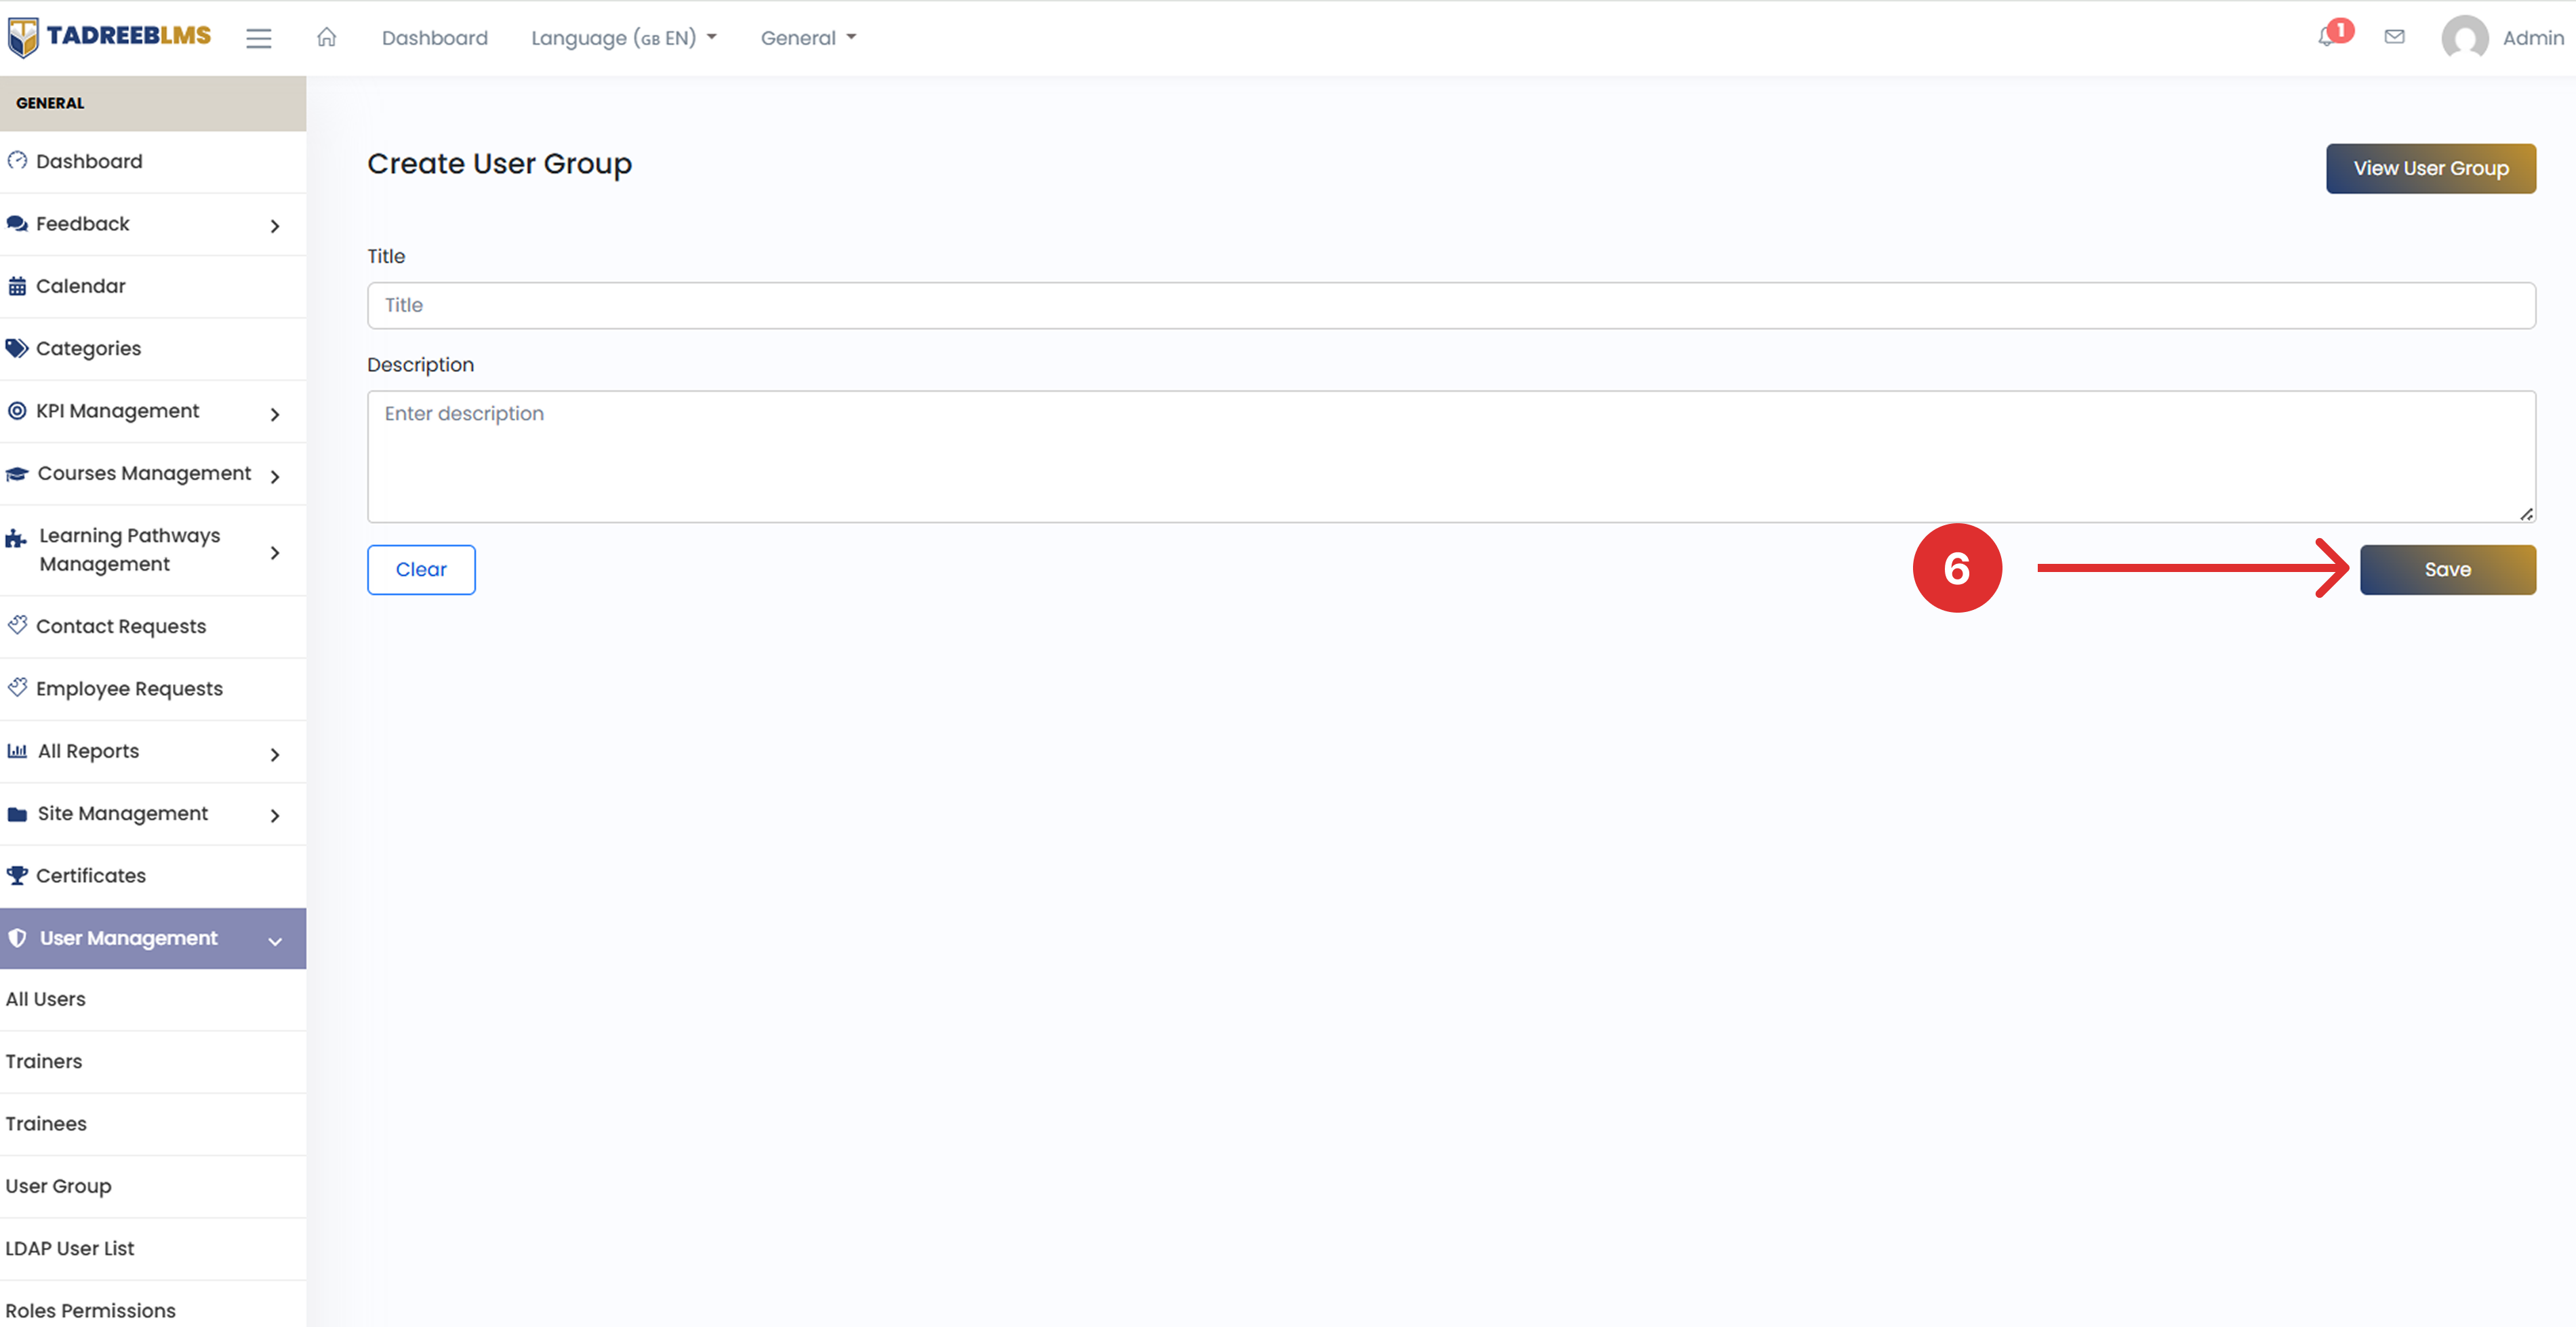
- Enter a Title for the User group (e.g., Engineering, HR, QA).
- Add a description that briefly explains the purpose of the group.
- Click Save to create the group.
📌 Note: Click Clear to reset the form if you want to start over, or click View User Group in the top right corner to go back to the user group list if needed.
12.5 LDAP User List
Most organisations store employee login details in a central directory, such as Microsoft Active Directory. LDAP connects Tadreeb LMS to this directory, allowing users to sign in with their existing organisation credentials instead of creating a separate Tadreeb LMS account.
The LDAP Users List page shows all the users added to the Tadreeb LMS platform through LDAP.
Table Headings
The table below describes the column information:
| Heading | Description |
|---|---|
| SL No. | Serial number of the entry |
| Name | The LDAP user's full name |
| Email Address | The user's registered email address |
| Username | The username linked to their LDAP account |
12.6 Roles and Permissions
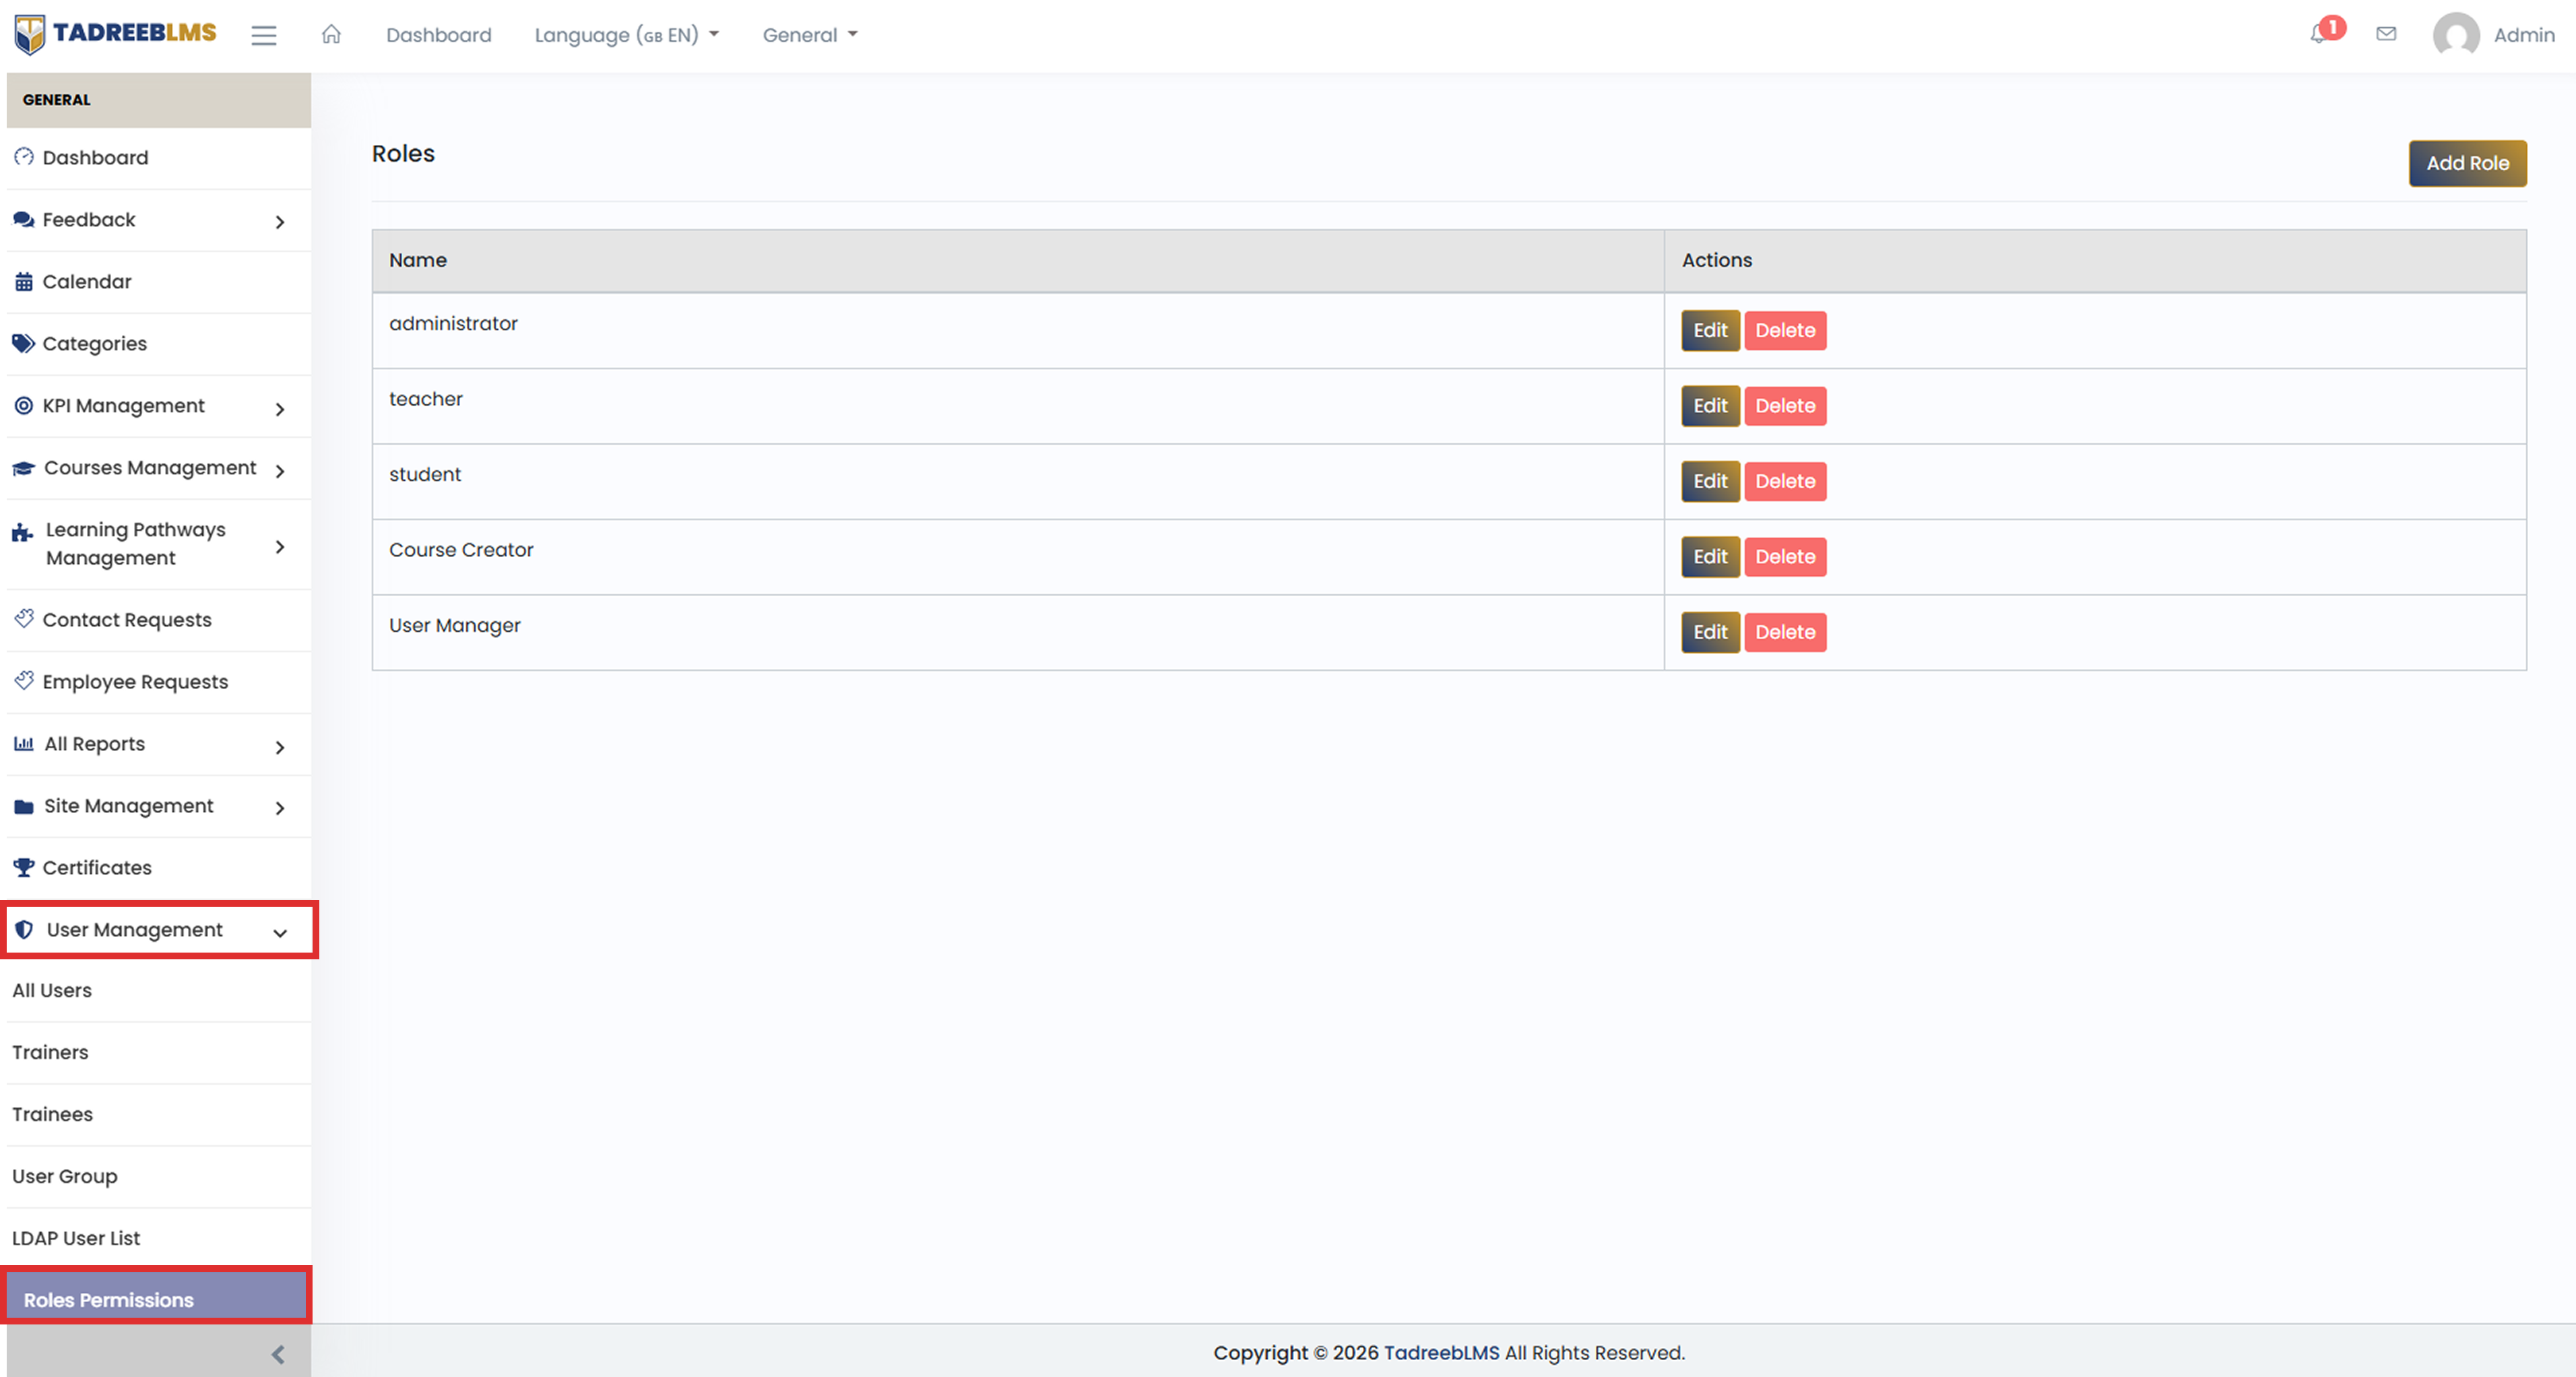
The Roles and Permissions page allows administrators to create and manage user roles within the platform. Roles help control user permissions and access to platform features. You can create custom roles to meet your organisation's requirements and assign them to users as needed. Existing roles can also be edited or deleted.
12.6.1 Create New Role
Create a new role and define its specific permissions and responsibilities.
📋 Before you start: Ensure you have a role name and a clear understanding of the role's permissions.
To create a new role:
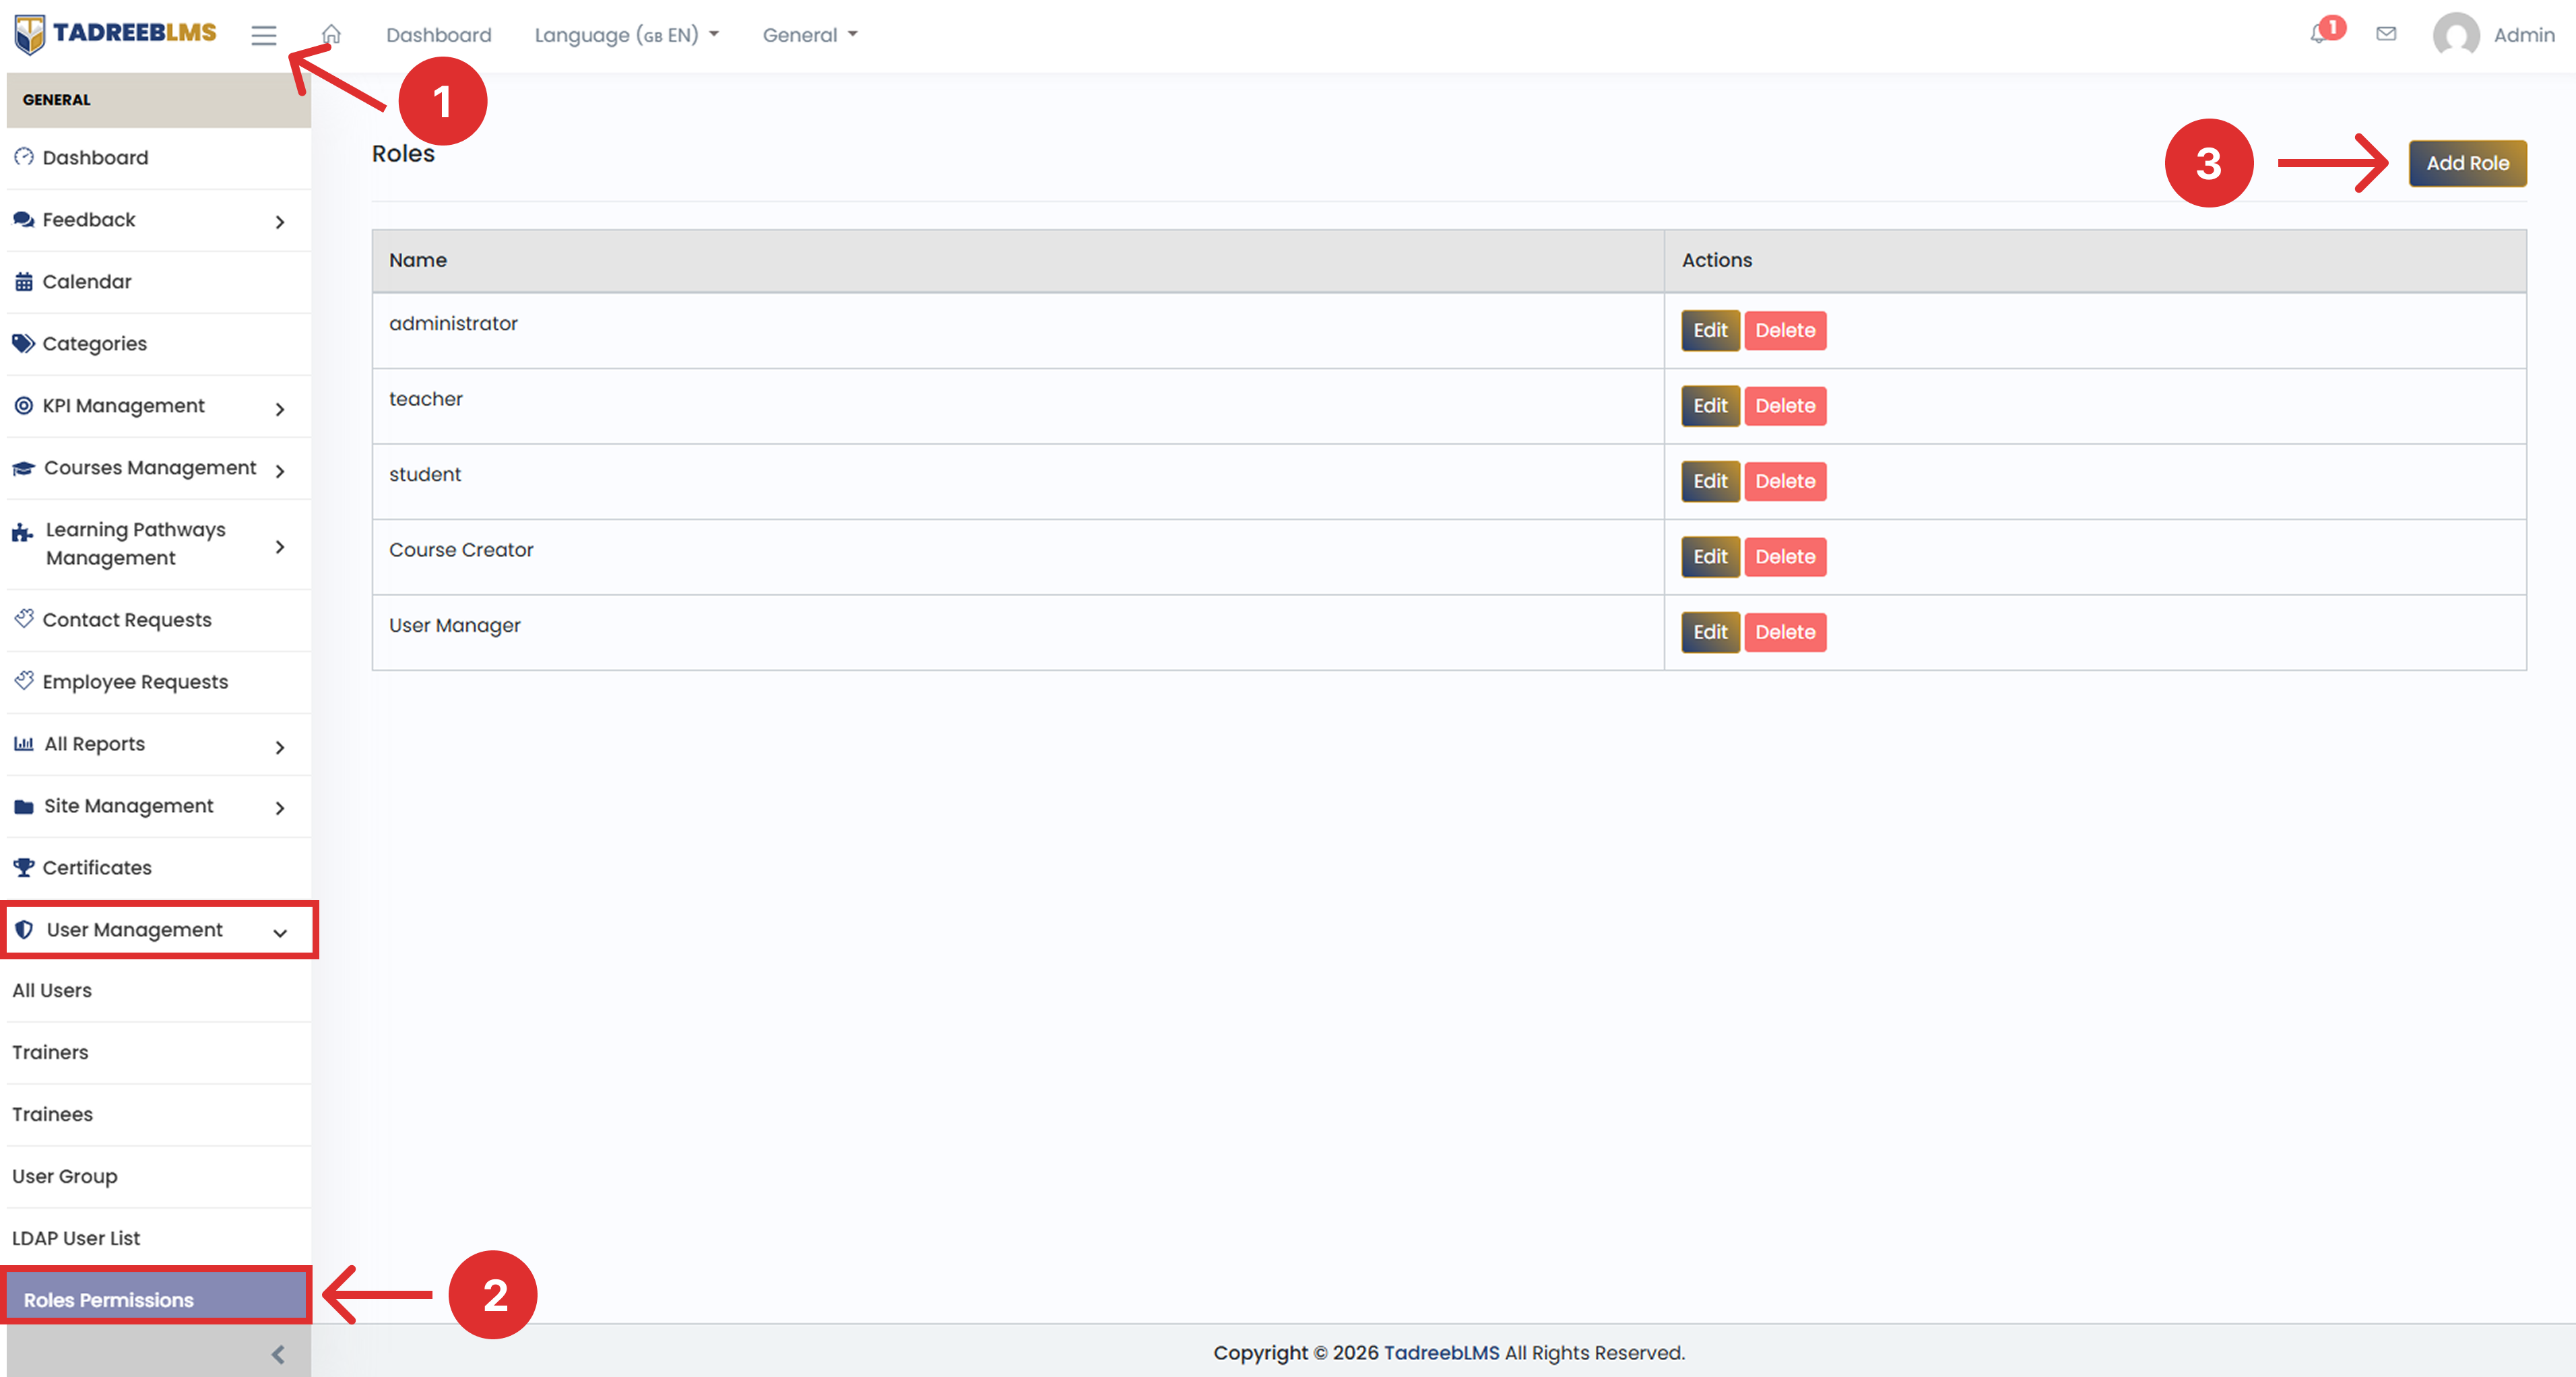
- Click the menu icon (☰) at the top left to open the sidebar menu.
- In the sidebar menu, go to User Management and select Roles Permissions.
- Click the Add Role button in the top right corner of the page.
-
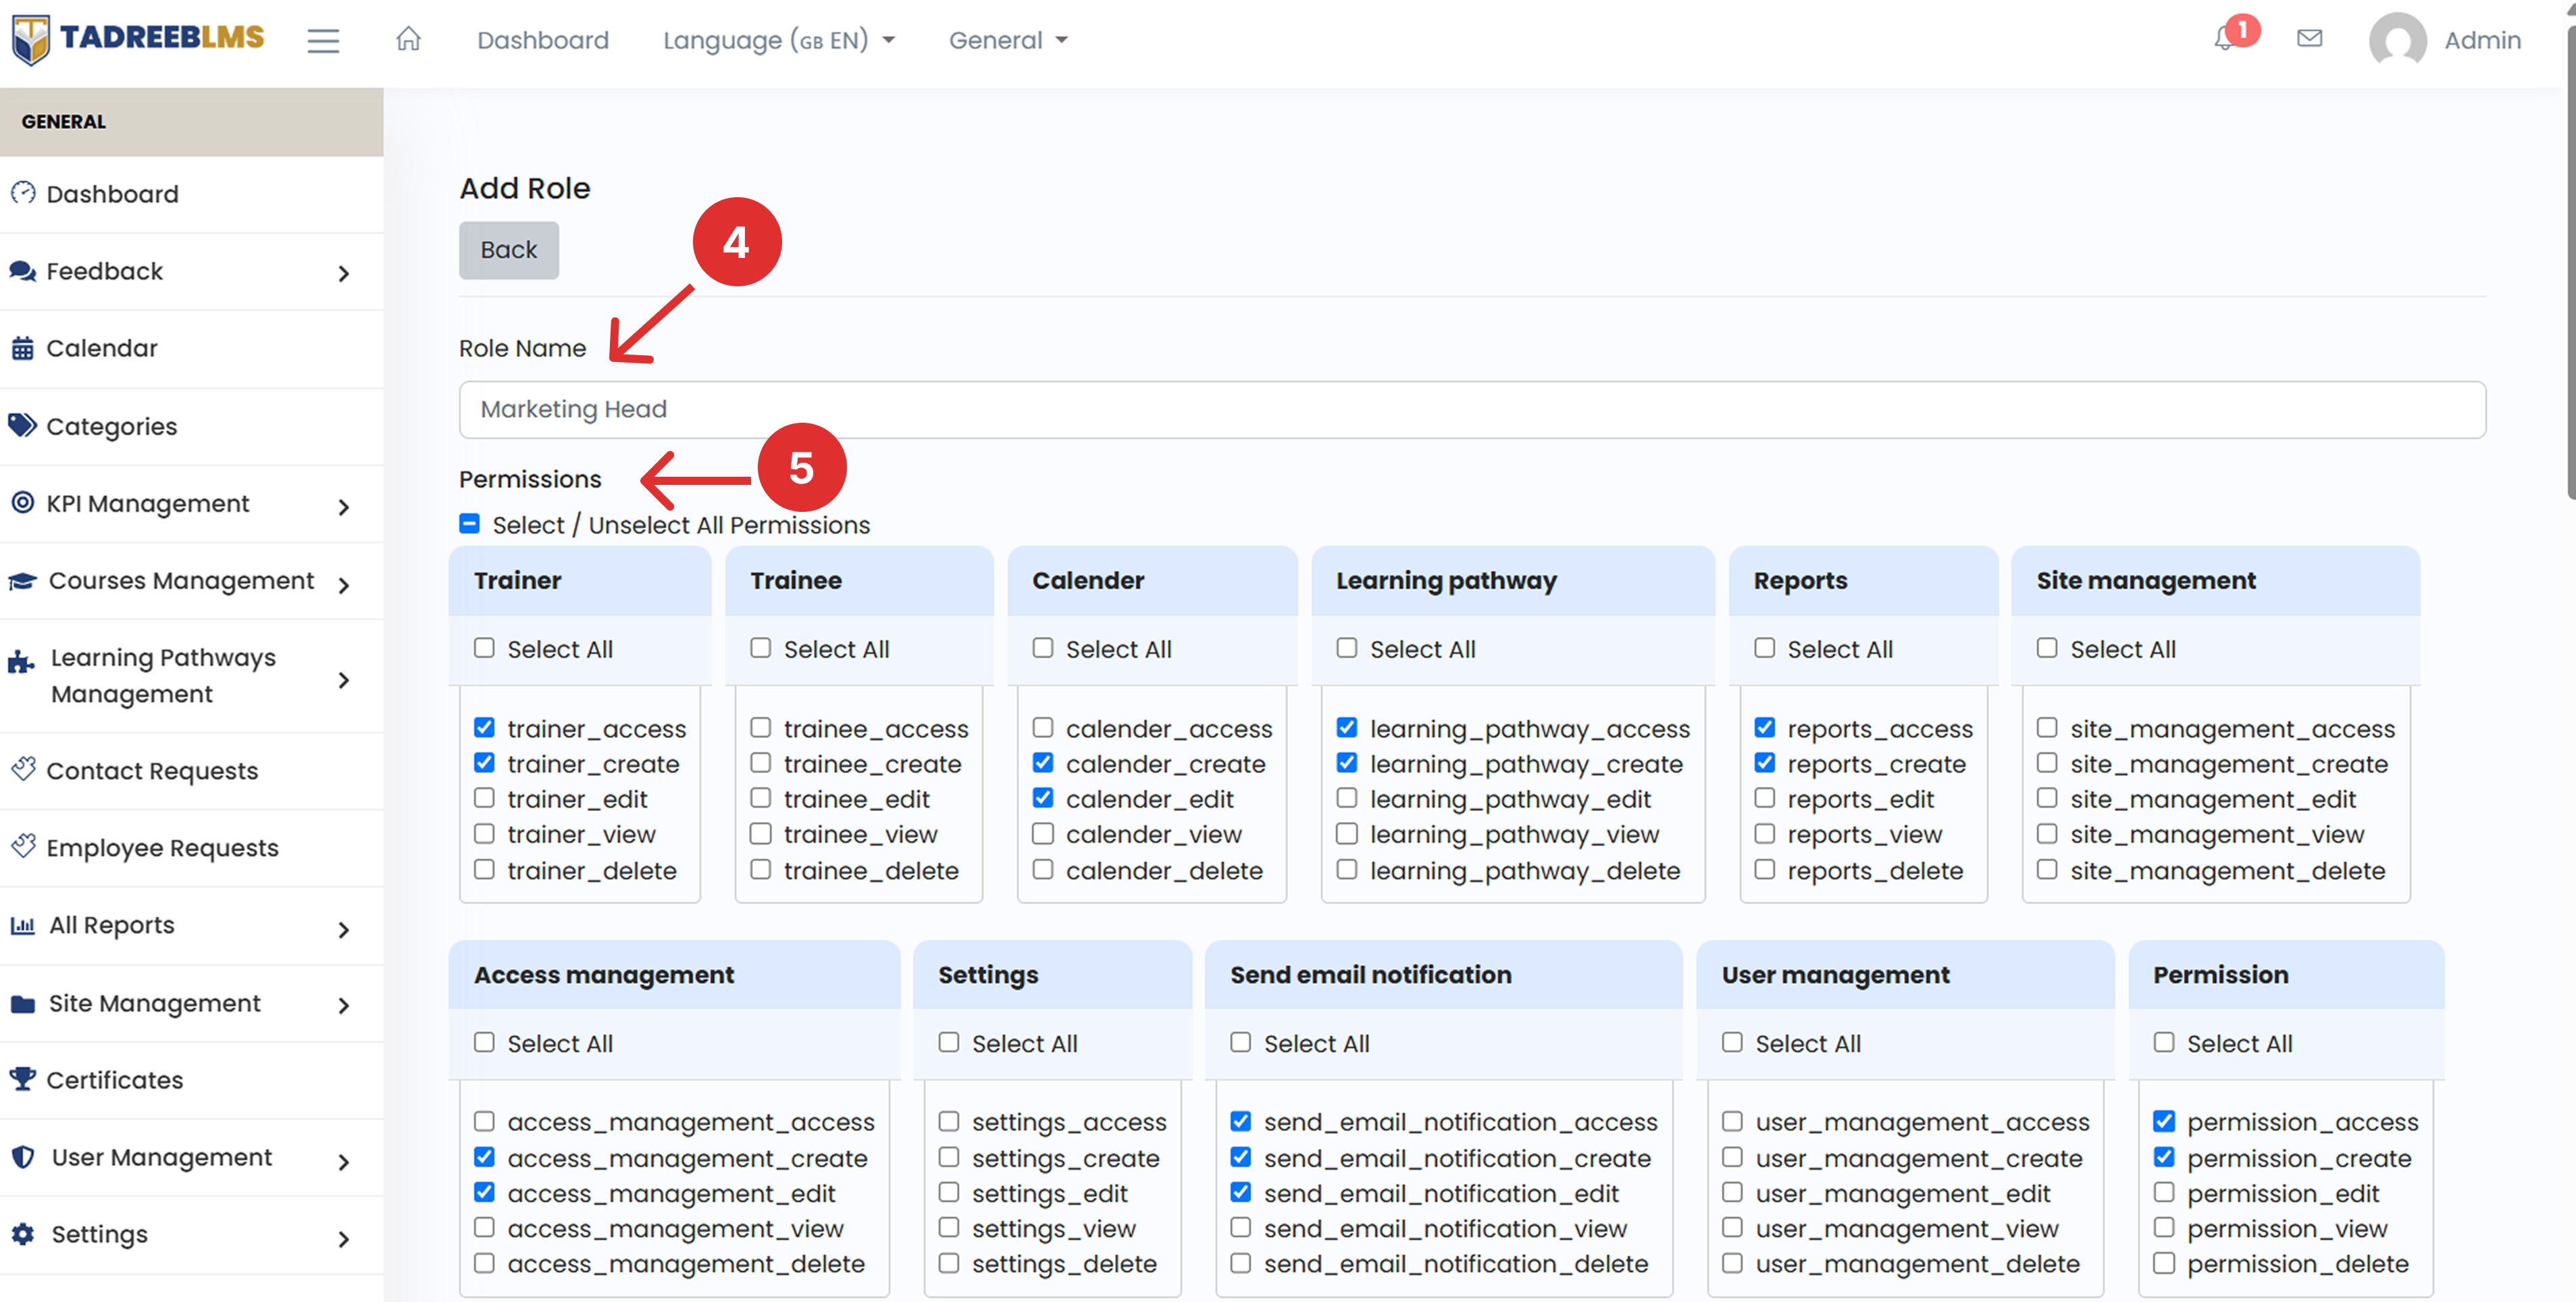
Enter a Role Name.
-
To assign permissions to this role:
- Select / Unselect All Permissions to assign or remove all permissions.
- Select All within a module to assign all permissions for that module.
- Alternatively, select individual permissions such as Access, Create, Edit, View, or Delete as required.
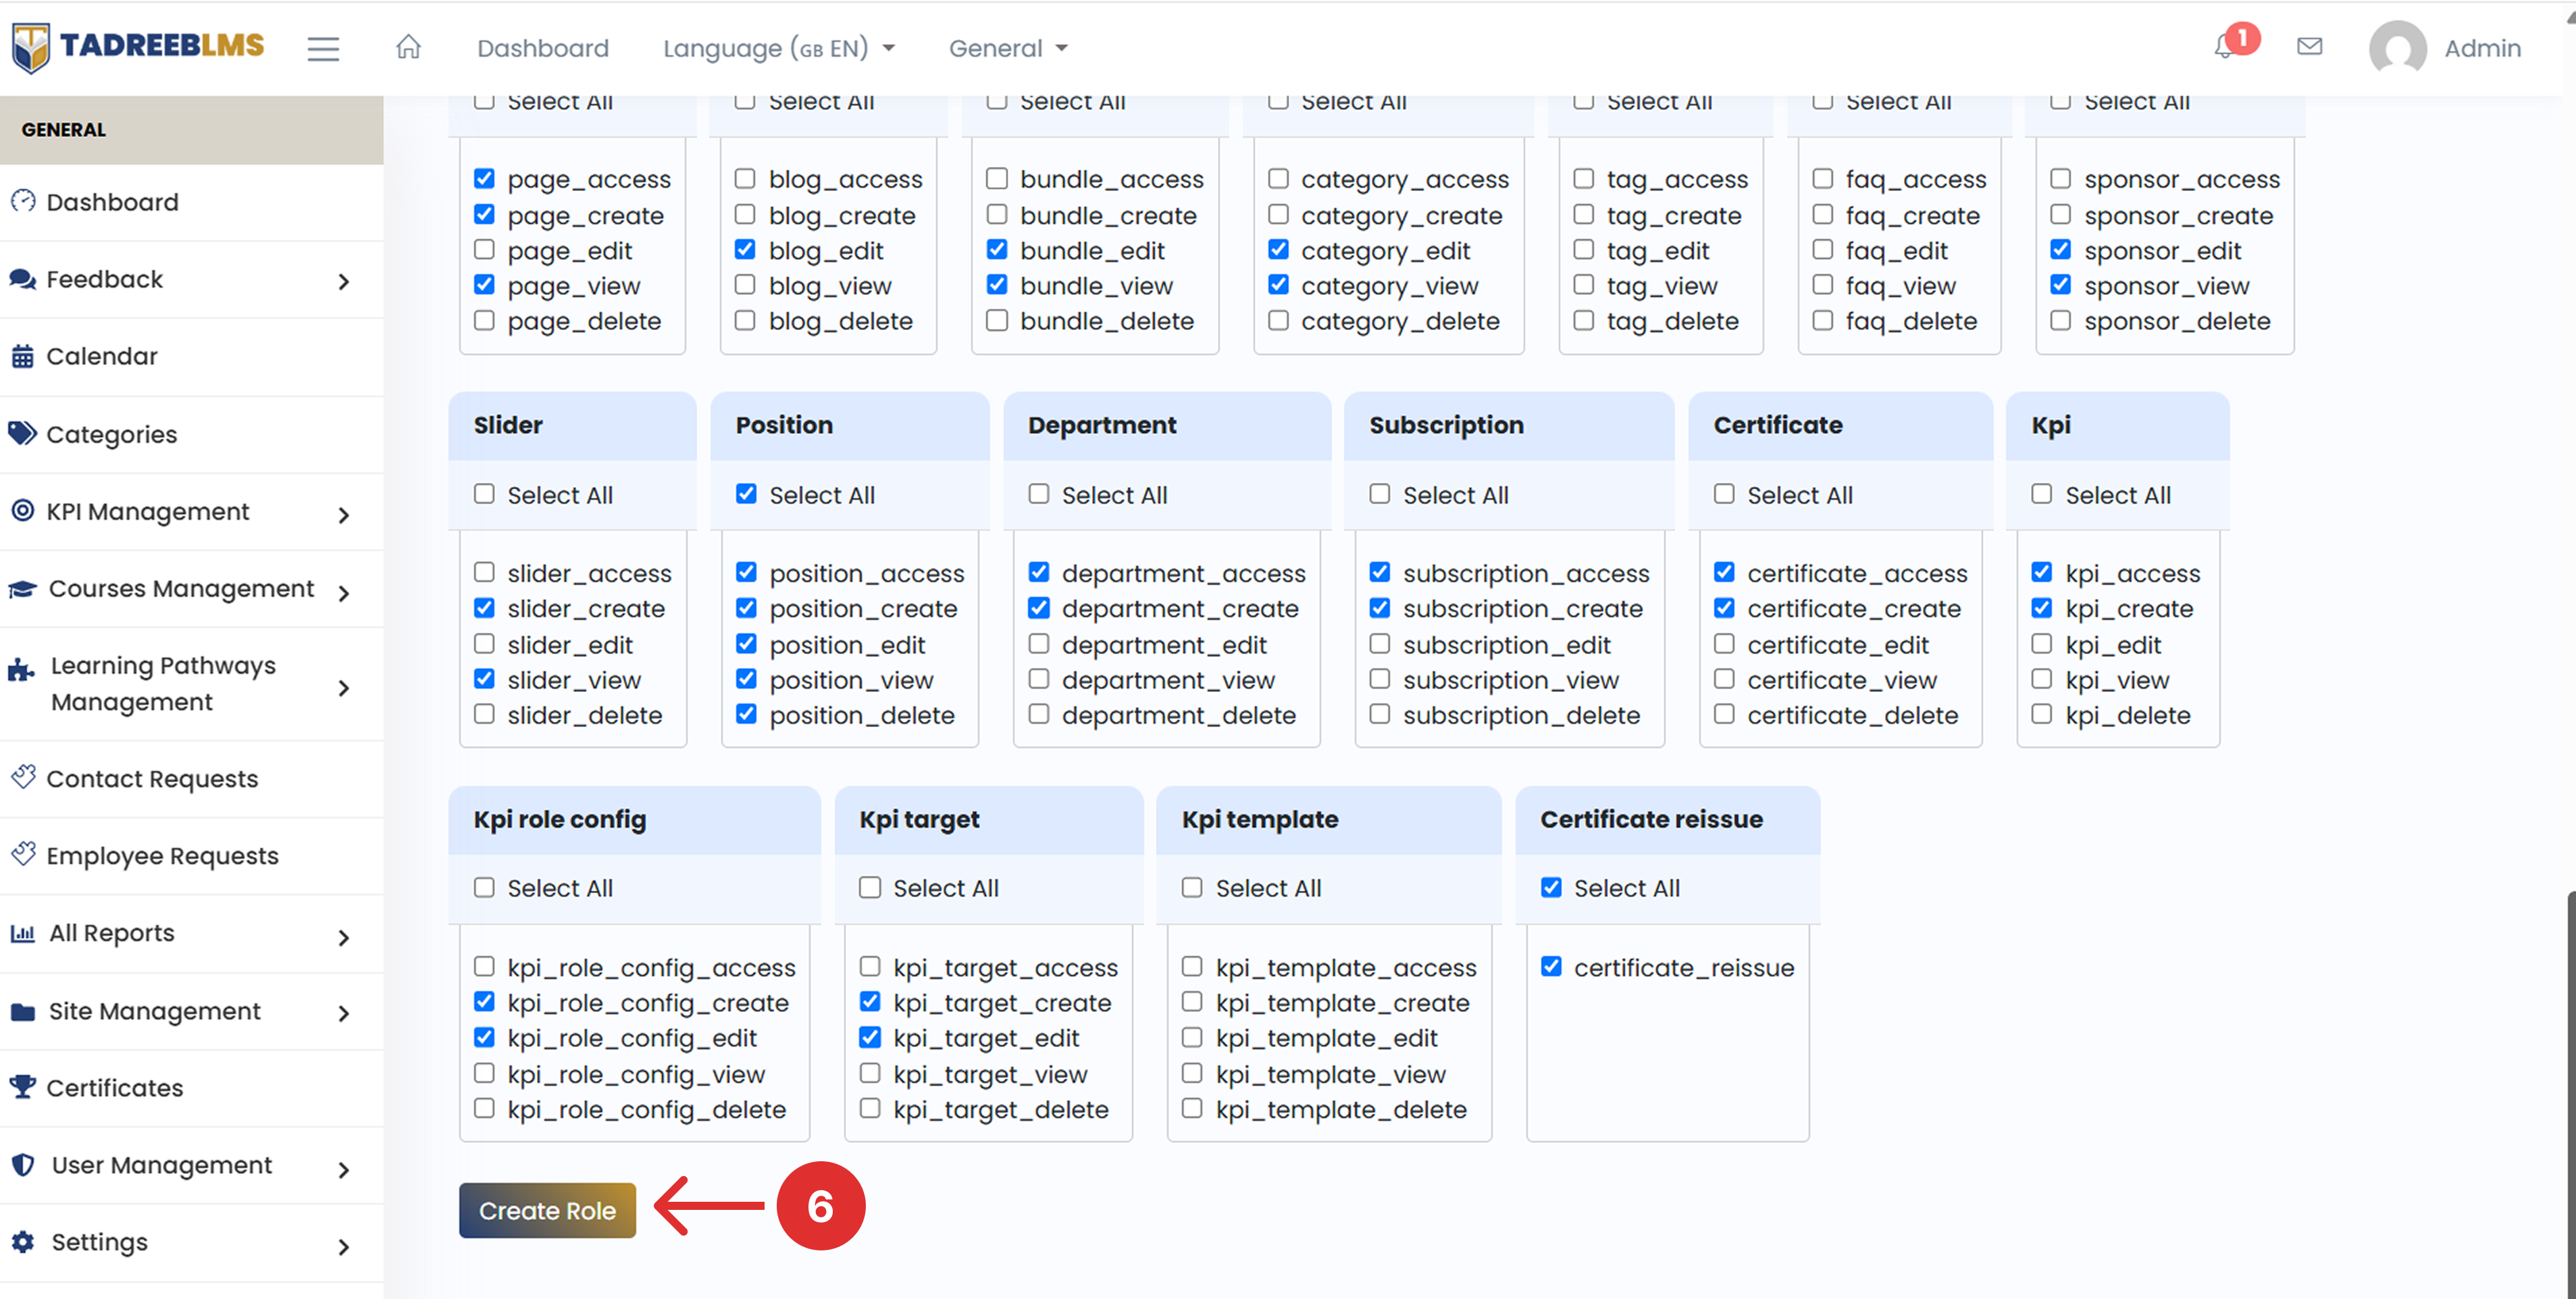
- Click Create Role to save the role.
13. Settings
The Settings module is used to configure the platform at the system level. It includes options for branding, homepage layout, email, payments, language, and other settings.
Changes made in this module affect what every user sees and how the platform behaves.
Navigate to the Menu icon on the left sidebar (☰) > Settings.
The General tab opens by default. You can use the other four tabs — Layout Type, Mail From Name, Stripe Payment Method, and Translations — from the same page.
13.1 General
The General tab lets you set the platform’s basic identity, including its name, logo, and web address. Instead of using the default name and logo, you can customise these details with your organisation’s branding to give the platform a more personalised look.
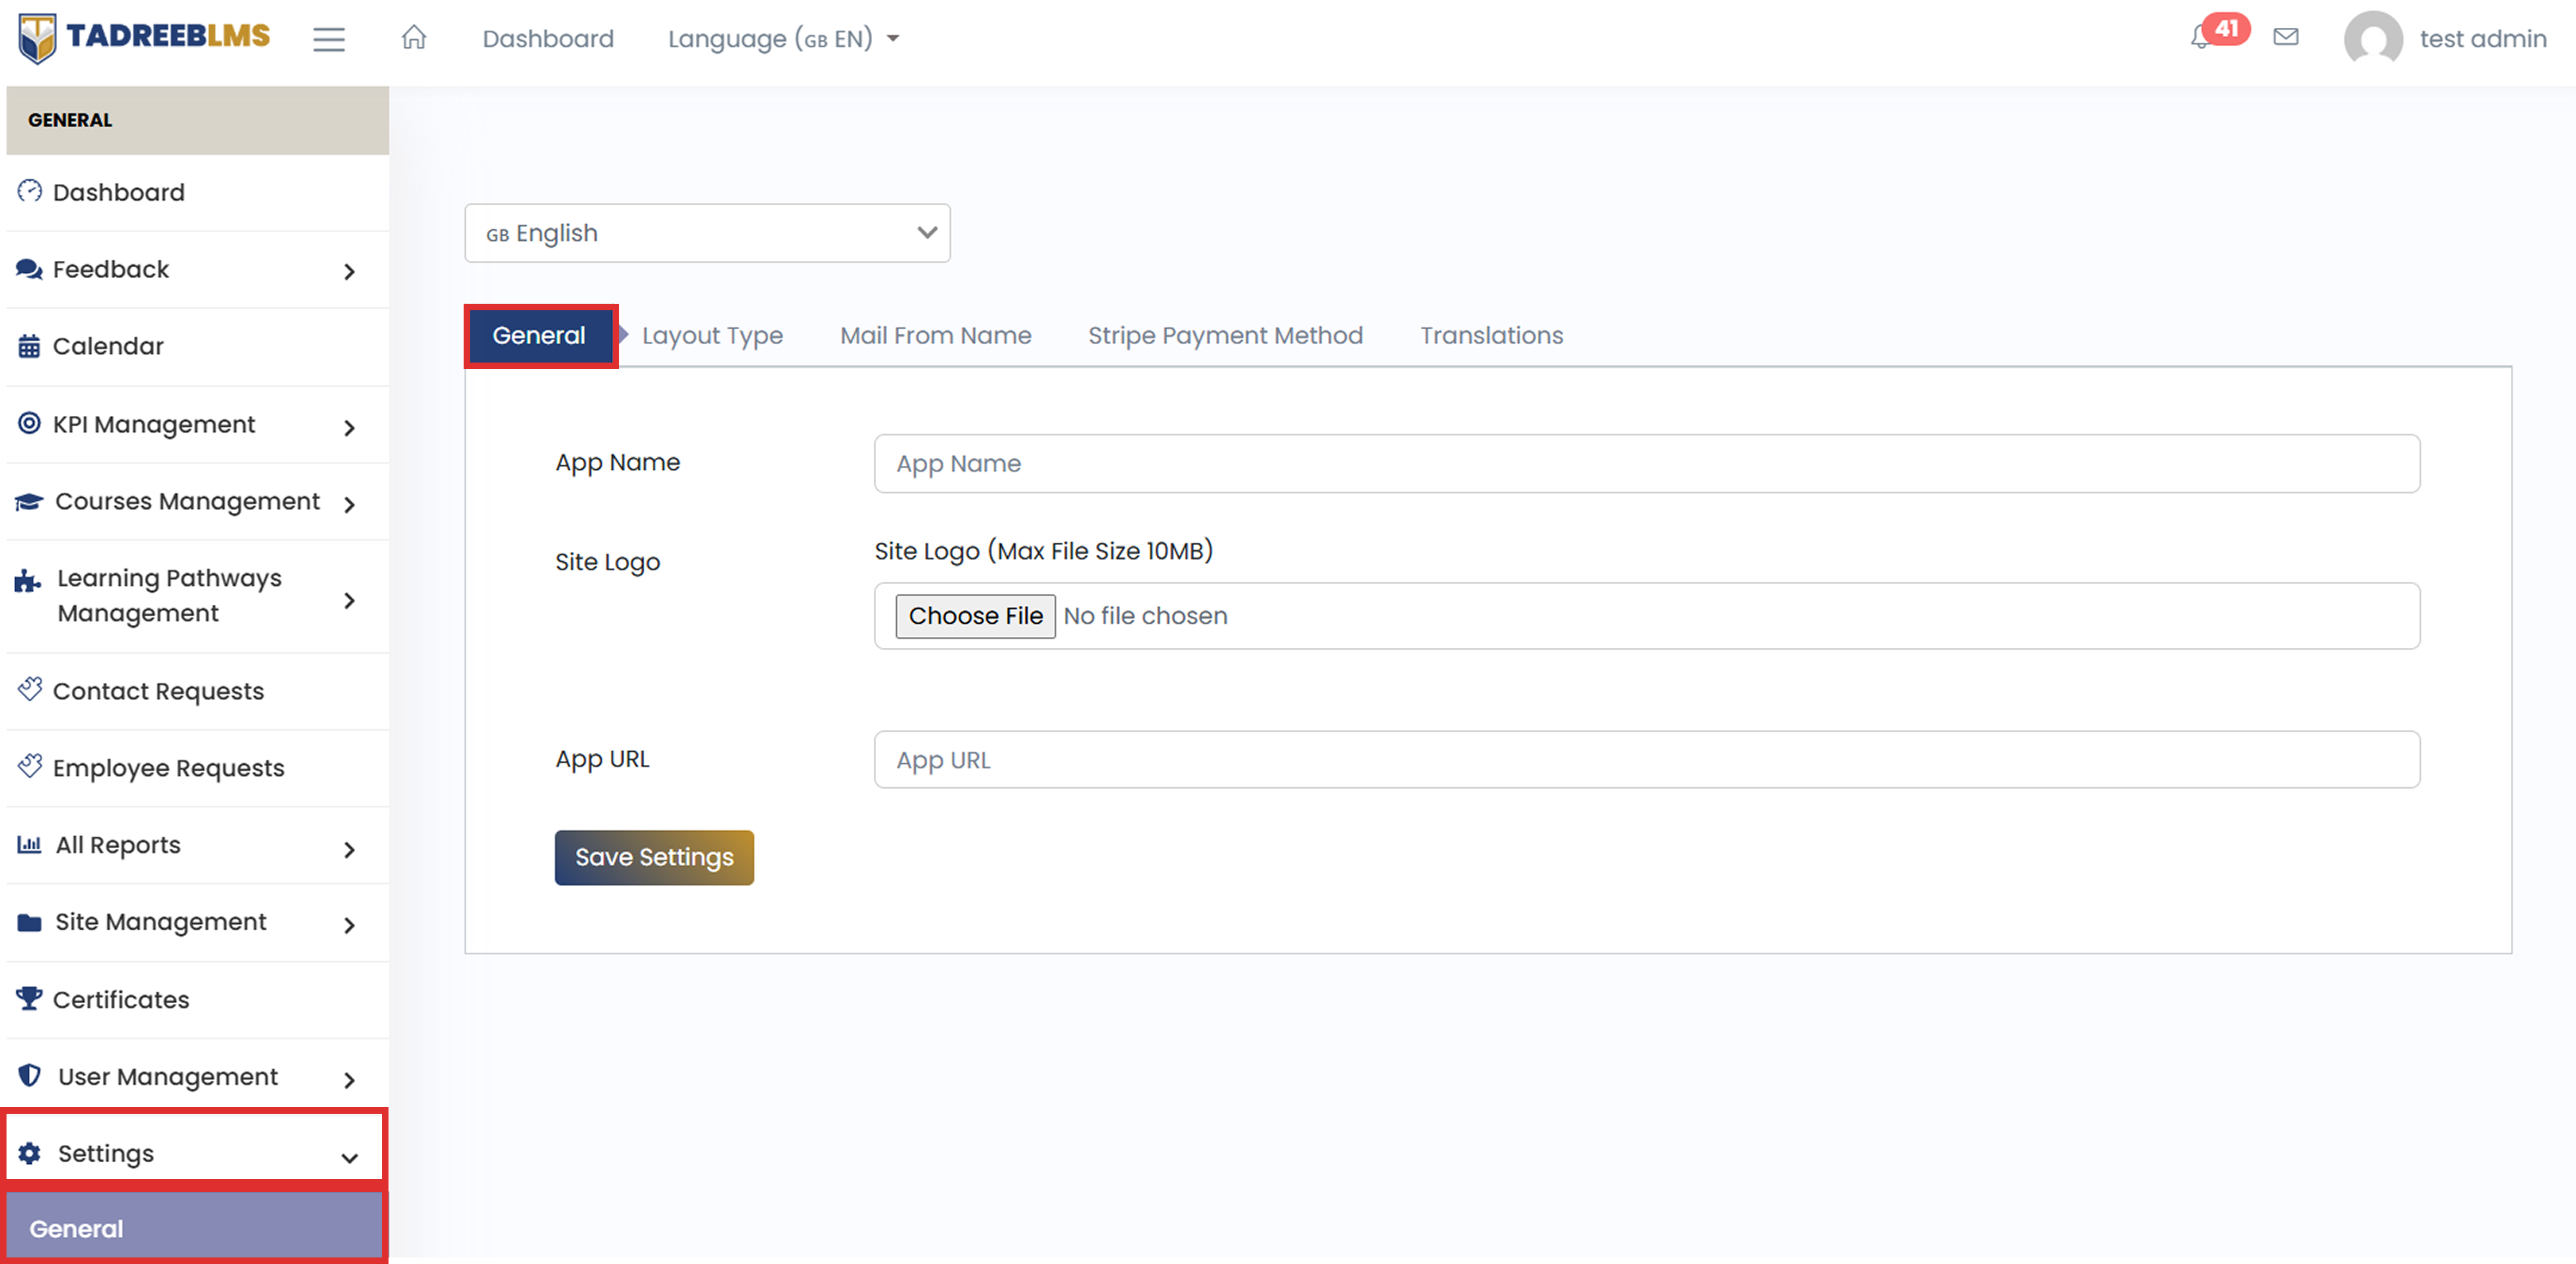
| Field | What it does |
|---|---|
| App Name | The name of your platform. It appears in the browser tab, system emails, and other areas. |
| Site Logo | Your organisation's logo. Click Choose File to upload it. The maximum file size is 10MB. |
| App URL | The web address of your platform. The system uses this URL to create links, such as in email notifications. |
To update these details:
- Enter the platform name in App Name.
- Click Choose File next to Site Logo and select your logo.
- Enter the platform URL in App URL.
- Click Save Settings.
💡 Tip: Use a simple, small logo file. A transparent PNG usually loads faster and looks cleaner across different screen sizes.
13.1.2 Layout Type
The Layout Type settings let you customise how the LMS homepage is structured and displayed. You can choose the overall layout style and decide which sections appear on the homepage, such as featured courses, popular courses, news, teachers, and FAQs.
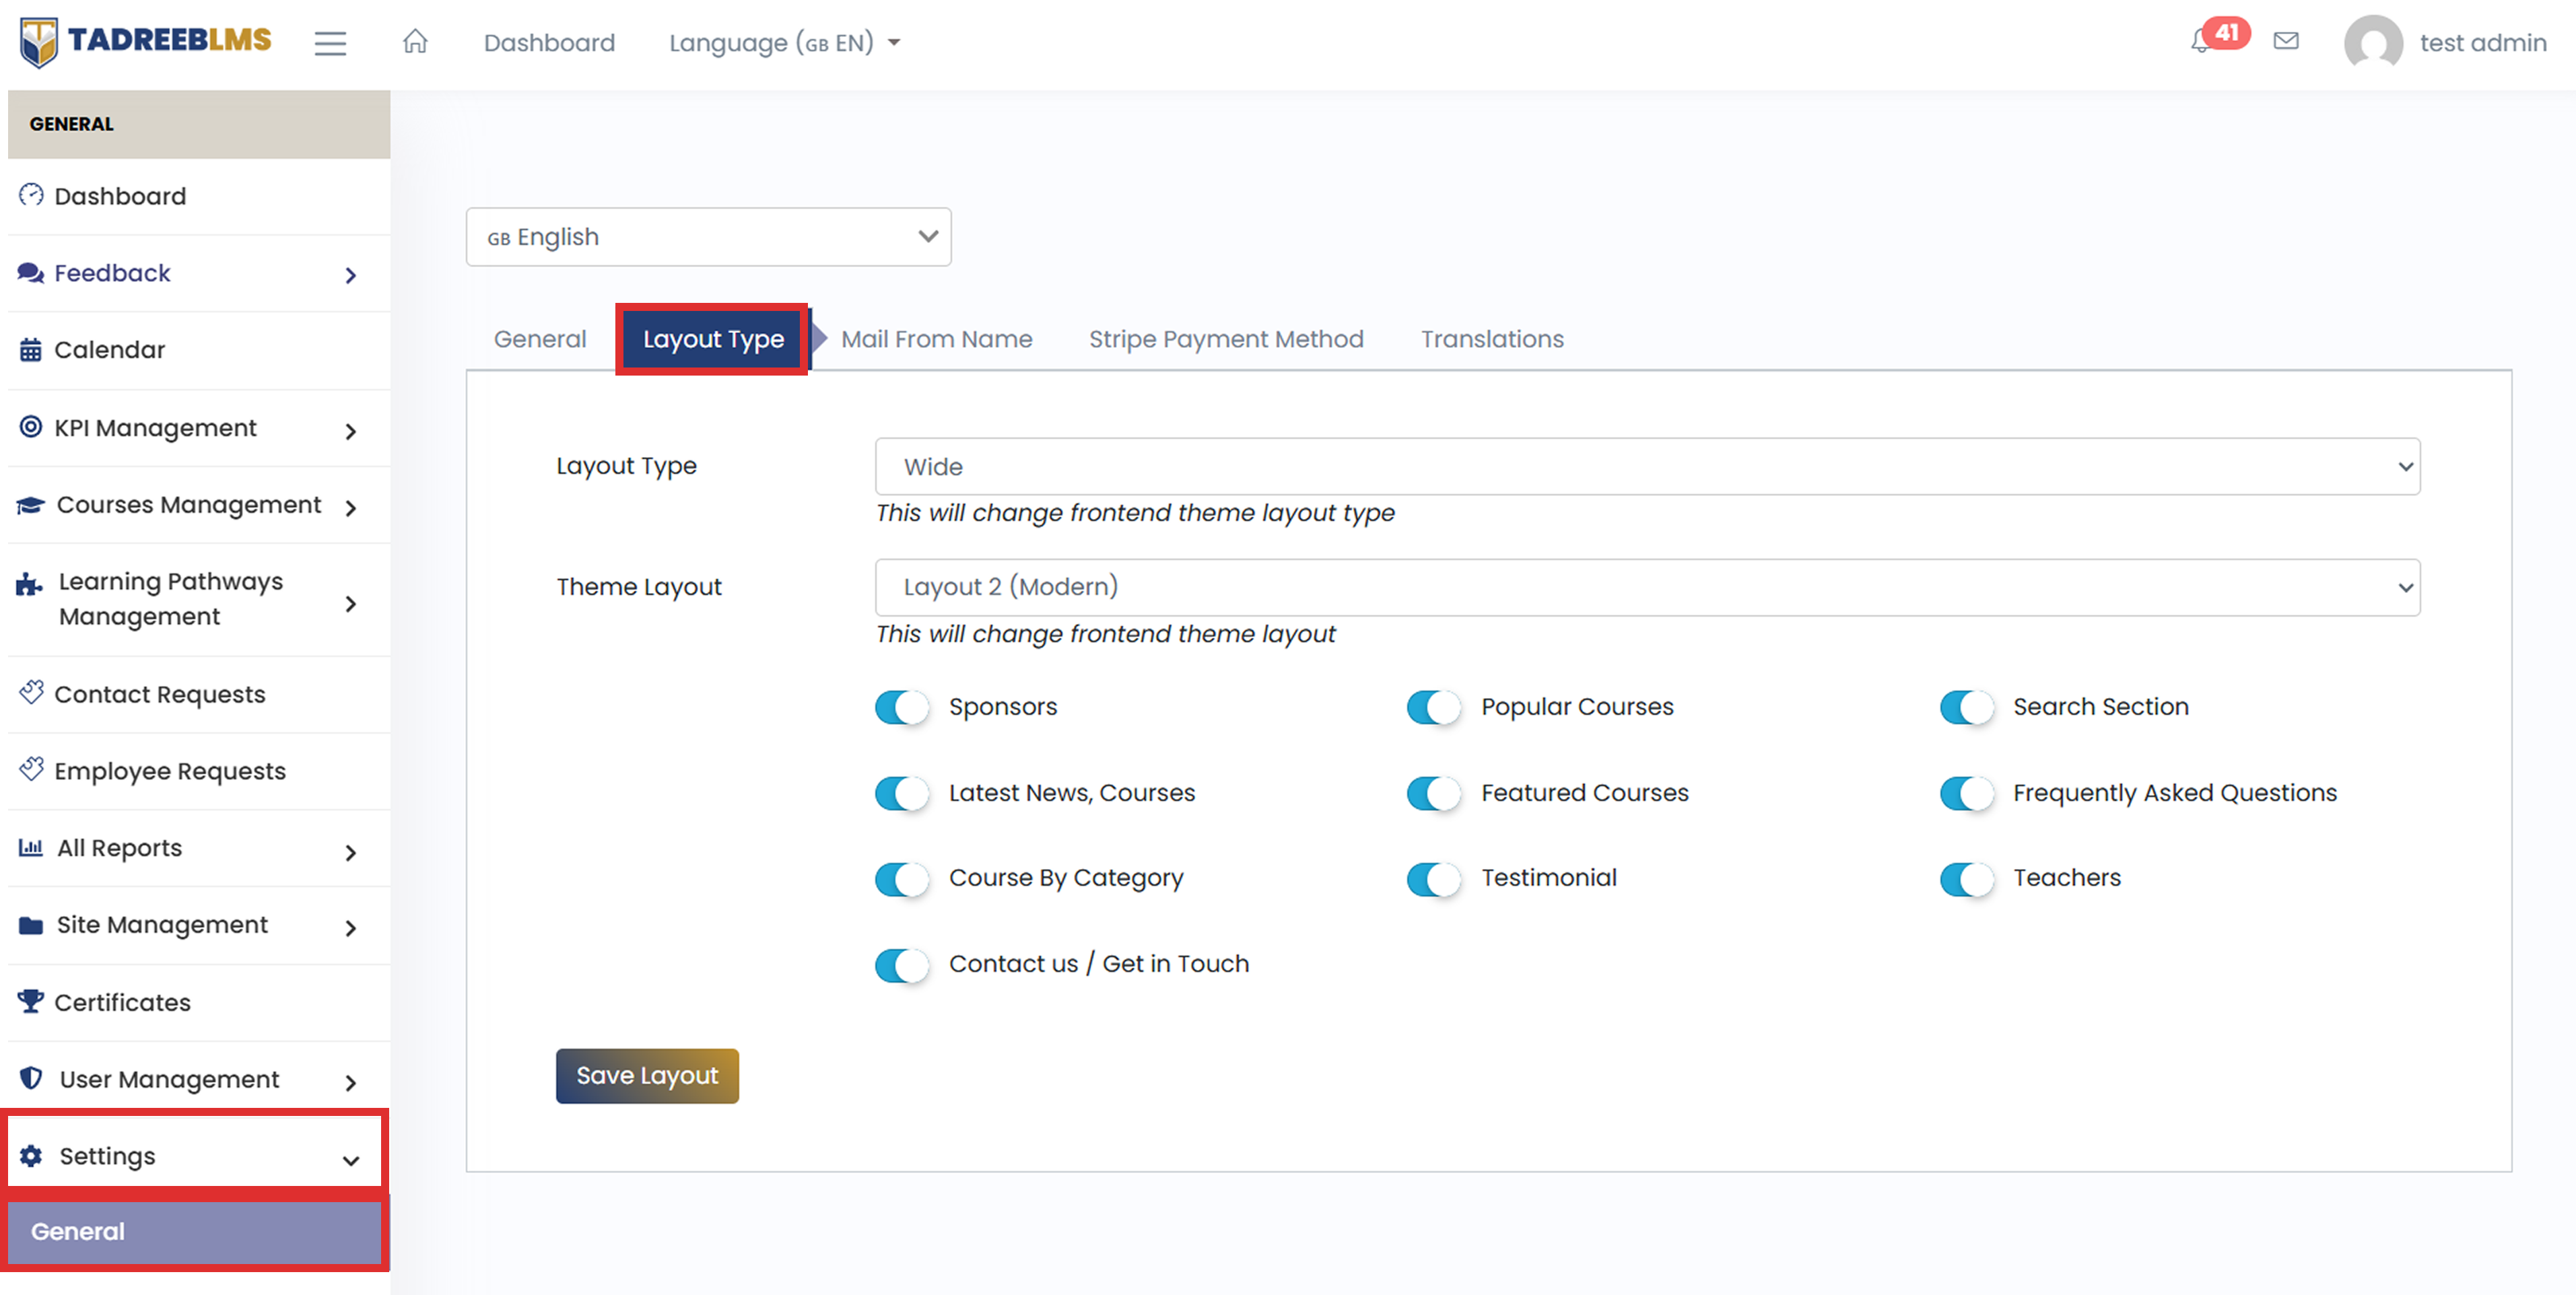
These options help you control the appearance of the LMS and show only the sections that are relevant to your organisation and learners.
13.1.3 Mail From Name
The Mail From Name settings control how the platform sends emails, such as notifications, password resets, and contact form replies. Here, you can configure the sender details and the email service used to deliver these messages.
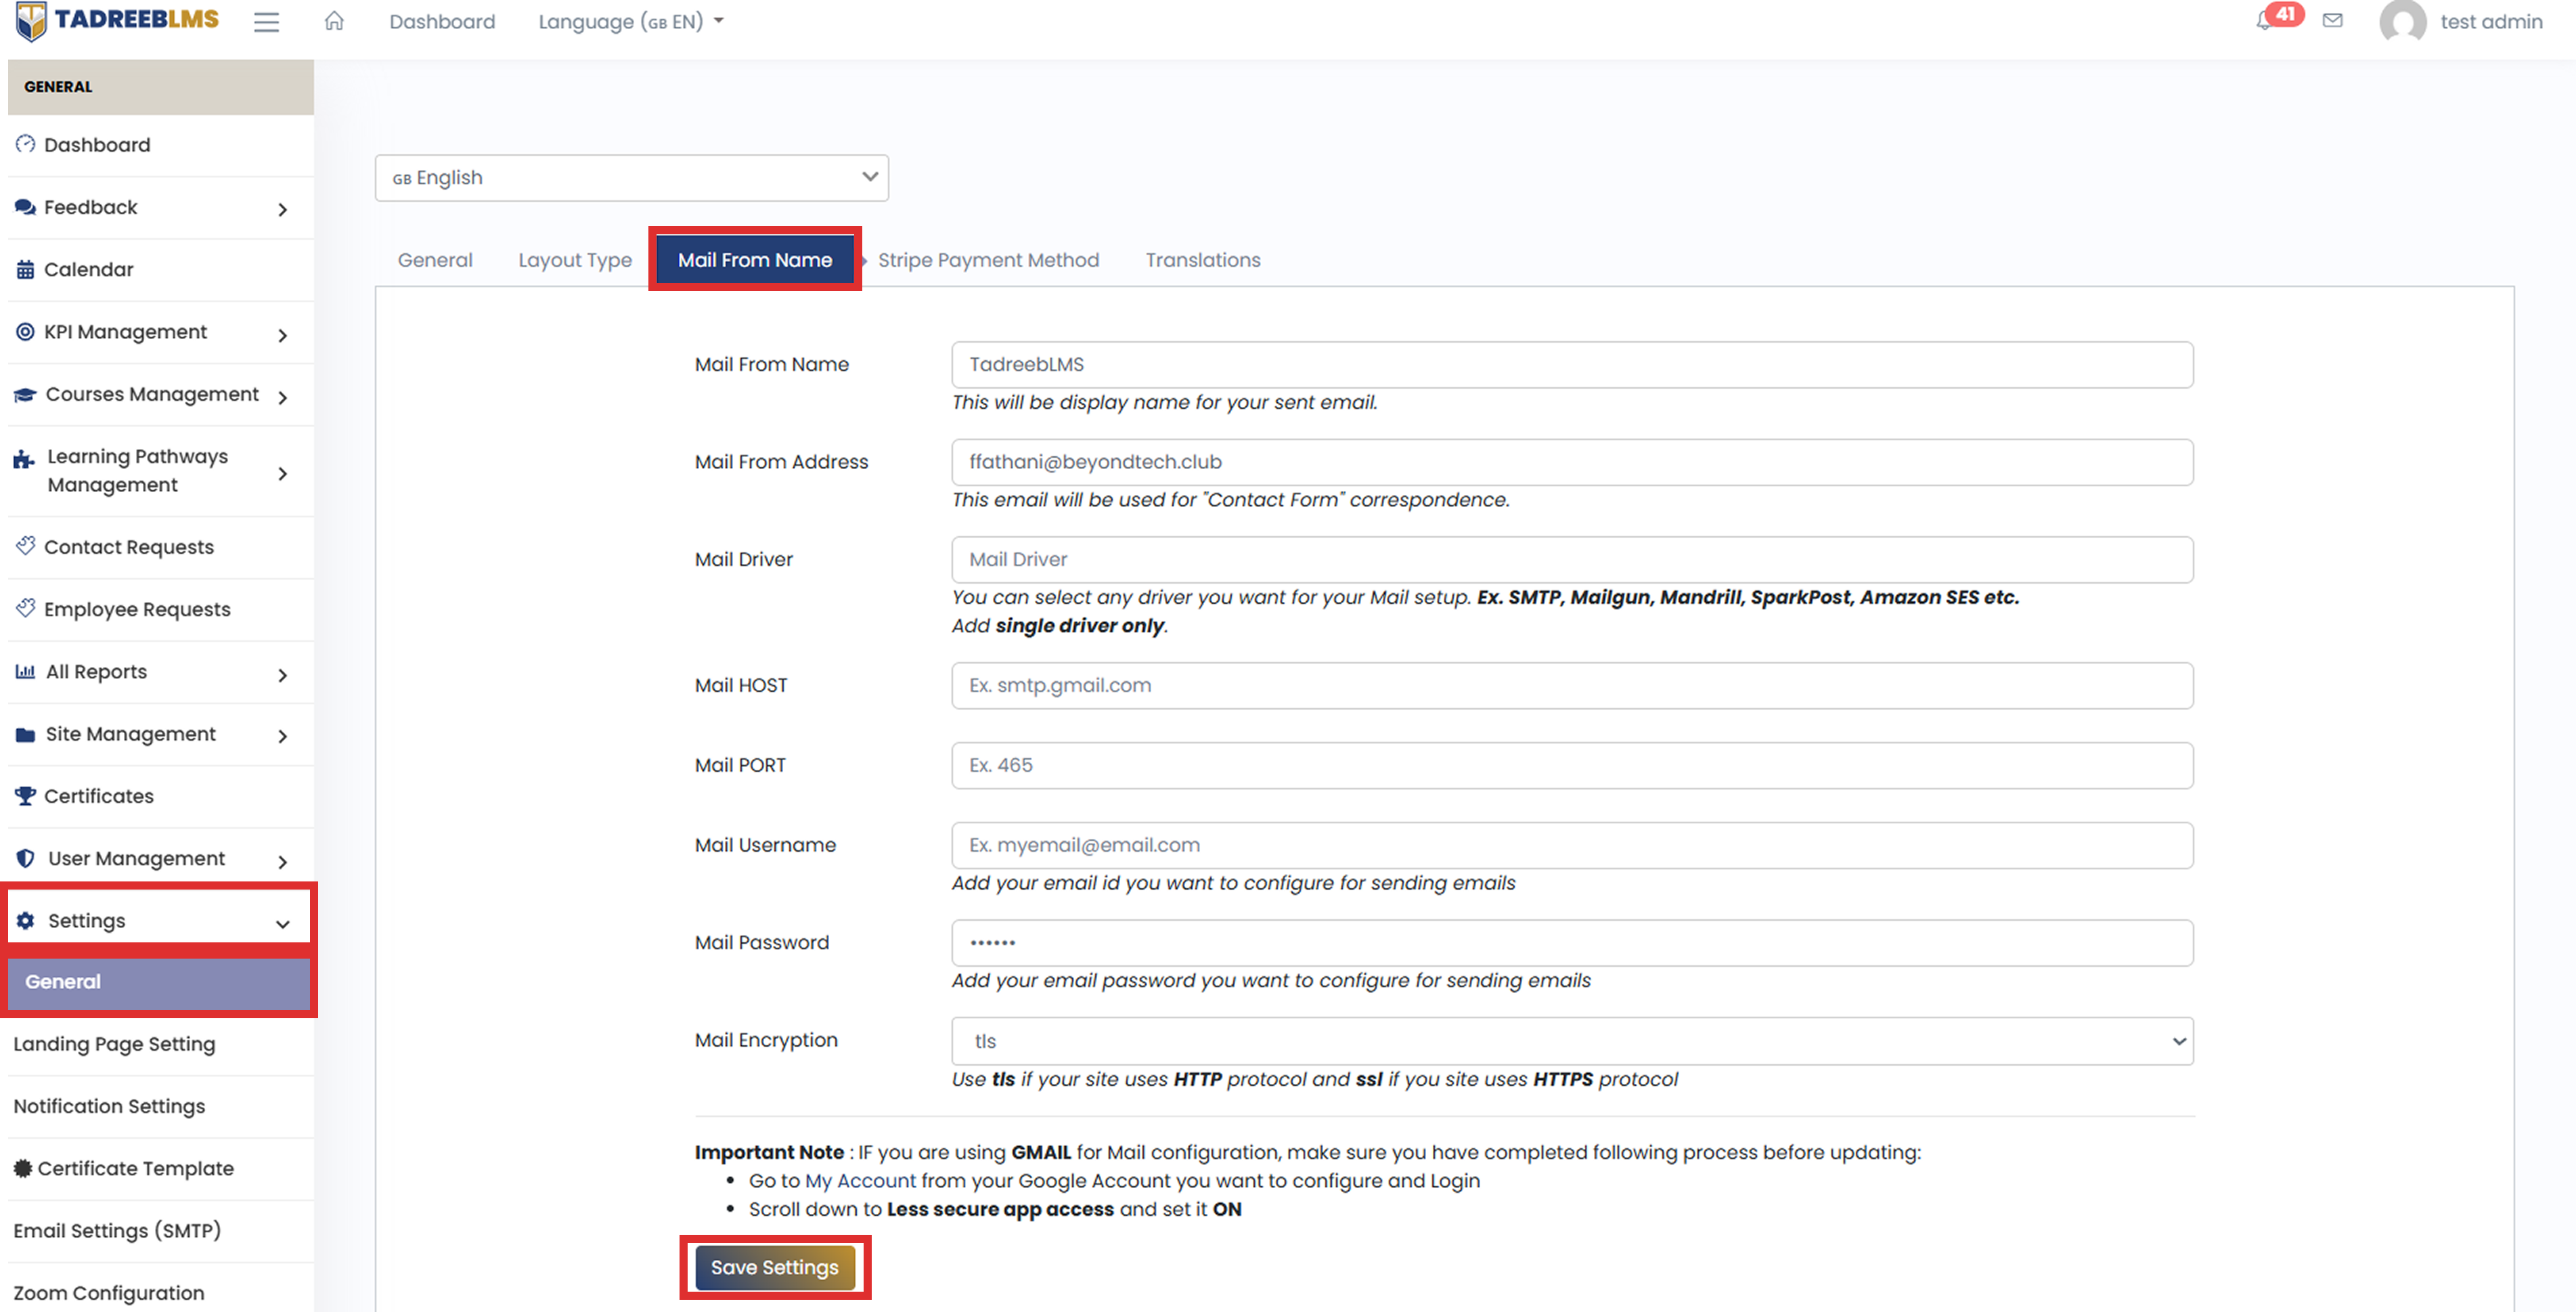
| Field | What it does |
|---|---|
| Mail From Name | The name recipients see as the sender of emails from the platform (e.g., TadreebLMS). |
| Mail From Address | The email address used for Contact Form correspondence. |
| Mail Driver | The email service used to send emails, such as SMTP, Mailgun, Mandrill, SparkPost, or Amazon SES. Add only one driver. |
| Mail HOST | The server address of your email service (e.g., smtp.gmail.com). |
| Mail PORT | The port used by the mail server to send emails (e.g., 465). |
| Mail Username | The email account used to send emails from the platform. |
| Mail Password | The password for the email account. |
| Mail Encryption | The security protocol used for the email connection. Select the appropriate option based on your mail service configuration. |
To configure outgoing email:
- Enter the Mail From Name that users should see as the sender.
- Enter the Mail From Address for contact form correspondence.
- Select a Mail Driver and enter the required mail server details.
- Enter the Mail Username and Mail Password.
- Select the required Mail Encryption option.
- Click Save Settings to apply the configuration.
📌 Note: If you are using Gmail, make sure your Google account is configured to allow the LMS to send emails before saving these settings.
13.1.4 Stripe Payment Method
The Stripe Payment Method settings allow you to accept online payments for paid courses through Stripe. You can select the currency used for payments and enable or disable Stripe as a payment option.
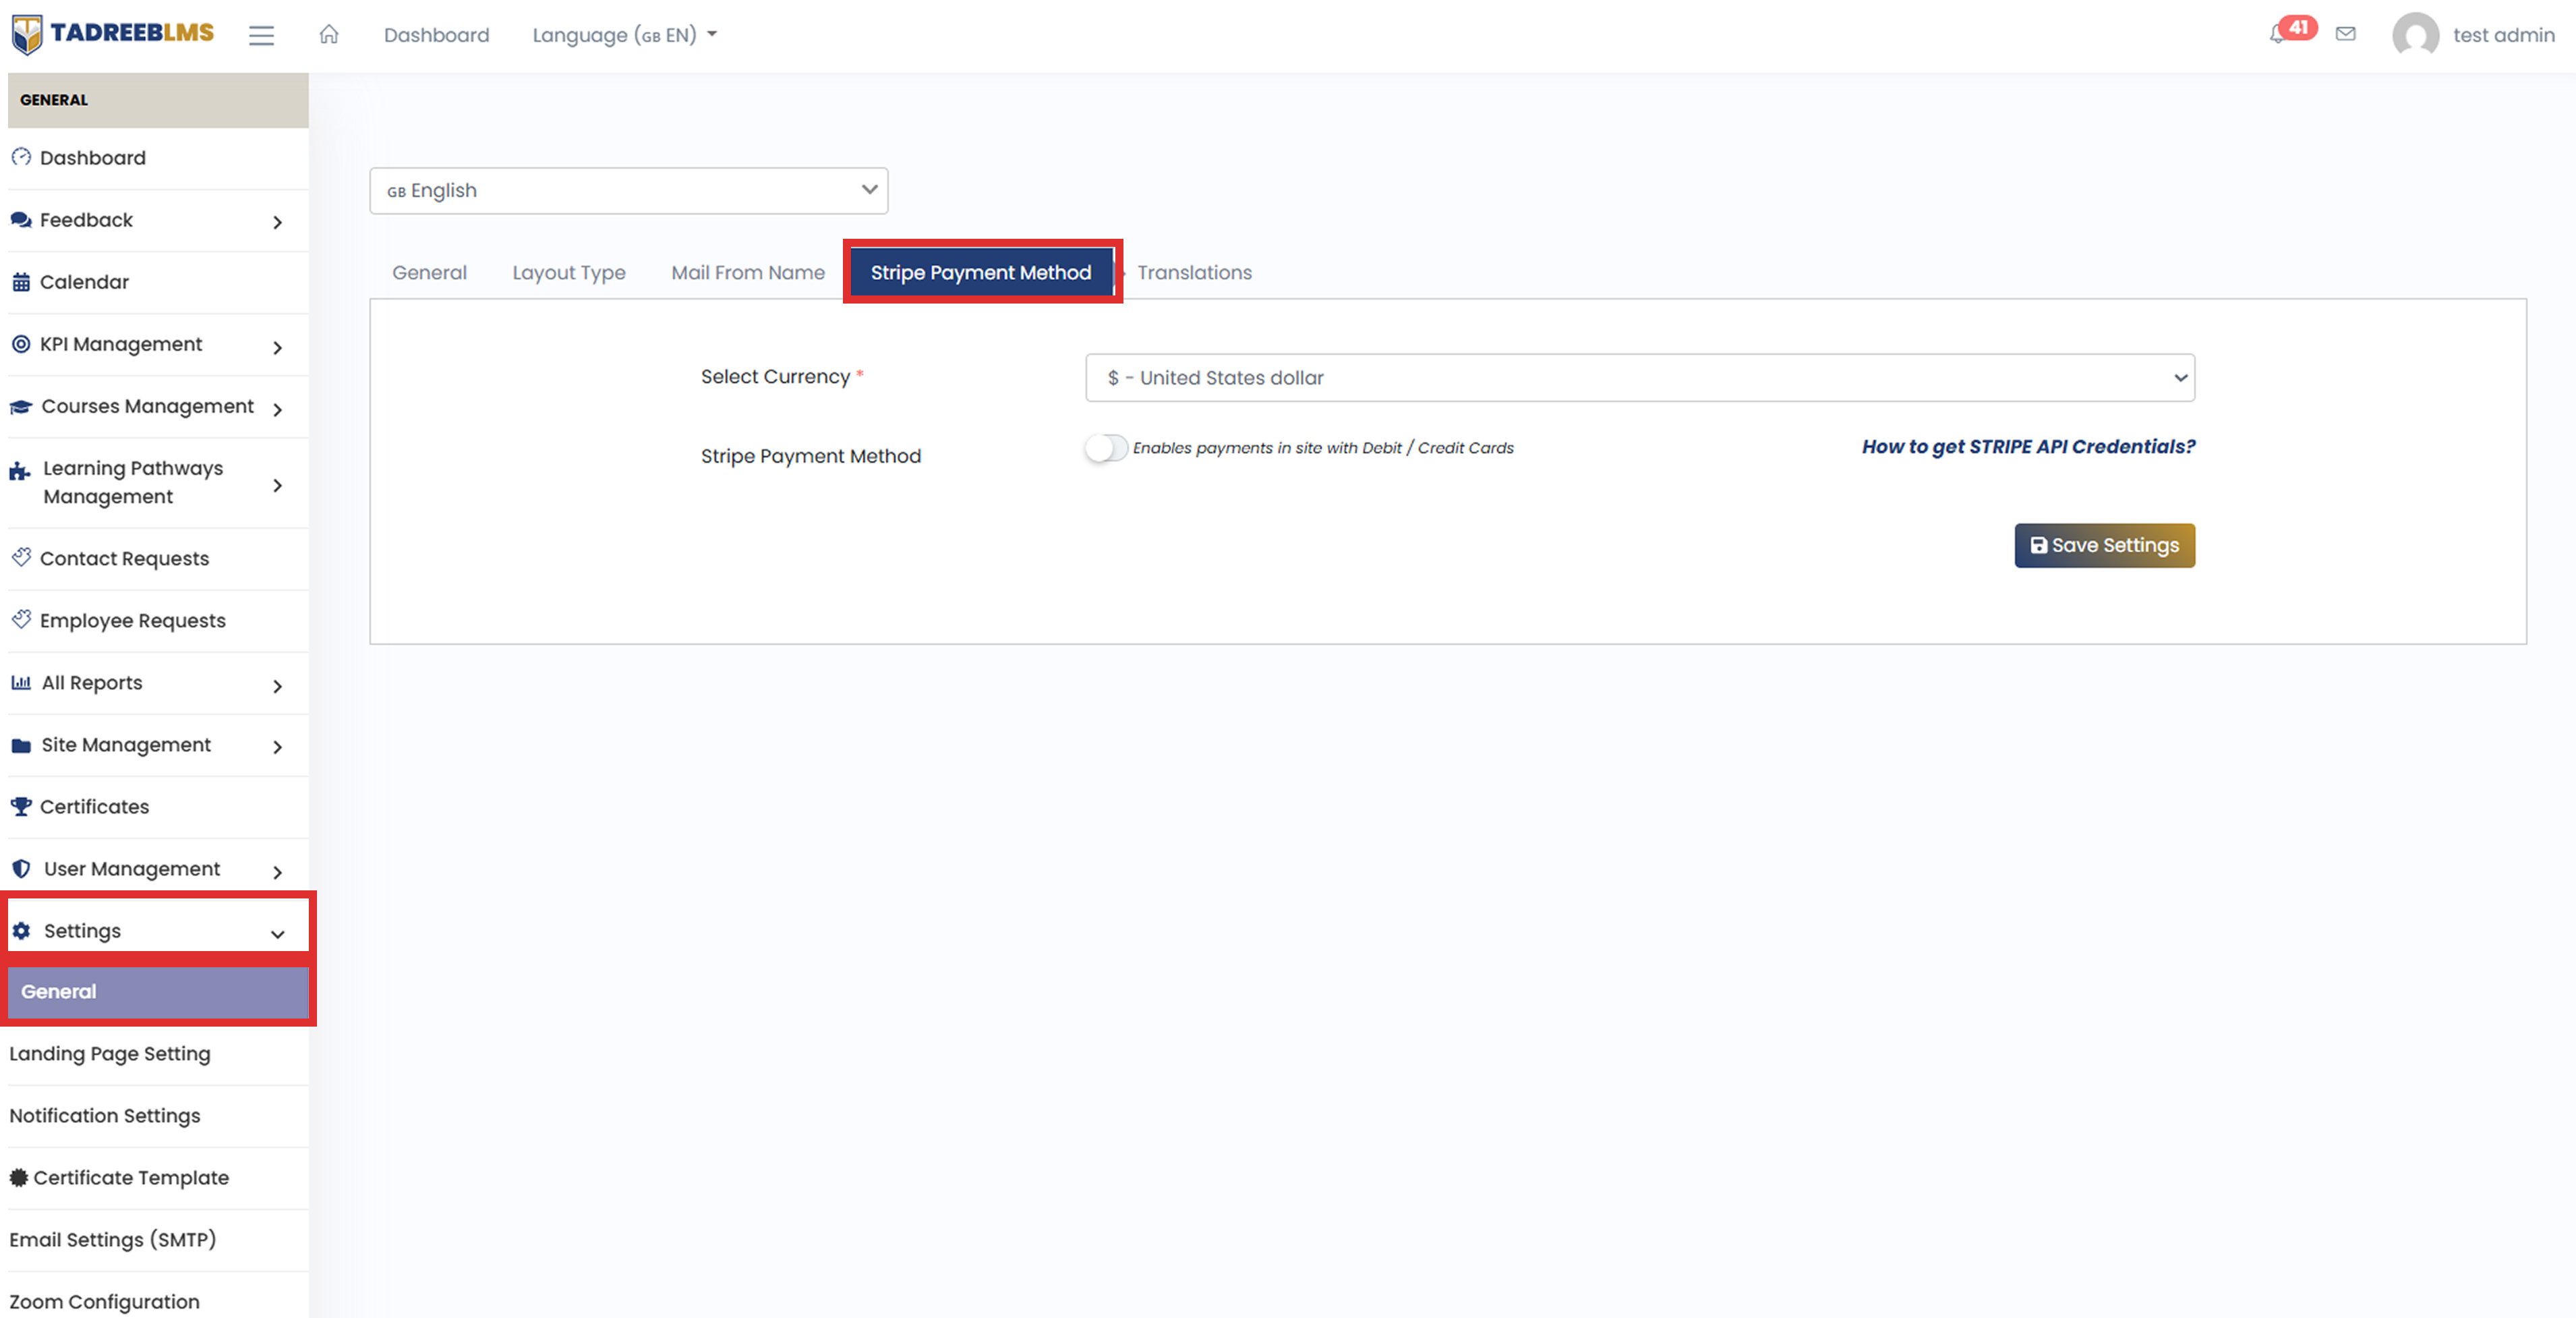
| Field | What it does |
|---|---|
| Select Currency | Selects the currency in which learners will make payments for courses. |
| Stripe Payment Method | Turns Stripe payments on or off on the platform. |
| How to get STRIPE API Credentials? | Opens a guide explaining how to get the API credentials required to connect your Stripe account with the LMS. |
To enable Stripe payments:
- Select the required currency from the Select Currency dropdown.
- Turn on the Stripe Payment Method toggle.
- If required, click How to get STRIPE API Credentials? to learn how to obtain your Stripe credentials.
- Click Save Settings to apply the changes.
📌 Note: You need an active Stripe account and the required API credentials to process payments through Stripe.
13.1.5 Translations
The Translations settings allow you to manage the languages available on your LMS. You can set a default language, choose the text direction, and add new languages by uploading a translation file in JSON format.
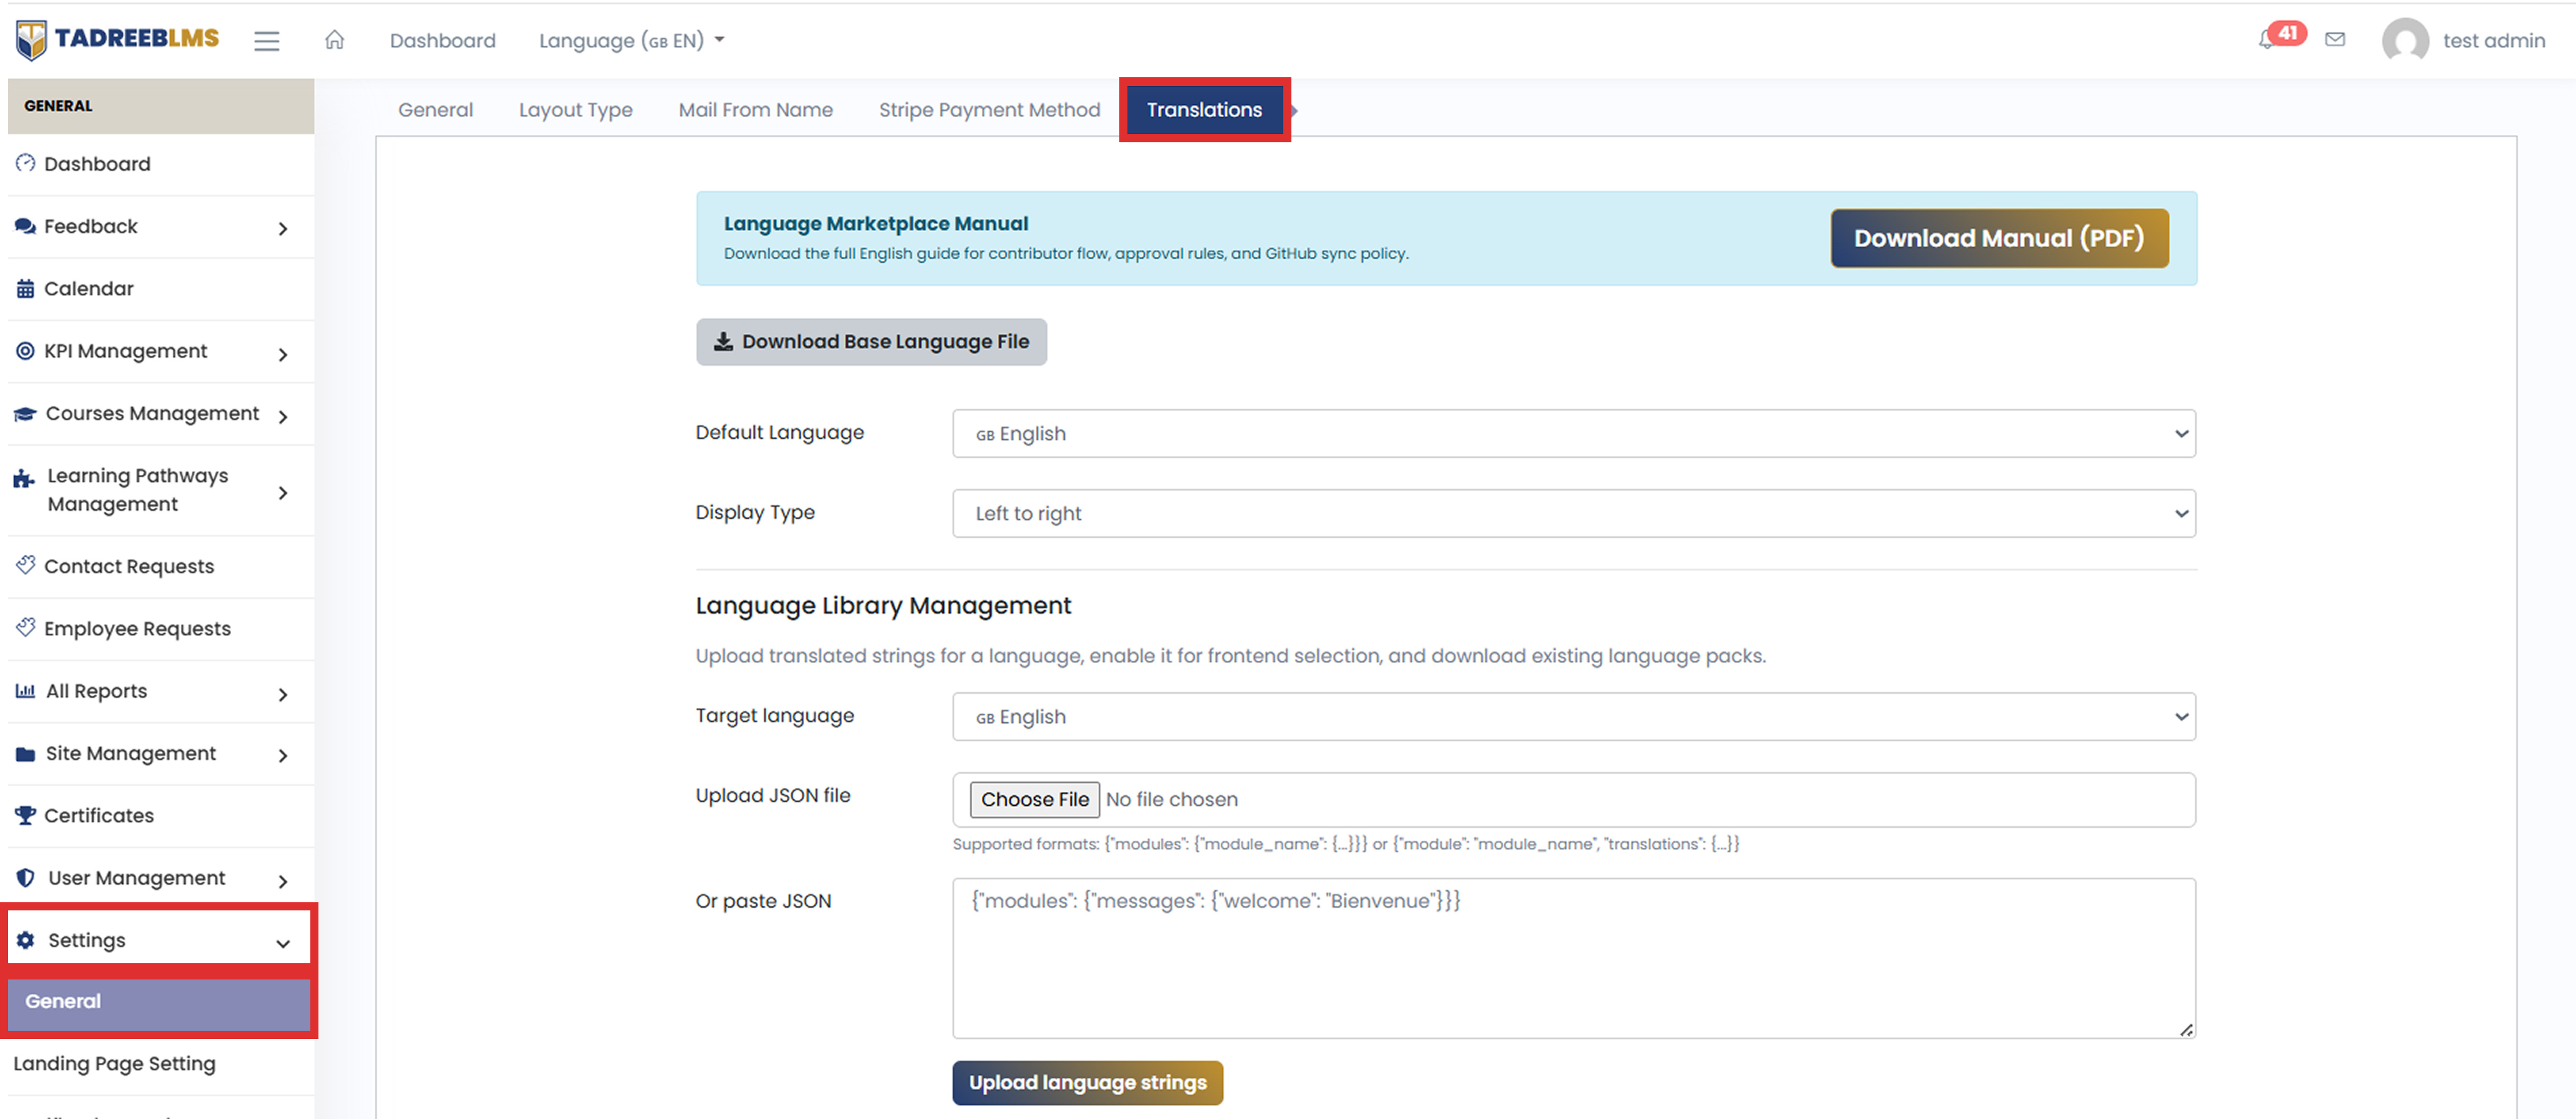
| Field | What it does |
|---|---|
| Download Base Language File | Downloads the base language file, which you can use as a template to create a translation. |
| Default Language | Sets the language displayed by default on the platform. |
| Display Type | Sets the text direction for the language, such as Left to right or Right to left. |
| Target Language | Selects the language for which you want to upload translation strings. |
| Upload JSON File | Allows you to upload a translation file from your computer. |
| Or Paste JSON | Allows you to paste the translation strings directly in JSON format instead of uploading a file. |
The language list below shows the languages currently available on the platform, along with their Code, Status, Last uploaded date, and available Actions.
To add a custom language:
- Download the Base Language File if you need a template for your translation.
- Select the Target Language.
- Upload the translated JSON file using Choose File, or paste the translation into the Or Paste JSON box.
- Click Upload language strings.
- Check the language list to confirm that the language has been added and enabled.
💡 Tip: If you are creating a new translation, start by downloading the Base Language File. It provides the text strings that can be translated and uploaded back to the LMS.
Language Marketplace Workflow
The Language Marketplace Workflow provides a structured way to manage translations with contributors. It is useful when translations are being created or reviewed by other people.
The workflow includes five steps:
- Publish Source Package — Select a locale and publish the source language package for translation.
- Invite Contributor — Select the target language and enter the contributor's name and email address to send an invitation.
- Contributor Invitations — View and track the invitations sent to translation contributors.
- Published Marketplace Packages — View the language packages published in the marketplace and download or sync them as required.
- Review Queue — Review submitted translations and either approve or reject them.
📌 Note: The Language Marketplace Workflow helps you manage the complete translation process — from preparing the source language and inviting contributors to reviewing and approving submitted translations.
13.2 Landing Page Setting
The Landing Page Setting options let you customise the appearance and content of your LMS landing page. You can enable or disable the landing page and manage its footer, menu, and slider settings.
The section contains four tabs:
- Landing Page Setting — Enables or disables the landing page.
- Footer Setting — Customises the footer content, links, social media, and newsletter options.
- Menu Setting — Creates and manages the menus displayed on the platform.
- Slider Setting — Adds and manages the hero slider images and their display order.
13.2.1 Landing Page Setting
The Landing Page Setting tab contains a simple option to control whether the landing page is available on the platform.
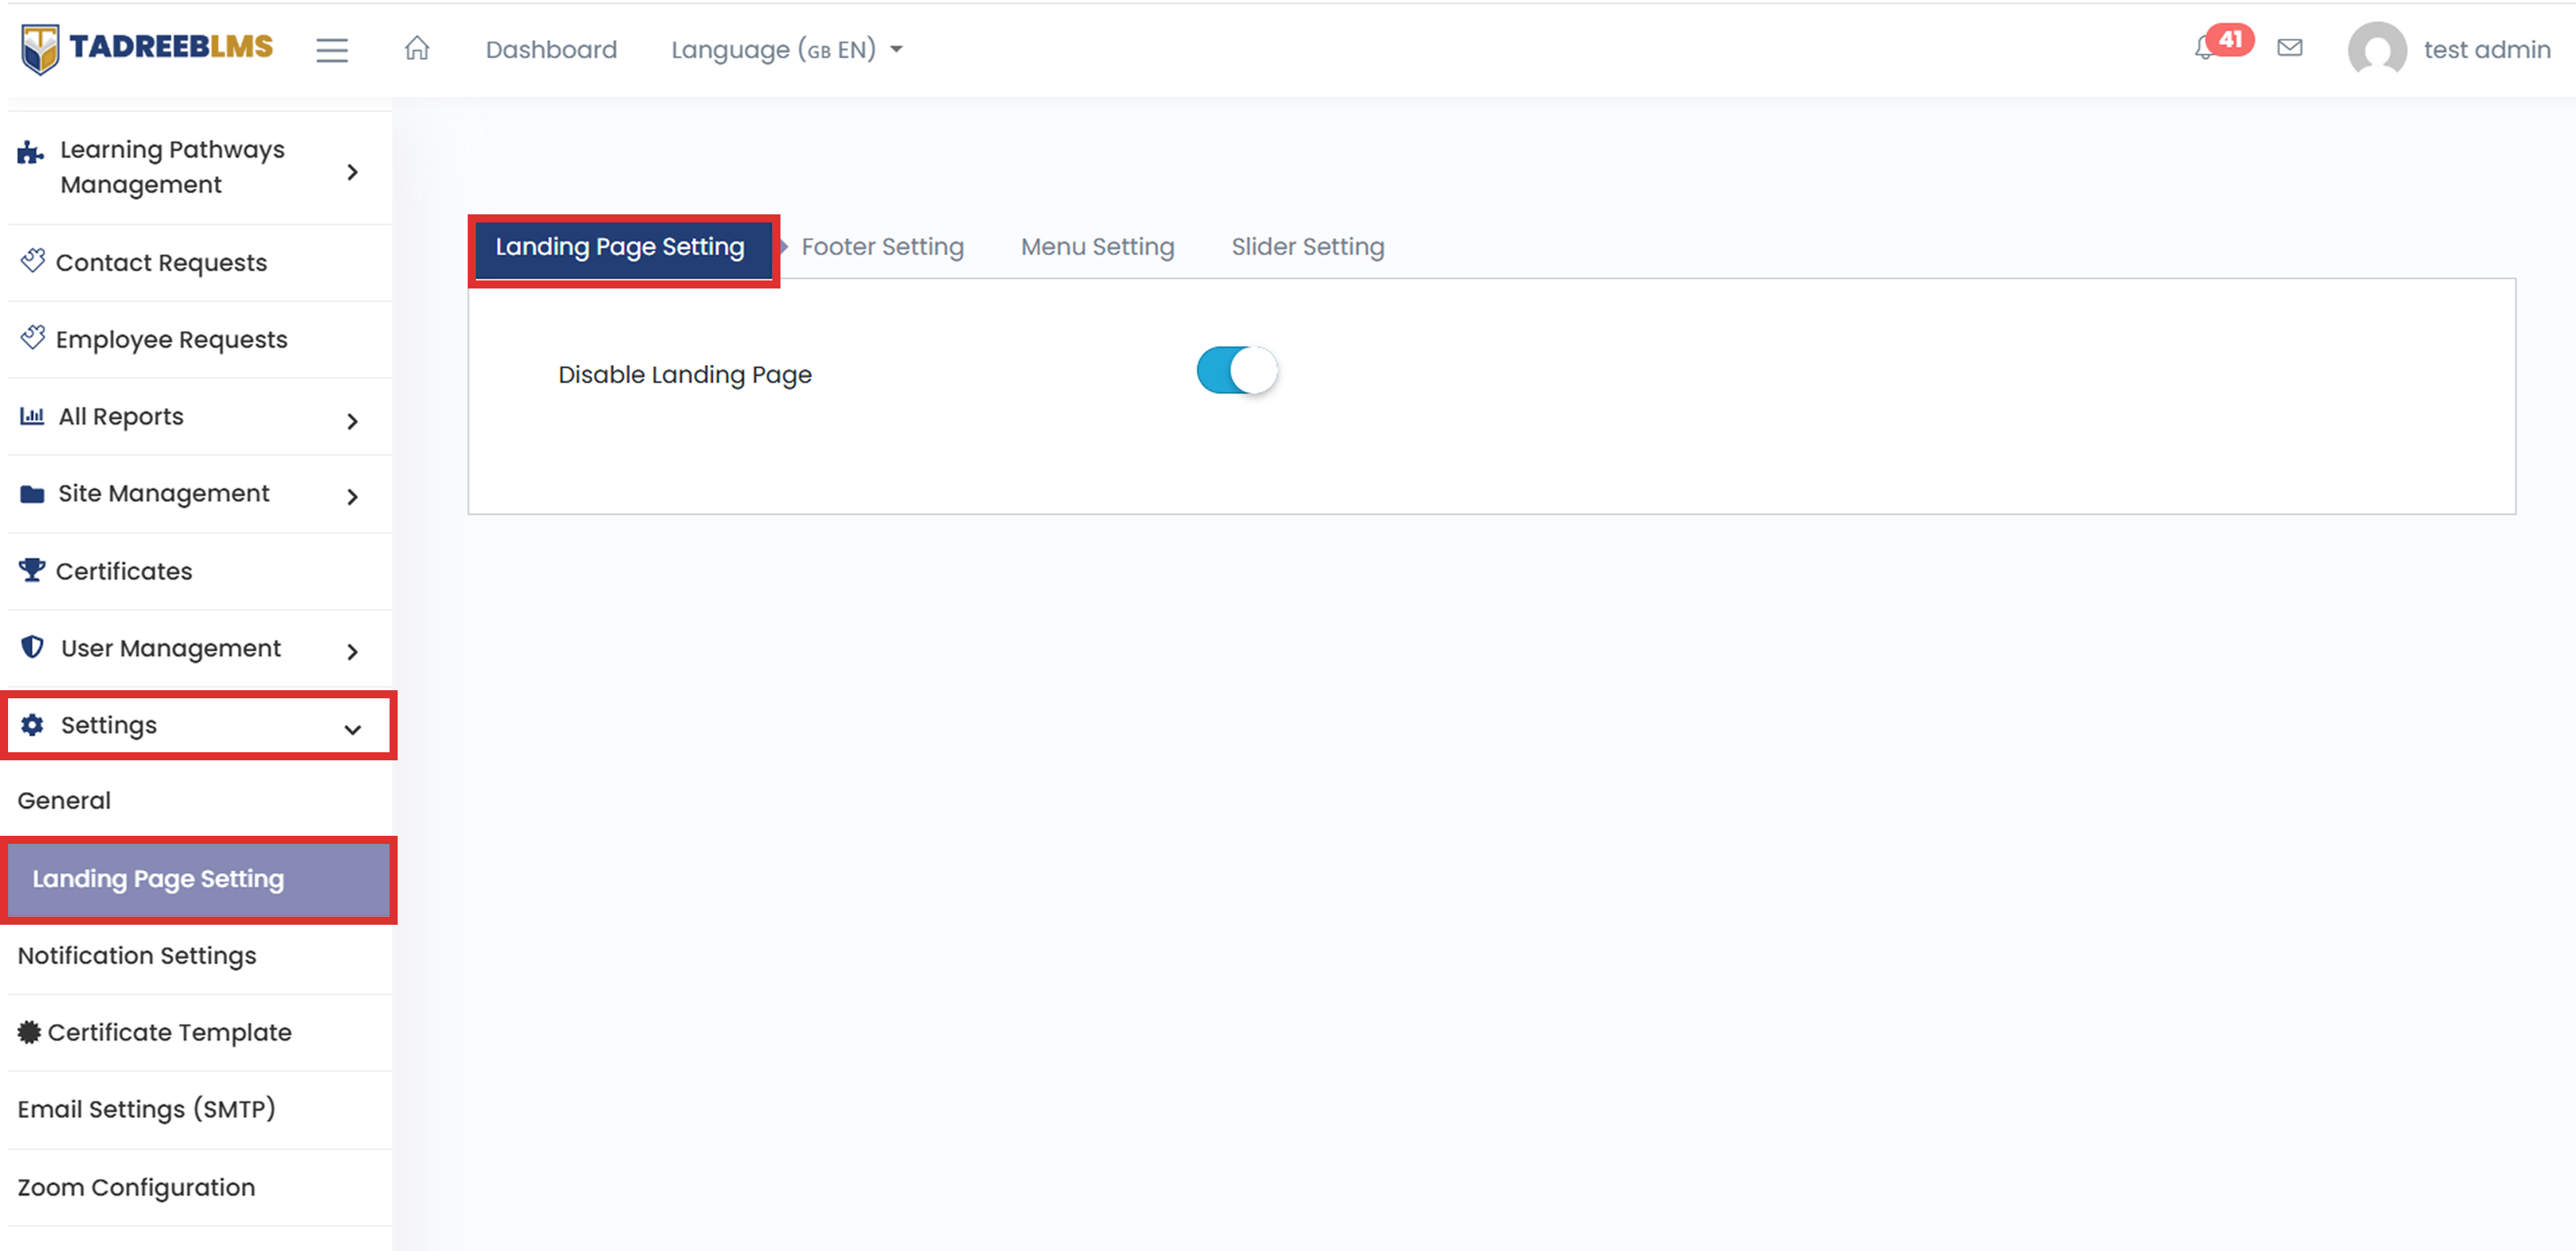
| Field | What it does |
|---|---|
| Disable Landing Page | Turns the landing page off when enabled. |
To disable the landing page:
- Turn on the Disable Landing Page toggle.
- Save or apply the setting if prompted.
13.2.2 Footer Setting
The Footer Setting tab allows you to customise the footer displayed at the bottom of the landing page. You can add a short description, select the content shown in different footer sections, add social media links, enable a newsletter form, and customise copyright text and footer links.
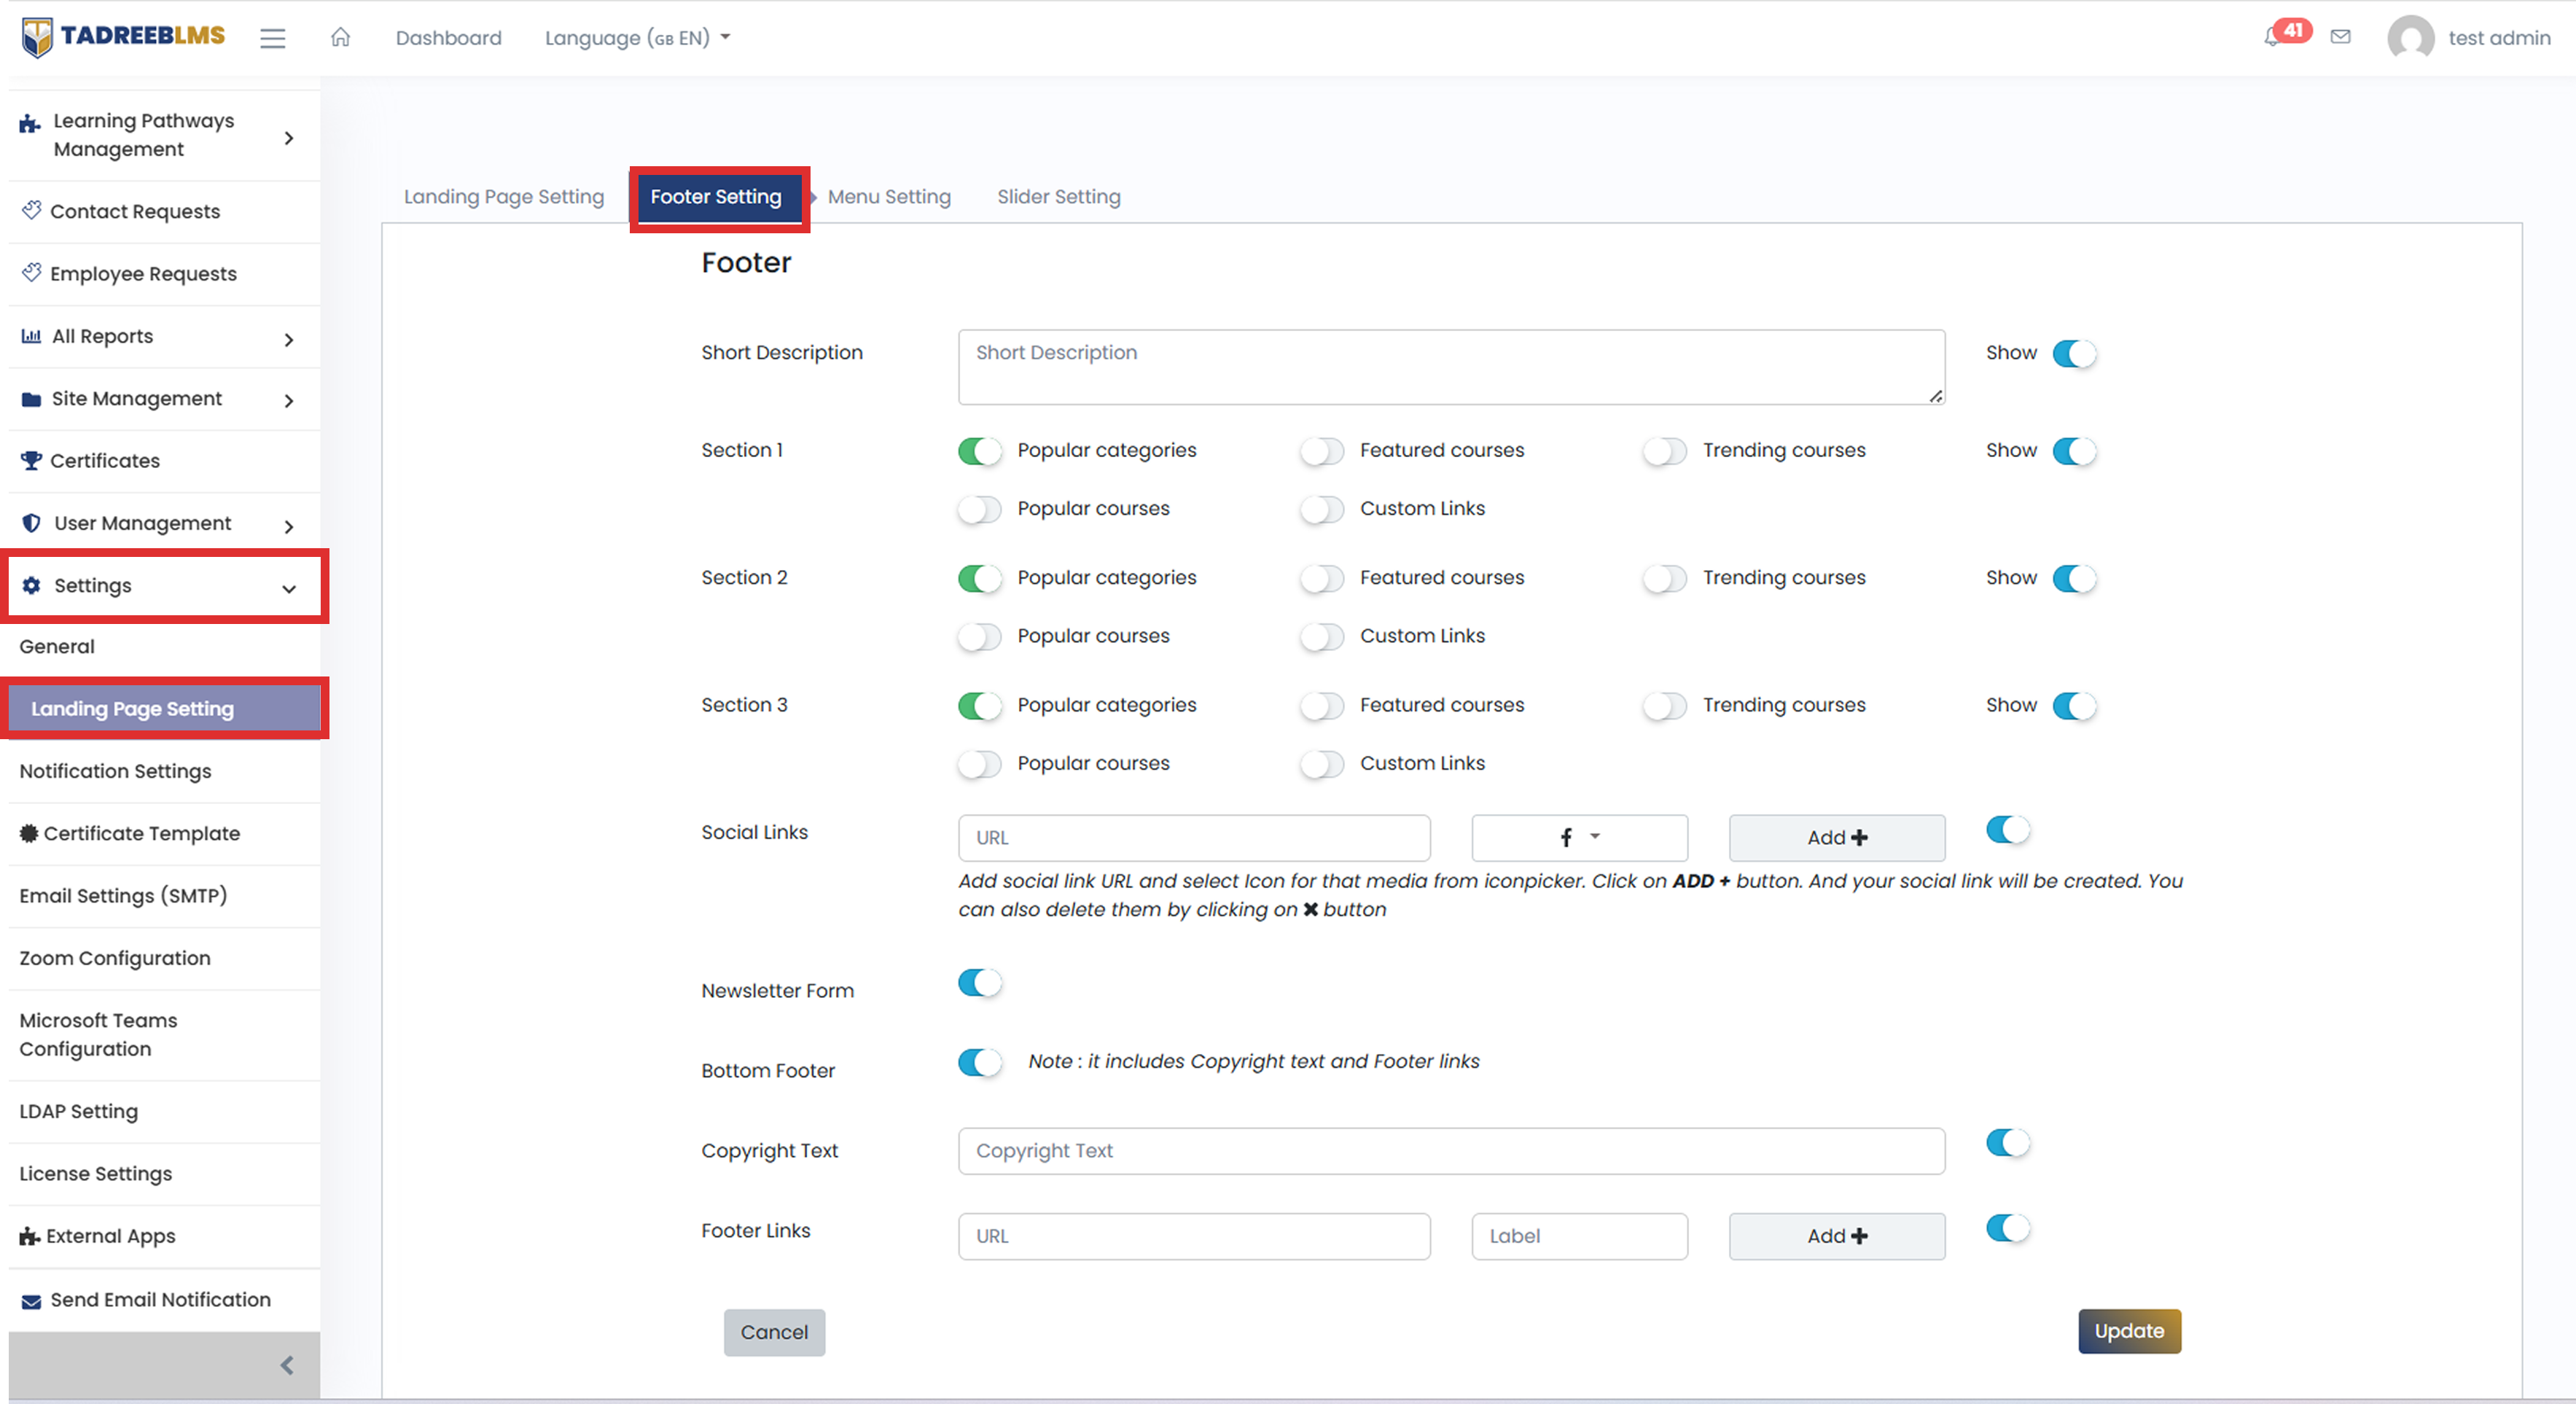
| Field | What it does |
|---|---|
| Short Description | Adds a brief description that appears in the footer. |
| Section 1 | Lets you select the content to display in the first footer section, such as popular categories, popular courses, featured courses, trending courses, or custom links. |
| Section 2 | Lets you select the content to display in the second footer section. |
| Section 3 | Lets you select the content to display in the third footer section. |
| Social Links | Adds links to your social media pages and allows you to select the relevant social media icon. |
| Newsletter Form | Shows or hides the newsletter subscription form in the footer. |
| Bottom Footer | Shows or hides the bottom part of the footer containing copyright text and footer links. |
| Copyright Text | Adds the copyright text displayed at the bottom of the page. |
| Footer Links | Adds custom links to the bottom footer by entering a URL and label. |
Each footer section has a Show toggle, which allows you to display or hide that section.
To customise the footer:
- Enter a Short Description if required.
- Select the content you want to display in Section 1, Section 2, and Section 3.
- Use the Show toggles to display or hide the footer sections.
- Add Social Links by entering the URL and selecting the appropriate icon. Click Add + to add the link.
- Enable or disable the Newsletter Form as required.
- Enable Bottom Footer if you want to display the copyright text and footer links.
- Enter the Copyright Text.
- Add any required Footer Links by entering the URL and label, then clicking Add +.
- Click Update to save the changes.
13.2.3 Menu Setting
The Menu Setting tab allows you to create and manage the menus displayed on the platform. You can select an existing menu to edit or create a new menu by giving it a name.
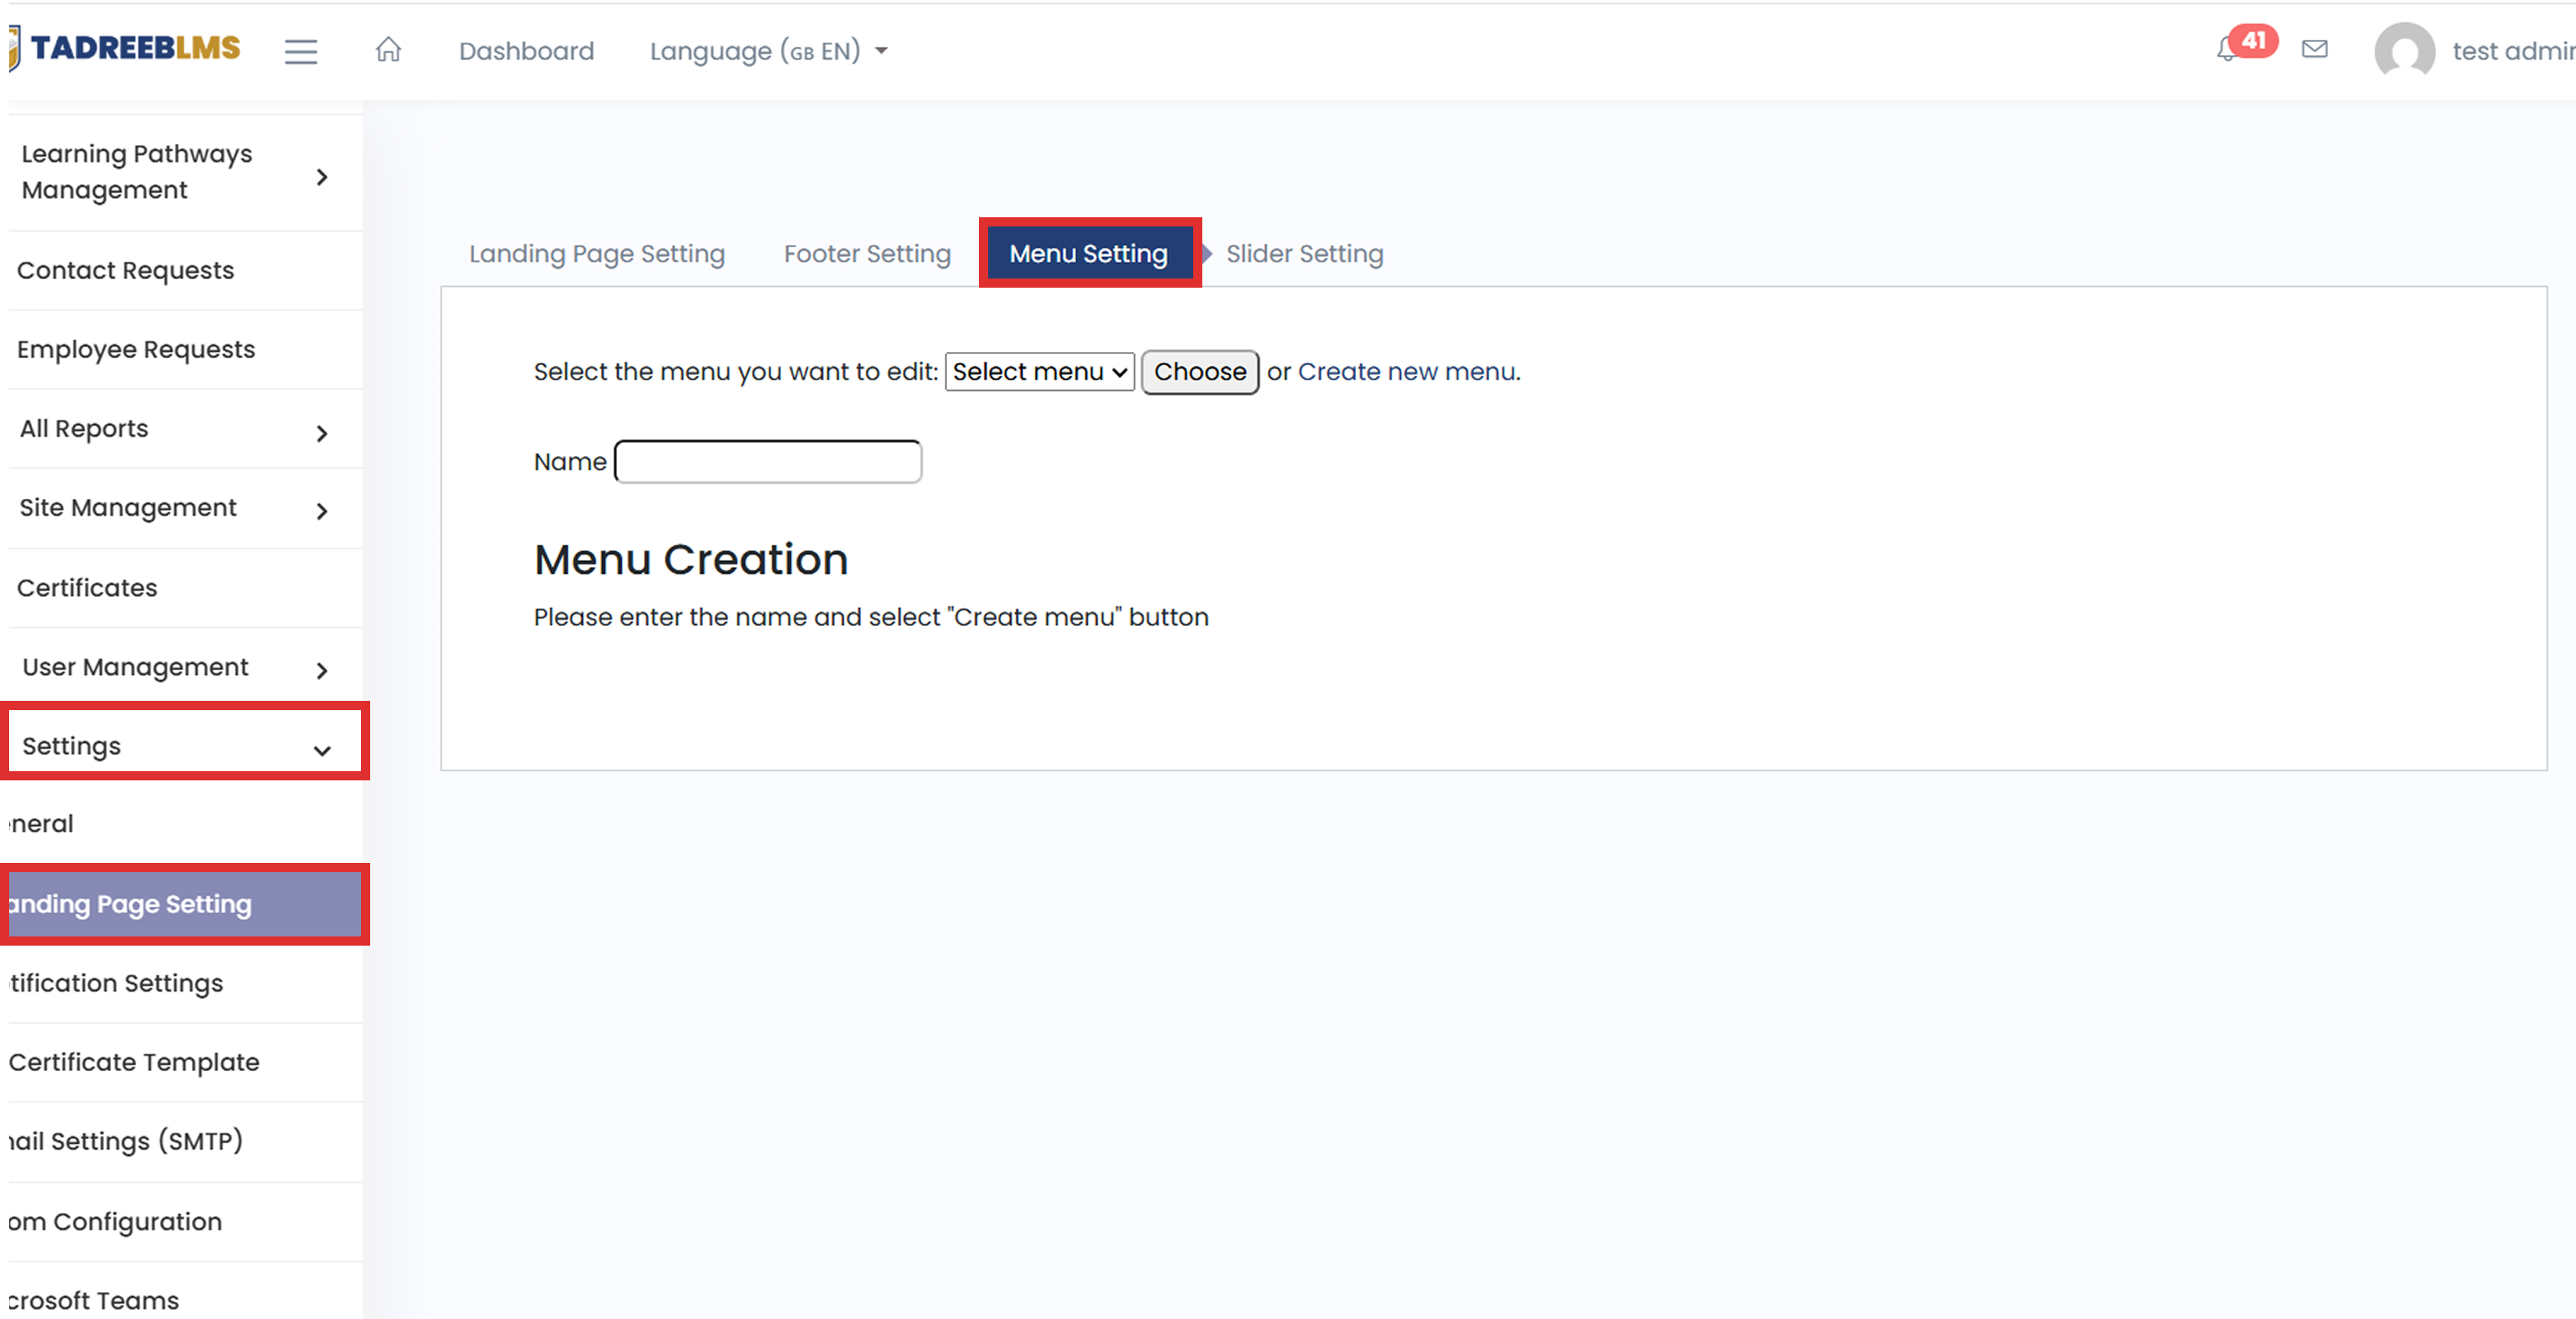
| Field | What it does |
|---|---|
| Select the menu you want to edit | Allows you to select an existing menu for editing. |
| Choose | Opens the selected menu for editing. |
| Create new menu | Allows you to create a new menu. |
| Name | Enter the name of the new menu. |
To create a new menu:
-
Select Create new menu.
-
Enter a name in the Name field.
-
Click Create menu.
-
Configure the menu as required. To edit an existing menu:
-
Select the menu you want to edit from the dropdown.
-
Click Choose.
-
Make the required changes to the menu.
13.2.4 Slider Setting
The Slider Setting tab allows you to manage the Hero Slider displayed on the landing page. You can add new slides, enable or disable existing slides, edit slide details, and change the order in which slides appear.
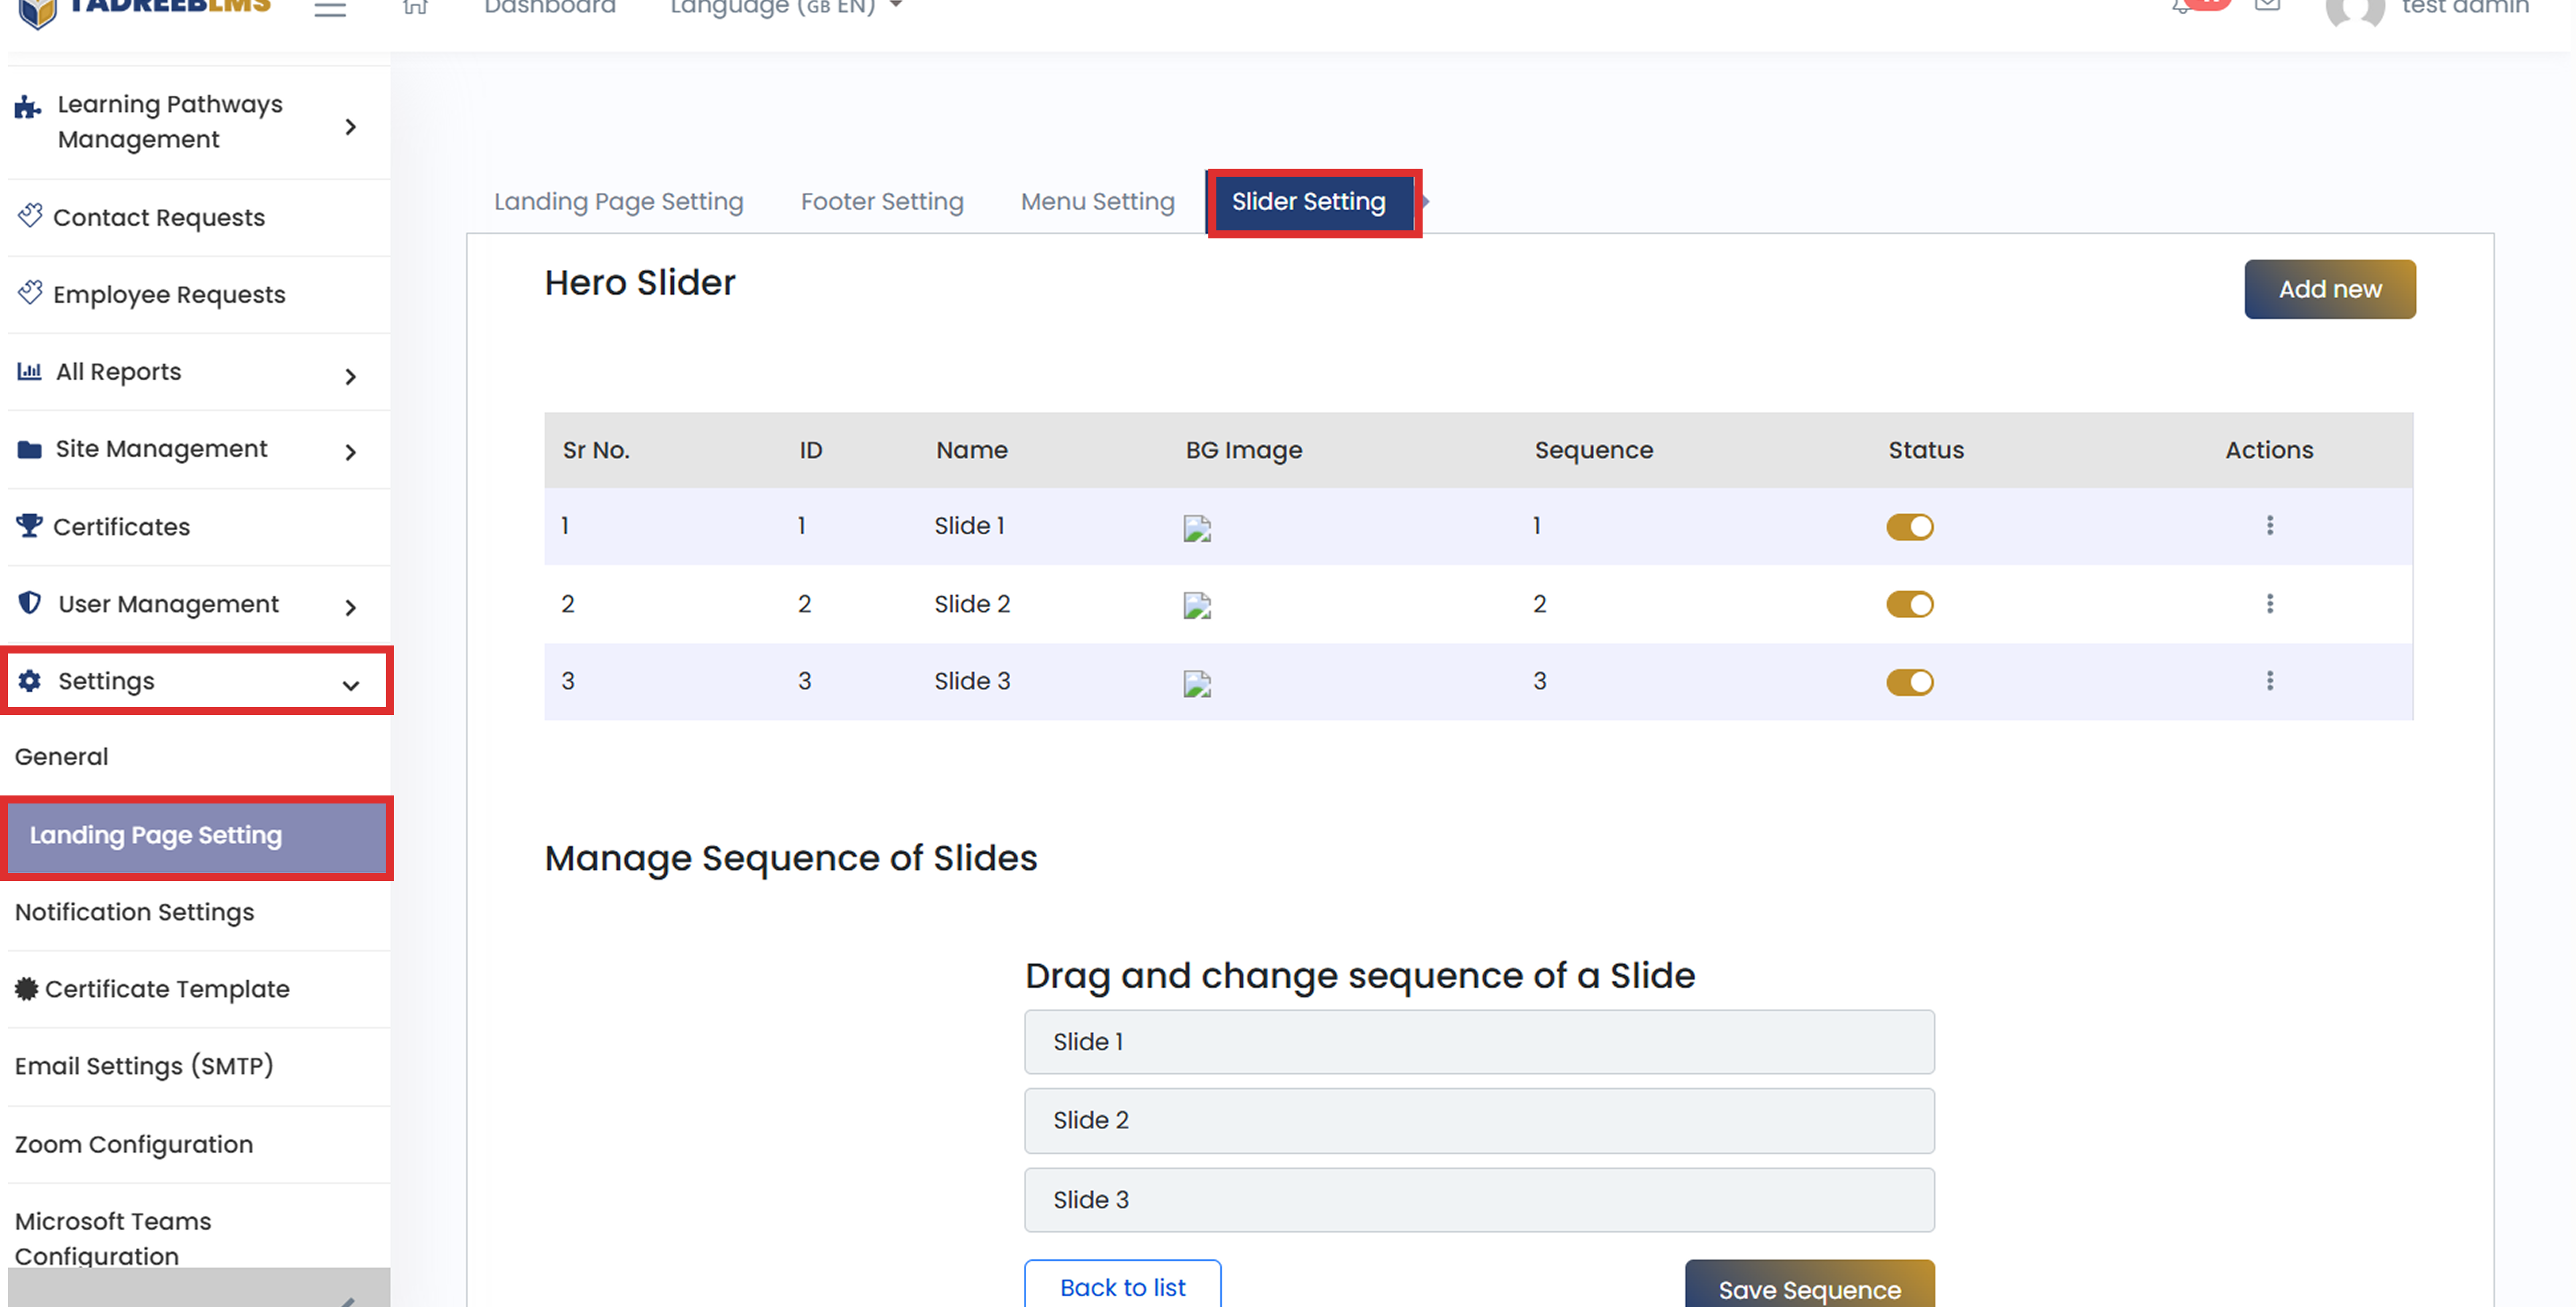
The slide list displays the following information:
| Field | What it does |
|---|---|
| Sr. No. | Shows the serial number of the slide. |
| ID | Displays the unique ID assigned to the slide. |
| Name | Displays the name of the slide. |
| BG Image | Shows the background image used for the slide. |
| Sequence | Shows the current order of the slide. |
| Status | Allows you to enable or disable the slide. |
| Actions | Provides options for managing the slide. |
The Manage Sequence of Slides section allows you to change the order of the slides by dragging them into the desired sequence.
To add a new slide:
- Click Add new.
- Enter the required slide details and add the background image.
- Save the slide.
To change the slide order:
- Go to Manage Sequence of Slides.
- Drag the slides into the required order.
- Click Save Sequence.
To enable or disable a slide:
- Use the Status toggle next to the slide. An enabled slide is displayed on the landing page, while a disabled slide is hidden.
13.3 Notification Settings
The Notification Settings allow you to control which email notifications are sent by the LMS. You can enable or disable notifications for different activities, such as user management, courses, lessons, assessments, trainees, trainers, and system security.
Each notification has a toggle that lets you turn that particular notification on or off. The settings are grouped by category, making it easier to manage notifications for different parts of the platform.
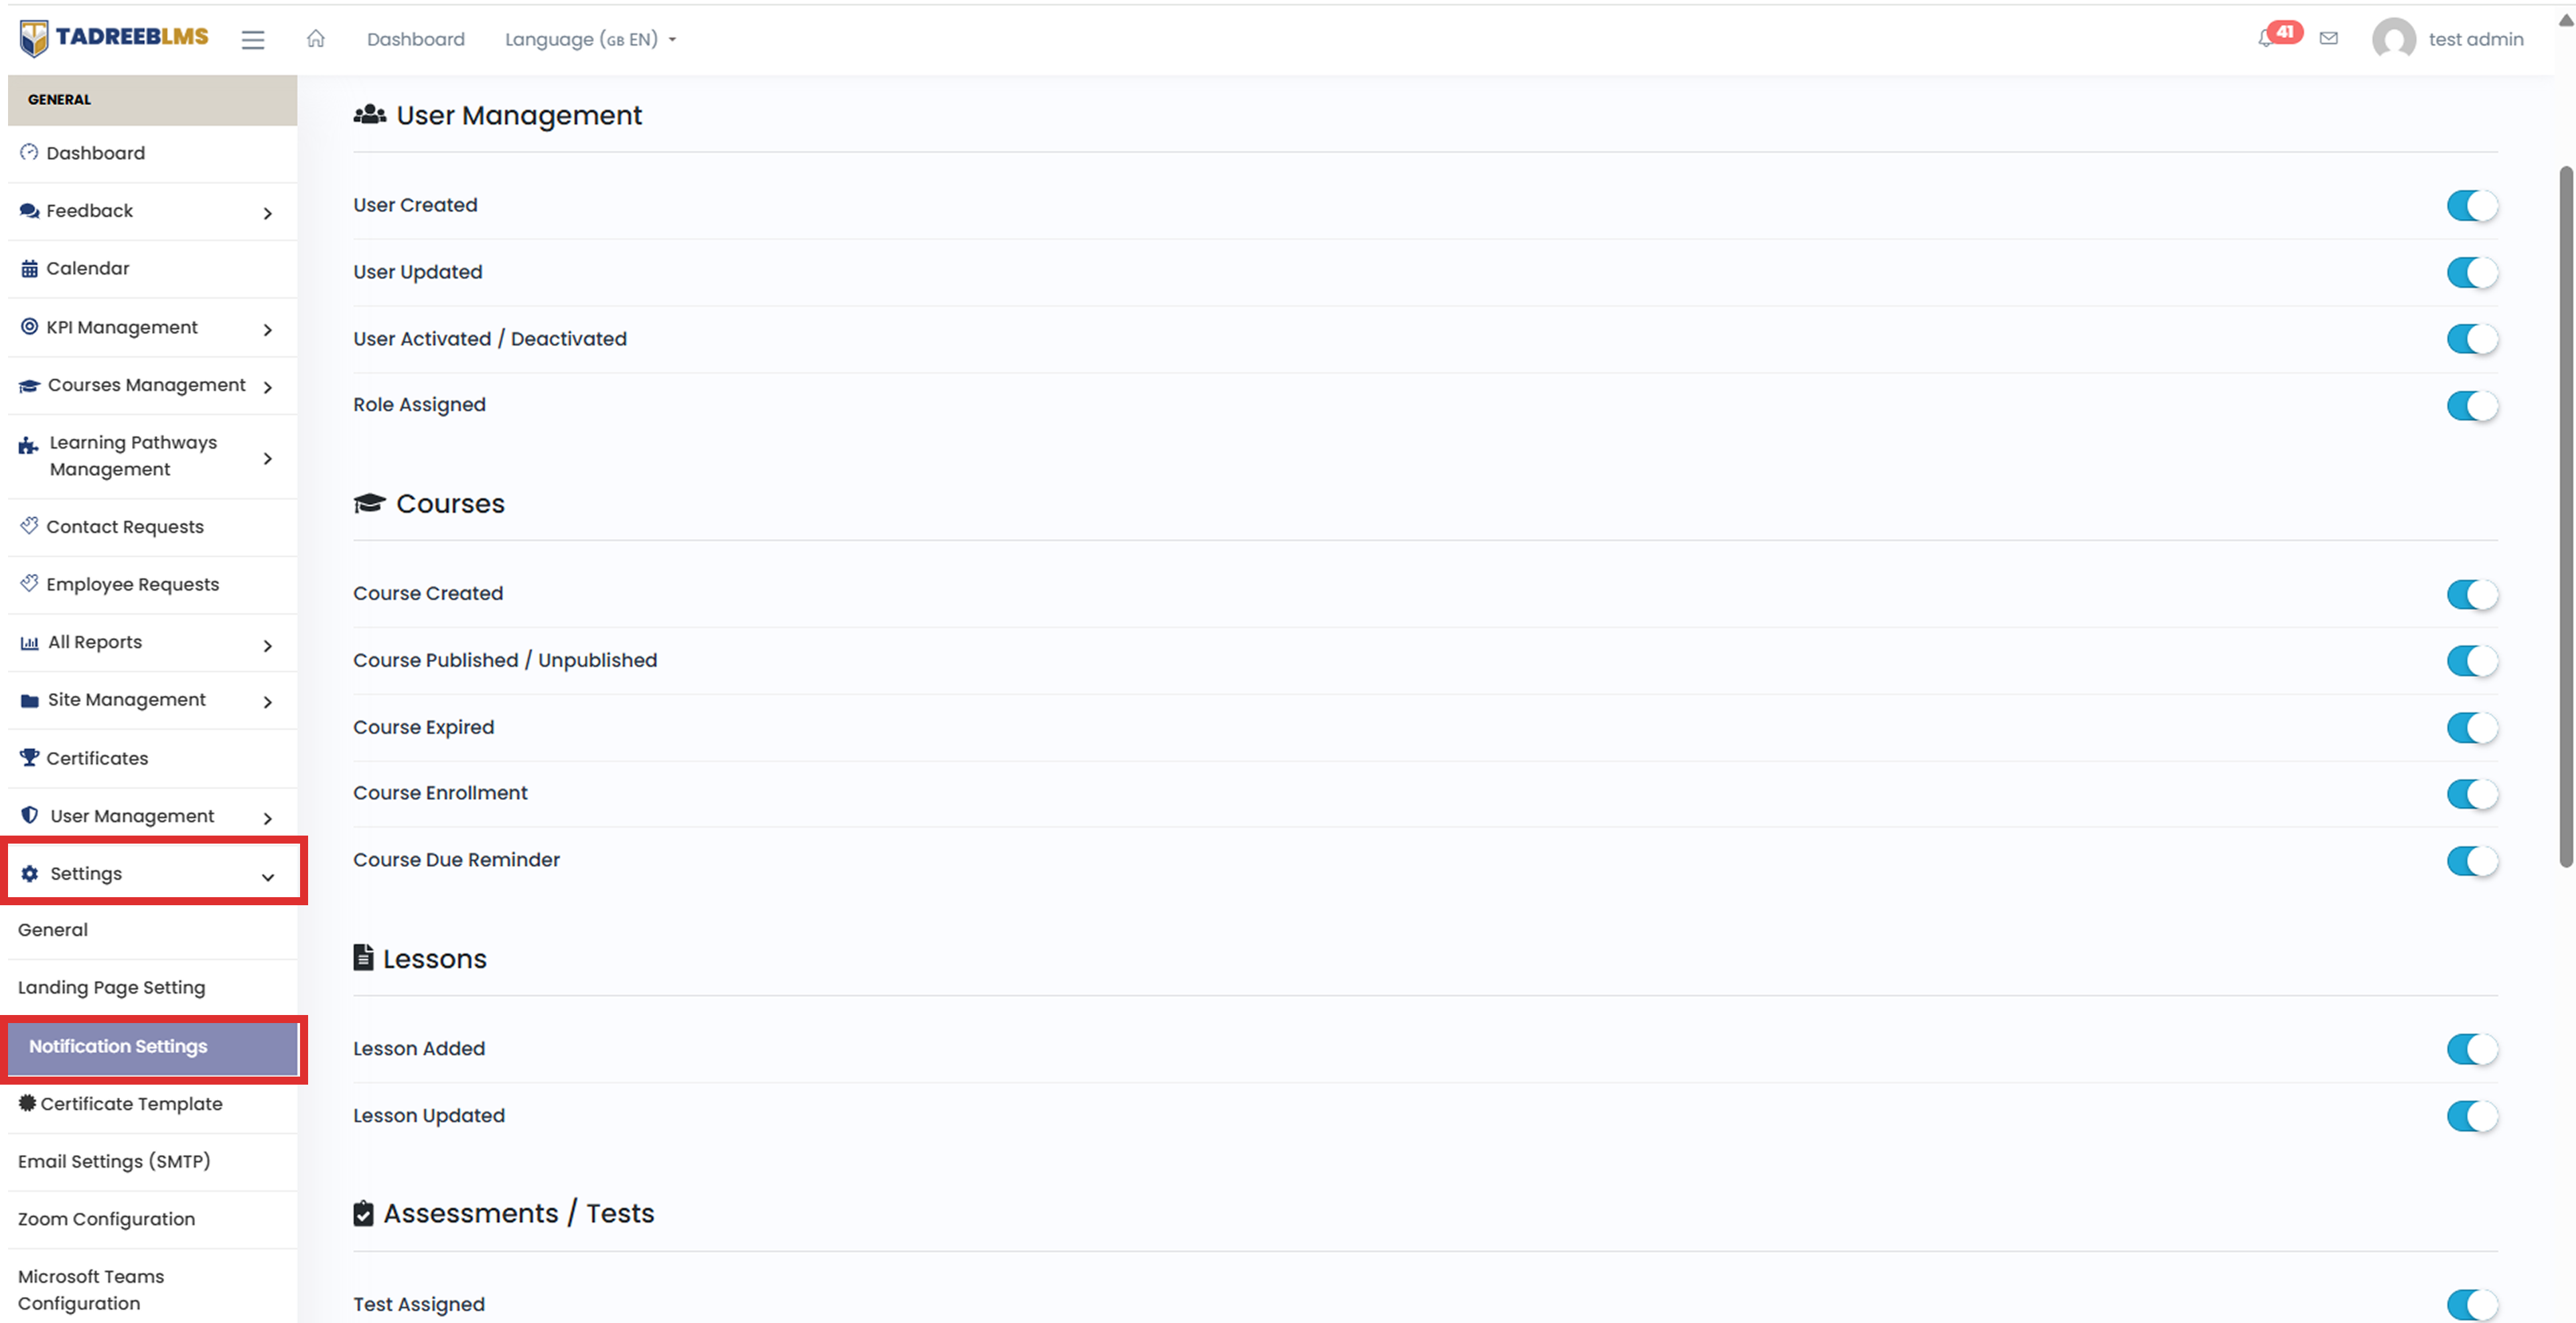
Global Channel Controls
The Global Channel Controls section provides an overall control for email notifications.
| Field | What it does |
|---|---|
| Email Notifications | Enables or disables email notifications across the platform. When enabled, individual notification settings can be used to control specific types of emails. |
User Management
This section contains notifications related to user accounts and roles.
| Notification | What it does |
|---|---|
| User Created | Sends a notification when a new user is created. |
| User Updated | Sends a notification when a user's information is updated. |
| User Activated / Deactivated | Sends a notification when a user's account is activated or deactivated. |
| Role Assigned | Sends a notification when a role is assigned to a user. |
Courses
This section contains notifications related to courses.
| Notification | What it does |
|---|---|
| Course Created | Sends a notification when a course is created. |
| Course Published / Unpublished | Sends a notification when a course is published or unpublished. |
| Course Expired | Sends a notification when a course expires. |
| Course Enrollment | Sends a notification when a learner is enrolled in a course. |
| Course Due Reminder | Sends a reminder when a course is approaching its due date. |
Lessons
This section contains notifications related to lessons.
| Notification | What it does |
|---|---|
| Lesson Added | Sends a notification when a lesson is added. |
| Lesson Updated | Sends a notification when a lesson is updated. |
Assessments / Tests
This section contains notifications related to tests and assessments.
| Notification | What it does |
|---|---|
| Test Assigned | Sends a notification when a test is assigned. |
| Test Completed | Sends a notification when a test is completed. |
| Test Results Published | Sends a notification when test results are published. |
Trainees
This section contains notifications related to trainee activities.
| Notification | What it does |
|---|---|
| Trainee Enrolled | Sends a notification when a trainee is enrolled. |
| Trainee Completed Course | Sends a notification when a trainee completes a course. |
Trainers
This section contains notifications related to trainer assignments.
| Notification | What it does |
|---|---|
| Trainer Assigned to Course | Sends a notification when a trainer is assigned to a course. |
System / Security
This section contains notifications related to account security and login activity.
| Notification | What it does |
|---|---|
| Login Alerts | Sends alerts for relevant login activity. |
| Password Reset | Sends a notification when a password reset is requested or performed. |
| Failed Login Attempts | Sends an alert when there are failed attempts to log in. |
To manage notifications:
- Make sure Email Notifications is enabled under Global Channel Controls.
- Find the notification category you want to configure.
- Turn the toggle on to enable a notification or off to disable it.
- Repeat this for each notification you want to customise.
📌 Note: The Global Channel Controls setting provides the overall control for email notifications, while the individual toggles let you manage specific notification types.
13.4 Email Settings (SMTP)
The Email Settings (SMTP) section allows you to configure the email service used by the LMS to send outgoing emails. You can enable or disable SMTP, enter your mail server details, specify the sender information, and send a test email to verify that the configuration is working correctly.
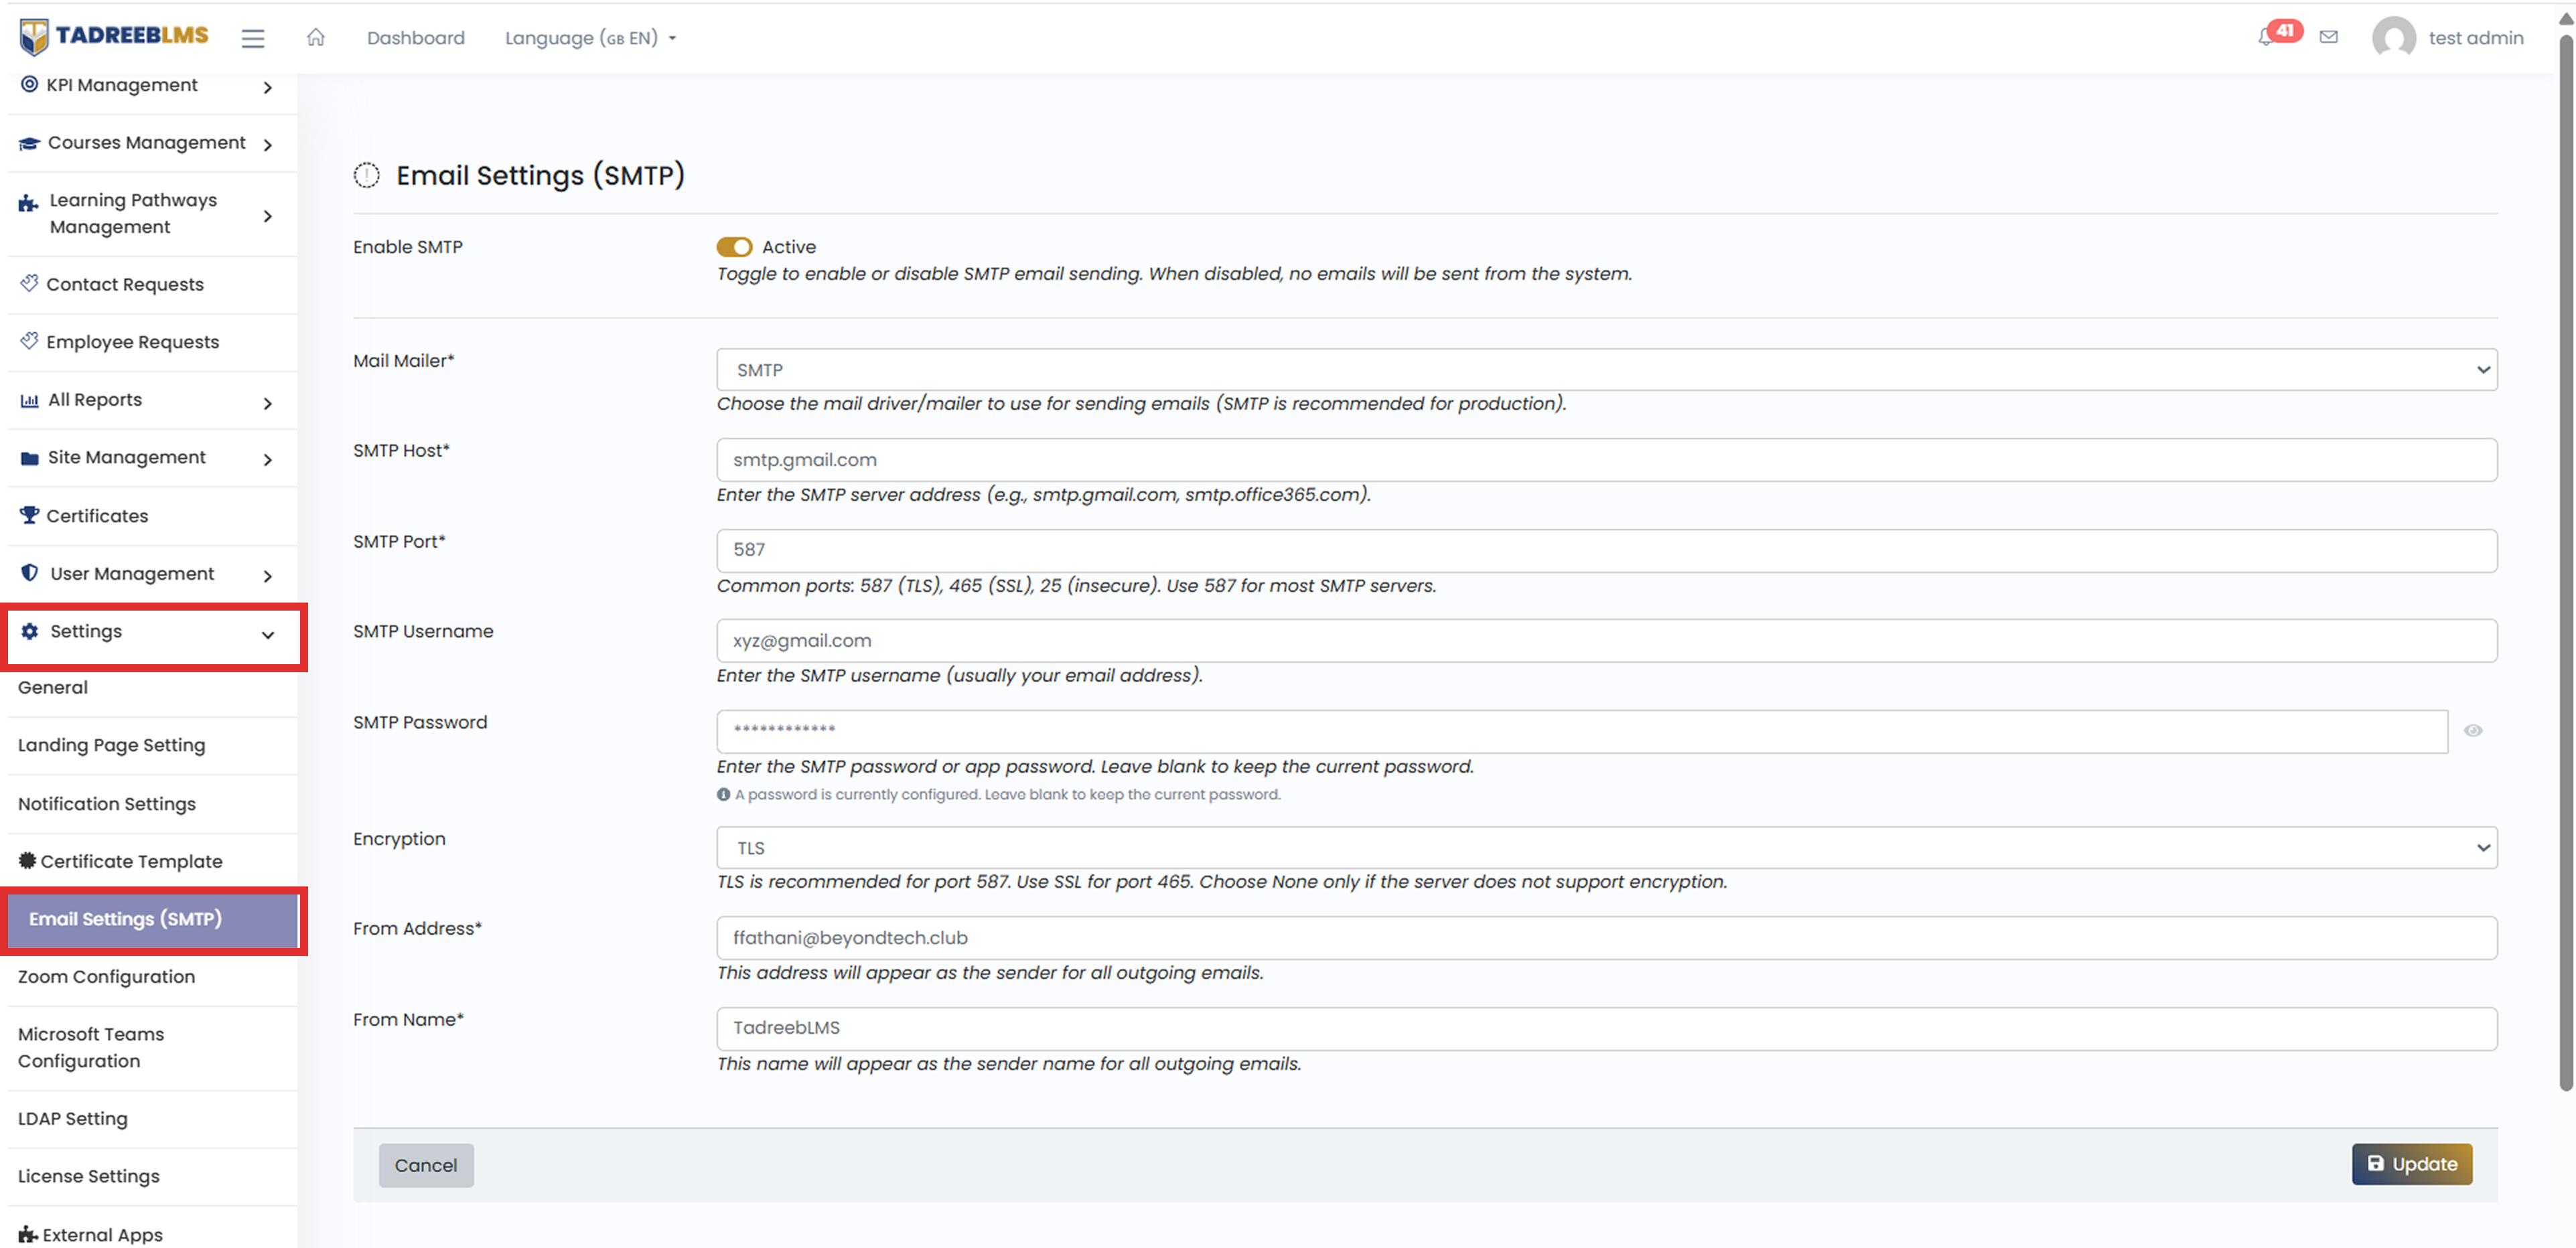
SMTP Configuration
| Field | What it does |
|---|---|
| Enable SMTP | Turns SMTP email sending on or off. When disabled, the system will not send emails through SMTP. |
| Mail Mailer | Selects the mail driver used for sending emails. SMTP is recommended for production use. |
| SMTP Host | Enter the address of your SMTP server, such as smtp.gmail.com or smtp.office365.com. |
| SMTP Port | Enter the port used by your SMTP server. Common ports include 587 (TLS) and 465 (SSL). |
| SMTP Username | Enter the username for your SMTP account, usually your email address. |
| SMTP Password | Enter the password or app password for your SMTP account. Leave it blank to keep the existing password unchanged. |
| Encryption | Select the encryption method supported by your SMTP server, such as TLS or SSL. |
| From Address | The email address that appears as the sender for outgoing emails. |
| From Name | The name that appears as the sender for outgoing emails. |
To configure SMTP email:
- Turn on Enable SMTP.
- Select SMTP as the Mail Mailer.
- Enter the SMTP Host and SMTP Port provided by your email service.
- Enter your SMTP Username and SMTP Password.
- Select the required Encryption method.
- Enter the From Address and From Name that should appear on outgoing emails.
- Click Update to save the settings.
Test Email Configuration
After saving the SMTP settings, you can test whether the email configuration is working correctly.
| Field | What it does |
|---|---|
| Test Email Address | Enter the email address where you want to receive the test email. |
To test the email configuration:
- Enter an email address in Test Email Address.
- Click Send Test Email.
- Check the specified email inbox to confirm that the test email was received.
📌 Note: Make sure you save the SMTP settings before sending a test email. If the test email is not received, verify the SMTP host, port, username, password, and encryption settings provided by your email service.
13.5 LDAP Setting
The LDAP Setting allows you to connect Tadreeb LMS with an LDAP (Lightweight Directory Access Protocol) server. This can be used to authenticate users through an organisation's existing directory service instead of managing their login credentials separately in the LMS.
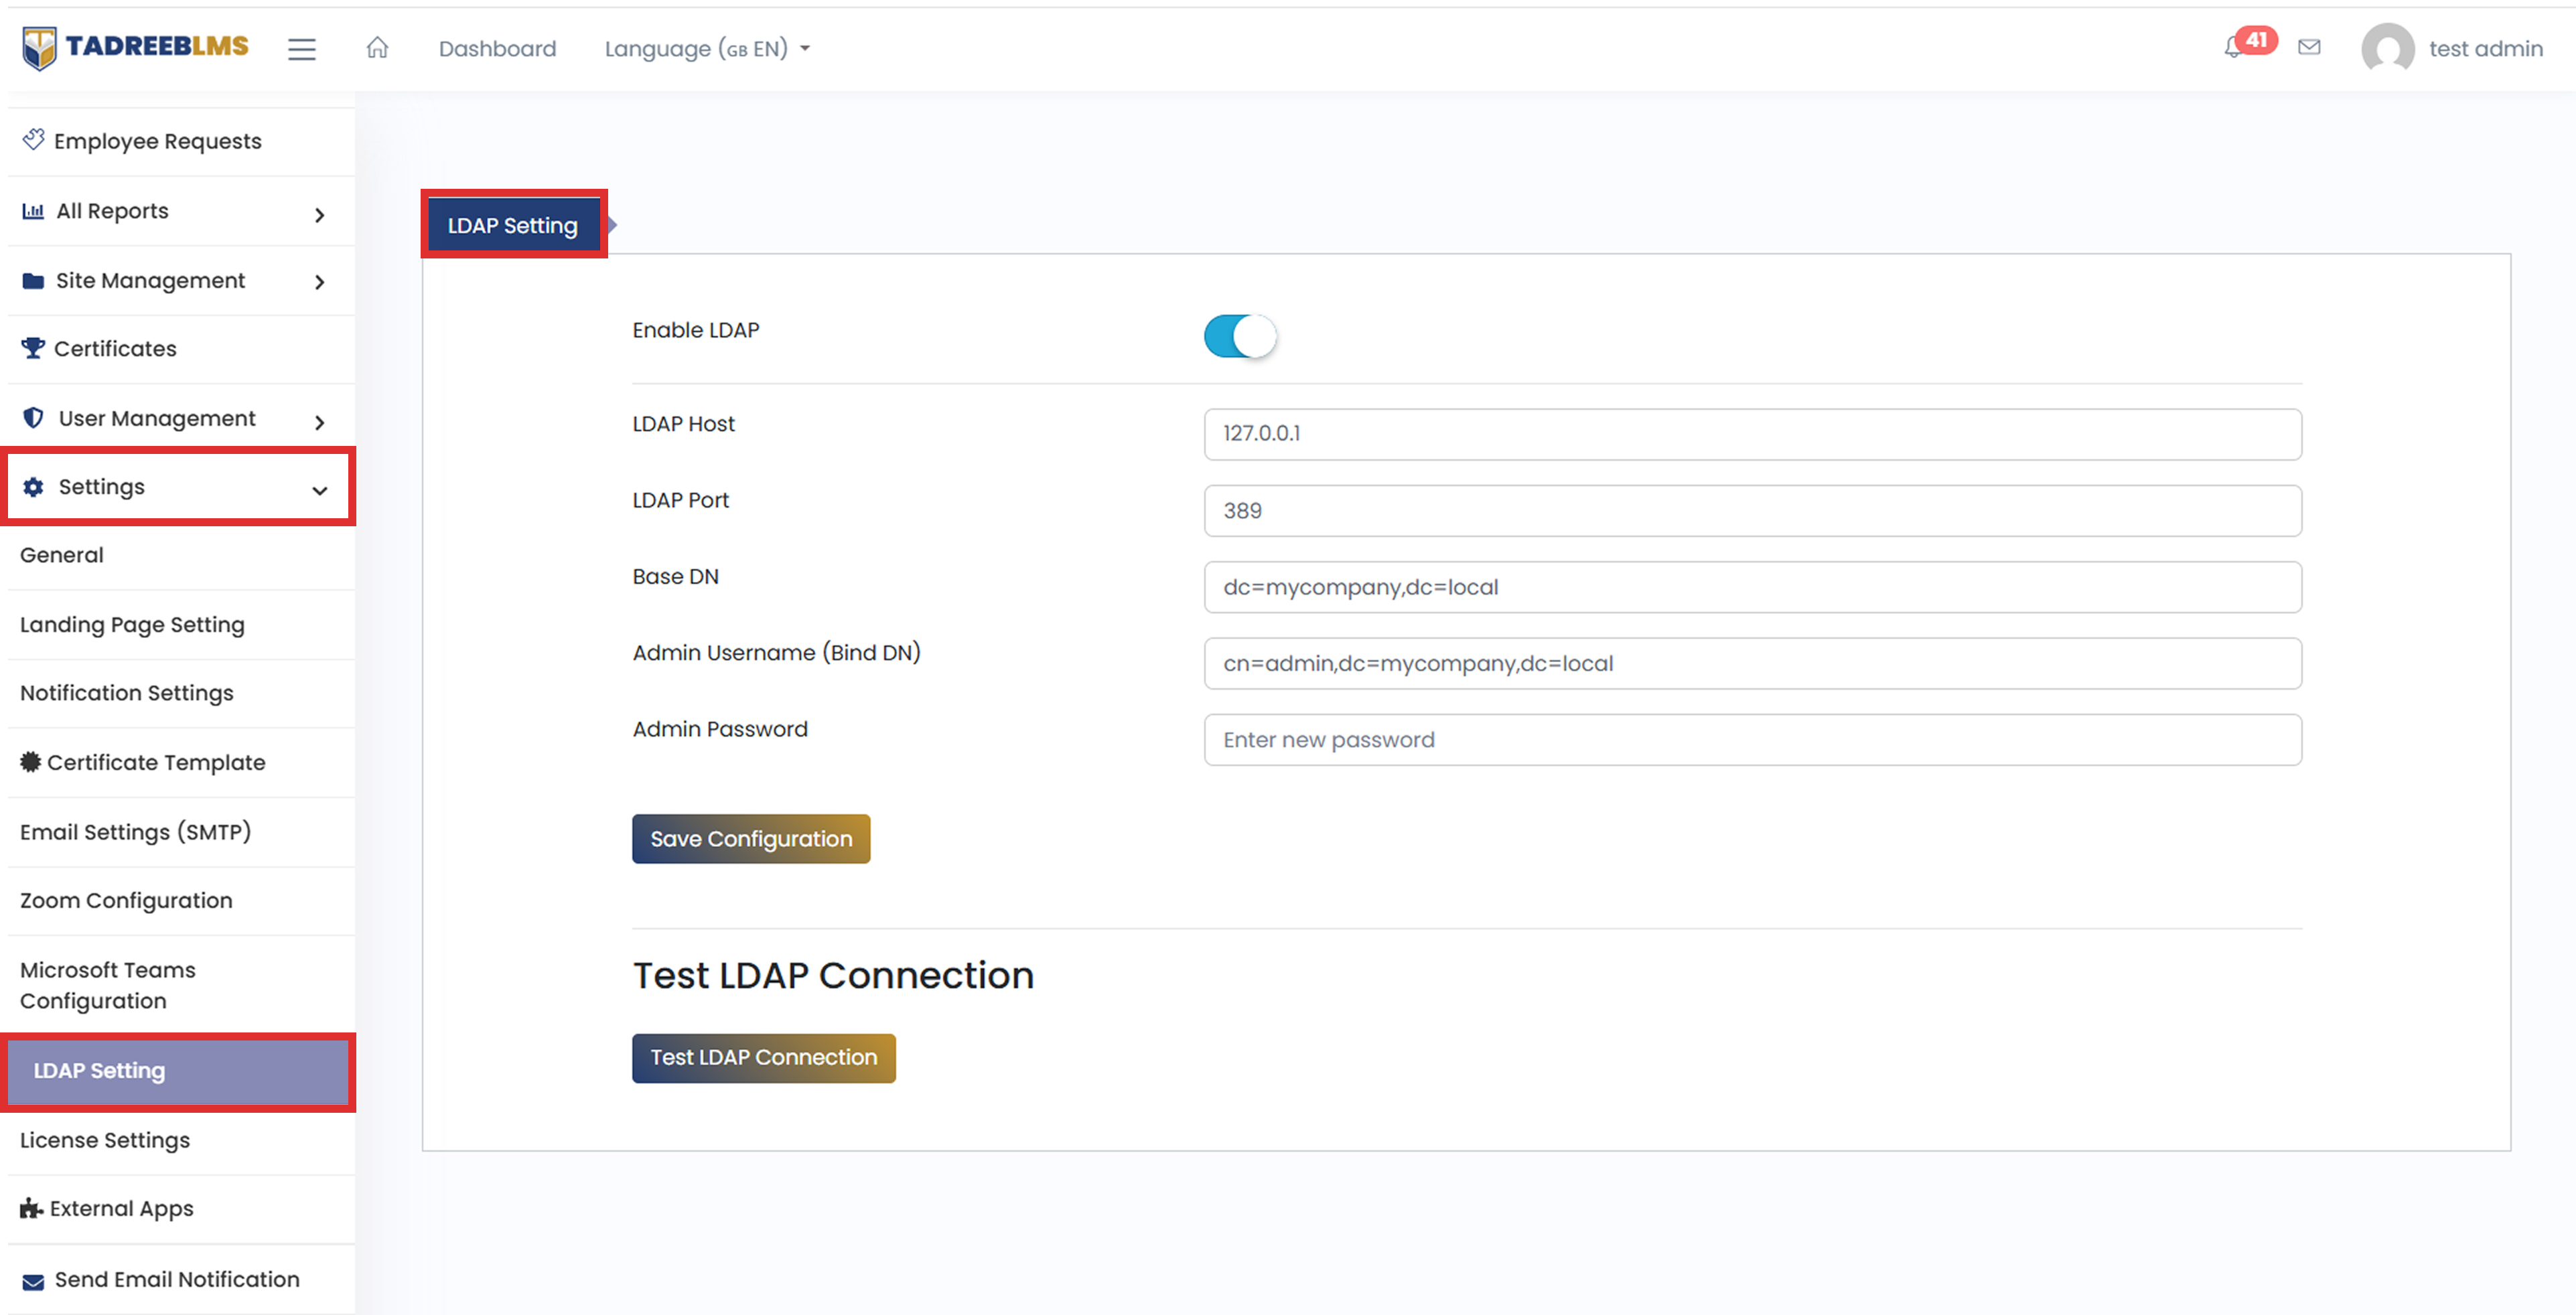
LDAP Configuration
| Field | What it does |
|---|---|
| Enable LDAP | Turns LDAP integration on or off. |
| LDAP Host | Enter the hostname or IP address of the LDAP server. |
| LDAP Port | Enter the port used by the LDAP server, such as 389. |
| Base DN | Specifies the starting point in the LDAP directory where users and other directory information are searched. |
| Admin Username (Bind DN) | Enter the administrator or service account used by the LMS to connect to the LDAP server. |
| Admin Password | Enter the password for the LDAP administrator or service account. |
To configure LDAP:
- Turn on Enable LDAP.
- Enter the LDAP Host and LDAP Port provided by your organisation.
- Enter the Base DN for your LDAP directory.
- Enter the Admin Username (Bind DN).
- Enter the Admin Password.
- Click Save Configuration. Test LDAP Connection
The Test LDAP Connection option allows you to check whether the LMS can successfully connect to the configured LDAP server.
To test the connection:
- Enter and save the LDAP configuration details.
- Click Test LDAP Connection.
- Check the result to confirm whether the connection was successful.
📌 Note: Make sure you have the correct LDAP server details and administrator/service account credentials before enabling LDAP. The required values may vary depending on your organisation's LDAP setup.
13.6 License Settings
The License Settings section allows you to activate your Tadreeb LMS license using the license key provided when you purchase the software. The page also shows whether a license is currently activated.
If no license is activated, the page displays No License Activated and provides an option to enter a license key.
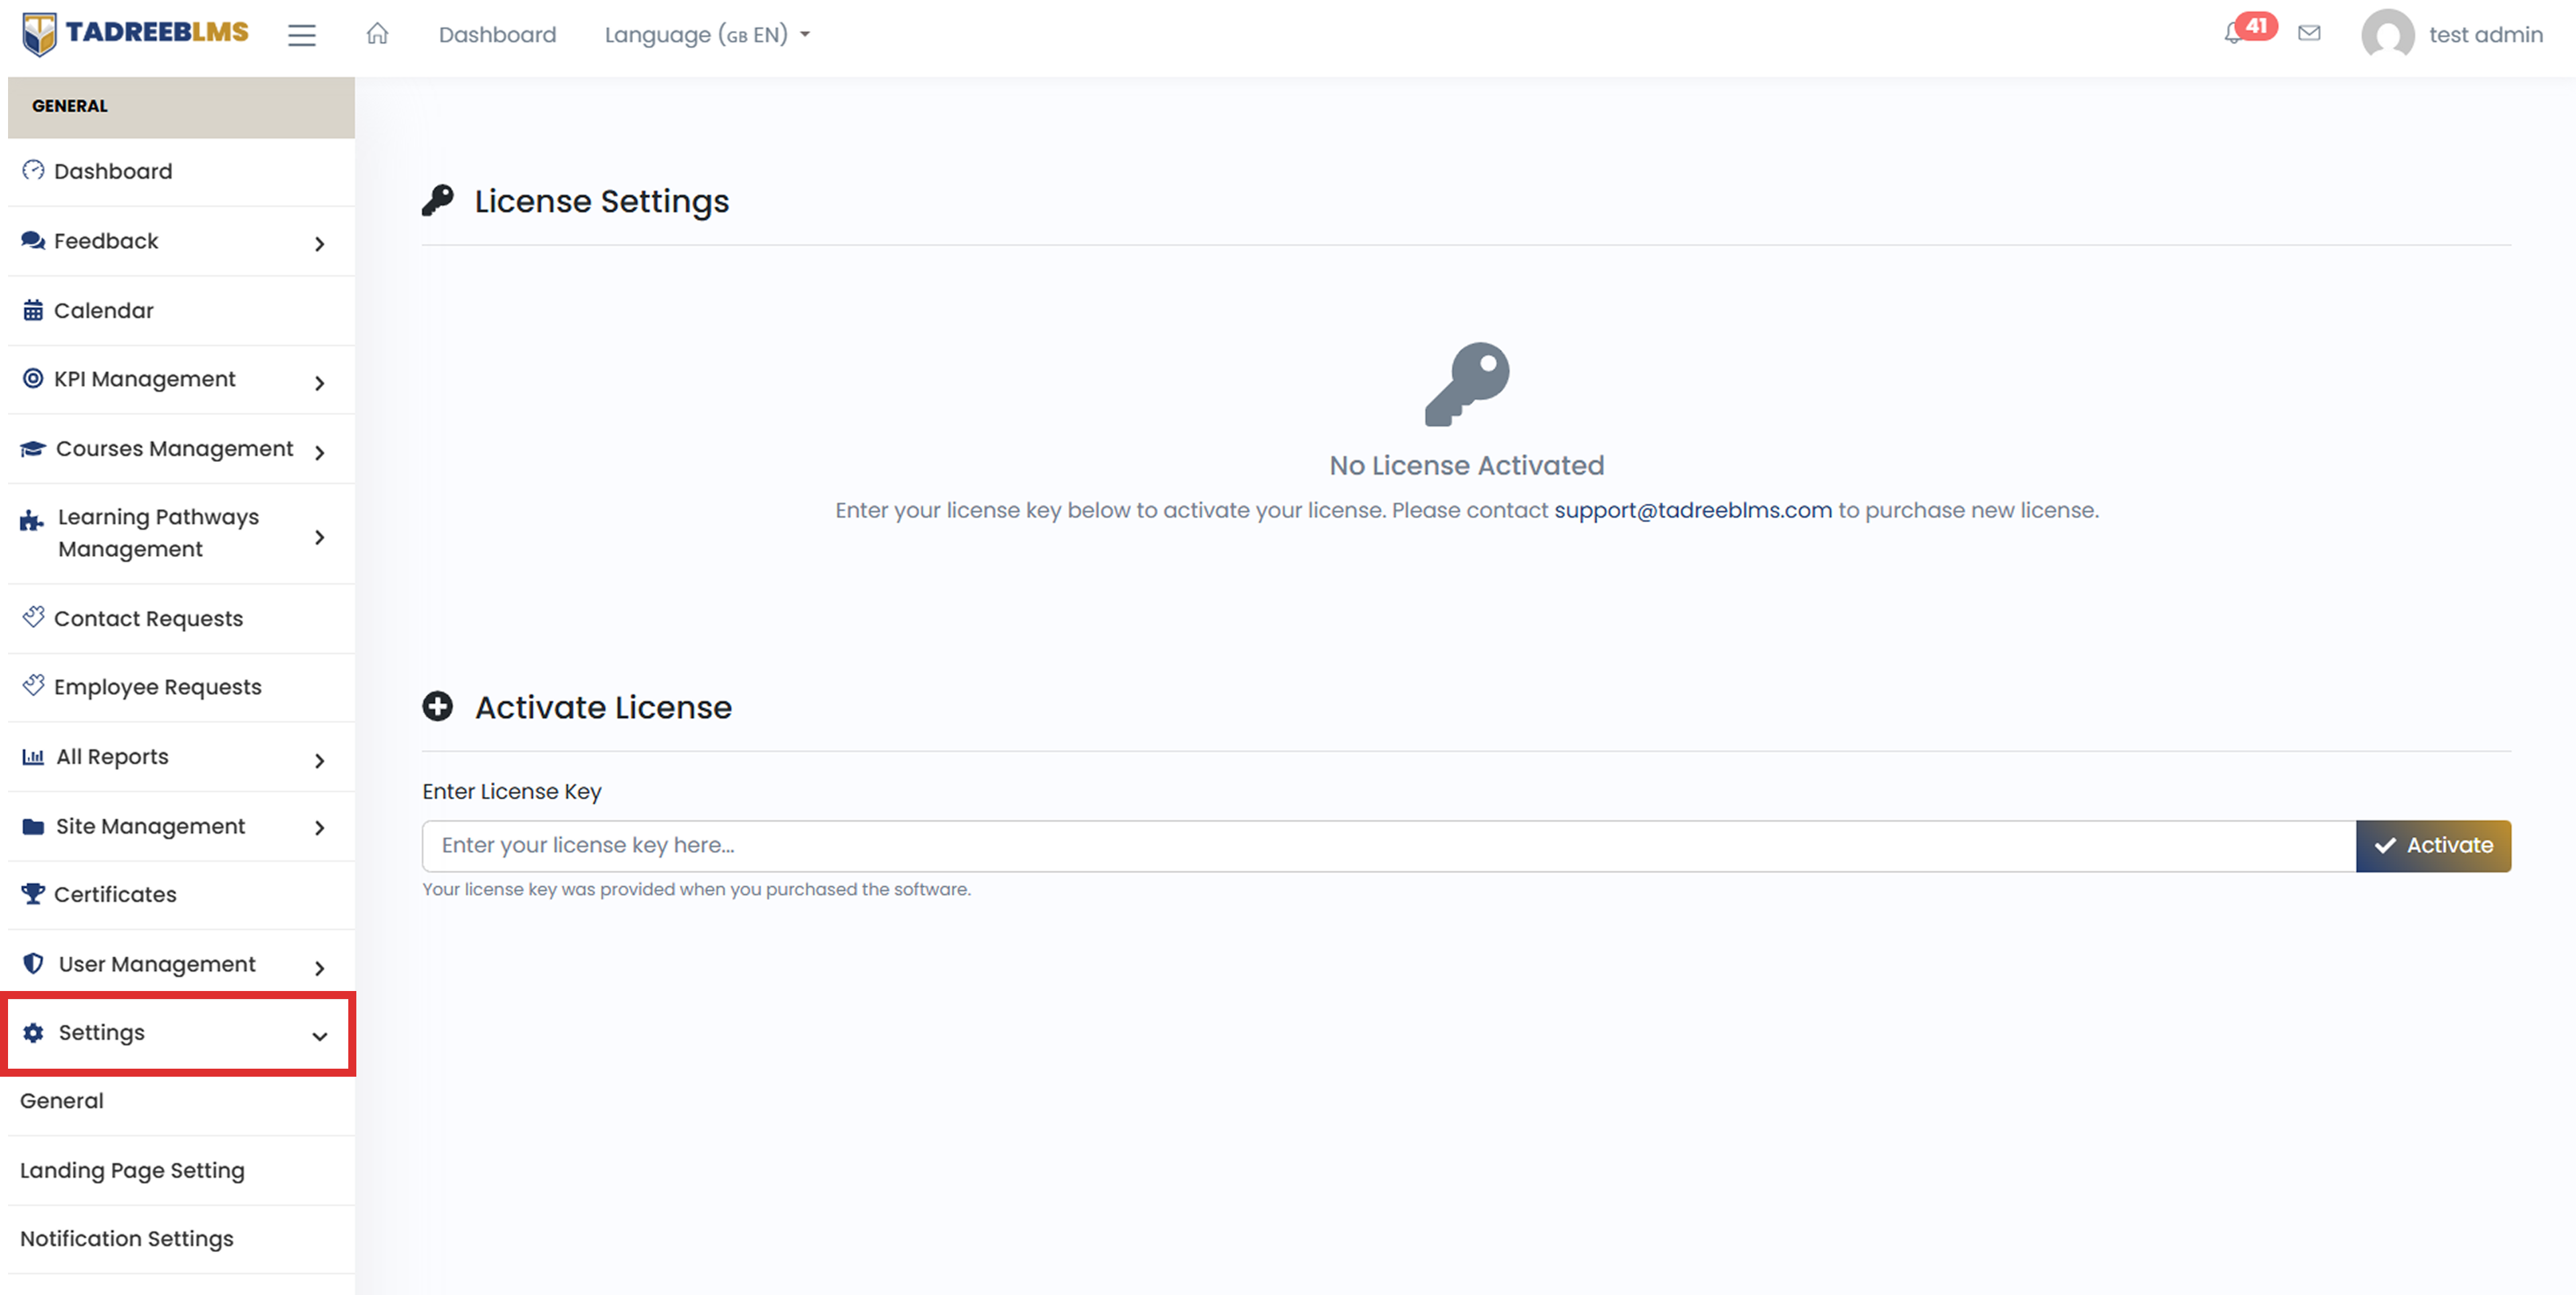
Activate License
| Field | What it does |
|---|---|
| Enter License Key | Enter the license key provided when you purchased the Tadreeb LMS software. |
| Activate | Activates the license using the entered license key. |
To activate your license:
- Enter your license key in the Enter License Key field.
- Click Activate.
- Check the page to confirm that the license has been activated successfully.
📌 Note: Your license key is provided when you purchase the software. If you need a new license, contact Tadreeb LMS support.
13.7 Certificate Template
The Certificate Template settings allow administrators to customise the certificate issued to learners after they complete a course. You can choose a certificate style, customise its appearance, and add or remove elements such as the badge, seal, and signature.
The customised certificate template is then used when learners download their certificates from the LMS.
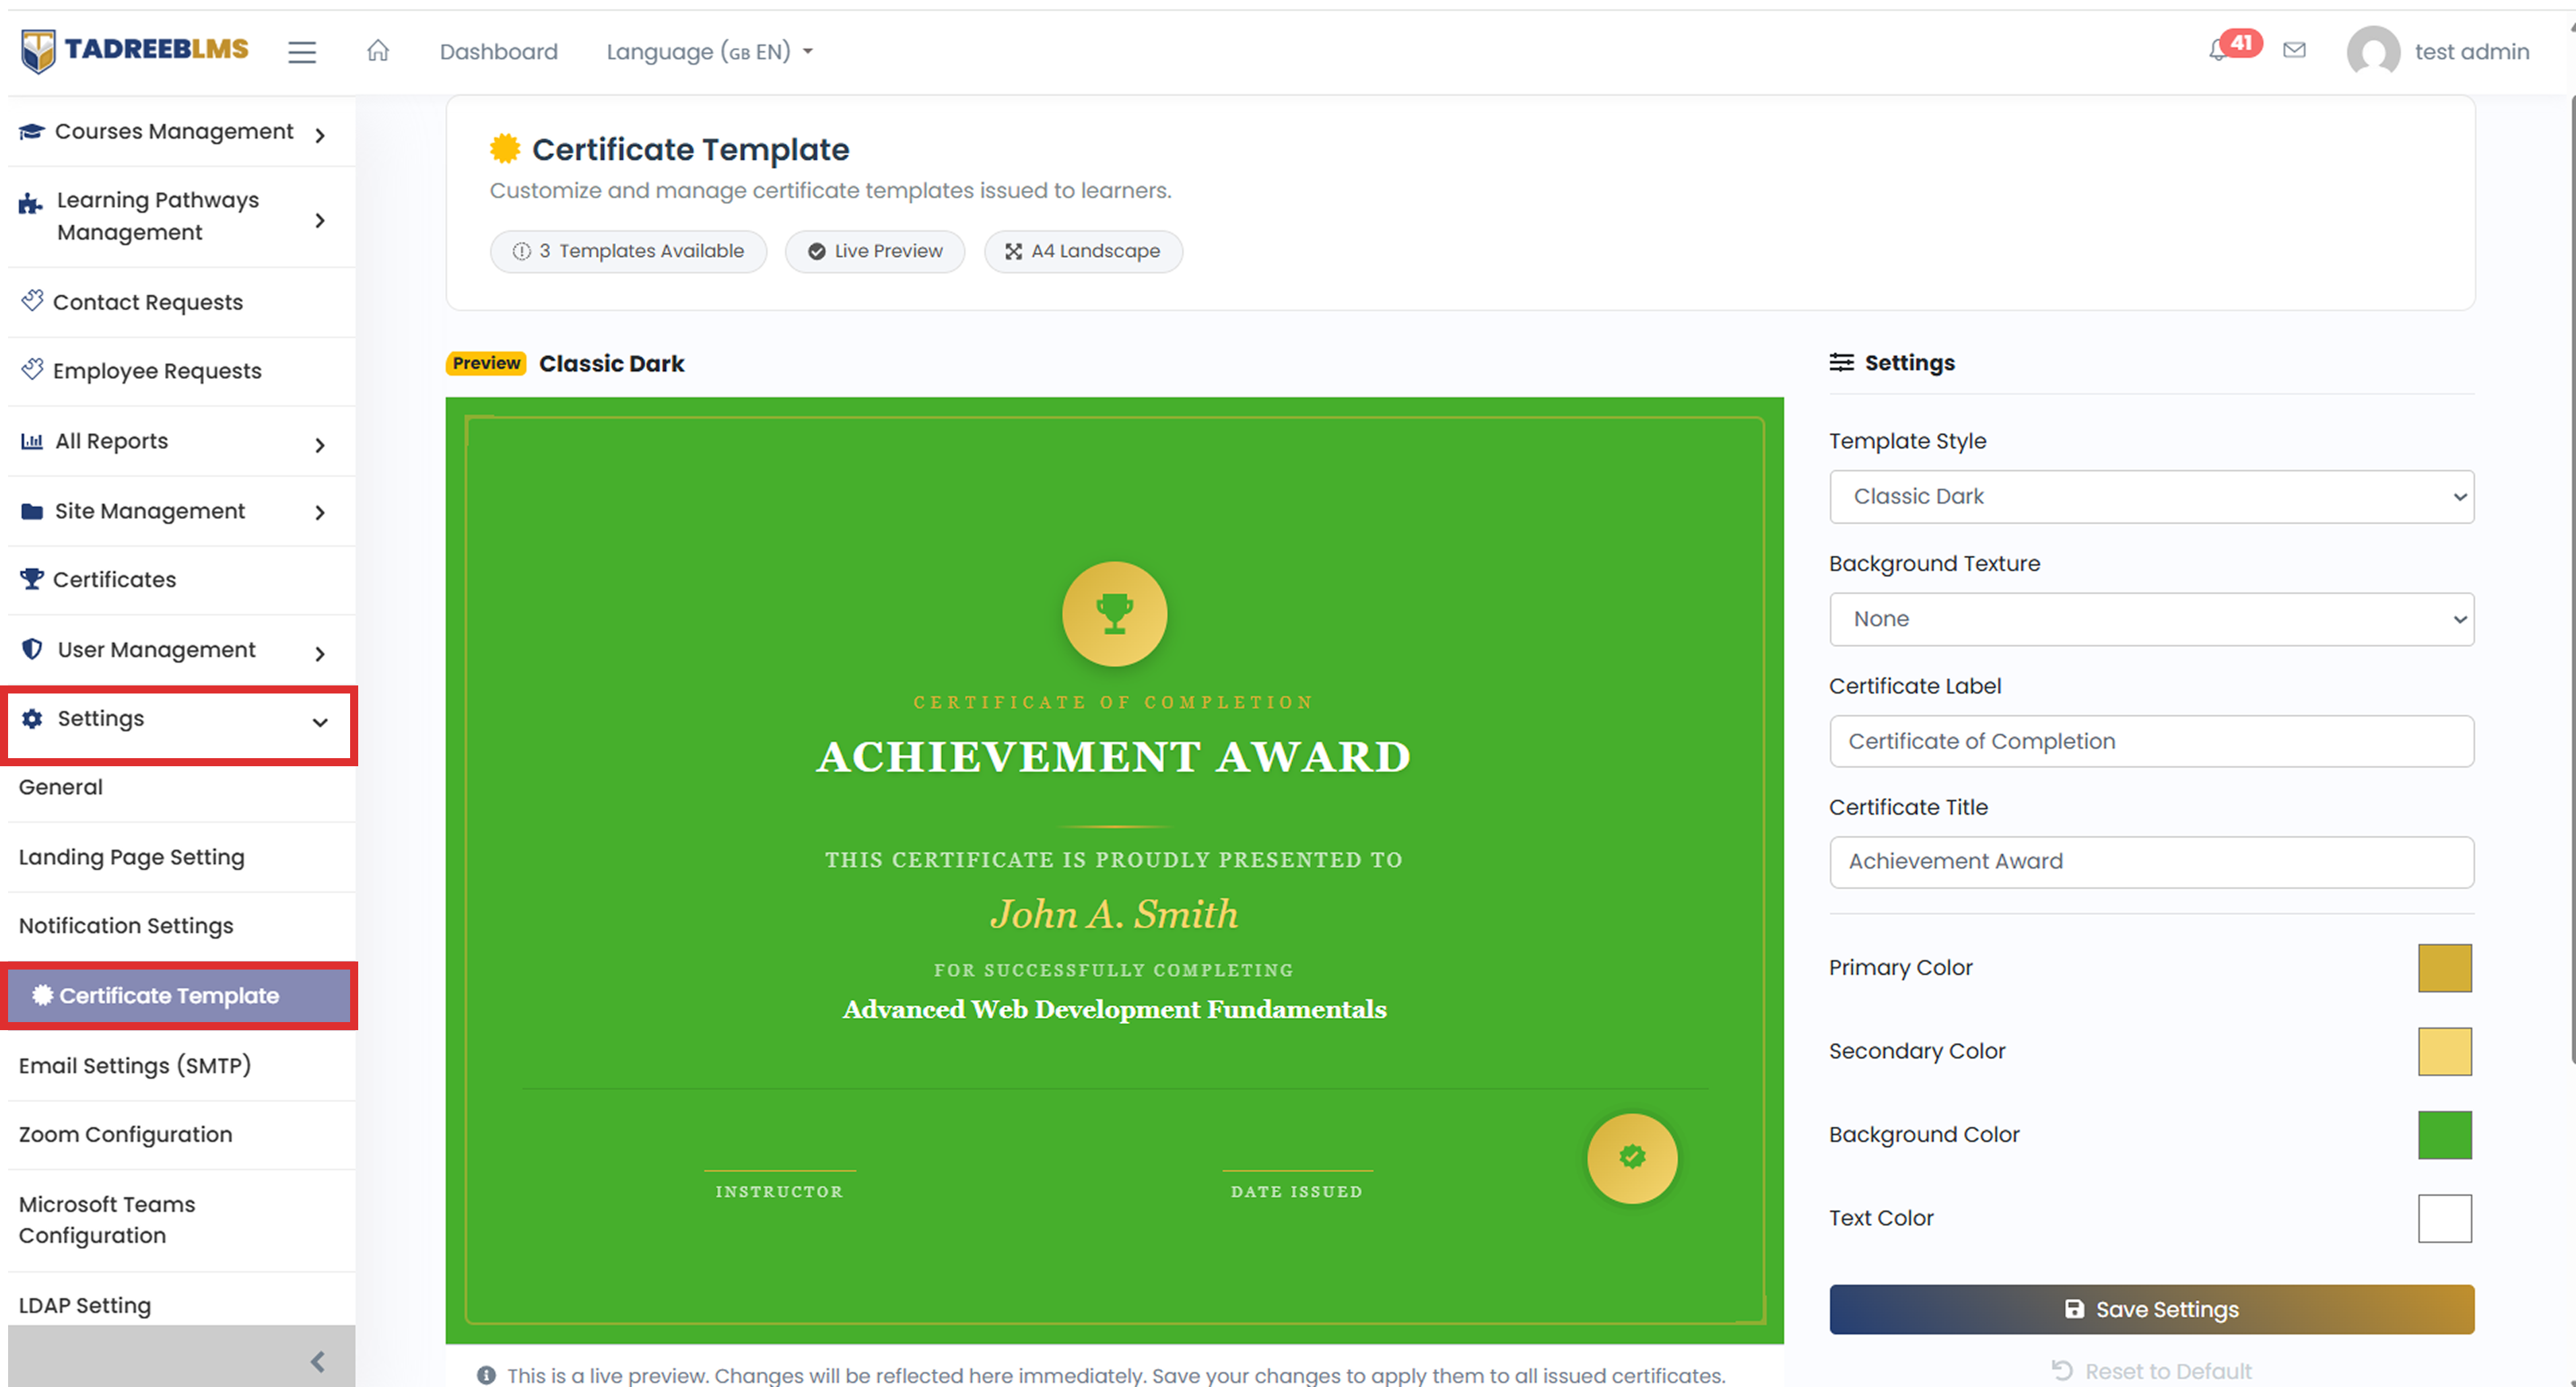
| Setting | What it does |
|---|---|
| Template Style | Selects the certificate design or style to use. |
| Background Texture | Adds a background texture to the certificate. |
| Certificate Label | Sets the label displayed on the certificate, such as Certificate of Completion. |
| Certificate Title | Sets the main title displayed on the certificate, such as Achievement Award. |
| Primary Color | Sets the main colour used in the certificate design. |
| Secondary Color | Sets the supporting colour used in the certificate design. |
| Background Color | Sets the certificate's background colour. |
| Text Color | Sets the colour of the text displayed on the certificate. |
Display & Assets
You can also control which visual elements appear on the certificate and upload your own images.
| Option | What it does |
|---|---|
| Show Badge | Shows or hides the badge on the certificate. |
| Show Seal | Shows or hides the certificate seal. |
| Show Signature | Shows or hides the signature area. |
| Logo | Allows you to upload a logo to display on the certificate. |
| Seal | Allows you to upload a custom seal image. |
The live preview lets you see how the certificate will look while making changes. This makes it easier to customise the design before applying it to issued certificates.
To customise a certificate template:
- Select a Template Style.
- Choose a Background Texture, if required.
- Enter the Certificate Label and Certificate Title.
- Select the required Primary, Secondary, Background, and Text colours.
- Enable or disable the Badge, Seal, and Signature elements as required.
- Upload a Logo or Seal image if required.
- Check the live preview to see the changes.
- Click Save Settings to apply the customised template.
📌 Note: The certificate template is customised by the administrator. Once the settings are saved, the customised design is used for certificates issued to learners, which learners can download after completing the required course.
13.8 Zoom Configuration
The Zoom Configuration section allows administrators to integrate the LMS platform with Zoom for online meeting and virtual classroom functionality. This section is used to configure Zoom API credentials, verify integration status, and test API connectivity.
The integration enables the LMS platform to support Zoom-based live classes, webinars, online training sessions, and virtual meetings.
To access the Zoom Configuration section:
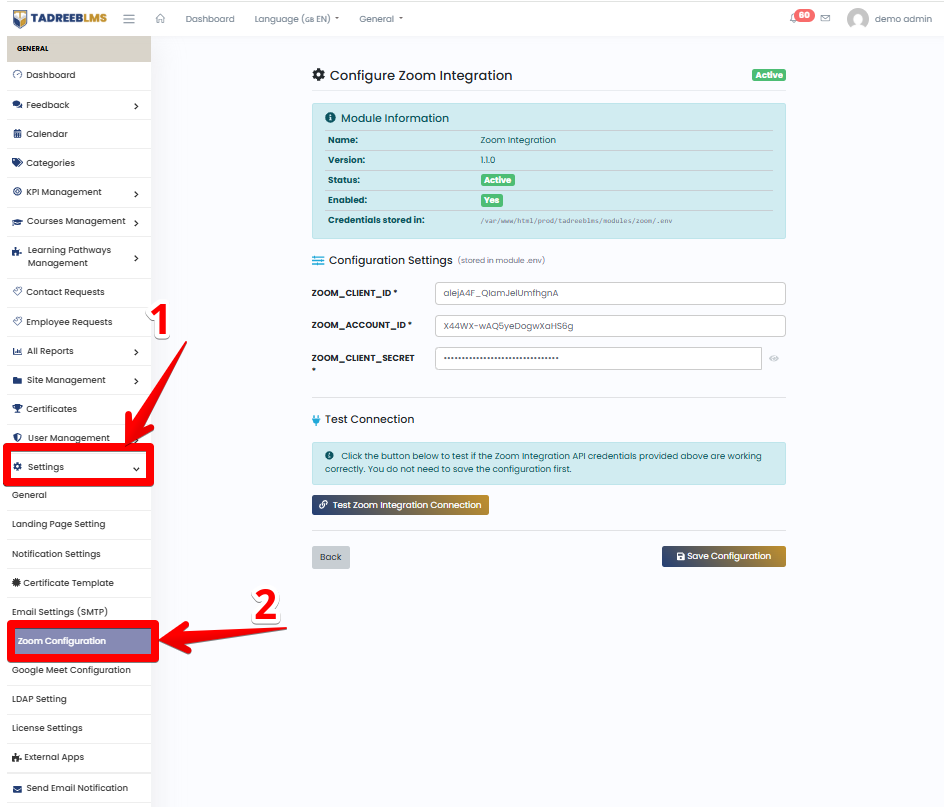
- Navigate to Settings from the left navigation menu.
- Click Zoom Configuration.
Configure Zoom Integration
The Configure Zoom Integration page provides information about the Zoom integration module and allows administrators to configure API credentials required for Zoom connectivity.
13.6.1 Module Information
The Module Information section displays Zoom integration details and current module status.
Available Information
| Field | Description |
|---|---|
| Name | Displays the integration module name. |
| Version | Displays the current module version. |
| Status | Displays the module status, such as Active or Inactive. |
| Enabled | Indicates whether the Zoom integration is enabled. |
| Credentials Stored In | Displays the location where Zoom credentials are stored. |
13.6.2 Configuration Settings
The Configuration Settings section is used to configure Zoom API credentials.
Available Fields
| Field | Description |
|---|---|
| ZOOM_CLIENT_ID | Enter the Zoom Client ID generated from the Zoom Developer Portal. |
| ZOOM_ACCOUNT_ID | Enter the Zoom Account ID associated with the Zoom application. |
| ZOOM_CLIENT_SECRET | Enter the Zoom Client Secret used for API authentication. |
Credential Requirements
The LMS platform requires valid Zoom API credentials for successful integration.
Required Information
Administrators must obtain the following from the Zoom Developer Portal:
- Zoom Client ID
- Zoom Account ID
- Zoom Client Secret
These credentials are required to authenticate and establish communication between the LMS platform and Zoom services.
13.6.3 Test Connection
The Test Connection section allows administrators to verify whether the configured Zoom API credentials are valid and functioning correctly.
Available Actions
| Action | Description |
|---|---|
| Test Zoom Integration Connection | Verifies whether the Zoom API credentials are working correctly. |
| Save Configuration | Saves the Zoom integration configuration settings. |
| Back | Returns to the previous configuration page. |
Integration Status Indicator
The page includes a status indicator that displays the current Zoom integration state.
| Status | Meaning |
|---|---|
| Active | Indicates that the Zoom integration module is enabled and operational. |
13.9 External Apps
Tadreeb LMS works seamlessly with the tools your organisation already uses. The External Apps page lets administrators view all available third-party integration tools and easily enable or disable them as needed.
From payment gateways and virtual classrooms to HR systems and collaboration tools, you can manage all your integrations from one convenient place.
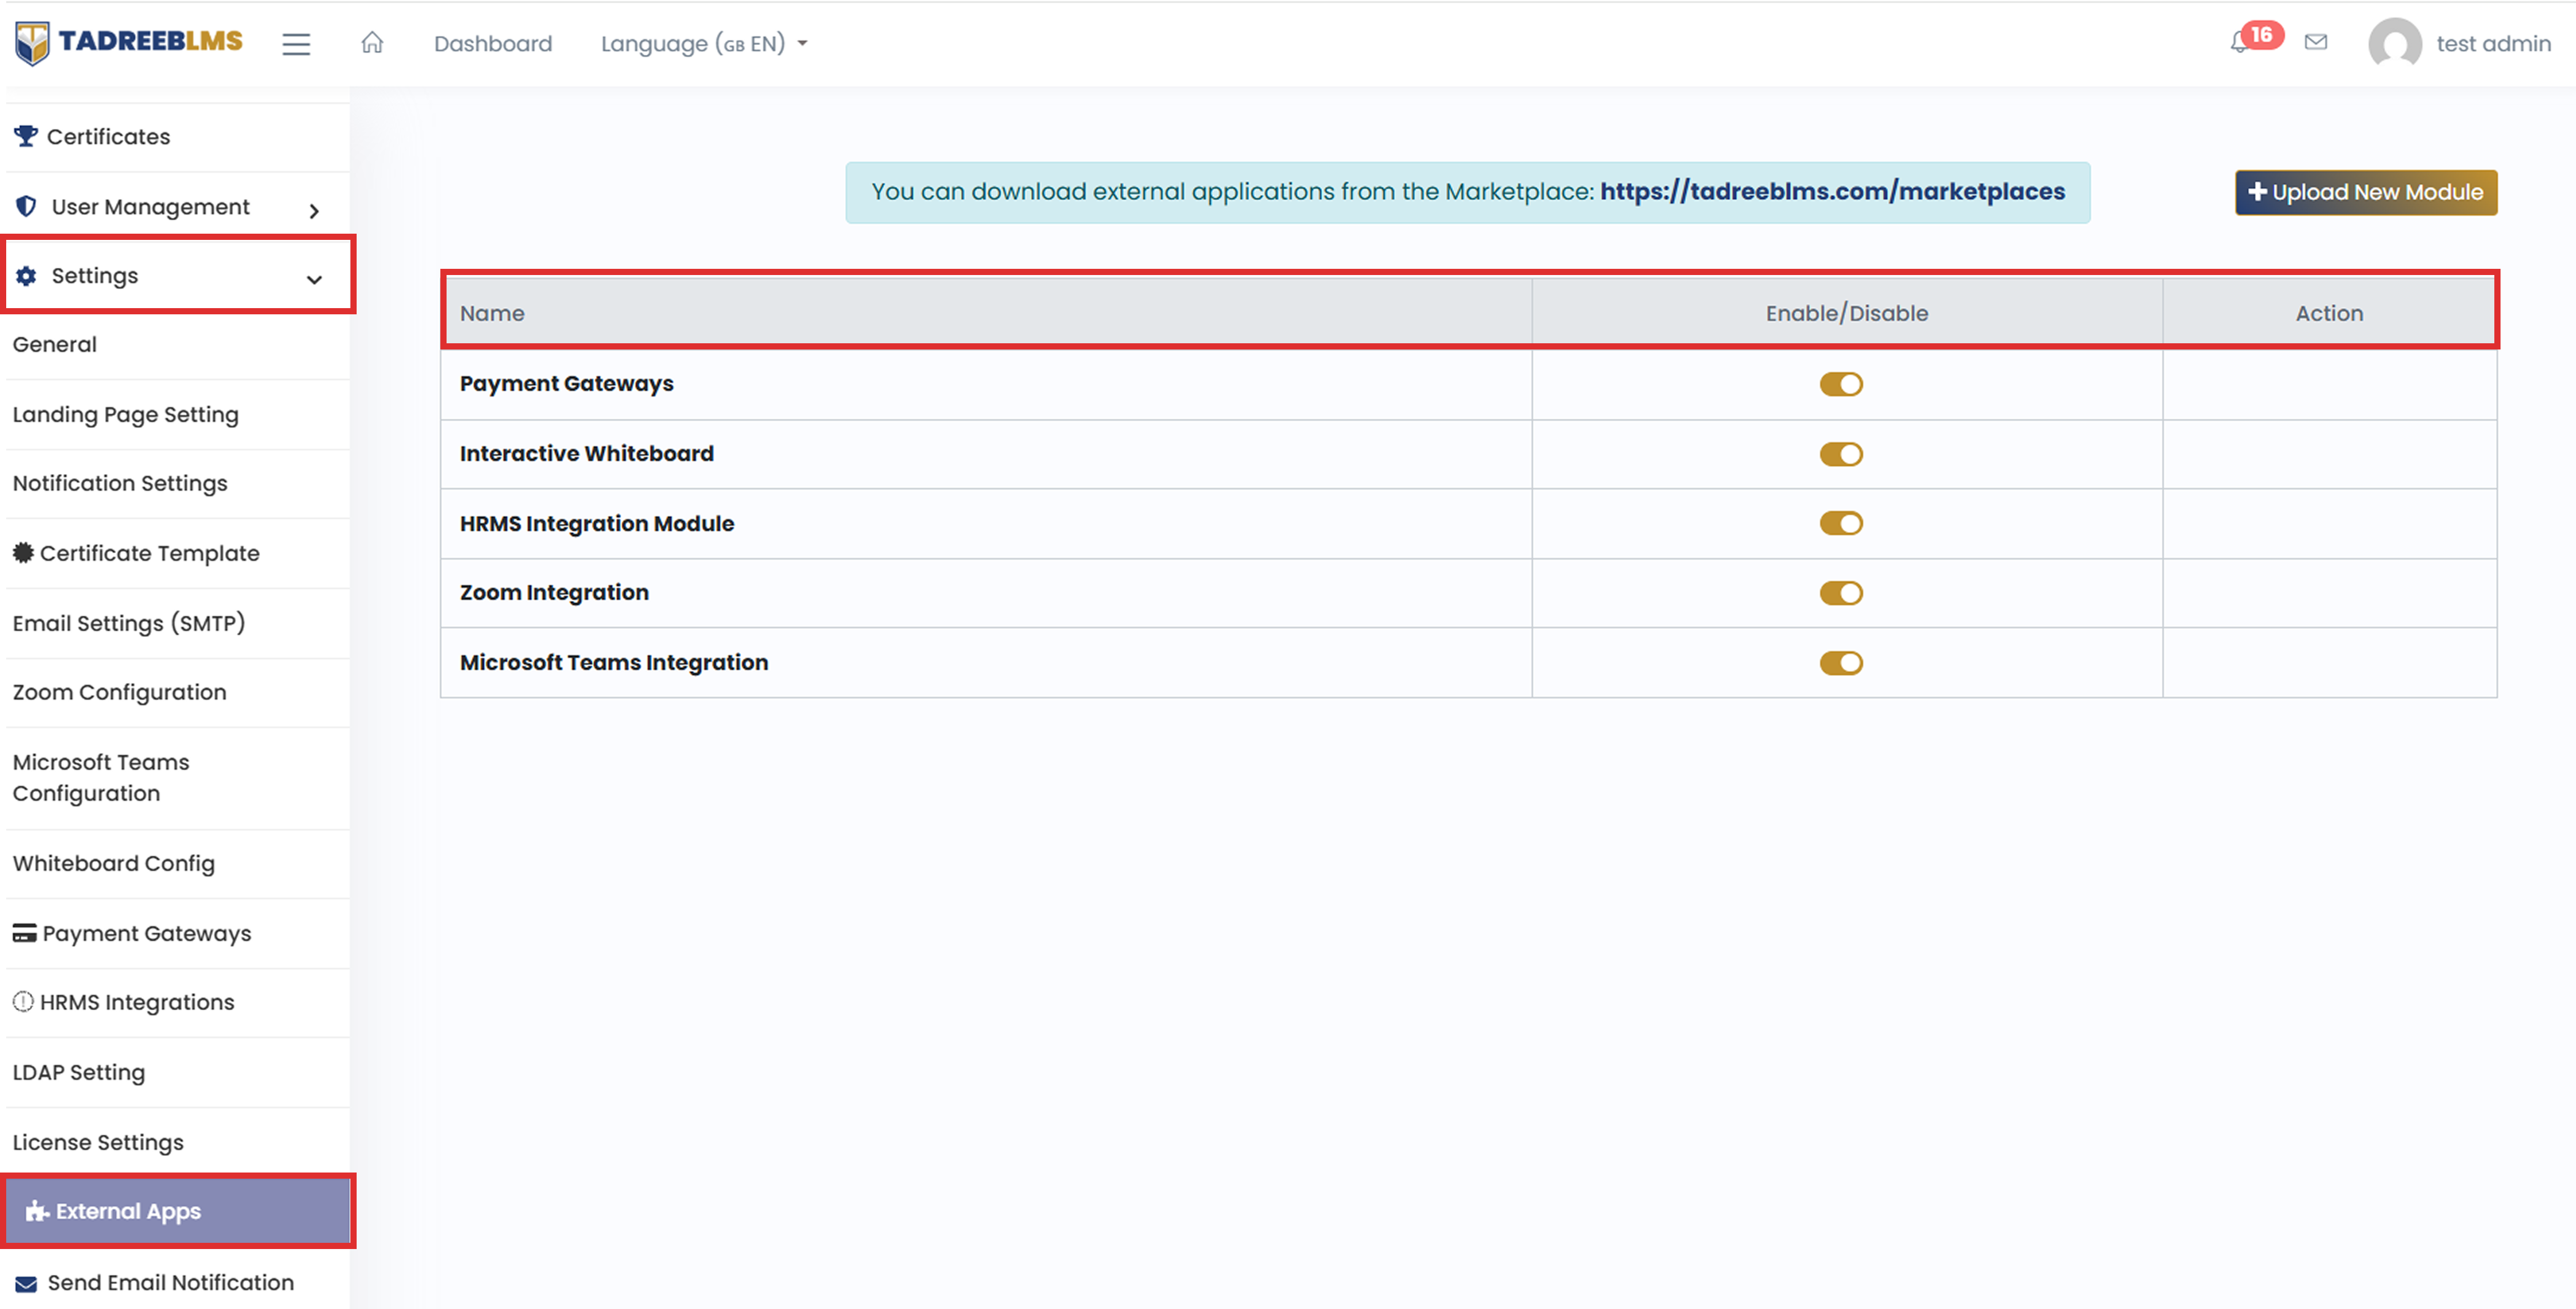
| Column | Description |
|---|---|
| Name | The name of the third-party or external application |
| Enable/Disable | A toggle switch showing whether the app is currently active. Slide it on to enable the integration, or off to disable it |
| Action | Actions such as uninstalling the integrated application |
📌 Note: Toggling an application off doesn't delete it. It simply switches off that integration until you turn it back on.
13.9.1 Available integrations
Tadreeb LMS comes with several built-in integrations that help you connect with the tools your organisation already uses.
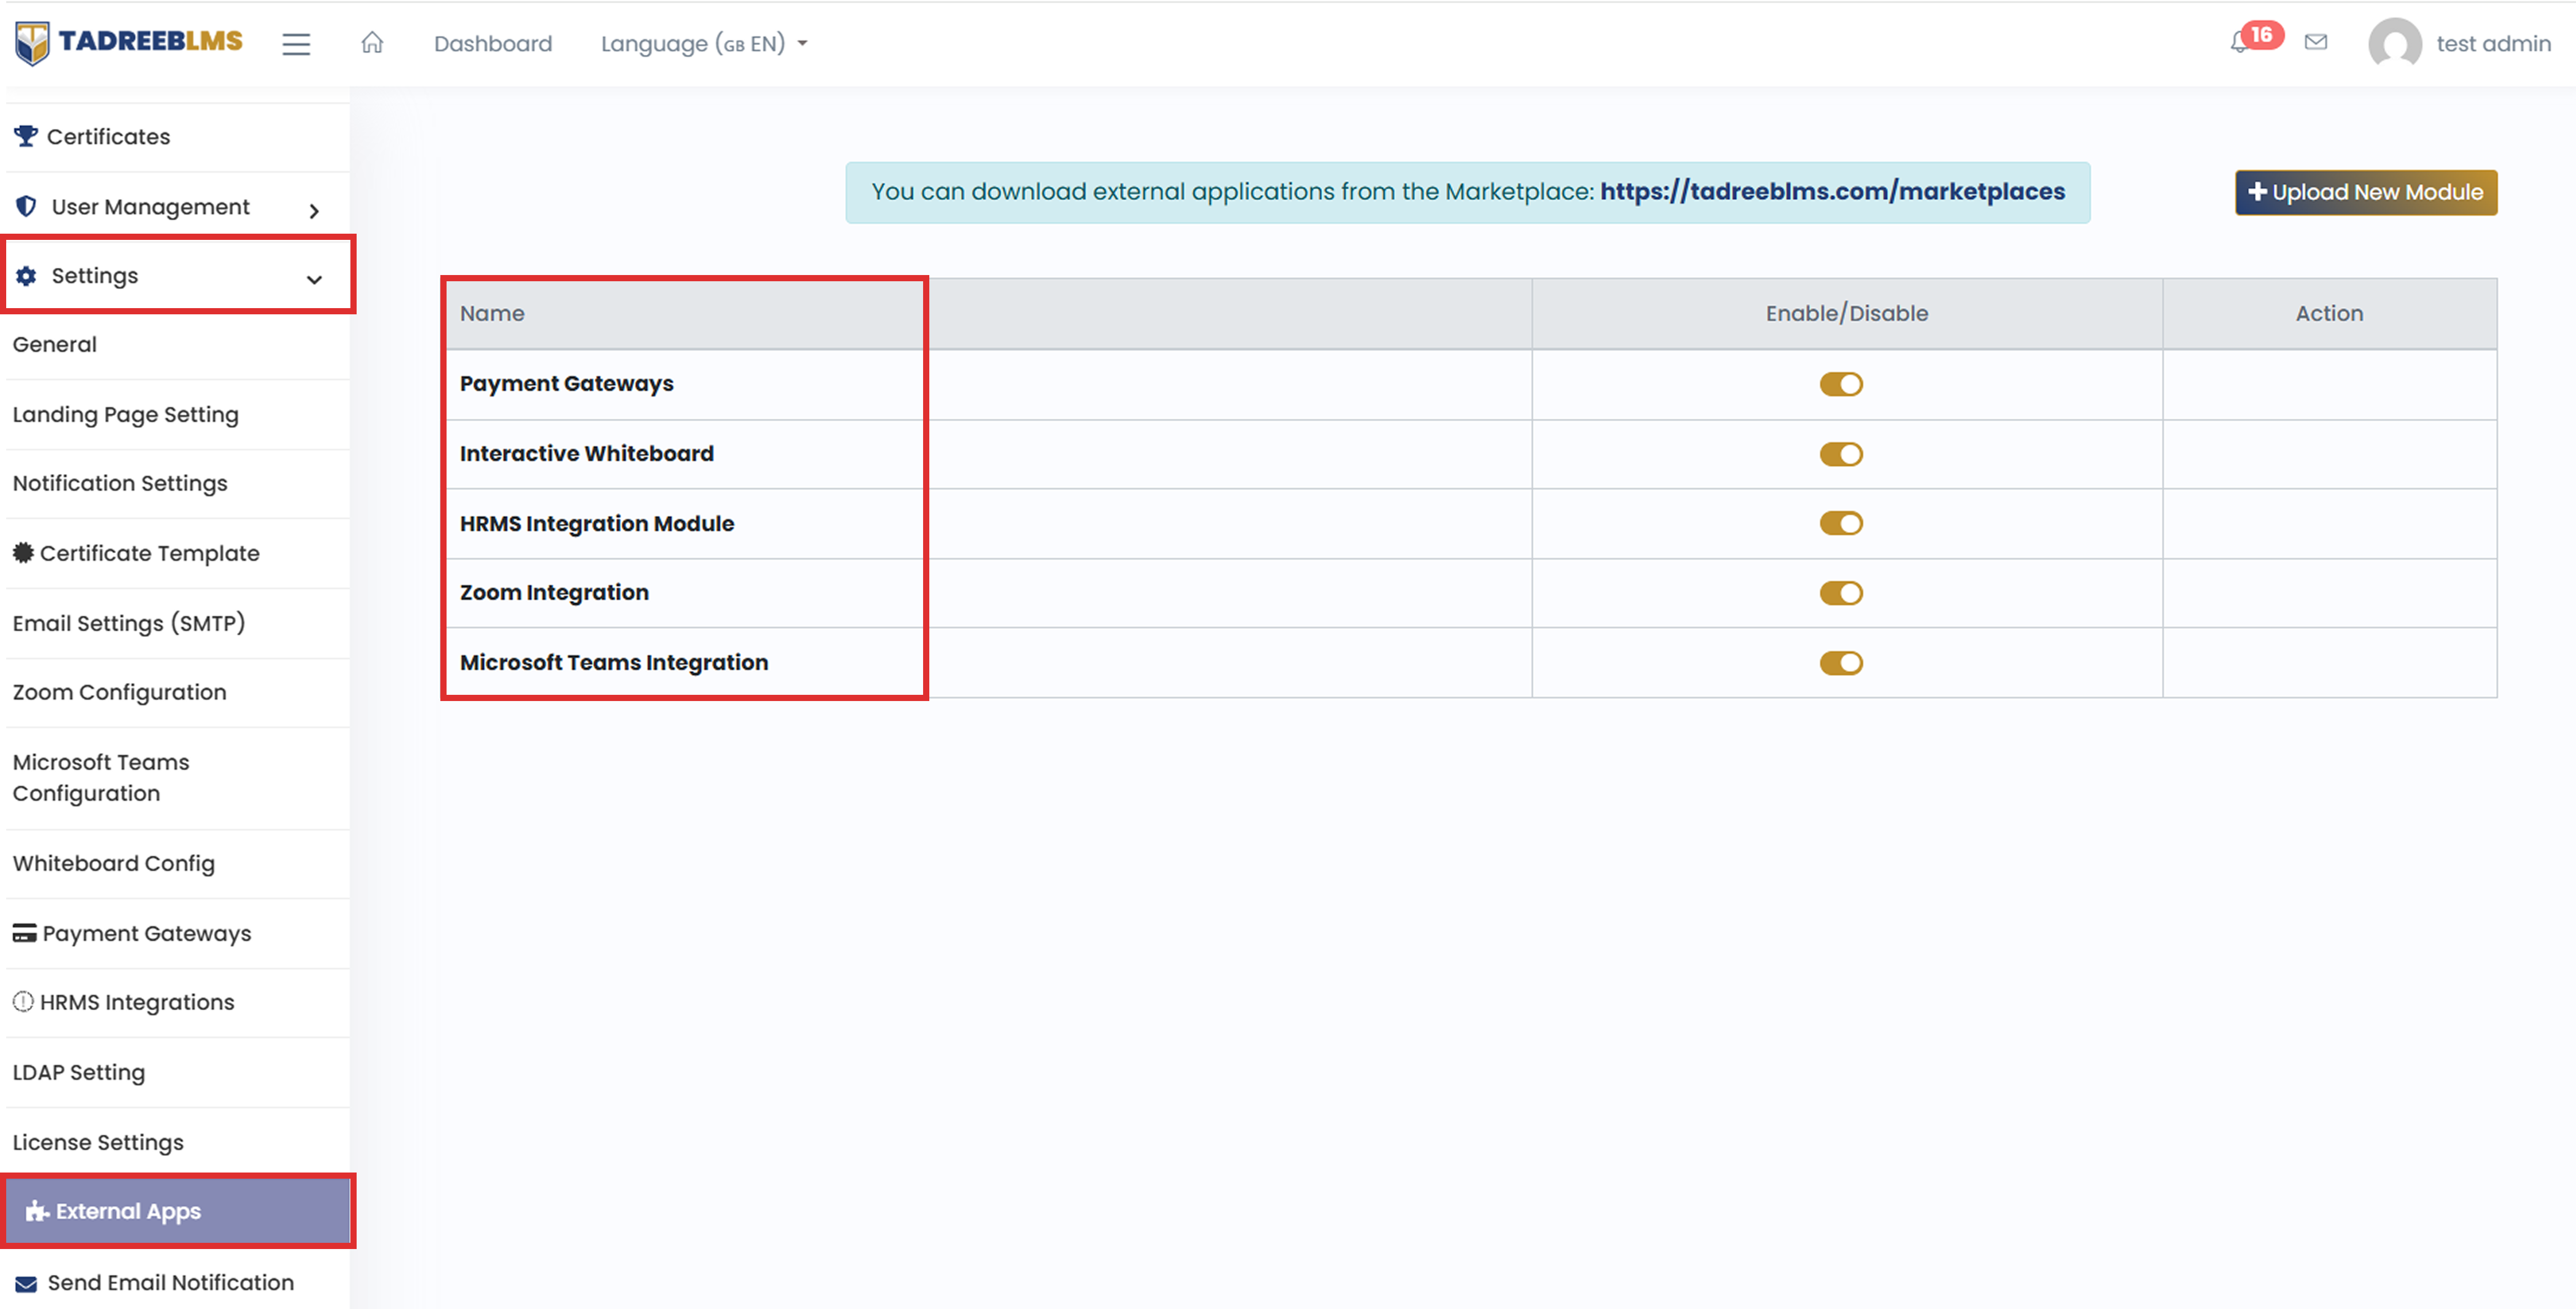
- Payment Gateways – Accept course payments, subscriptions, and certification fees through your preferred payment provider.
- Interactive Whiteboard – Make virtual training sessions more engaging with a shared digital whiteboard for instructors and learners.
- HRMS Integration – Sync employee and learner data with your HR system to keep training records up to date automatically.
- Zoom Integration – Schedule, launch, and manage Zoom meetings directly from Tadreeb LMS.
- Microsoft Teams Integration – Conduct and manage online training sessions through Microsoft Teams without leaving the platform.
13.9.2 Add a New Application for Integration
In addition to the built-in integrations, Tadreeb LMS lets you add new applications from the Marketplace with just a few clicks, no coding required.
The Marketplace contains a collection of applications and integrations that you can add to your LMS, such as video conferencing, cloud storage, HR systems, and payment gateways. Think of it as an app store built specifically for extending your LMS's capabilities.
To add a new application:
- Click the Menu icon (☰) at the top-left corner to open the sidebar.
- Go to Settings > External Apps.
- Click the Marketplace link shown at the top of the page. (https://tadreeblms.com/marketplaces).
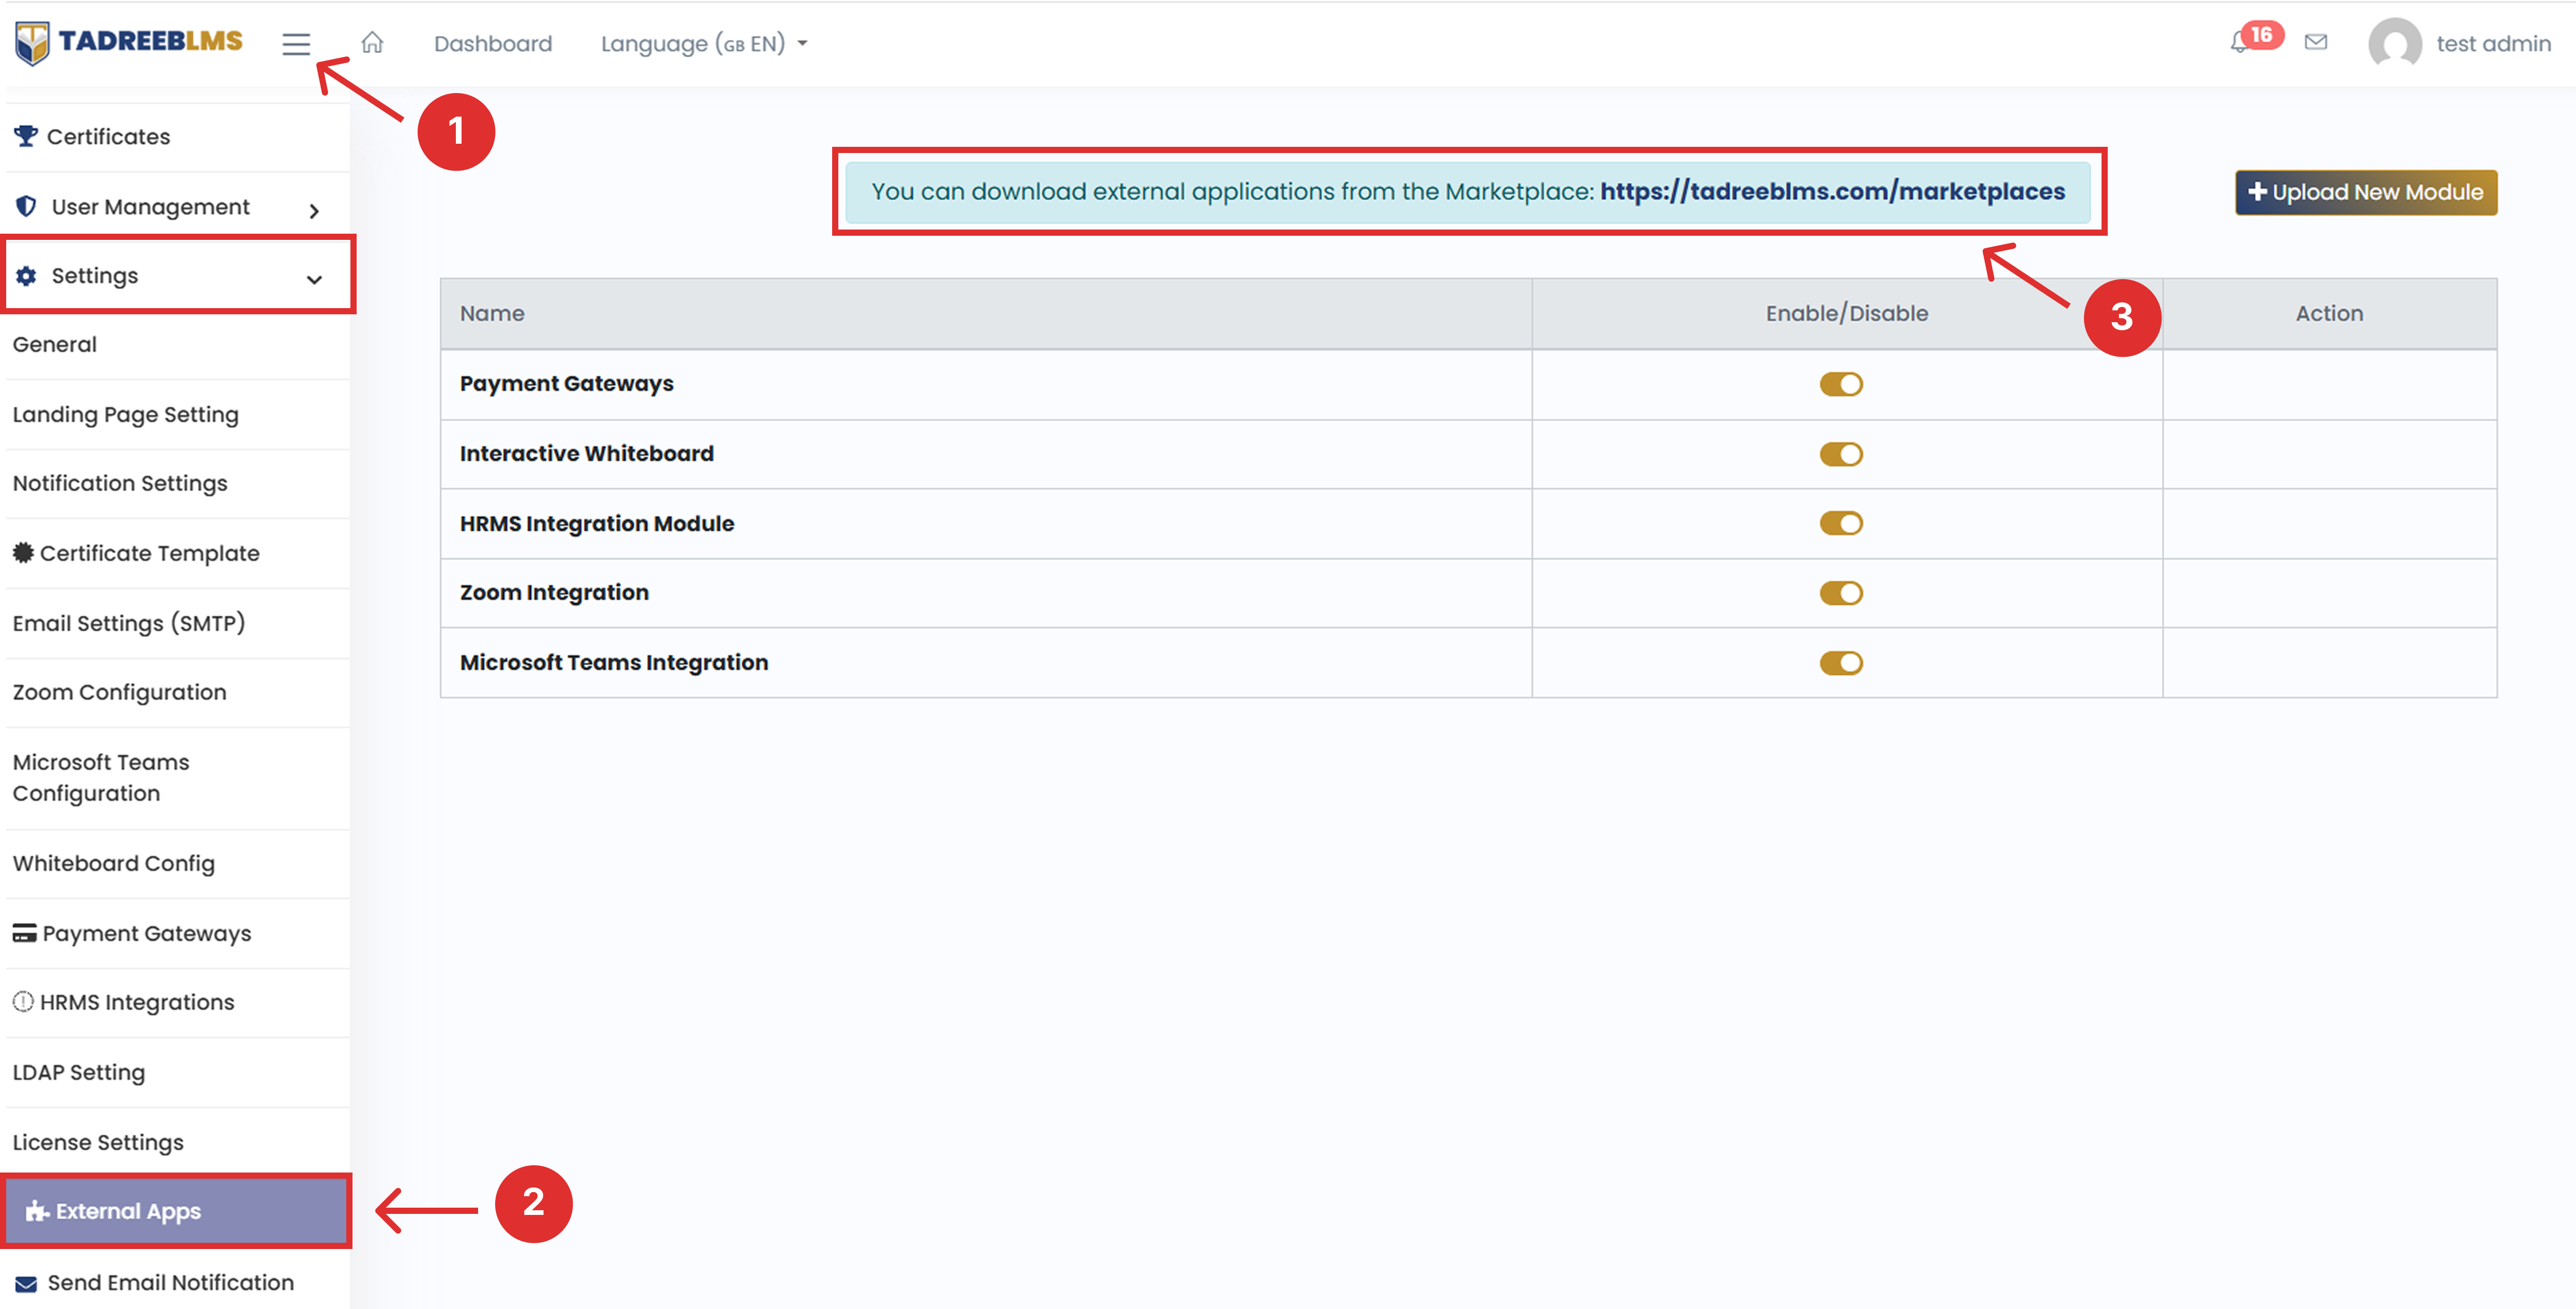
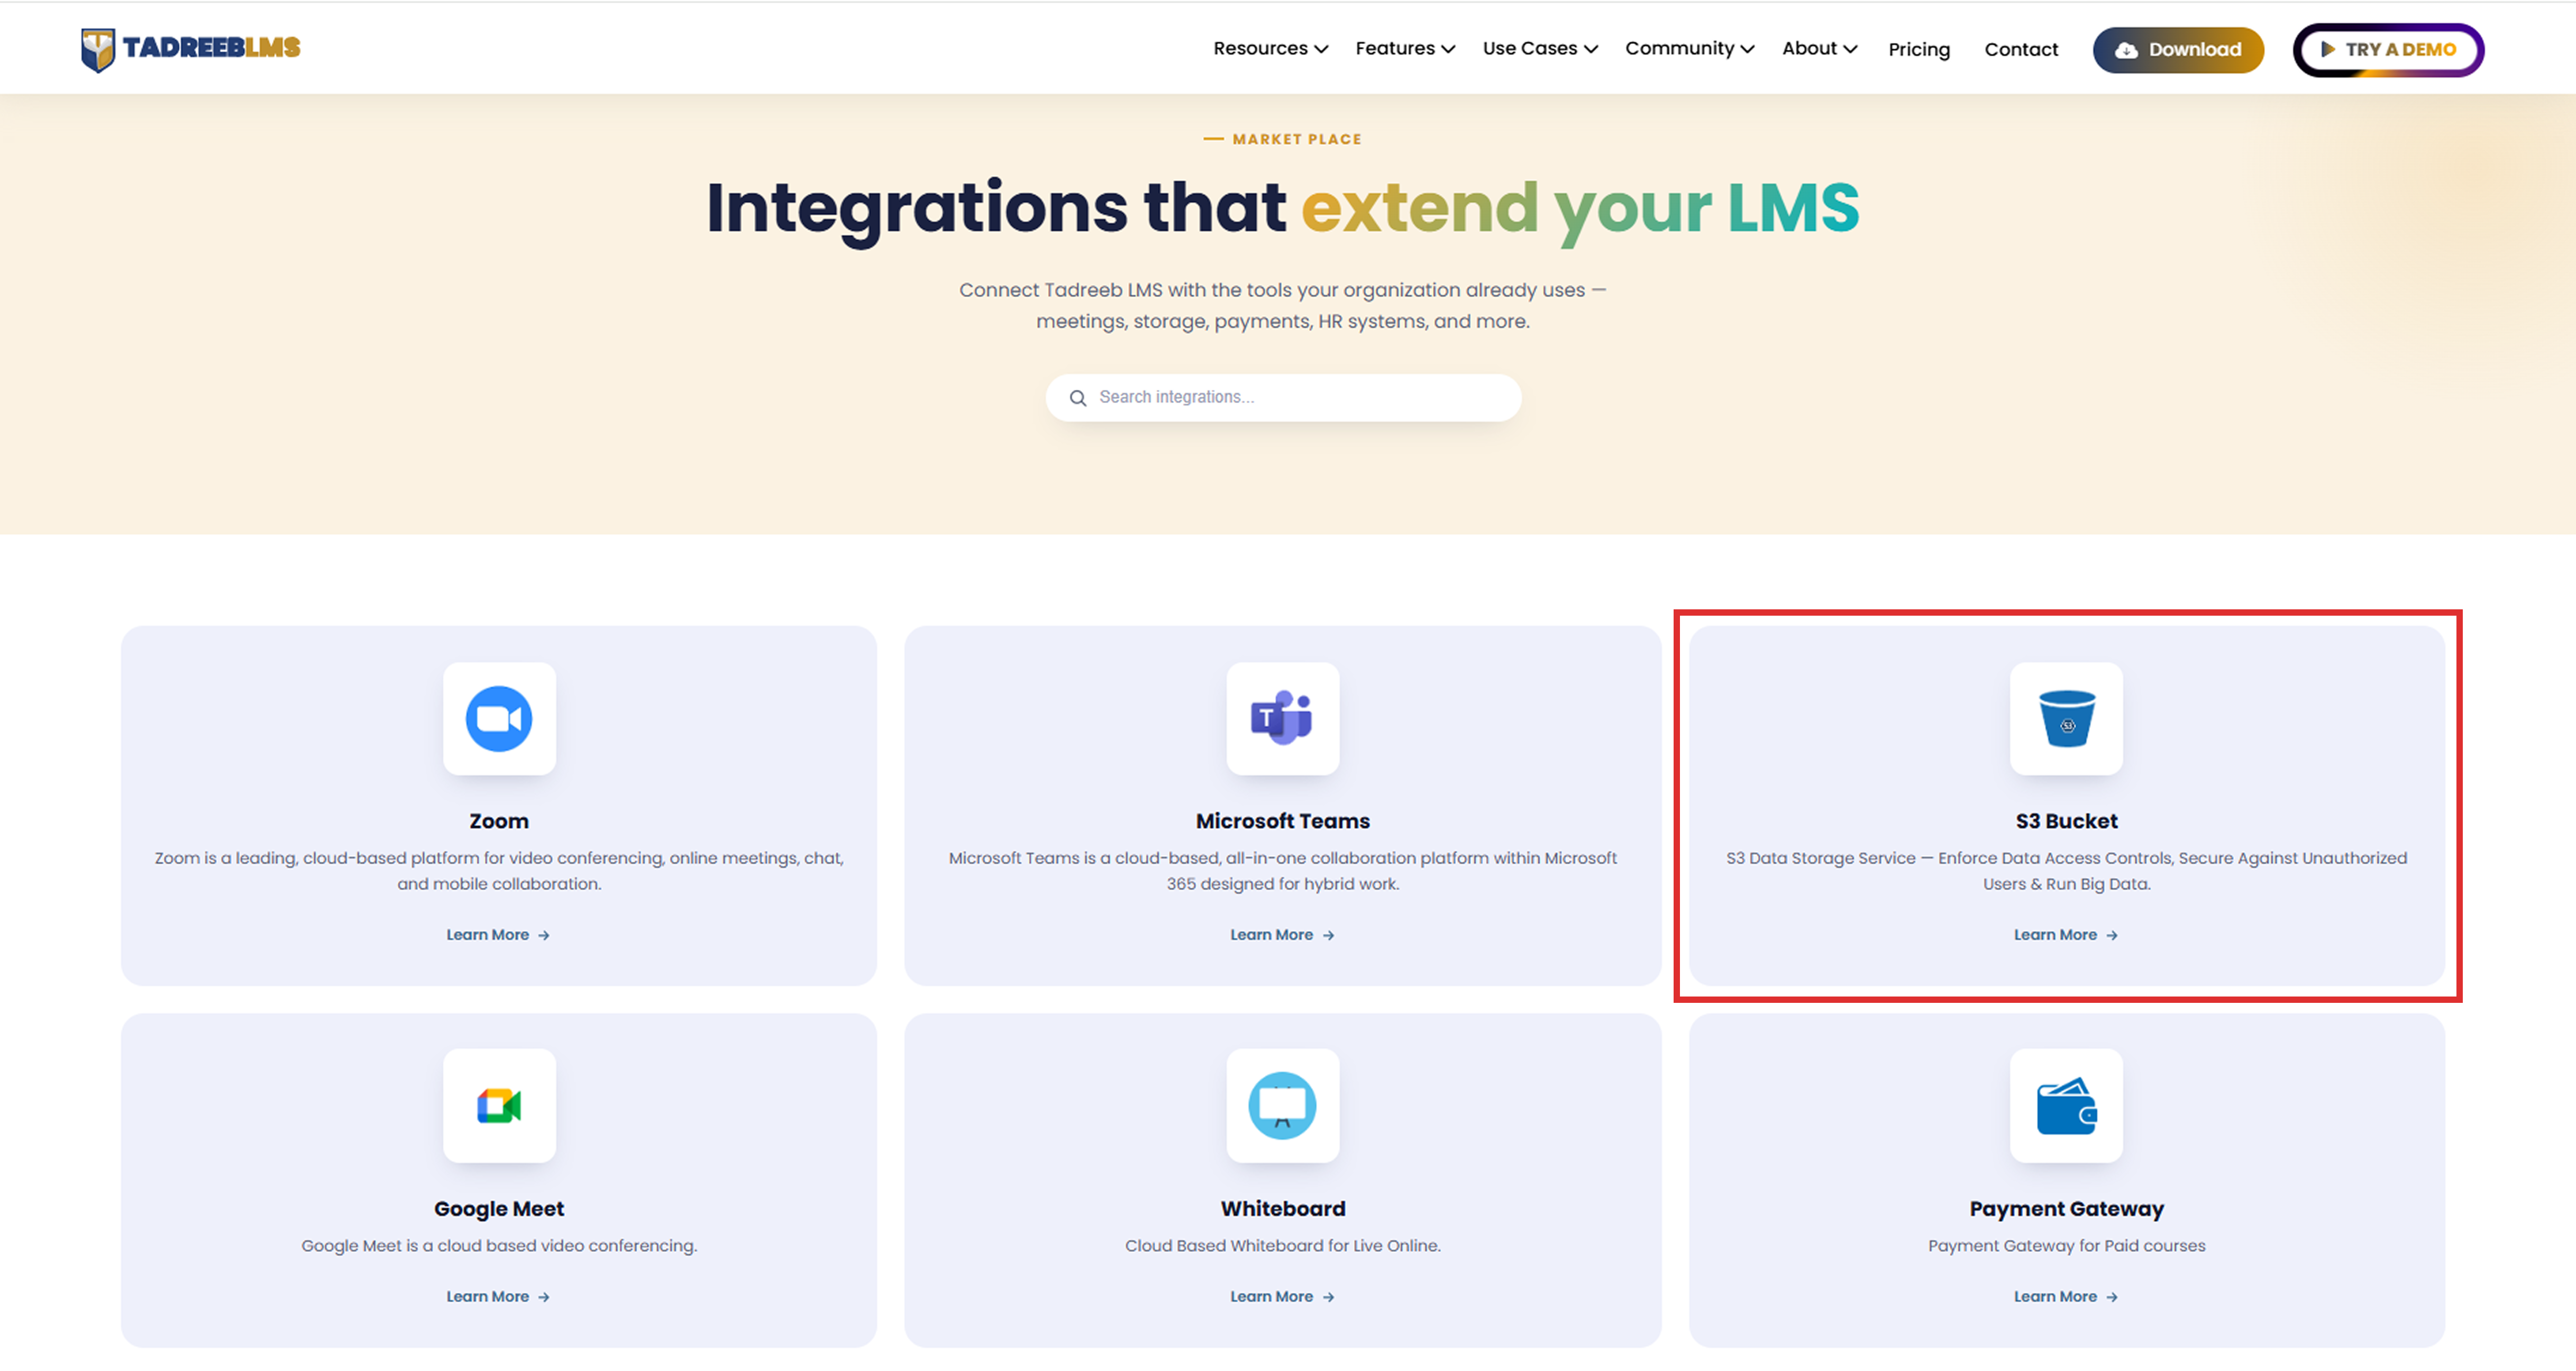
- On the application's page, click Download.
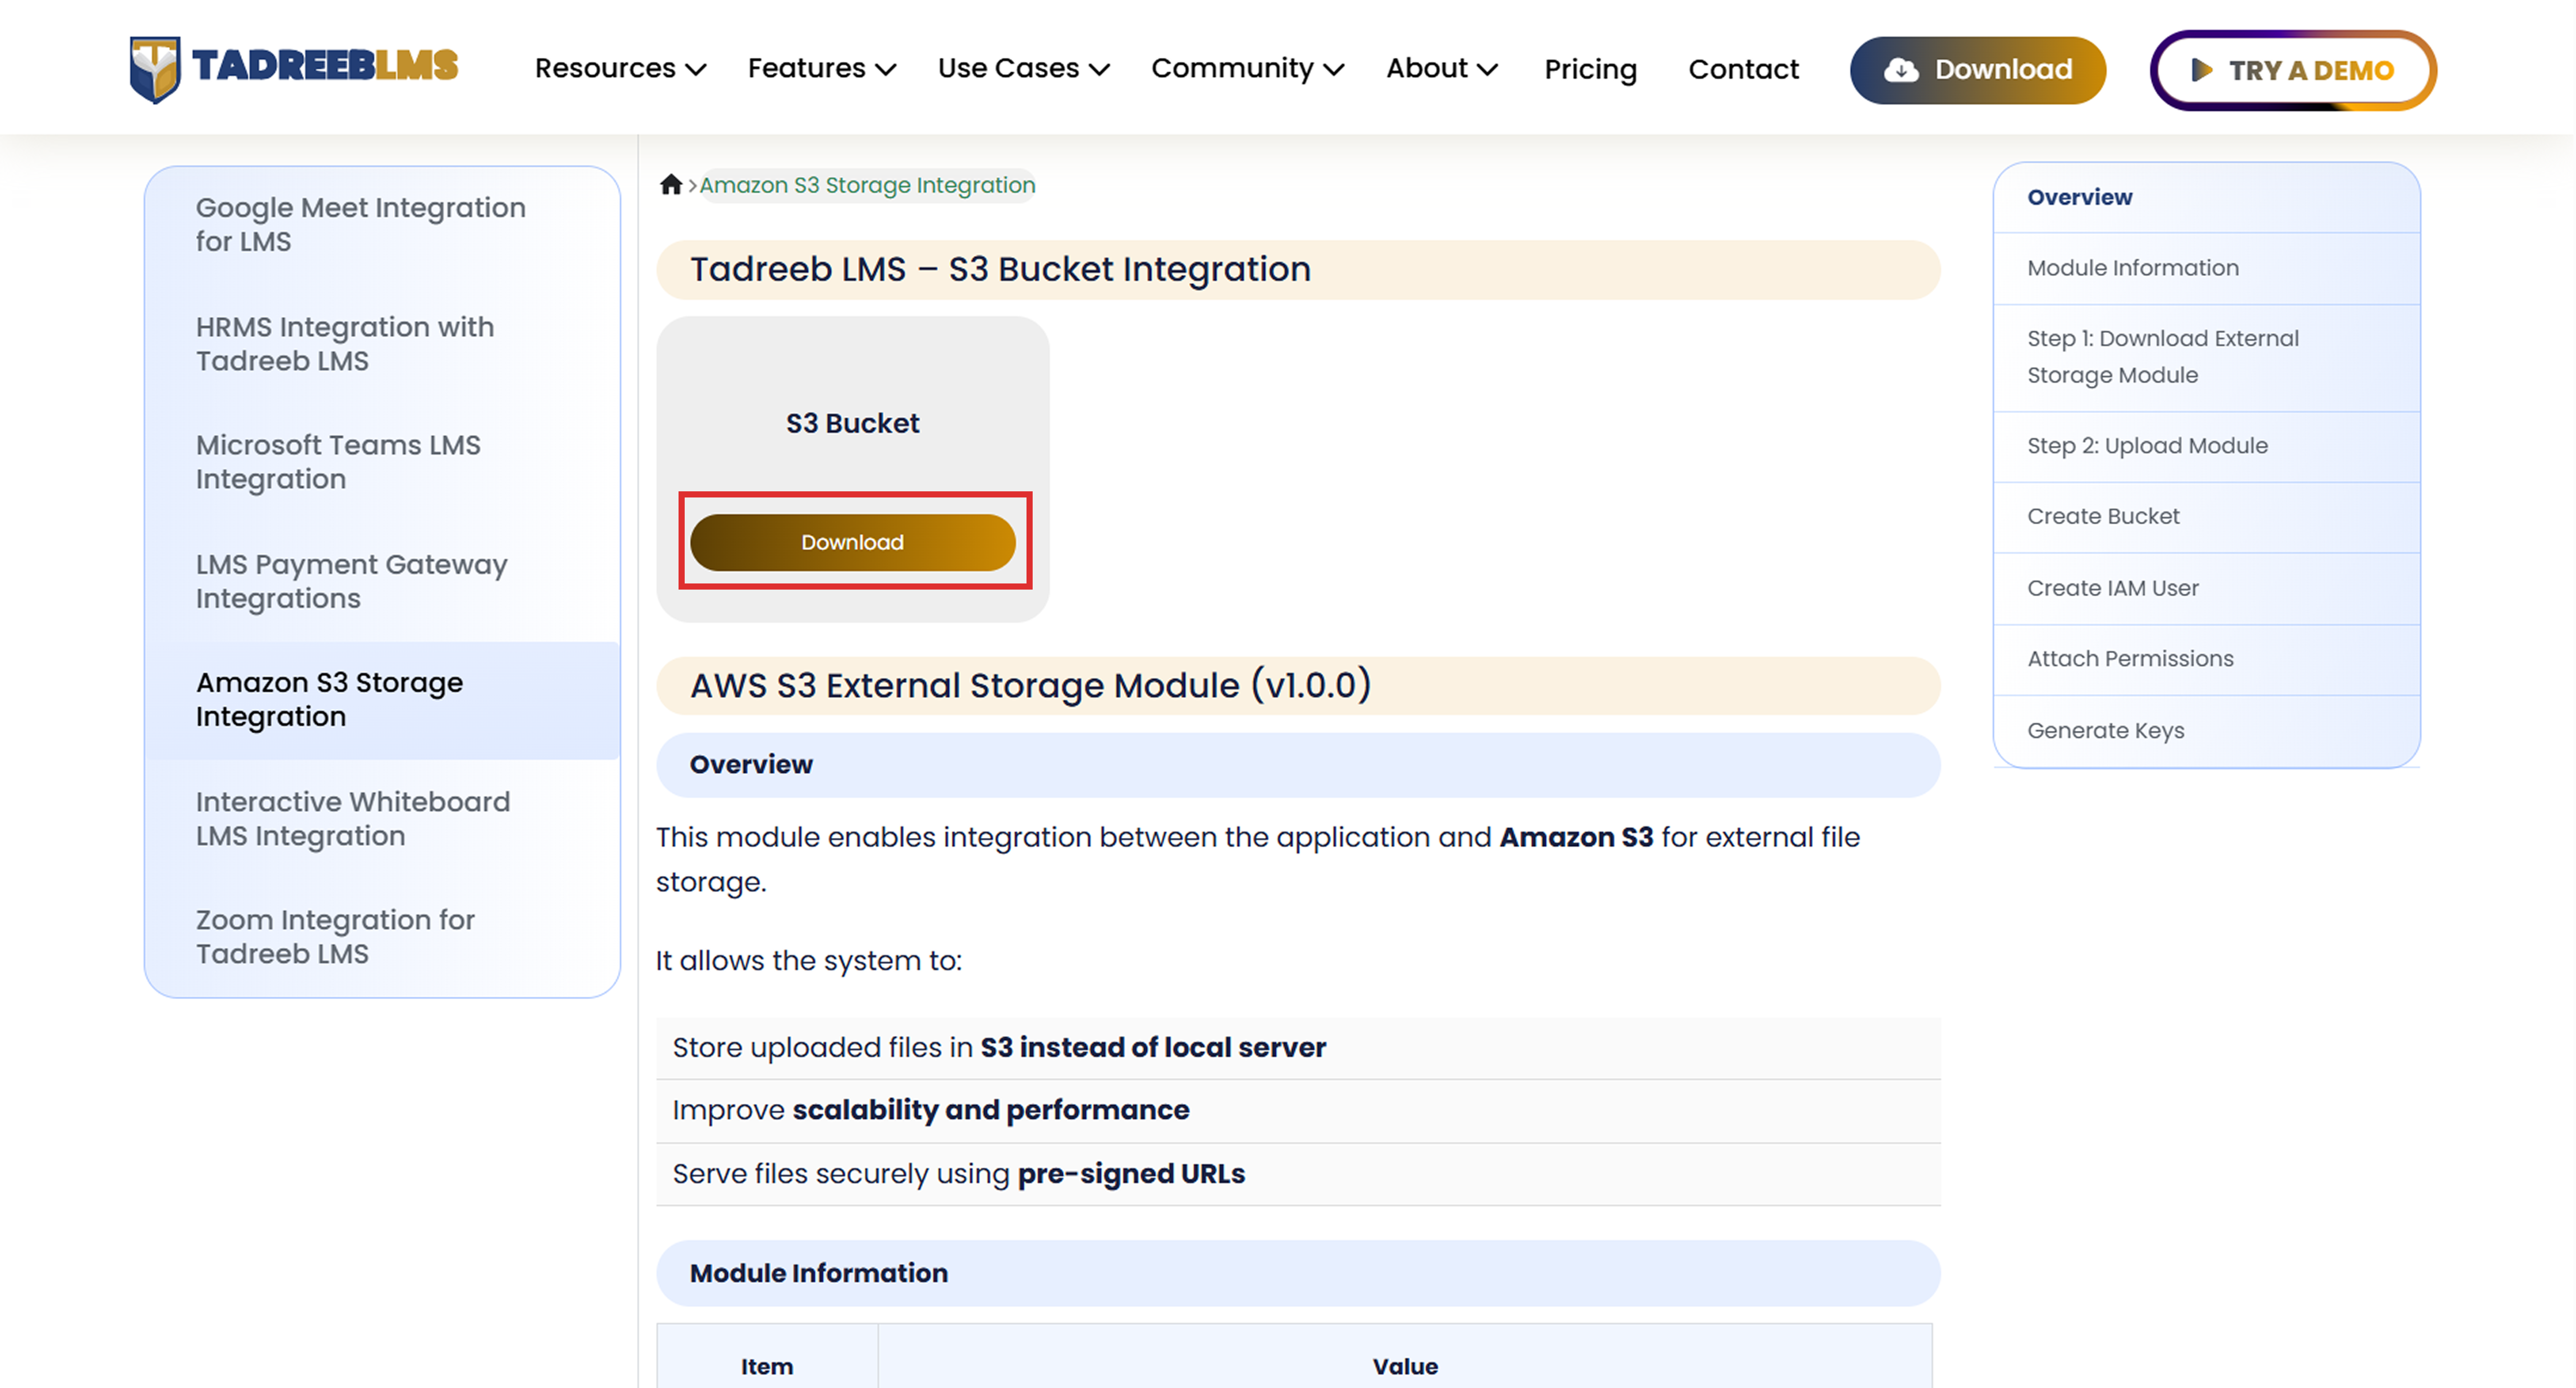
📌 Note: This downloads a ZIP file containing the application module. This page also includes step-by-step installation and setup instructions for the Application.
To install the downloaded module:
- Go to Settings > External Apps in Tadreeb LMS.
- Click Upload New Module.
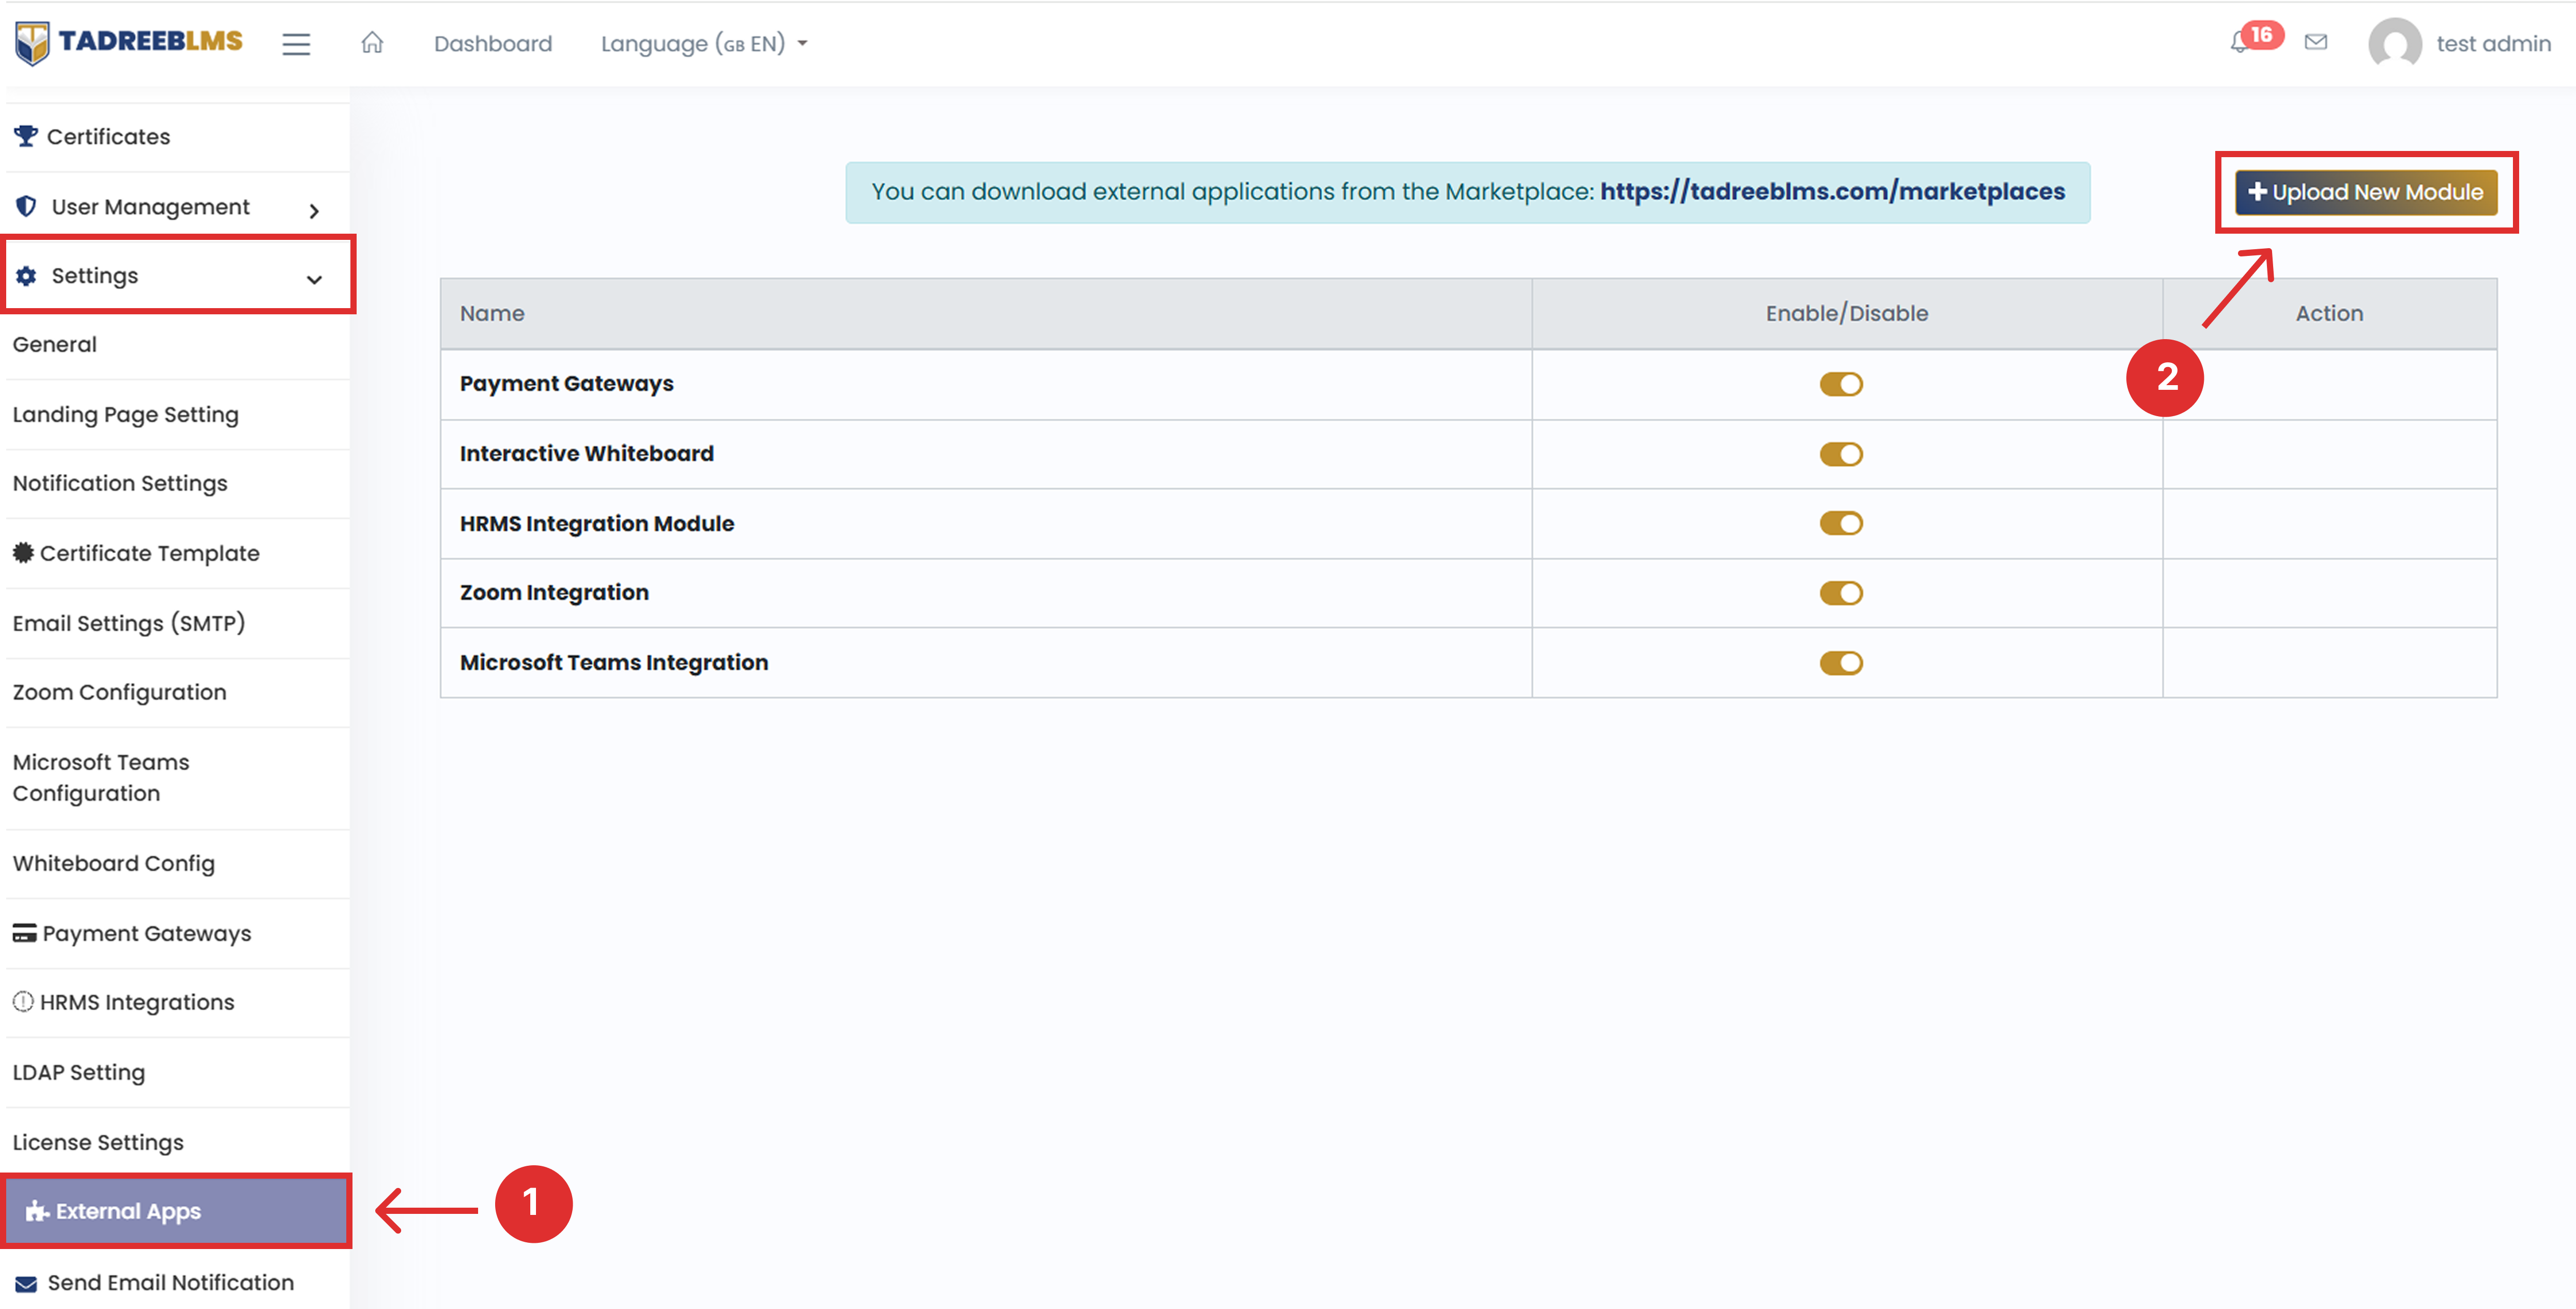
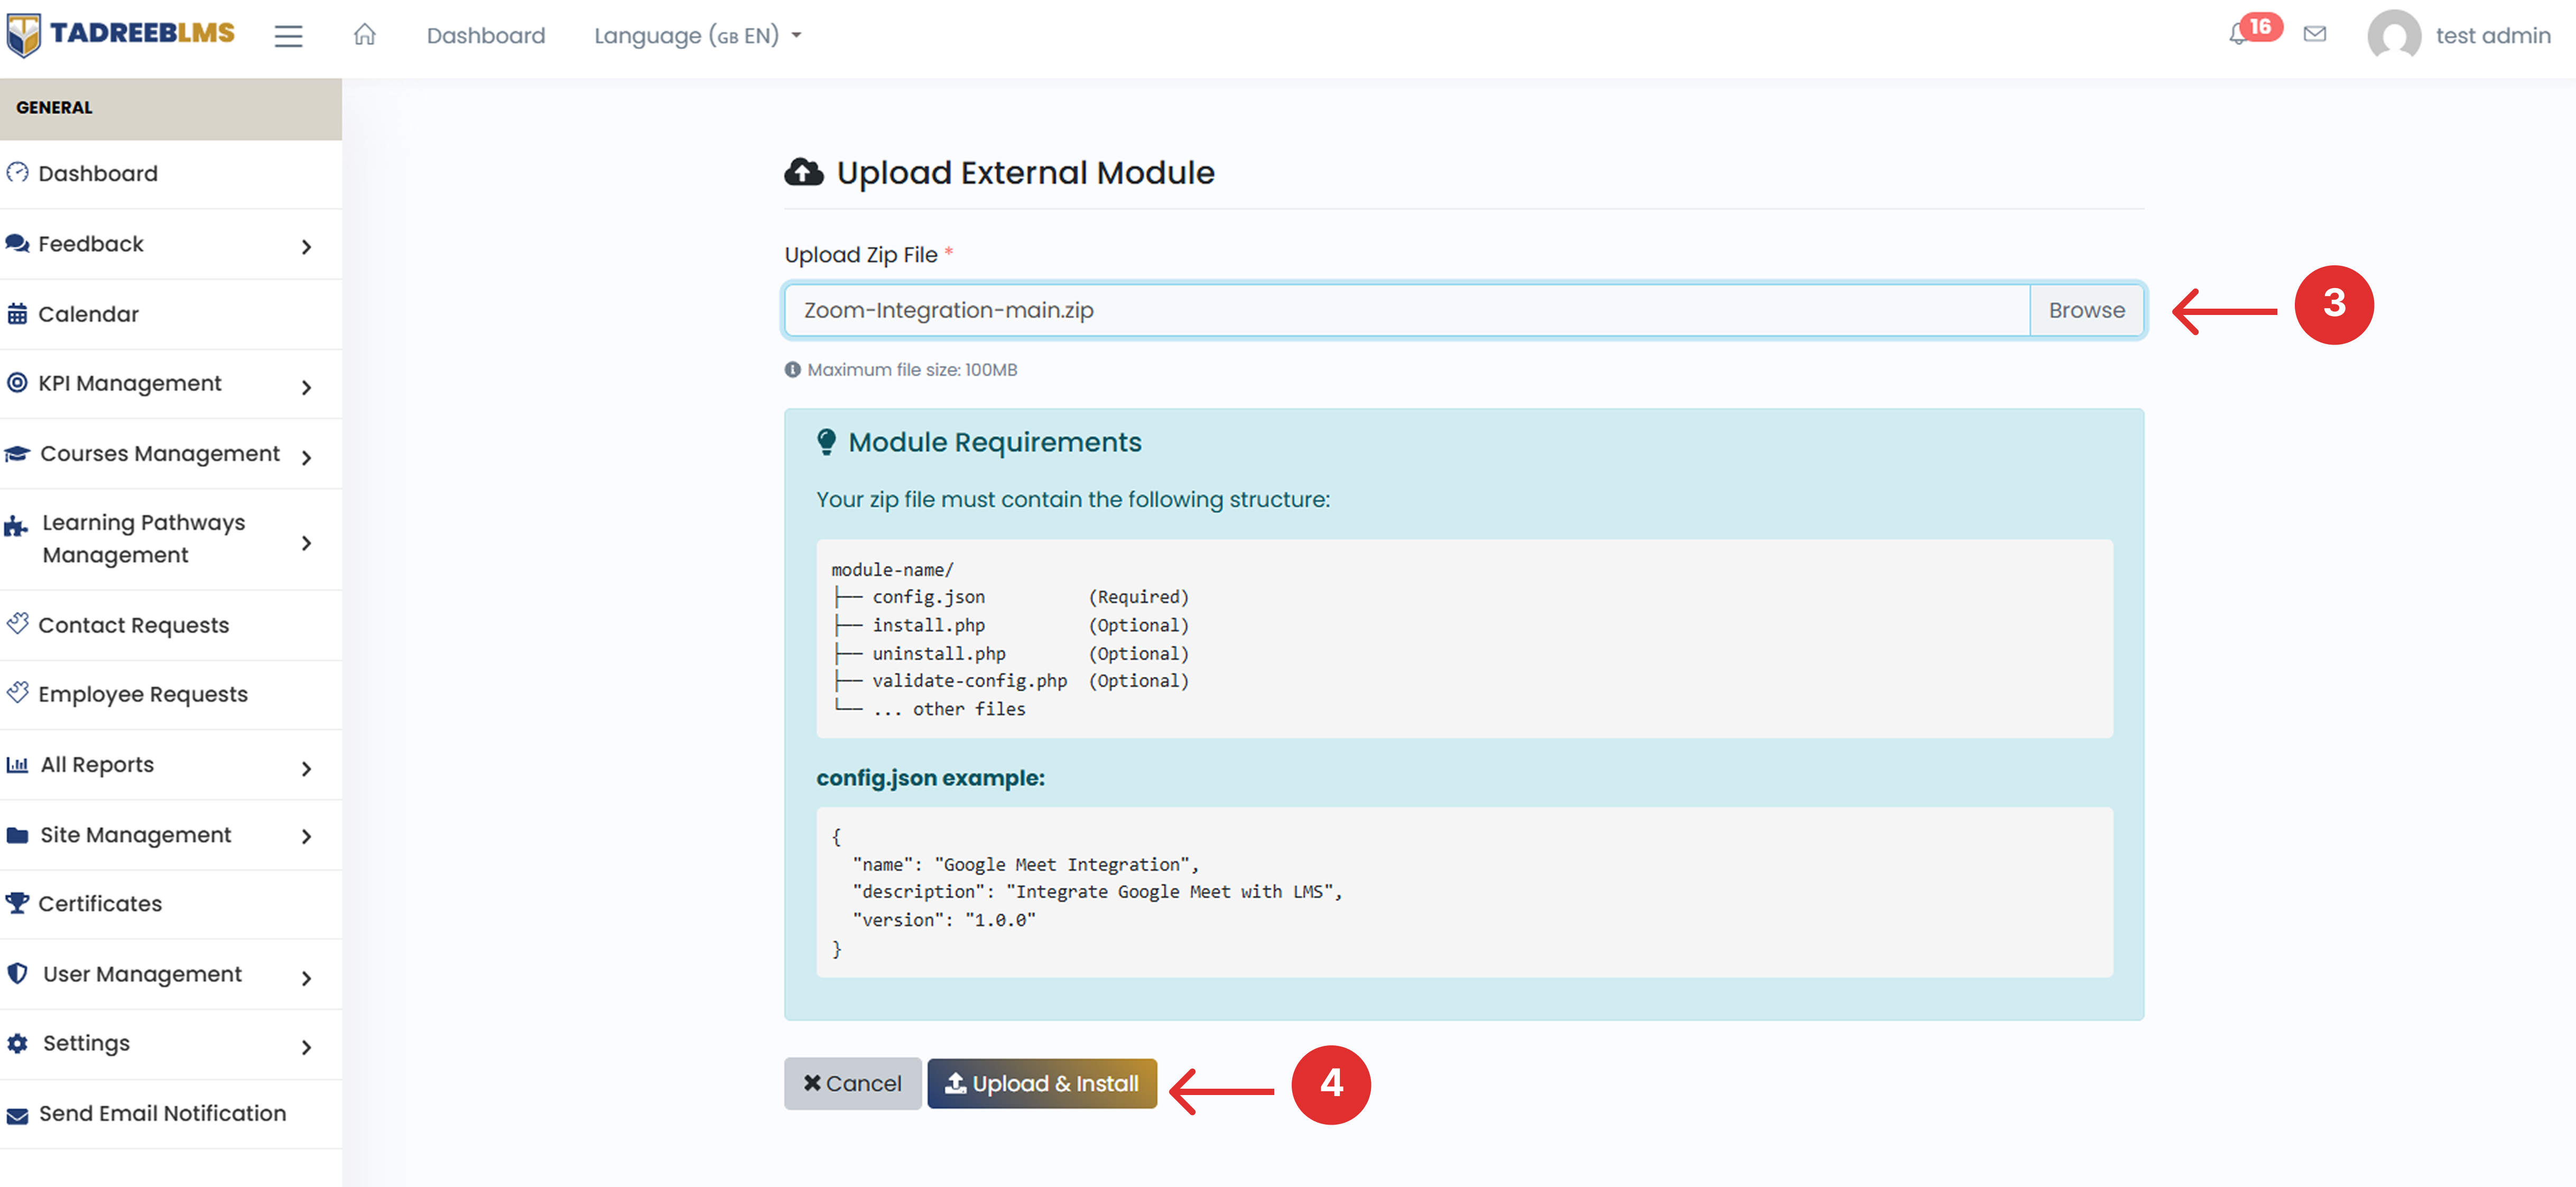
📌 Note: The module is now installed and integrated into your LMS. If you have any trouble uploading the module, refer to the Module Requirements section below.
13.9.3 Module Requirements
The uploaded ZIP file must follow the required folder structure:
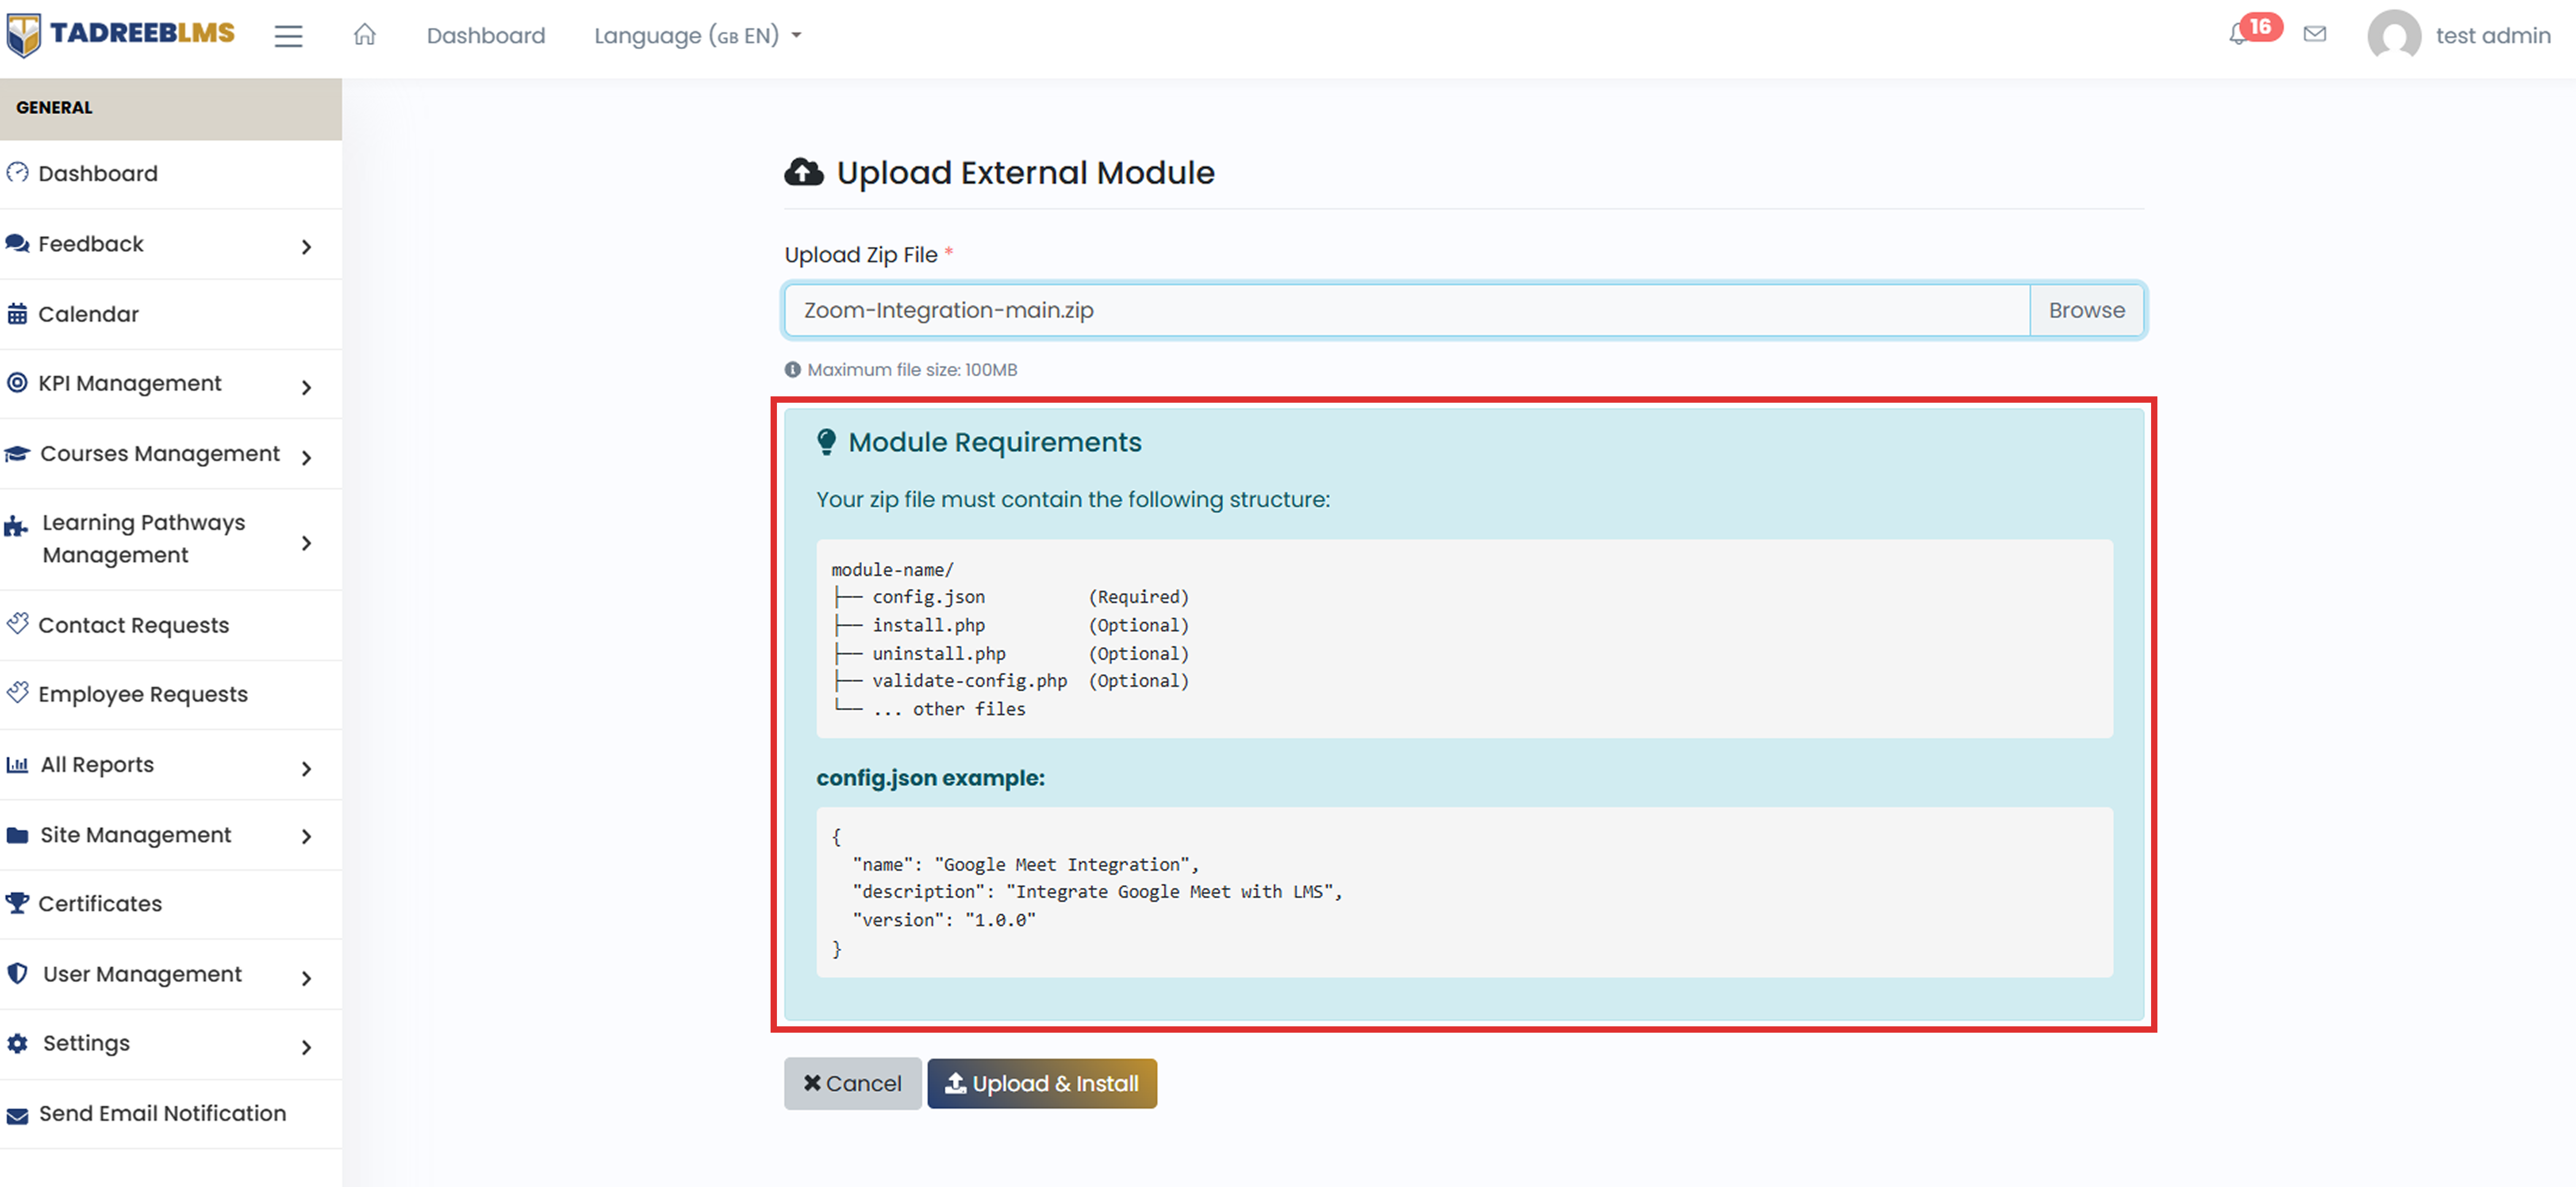
config.json File
Every module must include a config.json file. It contains the basic information required during installation, such as the module name, description, and version.
Important Notes
- Only ZIP files are supported.
- The maximum upload file size is 100 MB.
- The module package must include a config.json file.
- Modules with an invalid folder structure may fail to install.
- Administrator permissions are required to upload and manage external applications.
📌 Note: Configuration instructions for individual integrations, such as Amazon S3, HRMS, Zoom, and Microsoft Teams, are covered in the following sections.
14. Send Email Notification
Compose and send targeted email communications to users.
Form fields
Recipient source: Administrators must select one of the following recipent options. The form dynamically enables only the relevant field based on the selection:
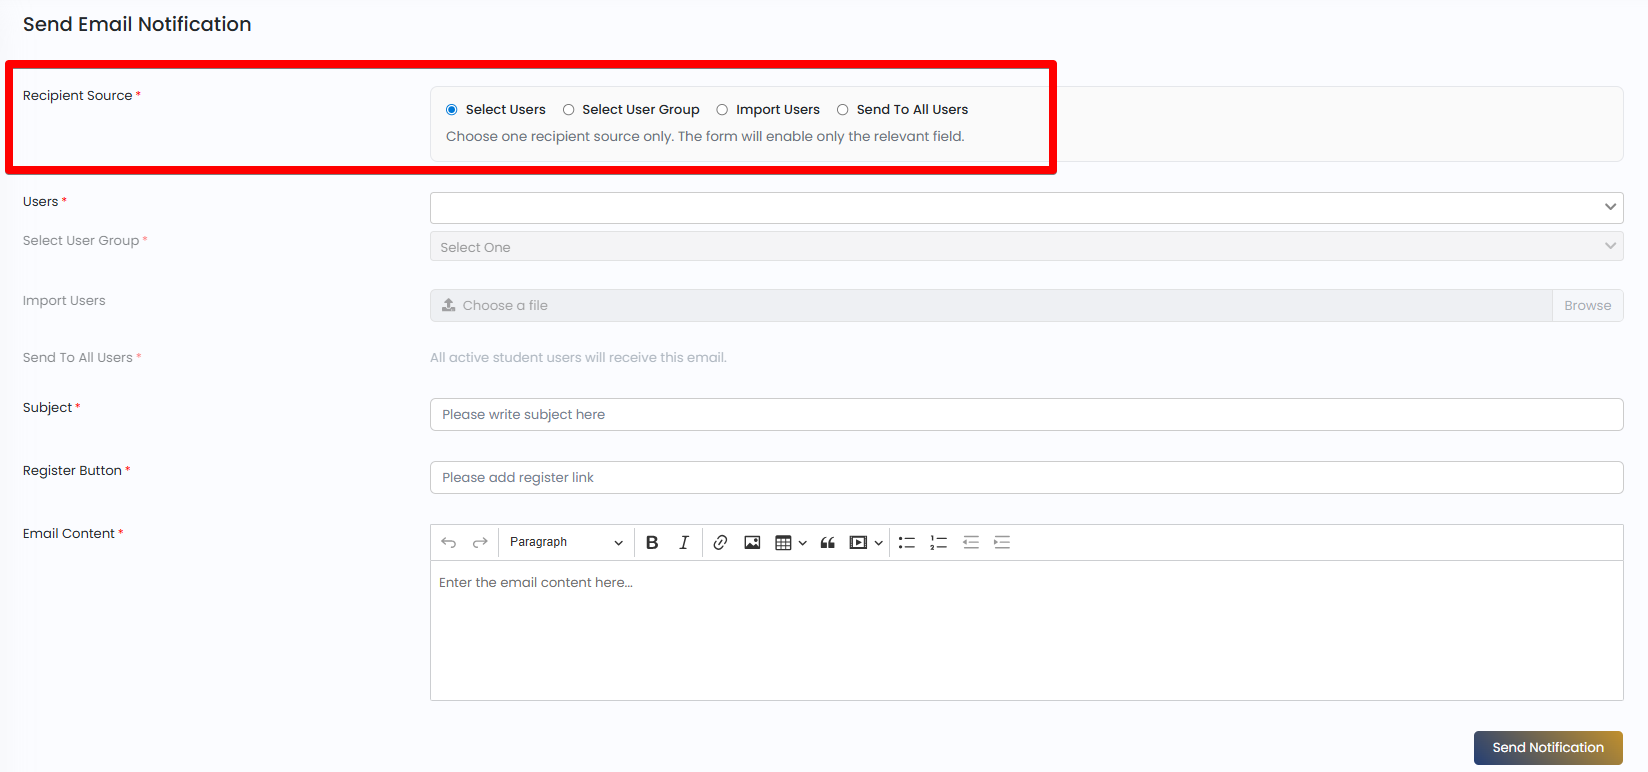
Options:
• Select users: Manually select specific individual users.
• Select user group: Send the email to all users within a specific group.
• Import users: Upload a file containing a list of recipent users.
• Send to all users: Broadcasts the email to all active student users on the platfor
Users: A dropdown field to select one or more individual users. Enabled only when Select users is chosen as the recipient source.
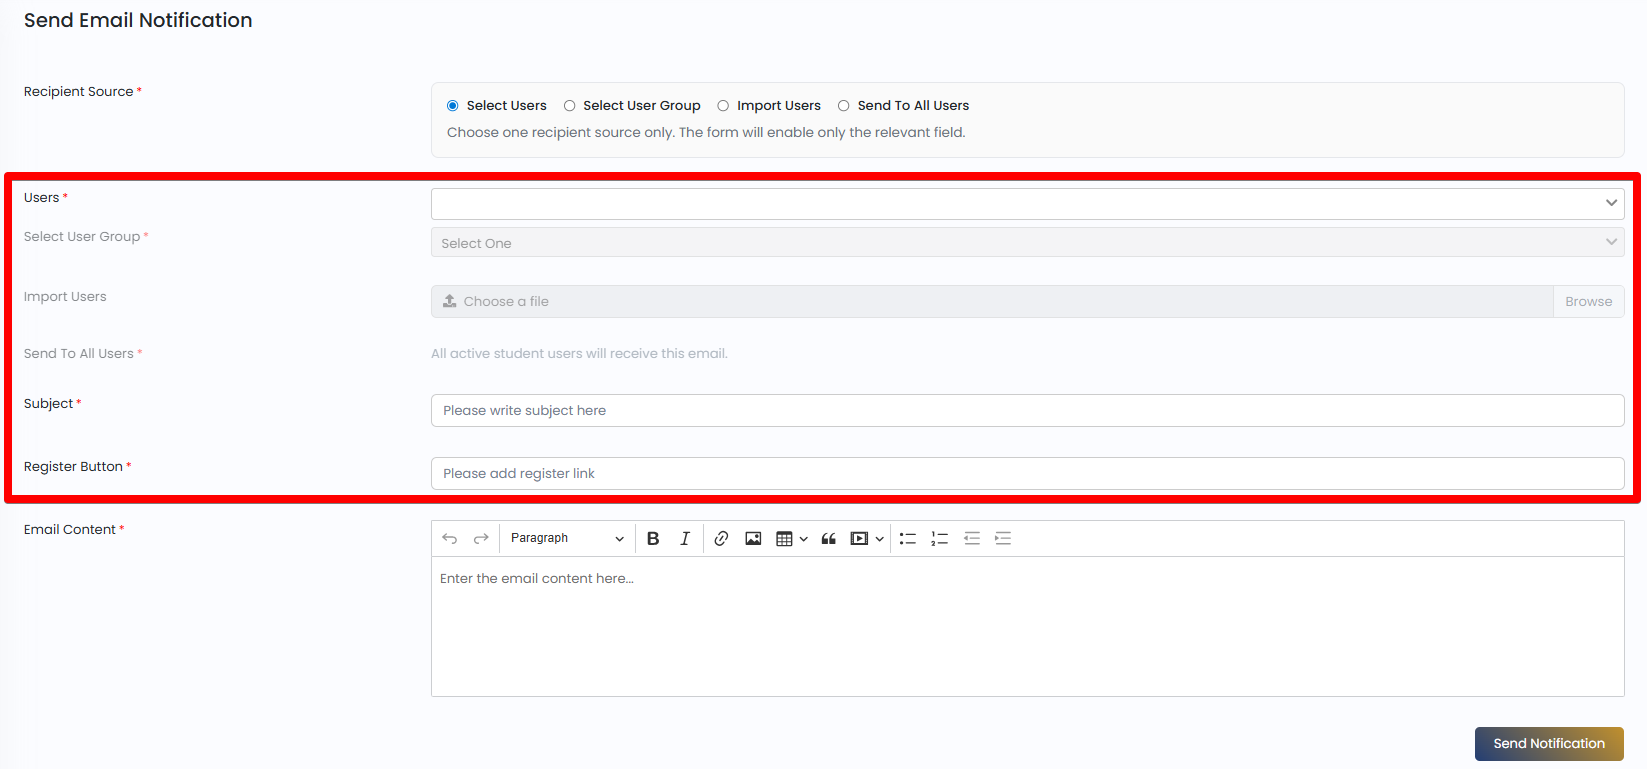
Select user group: A dropdown field to choose a specific user group as the recipient. Enabled only when Select user group is chosen.
Import users: A file upload field allowing administrators to import a list of recipients from an external file. Includes a Browse button to locate and select the file.
Send to all users: When selected, the system automatically sends the email to all active student users. No additional recipient selection is needed.
Subject: A text field for entering the email subject line.
Register button: A text field for adding a registration link that will appear as a button within the email.
Email content: A rich text editor for composing the body of the email. Supports the following formatting options:
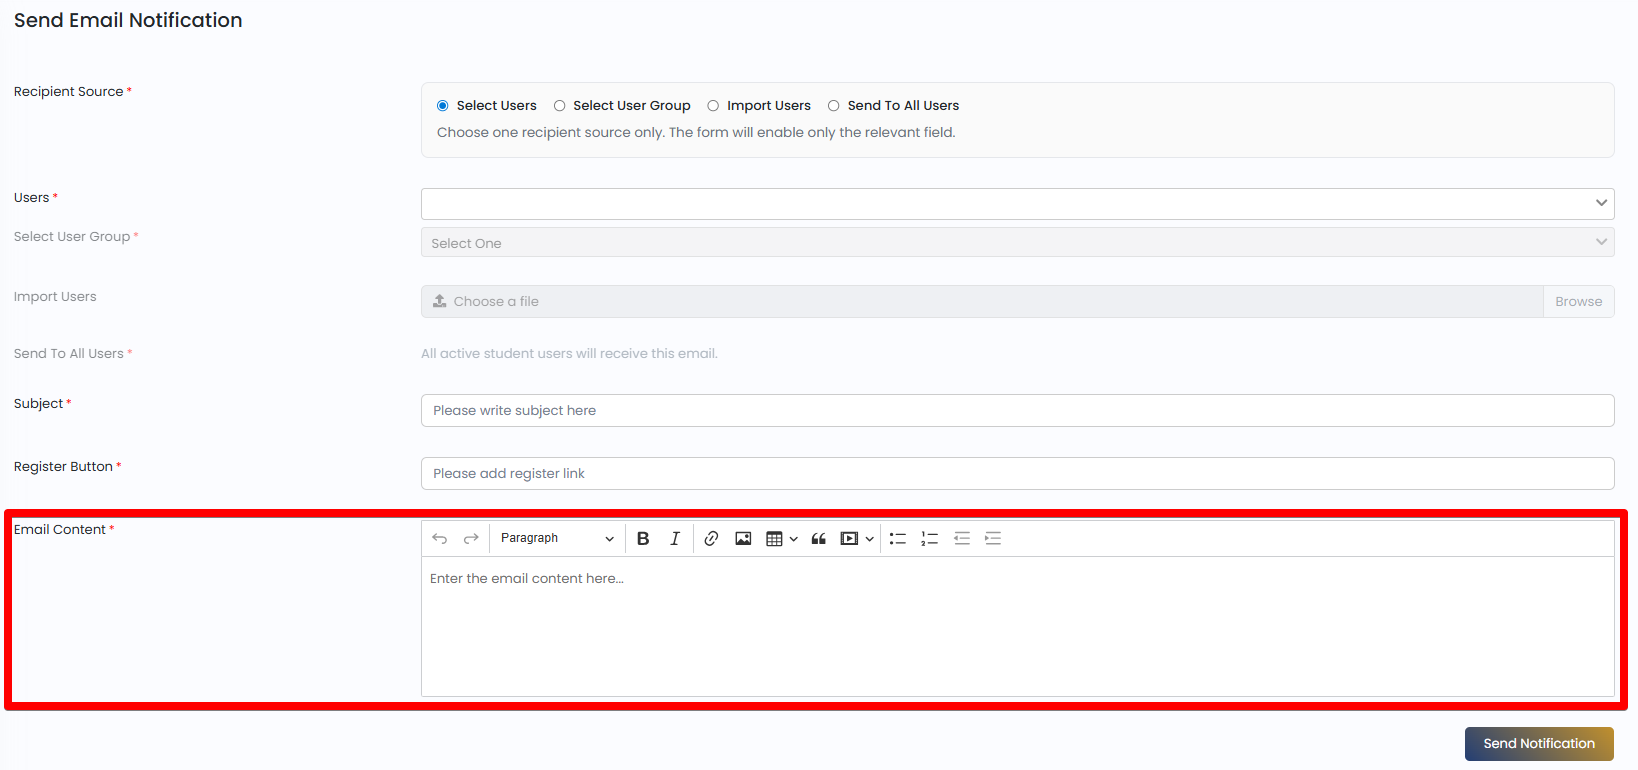
• Text formatting — Bold, Italic.
• Paragraph styles and heading levels.
• Hyperlinks and image insertion.
• Table insertion and management.
• Blockquote and media embed.
• Bullet lists, numbered lists, and text alignment controls.
• Undo and Redo actions.
• Send notification button — submits the form and dispatches the email to the selected recipients.
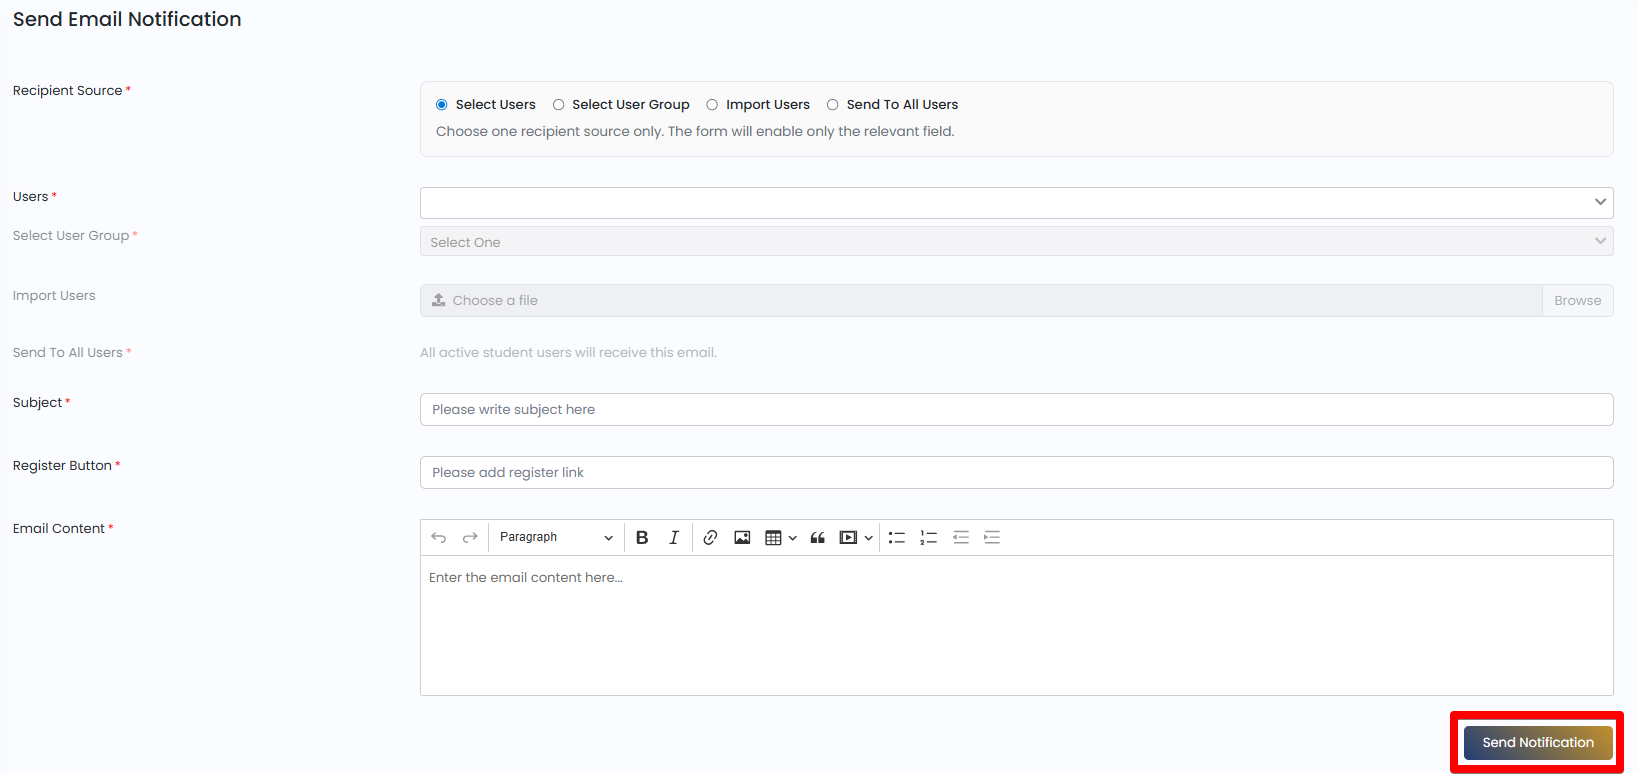
Revision Log
| Version | Date | Author | Description |
|---|---|---|---|
| 1.0 | May 7, 2026 | Mahadev | Initial Release |
Copyright © 2026 TadreebLMS. All Rights Reserved.